Managing COUNTER-Compliant Usage Data
Many vendors can provide COUNTER statistics for your institution's usage in the form of COUNTER reports. These COUNTER reports can be loaded into Alma in one of two ways:
- Manually Uploaded (see Manually Uploading and Deleting COUNTER Data)
- Automatically Uploaded (Harvested) via the SUSHI protocol (Standardized Usage Statistics Harvesting Initiative)
Note that the ability to use the SUSHI protocol is dependent on the vendor's compliance with this protocol.
COUNTER R5 Report Types
| Report Type | Report Name | Description | Manual Upload (xlsx, xls, csv, tsv, ssv, txt formats) | SUSHI Harvest or Manual Upload (JSON format) |
|---|---|---|---|---|
| DR | Database Master Report | A customizable report detailing activity by database that allows the user to apply filters and select other configuration options. | Y | Y |
| DR_D1 | Database Search and Item Usage | Reports on key Searches, Investigations and Requests metrics needed to evaluate a database. | Y | Y |
| DR_D2 | Database Access Denied | Reports on Access Denied activity for databases where users were denied access because simultaneous-use licenses were exceeded or their institution did not have a license for the database. | Y | Y |
| IR | Extended Item Report | A granular, customizable report showing activity at the level of the item (article, chapter, media object, etc.) that allows the user A person who accesses the online resourceto apply filters and select other configuration options. | Y | Y |
| IR_A1 | Journal Article Requests | Reports on journal article requests at the article level. This report is limited to content with a Data_Type of Article, Parent_Data_Type of Journal, and Metric_Types of Total_Item_Requests and Unique_Item_Requests. | Y | Y |
| IR_M1 | Multimedia Item Requests | Reports on multimedia requests at the item level. | Y | Y |
| PR | Platform Master Report | A customizable report summarizing activity across a content provider’s platforms that allows the user to apply filters and select other configuration options. | Y | Y |
| PR_P1 | Platform Usage | Platform-level usage summarized by Metric_Type. | Y | Y |
| TR | Title Master Report | A customizable report detailing activity at the title level (journal, book, etc.) that allows the user to apply filters and select other configuration options. | Y | Y
In case the TR report was customized Alma will not harvest it, there is a need to upload it manually |
| TR_B1 | Book Requests (Excluding OA_Gold) | Reports on full-text activity for books, excluding Gold Open Access content, as Total_Item_Requests and Unique_Title_Requests. The Unique_Title_Requests provides comparable usage across book platforms. The Total_Item_Requests shows overall activity; however, numbers between sites will vary significantly based on how the content is delivered (e.g. delivered as a complete book or by chapter). | Y | Y |
| TR_B2 | Book Access Denied | Reports on Access Denied activity for books where users were denied access because simultaneous-use licenses were exceeded or their institution did not have a license for the book. | Y | Y |
| TR_B3 | Book Usage by Access Type | Reports on book usage showing all applicable Metric_Types broken down by Access_Type. | Y | Y |
| TR_J1 | Journal Requests (Excluding OA_Gold) | Reports on usage of journal content, excluding Gold Open Access content, as Total_Item_Requests and Unique_Item_Requests. The Unique_Item_Requests provides comparable usage across journal platforms by reducing the inflationary effect that occurs when an HTML full text automatically displays and the user then accesses the PDF version. The Total_Item_Requests shows overall activity. | Y | Y |
| TR_J2 | Journal Access Denied | Reports on Access Denied activity for journal content where users were denied access because simultaneous-use licenses were exceeded or their institution did not have a license for the title. | Y | Y |
| TR_J3 | Journal Usage by Access Type | Reports on usage of journal content for all Metric_Types broken down by Access_Type. | Y | Y |
| TR_J4 | Journal Requests by YOP (Excluding OA_Gold) | Breaks down the usage of journal content, excluding Gold Open Access content, by year of publication (YOP), providing counts for the Metric_Types Total_Item_Requests and Unique_Item_Requests. Provides the details necessary to analyze usage of content in backfiles or covered by perpetual access agreement. Note that COUNTER reports do not provide access model or perpetual access rights details. | Y | Y |
COUNTER R4 Report Types
| Report Type | Description | COUNTER Release | Manual Upload (xlsx, xls, csv, txt, tsv formats) | SUSHI Harvest or Manual Upload (xml format) |
|---|---|---|---|---|
| BR1 | Book Report: Successful Title Requests by Month and Title | R4 | Y | Y |
| BR2 | Book Report: Successful Section Requests by Month and Title | R4 | Y | Y |
| BR3 | Book Report: Access Denied to Content Items by Month, Title, and Category | R4 | Y | Y |
| BR4 | Book Report: Access Denied to Content Items by Month, Platform, and Category | R4 | Y | Y |
| BR5 | Book Report: Total searches by Month and Title | R4 | Y | Y |
| CR1 | Consortial Report | R4 | Not supported | Not supported |
| DB1 | Database Report: Searches, Result Clicks, and Record Views by Month and Platform | R3 | Y | Y |
| DB1 | Database Report: Searches, Result Clicks, and Record Views by Month and Platform | R4 | Y | Y |
| DB2 | Database Report: Access Denied by Month, Database, and Category | R4 | Y | Y |
| JR1 | Journal Report: Successful Full-Text Article Requests by Month and Journal | R3/R4 | Y | Y |
| JR1 GOA | Journal Report: Successful Gold Open Access Full-Text Article Requests by Month and Journal | R4 | Y | Y |
| JR1a | Journal Report: Successful Full-Time Article Requests from an Archive by Month and Journal | R3/R4 | Y | Y |
| JR2 | Journal Report: Access Denied to Full-Text Articles by Month, Journal, and Category | R4 | Y | Y |
| JR5 | Journal Report: Successful Full-Text Article Requests by Year-of-Publication (YOP) and Journal | R4 | Y | Y |
| MR1 | Multimedia Report: Successful Full Multimedia Content Unit Requests by Month and Collection | R4 | Y | Y |
| PR1 | Total searches, result selects, and record views by Month and Platform (previously DB3) | R4 | Y | Y |
User Roles Summary
- Acquisitions Administrator - Configure COUNTER subscribers and activate, deactivate, or manually run the automatic harvesting job.
- Vendor Manager - View usage data related to a particular vendor, manually harvest data for the vendor, manually upload data for the vendor, and manage any uploaded data files.
- Usage Data Operator - Manually upload or delete data for any vendor, manage the uploaded data files, and view missing COUNTER data.
- General System Administrator - Activate, deactivate, schedule, or monitor the automatic harvesting job, view the job's history, report, and events, and configure email notifications for the job.
Configuring COUNTER Subscribers
- Acquisitions Administrator
Managing SUSHI Accounts
- Vendor Manager
For information on how to define a COUNTER R5 SUSHI Account for ProQuest, ProQuest Ebook Central and Alexander Street Press in Alma, see here.
To add a vendor to the list of certified vendors, contact the Ex Libris Support Team.
For the list of SUSHI-certified vendors for Release 5.1, see the SUSHI-Certified Vendors Release 5.1.
For the list of SUSHI-certified vendors for Release 5, see the SUSHI-Certified Vendors Release 5.
For the list of SUSHI-certified vendors for Release 4, see the SUSHI Vendors List.
You do not have to create a SUSHI account to retrieve COUNTER data from a vendor. Whether or not you configure a SUSHI account for a vendor, a vendor can provide you COUNTER data by some other means for you to upload manually to Alma.
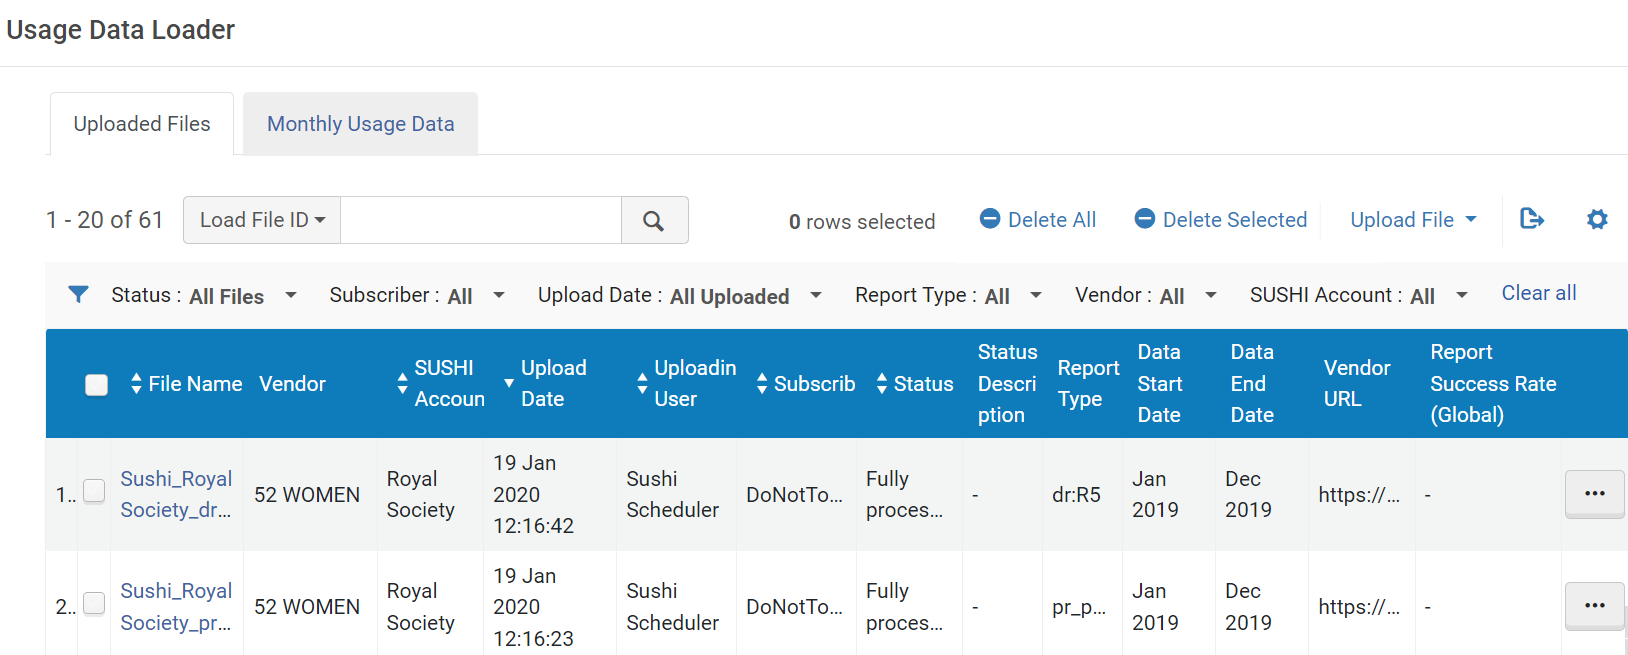
In the Uploaded Files section, the Report Success Rate column indicates the global success rate of the report type for that period, defined as the number of successes divided by the number of failures for the contributed accounts IDs. The statistics are calculated from two months prior to the current month and are updated roughly two days after the SUSHI report is run. The number links to the relevant SUSHI Account Details page.
While the procedure below indicates that you should add the account for a vendor on the Usage Data tab of that vendor, in fact you can add an account for any vendor on the Usage Data tab of any vendor. The vendor that is contacted by the SUSHI job is determined solely by the URL and other information you add when configuring the account, not the tab on which you enter the information. Nevertheless, Ex Libris recommends that you add the account for each vendor on the Usage Data tab of that vendor, for organizational purposes.
For vendors that are actually subscription agents for other vendors (access providers or publications), each report type from each access provider or publication requires an additional SUSHI account for each access provider or publication; multiple reports from the same vendor require multiple SUSHI accounts.
See also Best Practice Toolkit: Automatically Upload and Harvest COUNTER Usage Data via SUSHI Protocol.
- Ensure that a subscriber was defined for your institution. See Configuring COUNTER Subscribers.
- Select Add SUSHI Account.
- If Release 5 is enabled, select either Release 4 or Release 5. The SUSHI Account Details page appears.
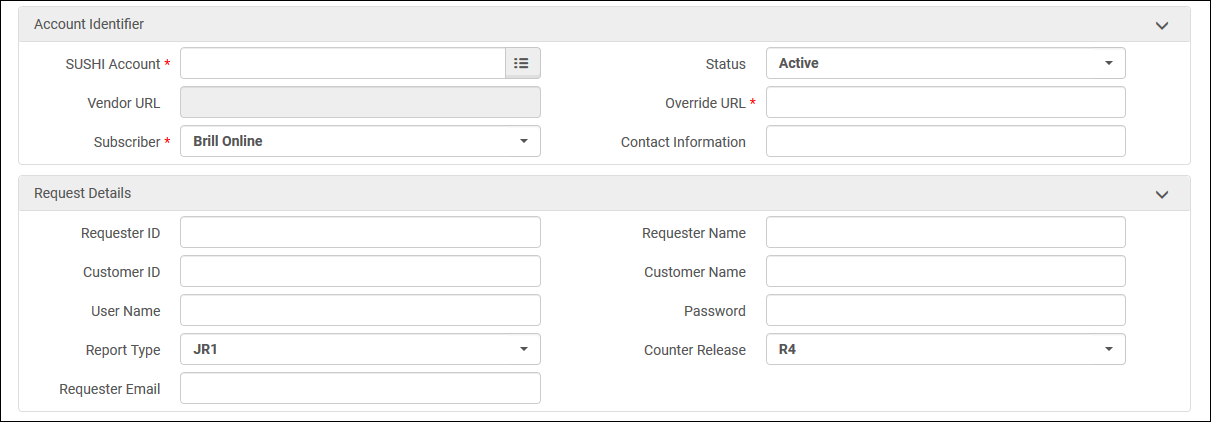 SUSHI Account Details Page - Release 4
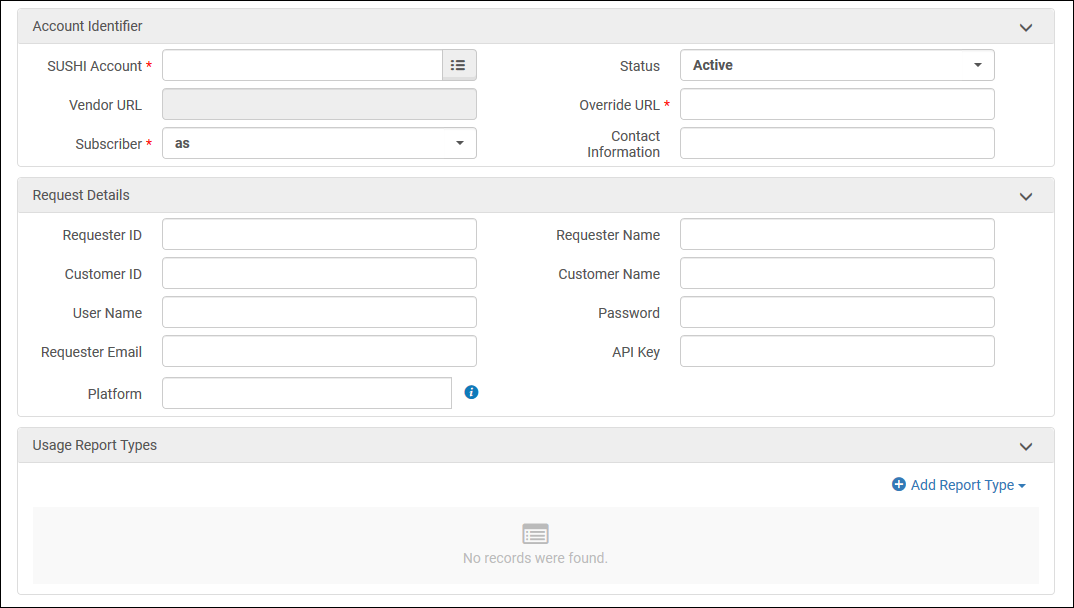 SUSHI Account Details Page - Release 5
 - Enter the vendor name in SUSHI Account. If you have selected release 5, only release 5 vendors appear in the drop-down list.
After you enter three letters in this field, a drop-down list of SUSHI-certified vendors appears (this list is predefined by Ex Libris; see the SUSHI Vendors List). If you select any of the vendors from this list, Vendor URL is prefilled with the correct URL for the vendor (other information may also be prefilled). However, you do not have to select a predefined certified vendor; you can enter any value you like.
Vendor names cannot contain a '/' (slash).
A quick pick list option is available to search the vendors.Watch the Add SUSHI Account to Vendor via Search video (1:34 min). - When the status is Active, this account is harvested in the scheduled SUSHI harvesting job.
- If you have not selected a vendor from the list, enter the URL in Vendor URL and select a subscriber in Subscriber. If needed, enter a URL in Override URL. Either the Override URL or the Vendor URL must be populated. If the Vendor URL for a SUSHI account changes in the list of SUSHI-certified vendors, the Vendor URL is updated. The Override URL is not changed by the update. When both the "Vendor URL" and "Override URL" fields are filled in Alma first attempts to connect via the "Override URL".
- Enter contact information in Contact Information. Typically, this will be a URL or email account of the vendor.
- Enter the required credentials in the Request Details area. Some information may already be prefilled; your vendor will supply you with the required information for this area. The vendor must supply the information and credentials for the API Key field. For information on special cases, see the SUSHI Vendors List. To avoid connection issues, this section should only include the information required from the vendor.
- For Release 4 accounts, select the Report Type. For Release 5 The Accounts, select Add Report Type for each of the report types needed on this account.
- To test the connection, select Test Connection. For Release 4 accounts, if there is an error, an error message appears at the top of the page. Select Test Connection with Response to view a Zip file containing both the SUSHI request and response packages (in XML) sent to/from the vendor. These packages may help you debug the connection. For Release 5 accounts, a JSON file is displayed with the connection status, and any errors, if applicable. You should also select Test Connection with Response for each report type from its respective row action menu to detect any further possible errors.
- Select Contribute to contribute a SUSHI account to the Community Zone.
- When you are done, select Save. The account is saved and appears in the Usage Data tab.
You can delete the account by selecting Actions > Delete in the account row on the Usage Data tab. Deleting an account will not delete any historical usage data associated with that vendor. It will still be available in Analytics.
On the Search Vendors page (Acquisitions > Acquisitions Infrastructure > Vendors), you can filter the table to display only SUSHI-enabled vendors by selecting SUSHI Vendor in the Vendor Type filter. Note that a vendor may be SUSHI-enabled even if it does not have a SUSHI account.

Managing SUSHI Harvesting
- Acquisitions Administrator
- Vendor Manager
- General System Administrator
By default, the SUSHI harvesting job harvests all COUNTER data from all active SUSHI accounts, and the job runs weekly, sometime between Friday evening and Saturday morning, depending on your time zone. Before uploading, Alma checks whether overlapping data exists in the database, according to a unique combination of owner code (constructed from the customer ID and institution ID), subscriber, platform, publisher, measure type, date and data type (in R5.1 only). When the job receives a response that indicates that the report will be available at a later time, Alma automatically retries to collect a report a random amount of time later. If the error persists, a number of such iterations are attempted, increasing the retry interval each time, until the attempt reaches a maximum number of retries.
For COUNTER 5, if one specific month returns an error when harvesting data, that same error will be shown for all months of that same report, even if the other months harvested successfully and have usage.
- As an Acquisitions Administrator, you can activate, deactivate, and schedule the automatic process, and you can run the job manually.
- As a Vendor Manager, you can run the job manually for a single vendor account and view a history of how often this was performed.
- As a General System Administrator, you can activate, deactivate, schedule, or monitor the job, view a job's history, report, and events, and configure email notifications for the job on the Monitor Jobs page. For more information, see Viewing Scheduled Jobs. Viewing Running Jobs, Viewing Completed Jobs.
- PR1 reports should have the following data in cells 1B and 1C:
- Cell 1B - Total Searches, Result Clicks and Record Views by Month and Platform
- Cell 1C - empty
- Cell 1B - Total Searches
- Cell 1C - Result Clicks and Record Views by Month and Platform
- PR1 reports should have the following data in cells 1B and 1C:
- Navigate to the Acquisitions Jobs Configuration Page (Configuration Menu > Acquisitions > General > Acquisition Jobs Configuration).
- Perform one of the following actions in the SUSHI Harvesting Job area:

-
To deactivate the SUSHI harvesting job, select Inactive or, under Schedule, select Not scheduled.
-
To activate the SUSHI harvesting job, select Active and then, under Schedule, select a scheduling option (options exist for weekly or monthly job runs).
-
To run the job immediately, select Run Now.
- Navigate to Acquisitions > Acquisitions Infrastructure > Vendors.
- Select Edit in the row actions list for the vendor.
- Select the Usage Data tab.
- Perform one of the following actions on an account:

-
Edit - Edit the account.
-
Harvest Now - To run the job immediately, select this option and then Confirm. This harvests the usage from the last 12 months. For Release 5 accounts, you can also edit the SUSHI account and harvest each report type separately.
-
Custom Harvest - Define a specific date range. You can also add multiple date ranges to harvest (see Custom SUSHI Harvest).
-
View History - View a history of these account-specific job runs.
-
Create R5.1 Account - Create an R5.1 account that copies the R5 account information, except for the name and harvest URL (see Moving SUSHI Account Information from R5 to R5.1).
-
Delete - Delete an account.
You can also upload usage reports to the Uploaded Files section. To manage reports received from the vendor, select View, Download, or Delete from the row actions list.
.png?revision=1)
You can download the file even if it was deleted (on the Usage Data tab of the Vendor Details page or the Uploaded Files tab of the Usage Data Loader page). For more information, see Manually Uploading and Deleting COUNTER Data.
Moving SUSHI Account Information from R5 to R5.1 - Workflow
Below is the recommended workflow when transitioning to R5.1:
If the usage for the same period is harvested both from R5 and from R5.1 accounts, duplicates and overrides may be seen.
-
When you hear about a vendor that starts to support R5.1, use the Create R5.1 Account action to create a new SUSHI account for this publisher (see Manage SUSHI Harvesting as Vendor Manager). This copies the fields of the R5 account into a newly created R5.1 account, except for name (SUSHI Account), Vendor URL and Override URL.
If you do not have an R5 account for this vendor, select Add SUSHI Account to create an R5.1 account. -
Once the account is created, choose an existing certified SUSHI vendor from the CZ list or fill in the vendor name (SUSHI Account field). If the vendor was not selected from the CZ, add an Override URL. After confirming that the connection works for the harvesting URL, please contribute it for the sake of the entire Alma community – see step 7 below.
-
Modify the fields as needed, for example, if the customer/requester credentials differ in R5.1.
-
Test the new vendor using the Test Connection action for the account and Test Connection with Response for each report type (see Adding a SUSHI Account).
-
Once the connection is confirmed, you are ready to harvest usage data using this account. Activate it, and make sure to deactivate the vendor's R5 account to avoid duplication.
The newly created R5.1 account will start harvesting from the last R5 harvesting onwards (using the scheduled job or the Harvest Now action), to avoid data duplication.
-
After confirming that the harvest from R5.1 is successful, disable the former R5 account (see Managing SUSHI Accounts).
-
We encourage you to contribute your SUSHI account to the list of certified SUSHI vendors in the Community Zone by using the Contribute action when editing a SUSHI account (see Contribute).
Custom SUSHI Harvest
The Custom Harvest option enables users to define a specific time frame while manually harvesting SUSHI data. This is only available for SUSHI Release 5 accounts. The existing "Harvest Now" function remains and harvests usage from the past 12 months while the new "Custom Harvest" function presents users with a pop-up window allowing them to define the exact time frame for the harvest period. The "Custom Harvest" operation can run on the entire SUSHI account or on a specific report within the account. Users can define multiple harvest time frames.
If the selected date range(s) contain months previously uploaded to Alma, these will get overridden.
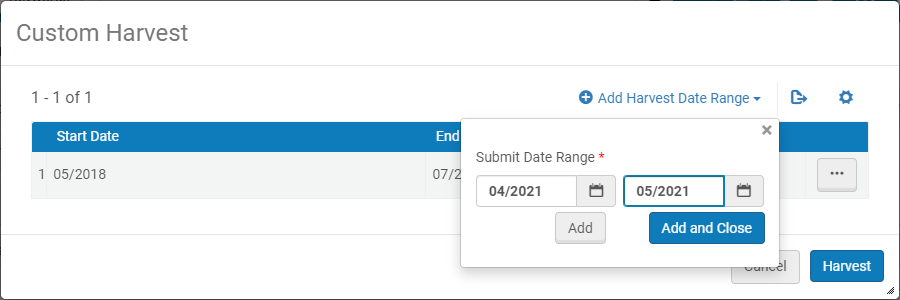
Watch the Harvest SUSHI Data from a Specific Time Frame video (1:18 minutes).
Viewing Usage Data
- Usage Data Operator
- In the Uploaded Files tab, select the desired report and click Download.
For more information, see Usage Data.

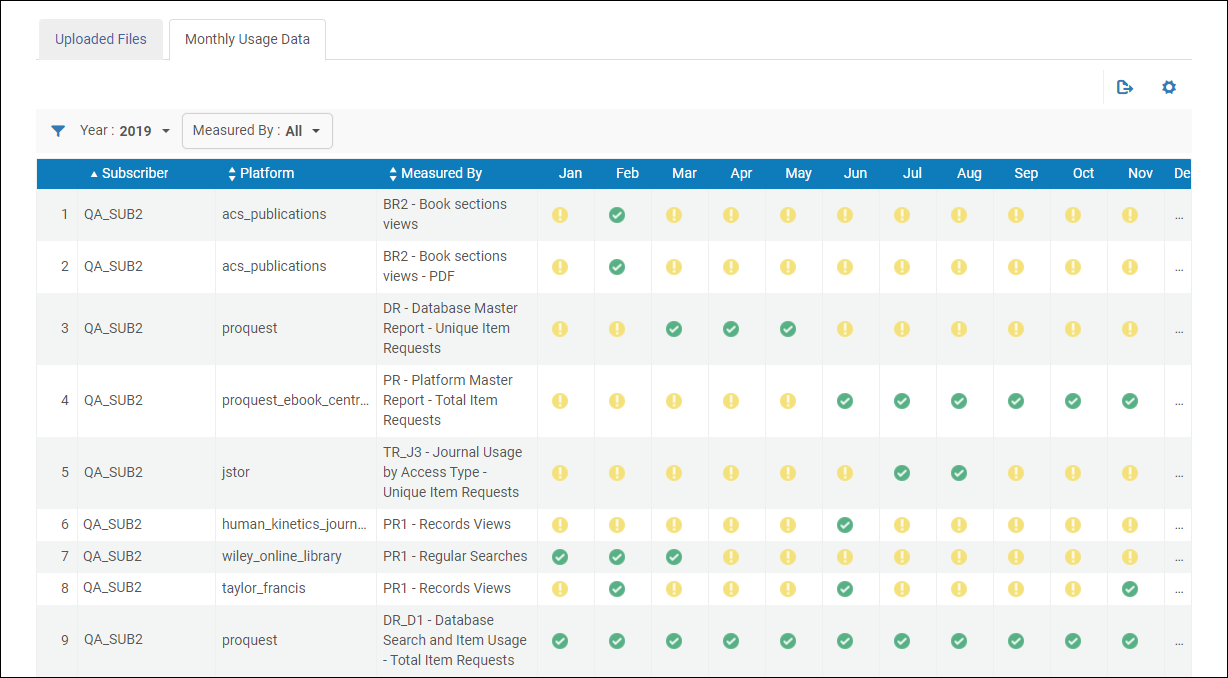
- Subscriber
- Platform
- Measured By - Report type and measurement. If you do not select anything in the Measured By filter, all report types and measurements appear.
- Jan .. Dec - Only the months of the year selected in the Year filter appear. The green icon (
 ) indicates that the usage report file was successfully uploaded. The yellow icon (
 ) indicates that the connection to the vendor was successful, but the vendor did not send any data. While the red icon (
 ) indicates that the the vendor connection attempt was unsuccessful.
Manually Uploading and Deleting COUNTER Data
- Usage Data Operator
Required Formats
Where to Access the Upload Feature
Checks Performed by Alma Before Uploading
Reloading Files
You can reload the file if it did not run successfully (Reload). The action is visible only for Invalid and Partially Loaded SUSHI files.
Watch the Reload Usage Data Files That Failed to Load video (1:10 min).
Manually Uploading COUNTER Data
Data can be uploaded to Alma automatically via the harvesting process (see Managing SUSHI Harvesting), or manually as described below.
- On the Uploaded Files tab of the Usage Data Loader page (as a Usage Data Operator), or on the Usage Data tab of the Vendor Details page (as a Vendor Manager), select Upload File and enter the following.
- Vendor (Usage Data Loader page, only) - The vendor associated with the uploaded data. Note that the vendor does not have to be a SUSHI vendor.
- Subscriber - Select the subscriber.
- Upload File - Browse for the file to upload. The file should list counter data from the 10th Excel line onwards.
- Allow data overlap - When checked, existing data in the system will be overwritten with data from the uploaded file. When not checked, if there is data duplication, the entire file will be ignored i.e., it will not be uploaded.
- Select Upload File. The file is uploaded and the data imported into Alma. Information about the file, including its status, appears in the table.
Manually Deleting COUNTER Data
A Usage Data Operator can also delete data according to its file ID on the Delete Usage Data page . This is helpful when usage data was migrated to Alma and appears (with its file ID) in Analytics. You can also delete COUNTER data in bulk.
- On the Delete Usage Data page (Acquisitions > Import > Delete Usage Data), enter the file ID, select Delete File and select Confirm in the confirmation dialog box.
 Delete Usage Data Page
 - A Delete Usage Data job runs. See Viewing Completed Jobs for information on monitoring the job and viewing the report.
- In the Usage Data page (see Where to Access the Upload Feature), select the reports to delete and then Delete Selected. Note that if you have more than one page of reports, you can select multiple reports across the pages.
- To delete all the rows, select Delete All.
If the displayed reports are filtered, Alma will delete only the filtered reports.
This functionality is only available to the Usage Data Operator role.


