Adding Staff-Mediated Research Deposits for Teaching and Learning Assets
- Last updated
- Save as PDF
Overview
When adding or editing research deposits, different information appears depending on the deposit type. For general information on adding research deposits see Working with Research Deposits. This page describes the information required when adding a deposit of type Teaching and Learning Assets.
Updating the Information for Teaching and Learning Assets
In the deposit, enter or configure the following information. When you are done, submit the deposit to the research repository as described in Adding Staff Mediated Research Deposits.
Deposit Section
| Field | Description | Values |
|---|---|---|
| Academic unit | One or more research academic units to associate with the deposit. | Enter or select an academic unit |
| Title | The asset title. |
Enter a full or partial title. If there is a match in the research repository, select the match to pre-fill some of the other fields on the page. |
Files Section
Add any additional files, as required. You can assign access rights and/or licenses of one or more files. Note that it is also possible to assign access rights and/or licenses at the asset level, instead of for each file; for more information about this option and about access rights and licenses, see the Access Rights and Licenses section.
To configure access rights and licenses, see Configuring Esploro Access Rights and Configuring Esploro Licenses.
Adding a License to One or More Files
Select the files, select Manage license, select the relevant access license to apply to the selected files, and select Set License. You can also manage the license when editing the file information.
Editing File Information
You can edit file information as follows:
-
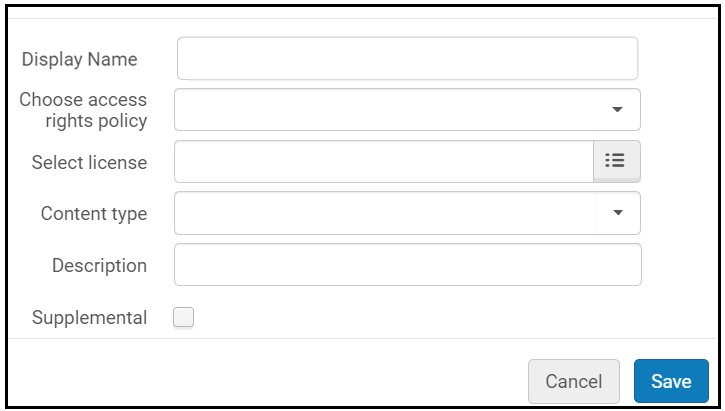
Select Edit File Information in the row actions list for a file. A pane to edit the file information appears.
 File Information Pane
 - Enter a display name if you want the name of the file displayed on the research portal to be different than the file name.
- Select the access rights policy for the file. See below for additional options that may appear.
- Select the license for the file.
- Optionally select the content type of the file's contents in Content Type. To configure these options, see Configuring Research Asset File and Link Types.
- Enter an optional description.
- Select the Supplemental checkbox to indicate that the file is supplemental, which prevents these files from being taken into consideration when determining the open access status of the asset. When this checkbox is selected, an icon
 appears next to the file.
 - Select Save.
Adding an Access Rights Policy to One or More Files
You can add an access rights policy to one or more files as follows:
- Select the files and select Manage access rights in the table actions list.
- Select the relevant access right policy to apply to the selected files. After selecting the policy, you may see additional fields to complete:
- Open – The file is immediately available.
- Open with Embargo – The file will be available after an embargo period. Select the end date for the embargo, or select a relative time period for the embargo, starting from the publication date. The date that the embargo expires is displayed in the Embargo Expiry Date column to help calculate the open access indicator and to help you determine until when the embargo is in force.
- Restricted – The file is visible to associated researchers but not available, except by request. Enter a reason for the restriction.
- Closed – The file is not available to researchers. Enter a reason for the restriction.
- Locally defined – Select a local access policy and enter a reason.
- Select Set Access Rights.
You can also manage the access rights when editing the file information.
Generating a Temporary Link to a File
Repository managers can generate a temporary link to an access-restricted file, which grants access to the file for a certain period of time to the requester.
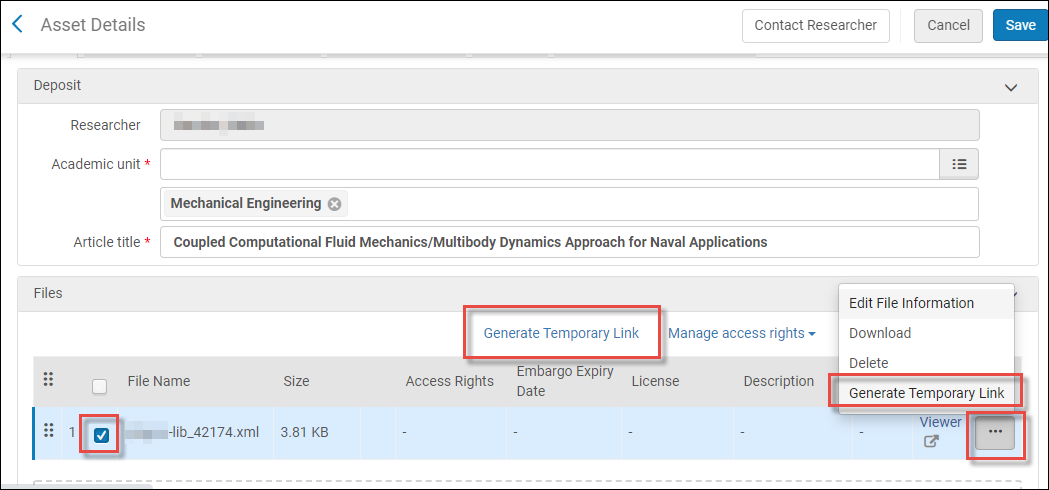
To create a temporary link, in the Asset Details > Files tab, select a file(s) and select Generate Temporary Link, or select the ellipsis menu of an individual file and select Generate Temporary Link. Then choose an expiry date and select Generate.
For a video showing how to generate a temporary access link to a file see here.


When the link is generated, it appears in a pop-up. If more than one file was selected, the link will be to a zip file containing the links to the individual files.
For a video showing how to generate a temporary link to restricted files see here.
Links for Remote Access Section
Add any links, as required. When adding a link, you can select a type for the link. To configure these options, see Configuring Research Asset File and Link Types.
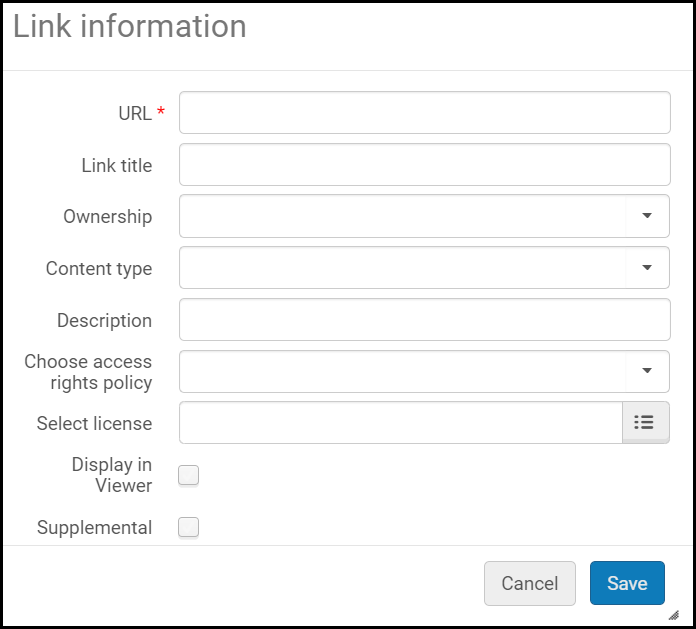
When adding or editing a link, enter the following fields:
- URL – The link to the output.
- Link title – The text to display for the link.
- Ownership – Select Institution for a link to a local resource or External for a link to an external resource.
- Content type – Optionally select an output status. To configure these types, see Configuring Research Asset File and Link Types.
- Description – Optionally enter a description.
- Choose access right policy – Apply an asset right to the link.
- Open – The file is immediately available.
- Embargo – The file will be available after an embargo period. Select the end date for the embargo, or select a relative time period for the embargo, starting from the publication date. The date that the embargo expires is displayed in the Embargo Expiry Date column to help calculate the open access indicator and to help you determine until when the embargo is in force.
- Restricted – The file is visible to associated researchers but not available, except by request. Enter a reason for the restriction.
- Closed – The file is not available to researchers. Enter a reason for the restriction.
- Locally defined – Select a local access policy and enter a reason.
- Select license – Apply a license to the link. See Configuring Esploro Licenses.
- Display in Viewer – opens the link in a viewer. If cleared, the link displays in the browser.
- Supplemental – select to indicate that the link is supplemental, which prevents these links from being taken into consideration when determining the open access status of the asset. When this checkbox is selected, an icon
 appears next to the link.

Authors and Contributors Section
You can add additional creators and contributors in the Authors and contributors section.
Adding a Locally Defined or External Research Academic Unit or Any Other Group as an Author or Contributor
To add a locally defined or external research academic unit or any other group as an author or contributor:
- Select Add group author / Add group contributor. A pane appears.
- Enter the organization in Affiliation.
- Select the type of contribution. This list can be configured by an administrator; see Configuring Contributor Types.
- Select Add and close.
Adding a Locally Defined Researcher as a Creator or Contributor
You can add a locally defined researcher as a creator or contributor as follows:
- Select Add author / Add contributor. A pane appears.
- Select Search existing.
- Enter or select the researcher in Choose researcher.
- To add and use a name variant for the researcher, select Update researcher name on asset and enter at least the last name.
- Select the type of contribution.
- Select Add and close.
Adding Any Other Person as a Creator or Contributor
You can add any other person as a creator or contributor as follows:
- Select Add author / Add contributor. A pane appears.
- Select Create non-affiliated.
- Enter the user's first and last name (mandatory). Optionally add a middle name and/or a name suffix.
- Optionally select an external research organization in Affiliation.
- Optionally enter the person's ORCID number.
- Select the type of contribution.
- Select Add and close.
Editing a Creator or Contributor
You can edit a creator or contributor as follows:
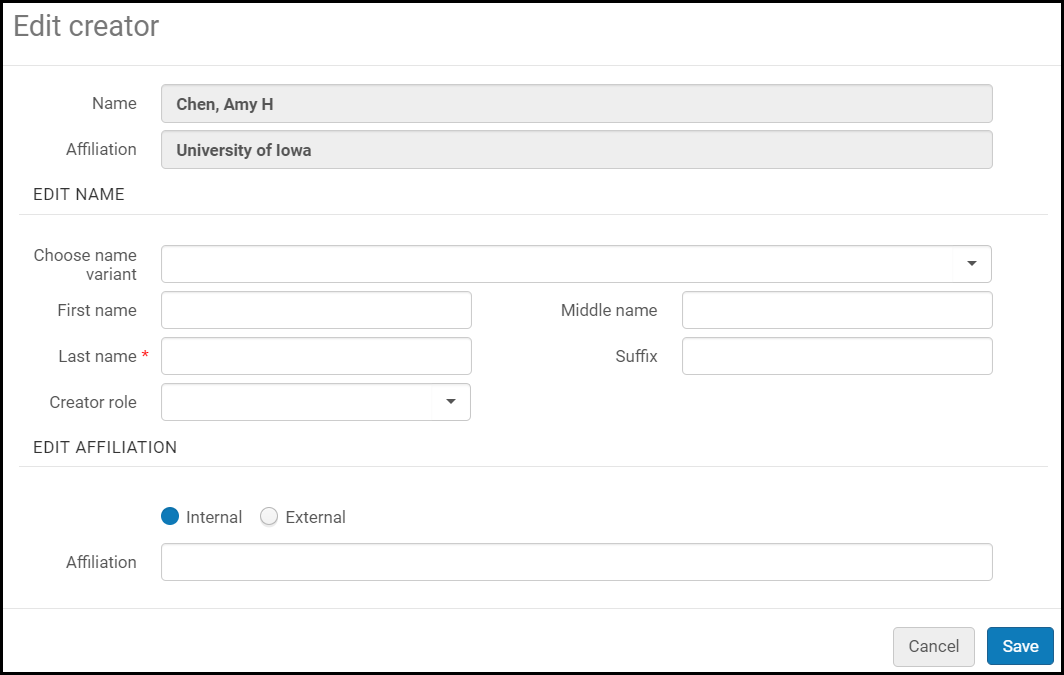
- Select Edit in the row actions list of the person. The Edit creator / Edit contributor pane appears.
 Edit Creator Pane
 - Optionally select from an existing name variant, or add a new name variant, to display in the asset instead of the primary name. When adding a name variant, last name is mandatory.
- Optionally select a new role.
- Optionally select another internal or external affiliation, to display in the asset instead of the primary affiliation.
- Select Done.
Once you have one row in the table, you can replace a researcher by selecting Replace in the row actions list for that researcher.
Once you have more than one row in a table, you can move one or more of them. Either drag and drop a row by selecting and dragging the drag and drop icon, or perform the following steps:
- Select one or ore rows in the table
- Select Move selected. A pane appears.
- Select whether to move the selected rows to the top or bottom of the table, or before a specific other row in the table.
- Select Move Selected.
If this asset was imported, some of the authors or contributors may have been matched by the import process. In this case, these people are considered only tentatively matched until you approve them .Two columns related to this feature appear for each person : Match status, indicating the certainty of the match, and Approve match.
- To approve a single author or contributor match, indicate this in the Approve match column.
- To match all authors/contributors, select Approve all author matches / Approve all contributor matches.
For approving assets see Author Matching Approval Task List.
Statuses and Dates Section
Add any relevant dates: accepted for publication, availability date, copyright date, date created, date presented, other date, posted to a pre-print archive site, submitted, or updated.
Asset Details Section
Enter any additional information about the asset in this section. Some information may be pre-filled if you selected a match when entering asset details.
- Subtitle
- Alternative title 1 / Alternative title 2 / Translated title
- Course Name
- Course Number
- Typical Learning Time
- Mobile Compatibility
- Source Code Availability
- Publisher
- Publication place
- PMID / PMCID
- Volume
- Issue
- Start page / End page
- Pages
- Edition
- ISBN / eISBN – The International Standard Book Number (ISBN). For ISBN or e-ISBN, you can enter multiple values, separating each value with a comma.
- Format – The media type or physical medium of the asset
- Size – The dimensions of the asset
- Language
- Subtype
- DOI – If the asset has a DOI, enter it here. If the asset does not yet have a DOI, and the asset category has an associated DOI agency (see Configuring DOI Agencies), the action Reserve DOI appears beside the DOI field. Select this action to generate a DOI for the asset. To register the DOI, see Managing Research Deposits Using the Research Deposits Page.
- Handle – Add a handle identification number to the asset. You can add one manually or select the Generate Handle PID button to add an identifier automatically. Note that after generating the handle, you still need to register it. You can register handles individually (by selecting Register Handle on the row actions menu), or in bulk with the Esploro register handles job.

For more information, see Configuring Handle Server Integration.
Additional Description Fields Section
Add any descriptions, as required. You can add a description type for each description.
You can choose one of the following description types:
- Audience
- Coverage
- Education Level
- Instructional Method
Description and Research Topics Section
This section will only display if your system is configured for default topics (not ANZSRC codes).
-
Abstract - Add an abstract, as required. If the Multilingual option is enabled, the Translation icon displays here (see Multi-Lingual Data Elements).
-
Research topics - Select one or more predefined research topics to associate with the deposit.
-
Additional subjects - If any of your topics is not predefined, enter a comma-separated list of topics. Make sure to press Enter after each keyword. If the Multilingual option is enabled, the Translation icon displays here (see Multi-Lingual Data Elements).
-
Sustainability Goals - If the asset impacts upon any sustainability goals, you can add them to the asset record by selecting them here. Note that SDG sustainability goals can also be added to assets automatically for organizations that subscribe to InCites (see InCites Integration; Configuring the Research Portal). SDGs that are added to an asset via InCites can be displayed in the asset record in the portal and appear in analytics, but do not appear in the asset record in the hub. Sustainability goals that are added manually to an asset record here are given precedence over those that come from InCites; if an asset has both, only the manually added ones are displayed in the portal.
Description and ANZSRC Codes Sections
These sections will only display if your system is configured for ANZSRC codes (not default topics).
ANZSRC Codes Section
For institutions in the Australia / New Zealand region, Ex Libris can enable the Australia and New Zealand Standard Research Classification (ANZSRC) in place of the default list of research topics. When enabled, you can assign percentages to ANZSRC Fields of Research (FoR) and ANZSRC Socio-Economic Objectives (SEO), and you can select the type of activity (pure basic research, strategic basic research, applied research, or experimental development) when creating or editing a deposit or asset.
Fields of Research
In this section, select Add Field of Research. In the pane, select a field of research, enter a percentage indicating the amount that this field is relevant to the asset, and select Add and Close (or Add to continue adding fields).
Socio-Economic Objectives
Select Add Socio-Economic Objective. In the pane, select a socio-economic objective, enter a percentage indicating the amount that this objective is relevant to the asset, and select Add and Close (or Add to continue adding objectives).
Select a type of activity: Pure basic research, Strategic basic research, Applied research, or Experimental development.
Description Section
-
Abstract - Add an abstract, as required. If the Multilingual option is enabled, the Translation icon displays here (see Multi-Lingual Data Elements).
-
Additional subjects - If any of your topics is not predefined, enter a comma-separated list of topics. Make sure to press Enter after each keyword. If the Multilingual option is enabled, the Translation icon displays here (see Multi-Lingual Data Elements).
Access Rights and Licenses Section
Select a predefined access rights policy and/or attach a predefined license. The access rights policy you select determines when the asset's files are available to view when a specific file does not have its own access rights policy defined. To select the access rights policies and/or licenses for individual files associated with the asset, see the Files section.
The license type informs the reader of any license requirements attached to the asset (but does not have any other effect). To configure these options, see Configuring Esploro Access Rights and Configuring Esploro Licenses.
You can also add a free text statement about the asset's copyright in Copyright statement.
Adding a License
In Select license, select the relevant access license to apply to the selected files.
Adding an Access Rights Policy
In Choose Access Rights Policy, select the relevant access right policy to apply to the selected files. After selecting the policy, you may see additional fields to complete:
- Open – The asset is immediately available. An indication with an icon displays if the asset is Open Access or not. An asset is considered Open Access if there is a file or link associated with it and the access rights restrictions on the asset and file levels are set to Open or, if the access rights are set to embargo, the embargo is currently not in force.
- Restricted – The asset is visible to associated researchers but not available, except by request. Enter a reason for the restriction.
- Closed – The asset is not available to researchers. Enter a reason for the restriction.
- Metadata and files are closed
- Locally defined – Select a local access policy and enter a reason.
Asset Grants and Funders Section
Select existing grants or add a new grant or funder to associate with this asset.
- Select Add Grant or Funder.
- Select Select Grant.
- Enter or select the grant in Researcher Grants (if the owner of the asset is not listed on a grant, there are no suggestions; see Managing Grant Information), or in All grants.
- Select Add and close.
If a grant does not exist, you can create a new one and associate it with the asset.
- Select Add Grant or Funder.
- Select Create Grant.
- Enter the grant ID (mandatory) and grant name (optional).
- Enter or select the funder (mandatory).
- Enter the grant URL (optional).
- Enter the grant type (optional) – see Working with Grant Information.
- Select Add and close.
To enter a funder only, select Add Grant or Funder, select Select Funder Only,
If you do not have specific grant information, you can associate the asset only to a funder. Select Add Grant or Funder, select Funder Only, select the funder (mandatory), and select Add and close.

You can also optionally add a note relevant to all grants in Grant Note.
Comment Section
Add an optional comment.
Relationships
You can optionally add relationships to other assets.
Adding Relationships to an Existing Local Asset
You can add a relationship to an existing local asset as follows:
- Select Add Relationship. A pane to define the relationship appears.
- Select Search existing assets (this is selected by default).
- In Choose asset, search for and select the asset.
- In Relationship Type, select the type of relationship that exists between this asset and the one you selected. For more information on the relationships, and to configure them, see Configuring Asset to Asset Relationships.
- When you are done, select Add and close. The relationship is added to the asset, and the reverse relationship is added to the other asset.
Adding Relationships to an External Asset
You can add a relationship to an external asset as follows:
- Select Add Relationship. A pane to define the relationship appears.
- Select Add external. The pane refreshes.
- Enter the external asset's title (mandatory), URL (mandatory) and DOI.
- When you are done, select Add and close. The relationship is added to the asset.
Importing Relationships
Additional Fields Section
When defined by your library, you can enter 1-15 fields of free text information relevant to the asset. Use these fields to enter additional information not available in any of the other sections.
To configure these fields, see Configuring Local Asset Fields.
Additional Identifiers
The Additional Identifiers section stores additional unique identifiers that an asset can have. You can add an identifier whose type is out-of-the-box (e.g. Scopus ID, Web of Science ID). You can also configure your own identifier types in the Asset Identifier Display mapping table, found in Configuration > Repository > Asset Details > Asset Identifier Display. For more details on configuring identifier types, see Configuring Asset Details.
Researcher Acceptance of Deposit Policy
If the researcher selected to accept the deposit policy when creating the deposit, the field Has the researcher accepted the deposit policy is pre-selected. For a staff-mediated deposit, ensure that the researcher agrees to the policy and select this field when creating the deposit.
When selected, additional fields appear.
- Policy accepted – The name of the policy that the researcher accepted. This value is pre-filled if the researcher accepted a policy when submitting the deposit.
- Date policy accepted – The date that the researcher accepted the policy. This is pre-filled if the researcher accepted the policy when creating the deposit.
- Note – After selecting a date, you can enter any additional notes in this field.
To configure this field, see Configuring Esploro Deposit Policies.

