
Creating Invoices
- Importing an EDI invoice file sent by a vendor, either automatically or manually (see Invoices Created Automatically from EDI and Creating an Invoice From a File, below)
- Importing an Excel invoice file (see Creating an Invoice From a File below)
- Using a PO or manually (see Creating an Invoice From a PO or Manually below)
To allow repeated invoice numbers from the same vendor, set the customer parameter invoice_not_unique to true; see Configuring Other Settings (Acquisitions).
Invoices Created Automatically from EDI
Handling of Taxes
Handling of Additional Charges
-
ALC+C++++BI::28:Binding Charges'
-
ALC+C++++DL::28:Freight Charges'
The loaded invoice in Alma will have two additional invoice lines, "1.1 Binding" and "1.2 Delivery," with the relevant amounts listed in each. (The total amount of line number 1 will be reduced by these amounts.) This also allows each additional charge to have its tax listed separately.
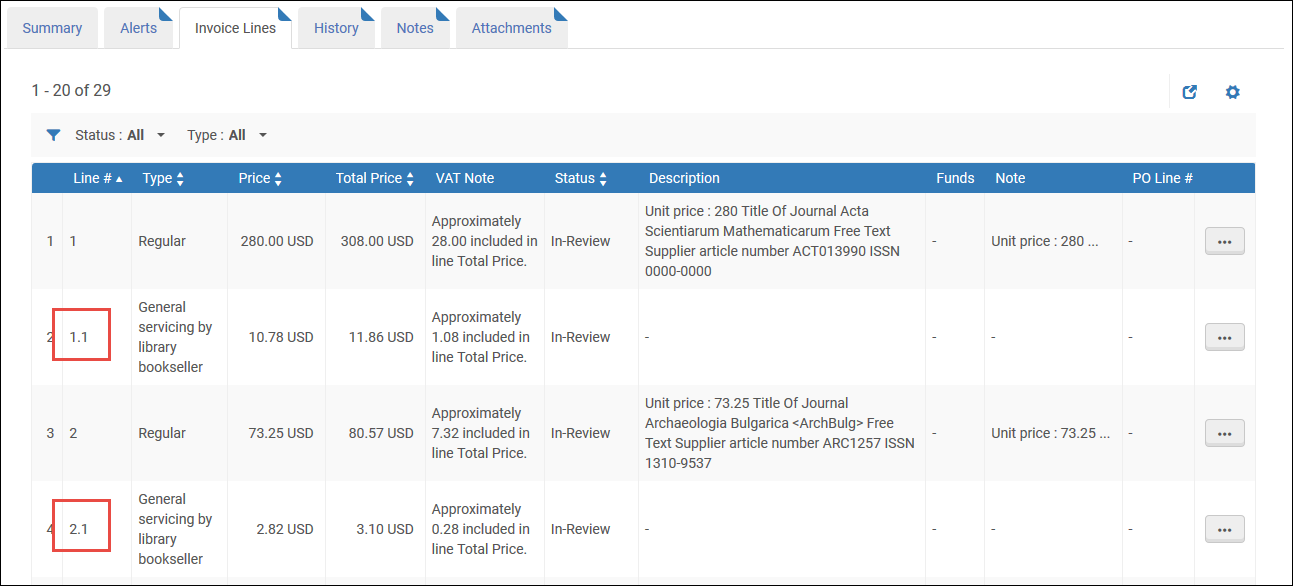
Even when line-level additional charges are itemized, only charge types that appear in the Invoice Line Types code table (Configuration menu > Acquisitions > Invoices > Invoice Line Types) are listed individually. (This table is only available when the value of the invoice_split_additional_charges customer parameter is set to true.) Charge types that do not appear in the table are summed in the "Overhead" line. For more information on the invoice_split_additional_charges customer parameter, see Configuring Other Settings (Acquisitions).
Creating an Invoice from a File
- Invoice Manager
- Invoice Operator
- Invoice Operator Extended
- Receiving Operator
- Imported invoices are associated to the institution
- To allow repeated invoice numbers from the same vendor, set the customer parameter invoice_not_unique to true; see Configuring Other Settings (Acquisitions).
- There is no way to select accrual mode (see Accrual Mode and Working With Accrual Accounting) for invoices created from a file.
- When an invoice is created from an Excel file, users have the option to use the VAT Code, if it exists, by selecting the Use VAT Code option in the EDI Information tab of the Vendor Details page (see Electronic Data Interchange (EDI)). This checkbox is also used by the invoice creation process from Excel.
- A new system job that creates the invoices from the input Excel file was added in the May 2025 release. For invoices created from an Excel file, from that date onwards, the creator of the invoice is "System" and not the User who loaded the file, since this is a system job.
- Creating invoices from XML supports E-invoice for the following standards:
- Italian standard (FatturaPA)
- German standard (XRechnung)
- Alma XML
- On the Select Invoice Creation Process page (Acquisitions > Receiving and Invoicing > Create Invoice), select From file.
- Select Next. The Invoice From File page appears:
 Invoice From File Page
 - In the Vendor field, select a vendor.
- In the File Type field, select either EDI, XML or Excel.
- In the Upload File field, select a file on your local system to upload.
- Optionally, select Download Excel Example and view an Excel example to confirm that your file follows the correct format:
 Invoice Example Spreadsheet
- You can copy the Excel example and use it as a template for your invoice.
- You can also view an Excel example here: Excel File for Invoice Creation Sample YLK.xlsx
This example is also referred to in a detailed scenario in the following document:
Creating multiple invoices with multiple invoice lines via an Excel file.docx. - For details on entering the information into the Excel file, see Instructions for Entering Data into the Excel File.
- Select Upload and Run Invoice Creation Job. A message appears on the Invoice From File page indicating whether the job was successful. When the file is successfully loaded, staff receive an email notification.
- Select Monitor Jobs to view the status of the job. The Monitor Jobs page appears, with the Completed tab selected. The job is either EDI – Load Files <vendor name> (for an EDI invoice) or Invoice - Create From Spreadsheet (for an Excel invoice). For details on the Monitor Jobs page, see Viewing Completed Jobs.
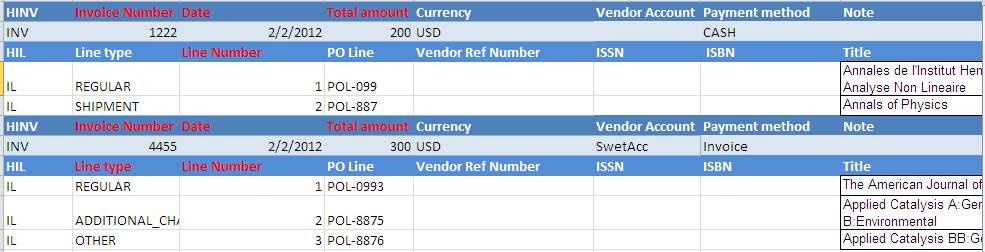
Instructions for Entering Data into the Excel File
-
The red columns indicate mandatory fields.
-
The only date format that can be used is MM/dd/YYYY.
-
The first column must have a line code type.
HINV = HEADER INVOICE
-
All types in this row must have the same name (Invoice Number, Date, Total Amount……..).
-
The mandatory fields are Invoice Number, Date, and Total Amount.
INV= INVOICE
-
It must follow the HINV row.
-
There can be only one INV row per HINV row.
HIL= HEADER INVOICE LINE
The mandatory fields are Line type and Line Number. This must follow the INV row.
IL = INVOICE LINE
-
All code types must be code table values such as "Line type" or "Reporting Code".
-
The "Fund and percent" column can hold a fund code with or without percentage, or only with CQfund which means 100%.
-
The fund percentage must be within round parentheses "(00)" with a number of up to 100, for example: AQfund(40) and the next fund rowBQfund(60).
-
Reporting codes: Only Reporting Code, Secondary Reporting Code and Tertiary Reporting Code are supported. Use the code rather than the ‘description’.
-
Do not include any commas in the price cells.
Creating an Invoice From a PO or Manually
- Invoice Manager
- Invoice Operator
- Invoice Operator Extended
- Receiving Operator
- On the Select Invoice Creation Process page (Acquisitions > Receiving and Invoicing > Create Invoice), select From PO or Manually.
- Select the Handle receiving checkbox if you want to process receiving the material directly after the invoice is created.
- If you selected From PO:
For Accrual accounting orders, you can only create invoices for one-time orders only. See Working with Accrual Accounting.
- Select Next. The second page of the invoice creation wizard, the Select PO page, opens.
 Select PO Page
 - Enter or select a PO in the Select PO quick pick list. Only active POs are displayed in the pick list. The auto complete can also find closed POs.
You can search on the following options:- Additional PO Line Reference
- All
- ERP number
- Organization unit description
- Fund code
- Fund name
- Item identifier
- PO Line
- Title
- PO #
- Vendor code
- Vendor invoice number
- Vendor name
Searching by Title is unavailable when "All" is selected for the search criteria.
- Select Save. The Invoice Lines tab on the Invoice Details page appears, displaying an invoice line for each PO line in the PO.
The invoice line fields are filled in automatically and can be edited as required.
- Invoicing is not required for PO lines with acquisition methods Gift, Depository, Technical, or Exchange.
- The value of the Line # field is a link which, when selected, opens the Invoice Line Details page for the invoice line.
- The value of the PO Line # field is a link which, when selected, opens the PO Line Summary page for the PO line.
-
The value of the Funds column is links to the funds. Select a fund name to view transactions related to the invoice in that fund.
- Select Save. The In Review Invoices page appears, displaying the invoices in review.
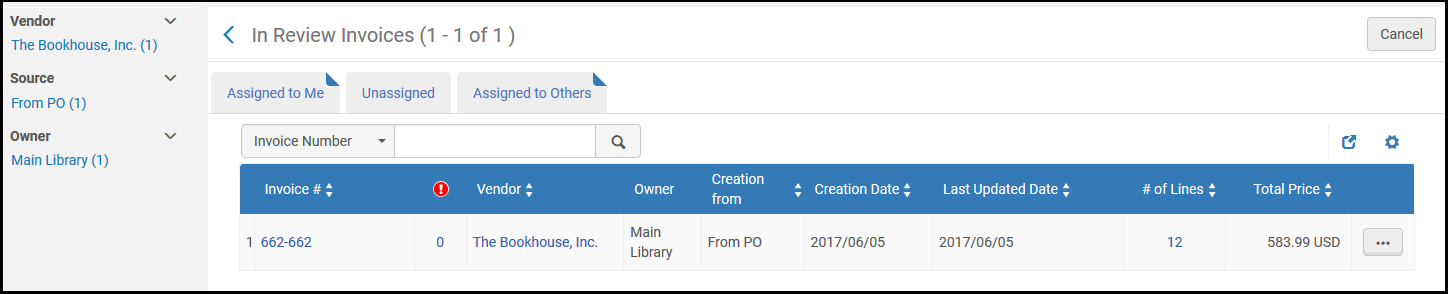 In Review Invoices PageIf you selected the Handle receiving checkbox in step 2, the Save and Save and Continue buttons on the Invoice Lines List page are replaced with a Save and Go to Receiving button. Select Save and Go to Receiving to open the Receive New material page to receive new material. Ensure that you are at a Receiving Department (see Library/Desk Selector in The Persistent Menu), and that there are PO lines in the invoice that are not fully received.
- Select Next. The second page of the invoice creation wizard, the Select PO page, opens.
- If you selected Manually:
- Select Next. The second page of the invoice creation wizard, the Invoice Details page, appears.
- Enter the required information, as described in the following table:
Invoice Details Page Fields Section Field Description Invoice Details Invoice number (required) An invoice number for the vendor (can include any keyboard characters and symbols; maximum length 100 characters). The number is not unique to a specific vendor. To allow repeated invoice numbers from the same vendor, set the customer parameter invoice_not_unique to true; see Configuring Other Settings (Acquisitions). Invoice date (required) The invoice date from the Calendar dialog box. Invoice due date The date on which the payment is due. Vendor (required) The vendor to whom the invoice is to be issued. When you select a vendor, the list of owners and currency units (in Total Amount) are filtered to display only those that are supported for that vendor.Vendor account The vendor account for this invoice. Total amount (required) The total invoice amount, including shipping (otherwise pro-rated additional charges are miscalculated). Select the currency. (The list is predefined by an administrator and restricted according to the selected vendor. For more information, see Configuring Currencies.) You can enter a negative amount (with a - sign preceding the number) to indicate a credit. A refund is then granted to the user.Vendor Contact Person The contact person at the vendor handling this invoice. Payment method Payment method for the invoice. The available payment methods are: - Accounting department - Use if Alma is connected to an ERP. When this payment method is selected, the Prepaid checkbox in the Payment section is disabled and cannot be selected (see Payment, below)
- Cash
- Credit card
- Attachment
- Deposit account
- Prepayment
- Special payment
- Bank transfers
Invoice reference # A reference number for the invoice, to enable invoice grouping for reporting. Owner (required) Associate the invoice with the institution or the library. The institution and/or libraries available in the drop-down box depend on your scope. See the Support for Library-Level Invoicing video (3:23 min) for details about library-level invoices.When you select an owning library, the list of vendors is filtered to display only vendors available for that library. Additionally, only PO lines owned by this library can be added to an invoice line for this invoice.Additional Charges Use Pro rata Prorate the following additional charges over all invoice lines: - Shipment amount
- Insurance amount
- Overhead amount
- Discount amount
- Any additional charge types and amounts enabled for your institution. See Configuring Invoice Line Types. If you have enabled multiple additional line types, each time you select one of the line types from the Additional Charge drop-down, another Additional Charge drop-down appears. You can add up to five types of additional lines.
If you do not select Use pro rata, each additional charge is displayed as an individual invoice line.This option is selected by default if the invoice_use_pro_rata setting is set to True (see Configuring Other Settings).If VAT is entered for this invoice, and the vendor is noted as liable for VAT, and the institution has an associated governmental vendor, a separate invoice is created for this tax and linked to this invoice. The linked invoice includes only the VAT. For details on configuring liability for tax and a governmental vendor, see step 2 and step 5 in To add a vendor and vendor account. See also How Alma Handles VAT Payments.After this invoice is paid/exported, the governmental invoice is also paid/exported and appears on the Find Invoices page with the name <invoice number>_RT, where <invoice number> is this invoice’s number and _RT stands for Report Tax (the governmental invoice).VAT Report tax Report a use tax (VAT). This field appears only if a governmental vendor is linked to the invoice’s vendor. When selecting this field, the VAT % and Amount fields are disabled, and any values in these fields revert to 0.VAT code A VAT code to assign a preconfigured VAT percentage to the invoice. Appears only when VAT codes are configured (see Configuring VAT Codes). Select Update Amount to apply the selected VAT code onto the invoice. VAT per invoice line Enable configuring VAT on the invoice line level (which can be handled by editing the PO line). Selecting this option disables the other fields in this section that are relevant to configuring VAT on the invoice level. This option appears only if the invoice_allow_vat_in_line_level parameter is set to true in Acquisitions Configuration (see Configuring Other Settings).VAT % The VAT % of the invoice total amount – inclusive, exclusive, or line exclusive. When the VAT code is not filled in the VAT % field is disabled. When the VAT code is filled in the VAT % field displays the VAT % which corresponds to the VAT Code.
For details on configuring the VAT fields, see VAT Calculation – Example. For details on configuring VAT codes, see Configuring VAT Codes.
VAT Type Select: - Inclusive: The invoice total amount includes VAT.
- Exclusive: VAT is added above the invoice total amount.
- Line Exclusive: The invoice's total amount includes VAT (similar to Inclusive), but the VAT amount is calculated outside of the invoice lines' total value and is not factored into the individual invoice lines.
Amount The amount of VAT to be paid on the invoice – inclusive, exclusive, or line exclusive. When a value is added, a VAT percentage is automatically calculated and appears in the VAT % field. When a VAT Code is configured and the VAT code field appears, this field is disabled and fills automatically when the VAT code is selected (based on the VAT code’s percentage and the invoice’s total amount). For details on configuring VAT codes, see Configuring VAT Codes.Expended from fund Whether the VAT amount is to be expended from the invoice line’s fund. Clear to indicate that the VAT amount is to be expended from a separate fund (Adjustment invoice line type).Vendor tax (local currency) Where relevant, enter a note to indicate that the VAT is charged in the local currency and the invoice itself is in a foreign currency. This field is for informational purposes only. Explicit Ratio (appears if the currency for the invoice is different from the currency of at least one ledger) You can specify a fixed exchange rate for the invoice amount to the currency used in the fund. By default, Alma calculates the value of the transaction based on the exchange rate on the date specified in Invoice Date. Foreign currency The currency for which you want to set a fixed exchange rate (the currency of the fund). Explicit ratio The exchange rate to use for the invoice amount. For example:- Invoice currency is USD
- Fund currency is EUR
- Explicit ratio is 1.5
If you add an invoice line of 10 USD but attach it to a EUR fund, the fund displays a transaction of 10 x 1.5 = 15 EUR.Select Add to add the exchange rate to the invoice.When payments are made by the ERP for invoices that are closed or waiting for payment, the ERP rate is used if it is better than the rate specified in the Explicit Ratio section.The explicit ratio can contain up to six decimal places.The explicit ratio is exported to the ERP system when the Use xsd format setting is enabled in General configuration (see Import/Synchronize/Export User Blocks/Export Users Fields).Learn more about this feature in the Explicit Currency Conversion Ratio for Invoices video (10:32 mins).Payment Prepaid Enabled only when the selected payment method is an option other than Accounting department. When selecting Prepaid, additional fields appear in the payment section. For details, see the next step. Internal copy Whether the invoice is loaded into Alma for documentation or tracking purposes. The invoice is not sent to the ERP financial system and is not marked as prepaid. When selecting Internal copy, additional fields appear in the payment section. For details, see the next step. - If you selected the Prepaid or Internal copy checkbox, enter the required information, as described in the following table:
Additional Prepaid Payment Fields Field Description Export to ERP Send the invoice to the Enterprise Resource Planning (ERP) system for notification purposes. This field is displayed only when the exportPrepaidInv parameter is set to True (see Configuring Other Settings). If this field is not displayed, contact your Acquisitions Administrator.If you selected Internal copy, this field cannot be selected and the invoice cannot be exported to the ERP.Payment status The relevant payment status: - Not paid
- Paid
Payment date The date of the payment. The current date is selected by default. Payment Identifier An external reference number from the ERP system, used to indicate that the invoice was paid. If there is no integration with an external system, you can enter an invoice or check number in this field.Payment amount (required) The final amount that was paid (after exchange rates and so forth are taken into account). You can also select the currency for the amount, in the field to the right of this field. Entering a negative number in this field indicates a credit amount. - Select Save and Create Invoice Lines. The Invoice Lines tab on the Invoice Details page appears, enabling you to add invoice lines to the invoice.
If you selected the Handle receiving checkbox in step 2, the Save and Save and Continue buttons on the Invoice Lines List page are replaced with a Save and Go to Receiving button. Select Save and Go to Receiving to open the Receive New material page to receive new material. Ensure that you are at a Receiving Department; see The Persistent Menu.
- Select Edit in the row actions list for an invoice line for which you want to assign a fund (see the next step for adding an invoice line). The Invoice Line Details page appears:
Closed PO lines can be included in the invoice. To find a closed PO line, select the quick pick link next to the PO Line field and set the filter to All.
- Select the checkbox next to each of the invoice lines to add a fund. Select the Add/Replace Selected Fund action and select a fund to assign the invoice line. Select Add Fund. The fund appears in the Funding section. The Add/Replace Selected Fund option is not available when Accrual Accounting is enabled.
Note that when Alma tries to create expenditure, the following occurs:- Alma goes to the fund and checks if there is an encumbrance that should be disencumbered.
- Alma then checks what the available balance would be if the disencumbrance is created. The disencumbrance creation is dependent upon expenditure creation. Disencumbrance will be for the same amount as the Expenditure.
- If the Available Balance is not enough (less than expenditure after subtracting the expected disemcumbrance), Alma checks the overexpenditure parameter definition (Fund > Rules section).
For more information, see the Change Funds in Invoice Lines video (1:16 mins).
- Modify any other information as required, and select Save. The invoice line information is saved and both disencumbrance (an amount up to but not more than the encumbrance amount) and expenditure transactions are created for the relevant funds. Note that if the invoice lines and PO lines use different funds, the disencumbrance transaction is created for the PO line fund and the expenditure transaction is created for the invoice line fund. If there are multiple funds for an invoice, all of the funds appear in the table.
If you are missing or have incomplete information, you are asked to confirm before you proceed. If any required information is missing or incomplete, you are not permitted to continue.
- Repeat step e through step f for any additional invoice lines you want to add to the invoice from the Invoice Lines List page.
- If you want to manually add an invoice line to the invoice: Alma checks each invoice line you add and displays the status — Ready to be paid or In Review.
An invoice can move to the next step in the workflow only if all of its invoice lines have the status Ready to be paid. If mandatory information is missing for an invoice line, it has the status In Review.To edit or delete the invoice line from the list of invoice lines:The Delete option is enabled only if you have the Invoice Operator Extended role.
- Select Add Invoice Line. The Add Invoice Line dialog box appears.
Some fields in the Add Invoice Line dialog box appear only when a specific type of PO line chosen. For details, see the field descriptions in the Add Invoice Line Dialog Box Fields table in Creating an Invoice from a PO or Manually.
- Enter the required information in the dialog box, as described in the following table:
Add Invoice Line Dialog Box Fields Field Description Type The type of invoice line to create: - Regular
- Other
- Shipment
- Insurance
- Discount
- Overhead
- Any additional type enabled for your institution. See Configuring Invoice Line Types.
Discount is subtracted from the value. A negative number is allowed; this is useful for when you return an item that had a discount (so the returned discount is added to the value).If you selected Pro rata when you created the invoice (see step b), the additional charges are pro-rated against all invoice lines, and only the Regular and Other types are available.If you did not select Pro rata, the additional charges are not allocated to a specific invoice line.Line number The invoice line number. PO line A PO line to link to the invoice line. The fields in the Add Invoice Line dialog box are updated, depending on the type of PO line selected (one-time or continuous). The amount that was previously encumbered in the PO line’s funds is disencumbered when the invoice line is added.Title The title of the selected PO line. PO line price The price of the selected PO line. If this value is less than 1, enter a leading 0. For example, 0.44, not .44. The price is in the currency selected in the PO line. Invoices that hold invoice lines associated with PO lines and ERP numbers have the ERP number indicated on the invoice line. This information is also available within the PO line section when exporting an invoice (see Exporting an Invoice to XM). Fully invoiced (one time PO line only) Whether the PO line is fully invoiced. This creates a disencumbrance transaction for any encumbered amounts. See Invoice Status in Manually Creating a PO Line. Check subscription date overlap (continuous PO lines only) Whether Alma checks if the subscription date overlaps with those of any other lines. If you select this option and an overlapping subscription is detected, an alert message appears when creating the invoice line.- The Check subscription date overlap tool is only meant to be used with editing prior purchase orders.
- Alma checks all invoice lines linked to the same PO for overlap.
- Alma can check only already saved information - invoice lines in other invoices, and previously added invoice lines from this invoice if you are editing the invoice. Invoice lines you are currently adding are not checked for overlap with other invoice lines you are currently adding. Use the list of invoices lines (see Invoice / Invoice line number list, below) to check for overlaps before saving.
- Users need to use the Invoice/Invoice line number list to manually check for subscription overlaps when creating a purchase order line, and not editing one.
Additional information (continuous PO lines only) Notes, as required. Required if the Subscription from date and Subscription to date fields are empty Accrual mode (continuous PO lines only) Whether to enable accrual of invoice expenditures from one fiscal period to another, in institutions that practice accrual accounting. Appears only when acquisition_accrual_mode=true in the CustomerParameters Mapping Table (see Configuring Other Settings). When a continuous PO line is selected in the PO line field, this checkbox is selected.For details on working with accrual accounting, see Working With Accrual Accounting.PO Line Subscription from date (continuous PO lines only) The subscription from date for the PO line. PO Line Subscription to date (continuous PO lines only) The subscription to date for the PO line. Subscription from date (continuous PO lines only) The date from which the invoice line is covered. Required if Check subscription date overlap is selected. Subscription to date (continuous PO lines only) An end date for the invoice line. Required if Check subscription date overlap is selected. Invoice/Invoice line number list For continuous PO lines, this list includes the last five regular invoice lines with this PO line and the dates associated with each invoice line.
Users need to use the Invoice/Invoice line number list to manually check for subscription overlap when creating a purchase order line and not editing one.
Price The price and currency for the invoice line. Enter the invoiced amount as it appears on the invoice for this line item. If this value is less than 1, enter a leading 0. For example, 0.44, not .44. Price Note A free text note that is displayed in the invoice line details, the invoice line list, and the Excel export. Release remaining encumbrance Whether to create a disencumbrance transaction to release encumbrance amounts that remain after paying an invoice. Appears only when a continuous PO line is selected. If encumbered amounts exist for multiple funds after an invoice is paid, a disencumbrance transaction is created for each fund that has encumbered amounts remaining.This option can be selected only when the total invoice line price is lower than the PO line price. It can be changed any time the invoice line is in an editable state.While this field appears whether creating an invoice manually or from a PO, when creating an invoice from a PO, the remaining encumbrance is automatically released. Selecting this field is only applicable when creating an invoice manually and when the field "Accrual mode" is not ticked.Quantity The quantity for the invoice line. This field records the number of invoiced items, but its value does not affect any calculations. Reporting codeSecondary reporting codeTertiary reporting codeThe primary, secondary, and tertiary report codes — select from the predefined drop-down lists. For more information on these codes, see Configuring Reporting Codes. VAT Note A read-only field that displays information on the VAT. The text displayed here appears in the VAT Note column on the Invoice Lines tab of the Invoice Details page. Note Notes you want associated with the invoice line. Additional information Descriptive information to be added (optional), providing additional scope information on the invoice line. Displayed only when the invoice line is connected to a continuous PO line. VAT code A VAT code to assign a pre-configured VAT percentage to the invoice line. Displayed only when VAT codes are configured (see Configuring VAT Codes). Update amount Whether to invoke the selected VAT code onto the invoice line. Displayed only when VAT codes are configured (see Configuring VAT Codes). VAT % The percentage of the invoice line price that is VAT. Appears only when VAT per invoice line is selected on the Invoice Details page (see the Invoice Details Page Fields table in Creating an Invoice from a PO or Manually). When a value is added, the VAT amount is calculated automatically and is displayed in the Amount field. When VAT codes are configured, this field is disabled (see Configuring VAT Codes).Amount The amount of VAT to be paid on the invoice line. Displayed only when VAT per invoice line is selected on the Invoice Details page (see the Invoice Details Page Fields table in Creating an Invoice from a PO or Manually). When a value is added, the VAT percentage is calculated automatically and is displayed in the VAT % field. When VAT codes are configured, this field is disabled (see Configuring VAT Codes).Fund information - Select Add Fund. Enter the following fund information and select Add Fund to add the fund to the invoice line. Fund The name of the fund. When the invoice line is saved, both disencumbrance (in the amount of the PO line encumbrance) and expenditure transactions are created for all the selected funds. Disencumbrances are created only for PO line funds, and only one disencumbrance is created for each encumbrance (and not for each expenditure). The disencumbrance date is set to five milliseconds before the encumbrance date, so that they appear together in the fund´s transactions list.If an amount other than 100% of an invoice line’s total is allocated to funds, select Redistribute Lines to re-allocate the fund amount percentages, based on each fund’s respective amount relative to the new total amount.If the invoice line and PO line use different funds, the disencumbrance transaction is created for the PO line fund and the expenditure transaction is created for the invoice line fund.Funds with a negative balance (or a balance of 0) appear only if there is a rule configured allowing overexpenditure and the overexpenditure limit has not been reached. For details on the fields used for configuring rules, see Ledger Rules.Percent The percent allocation for the fund selected in the Fund field. If an amount other than 100% of an invoice line’s total is allocated to funds, select Redistribute Lines to re-allocate the fund amount percentages, based on each fund’s respective amount relative to the new total amount. - Select Add to add the current invoice line and leave the dialog box open to add another invoice line, or select Add and Close to add the invoice line and close the dialog box. The invoice line is added to the Invoice Lines List page.
- Edit – Select Edit in the row actions list to edit the line. The Invoice Line Details page appears, where you can edit the invoice line information. The Invoice Line Details page also enables you to view details of the PO line with which you associated the invoice line. When you have edited the invoice line as required on this page, select Save. You are returned to the Invoice Lines List page, where you can view the invoice line you edited.
- Delete – Select Delete in the row actions list and select Confirm in the confirmation dialog box to delete an invoice line.
Deleting an invoice removes the corresponding expenditure and recalculates the disencumbrance. To remove the disencumbrance (when removing the only invoice associated with the PO line), manually set the PO line's Invoice Status to Partially Invoiced (see Manually Creating a PO Line).
- Select Add Invoice Line. The Add Invoice Line dialog box appears.
- In the Alerts tab, view any alerts that the system may have generated for the invoice when it is saved. If necessary, edit the invoice accordingly, based on the alerts.
Alerts that may be generated include:- Some invoice lines are not ready – One or more invoice lines in a saved invoice are missing information
- Some invoice lines are not linked to PO lines – One or more invoice lines are not linked to a PO line
- The invoice total amount entered is different than the calculated total net invoice
Note that the "Some Invoice Lines are not ready" alert does not block the invoice from being approved and can be ignored (see Understanding invoice alert "Some Invoice lines are not ready").
- In the Notes tab, add, update, or delete notes for the invoice. For details, see Notes Tab.
- In the History tab, you can view changes made to the invoice or any invoice line fields, including the date and time of the change, the user who made the change, the invoice line number (for invoice lines), and the old and new values.
For more information about invoice line audit history, see the Invoice Line Audit History video (0:49 mins).
- To see invoice line history, select Invoice line changes in the History type field.
- To see invoice history, select Invoice changes in the History type field.
- For more information about this tab, see History Tab.
- In the Attachments tab, add, update, or delete attachments for the invoice. For details, see Attachments Tab.
- Select one of the following buttons:
- If you did not select the receiving checkbox in step 2, you can:
- Save – The invoice information you entered is saved and the invoice is moved to the Review Invoices page, where you can review and edit it. The invoice does not continue to the next stage of the invoicing workflow.
- Save & Continue – The invoice information you entered is saved, and the invoice continues to the next stage of the invoicing workflow, where it is automatically processed. For more information on the invoicing workflow, see Invoicing Workflow.
- If you selected the Handle receiving checkbox in step 2, you can:
- Save and Go to Receiving – The invoice information you entered is saved (and remains in review), and the Receive New Material page opens, enabling you to receive the new material (see Receiving Material).
- If you did not select the receiving checkbox in step 2, you can:
VAT Calculation – Example
- If Inclusive is selected (total amount includes VAT), this indicates that the VAT is already figured into the total value of each invoice line. The VAT Amount is configured as $9.09 (100 - 100/1.1 = 9.09). The invoice’s Summary tab shows a Total Amount of 100. Total Invoice Lines Amount is 100, which is the sum of the invoice lines (40 + 60). VAT Amount is 9.09.
The Invoice Lines tab displays the Price of each line, which is the same as the Total Price of each line. A comment appears in the VAT Notes column, indicating the amount of VAT calculated for that line.
- Invoice Line 1 – Price = $40 (36.36 + 3.64 (VAT))
- If Expended from fund is selected: All $40 is expended from the invoice line’s fund, and the VAT note displays $3.64 included in the line’s total price.
- If Expended from fund is not selected: $36.36 is expended from the invoice line’s fund, and $3.64 is included in the VAT Adjustment line (a total of $9.09 is taken from both lines).
- Invoice Line 2 – Price = $60 (54.55 + 5.45 (VAT))
- If Expended from fund is selected: All $60 is expended from the invoice line’s fund, and the VAT note displays $5.45 included in the line’s total price.
- If Expended from fund is not selected: $54.55 is expended from the invoice line’s fund, and $5.45 is included in the VAT Adjustment line (a total of $9.09 is taken from both lines).
- Invoice Line 1 – Price = $40 (36.36 + 3.64 (VAT))
- If Exclusive is selected, then the total invoice amount does not include VAT. VAT is added to each invoice line but not reflected in the total invoice amount. The VAT Amount is configured as $10 (10% of $100).
The invoice’s Summary tab shows a Total Amount of 100. Total Invoice Lines Amount is 110, which is the sum of the invoice lines (44 + 66). VAT Amount is 10.The Invoice Lines tab displays the Price of each line, which is less than the Total Price of each line, and includes the VAT. A comment appears in the VAT Notes column, indicating the amount of VAT calculated for that line.
- Invoice Line 1 – Price – $40 + 4 (VAT) = $44
- If Expended from fund is selected: All $44 is expended from the invoice line’s fund, and the VAT note displays $4.00 included in the line’s total price.
- If Expended from fund is not selected: $40 is expended from the line’s fund, and $4 is included in the VAT Adjustment line (an adjustment of $10 is taken from both lines).
- Invoice Line 2 – Price – $60 + 6 (VAT) = $66
- If Expended from fund is selected: All $66 is expended from the invoice line’s fund, and the VAT note displays $6.00 included in the line’s total price.
- If Expended from fund is not selected: $60 is expended from the line’s fund, and $6 is included in the VAT Adjustment line (an adjustment of $10 is taken from both lines).
- Invoice Line 1 – Price – $40 + 4 (VAT) = $44
- If Line Exclusive is selected, the invoice's total amount includes the VAT (similar to Inclusive), but the invoice line’s prices do not. The VAT Amount is calculated against the invoice’s Total Value. In our example, this does not reflect the actual total of the invoice lines + VAT. The VAT Amount is configured as $9.09 (100 - 100/1.1 = 9.09), which is incorrect.
The invoice’s Summary tab shows a Total Amount of 100. You should adjust the values of the invoice lines or the Total Amount, since Total Amount does not accurately reflect the total value of the invoice lines + VAT. Total Invoice Lines Amount is 110, which is the sum of the invoice lines + VAT (44 + 66). VAT Amount is 9.09. If you adjust the Total Amount to 110, VAT Amount will correctly appear as 10The Invoice Lines tab is the same as it is if Exclusive is selected (see above).
- Invoice Line 1 – Price = $40 + 4 (VAT)) = $44
- If Expended from fund is selected: All $44 is expended from the invoice line’s fund, and the VAT note displays $4 included in the line’s total price.
- If Expended from fund is not selected: $40 is expended from the line’s fund, and $4 is included in the VAT Adjustment line (an adjustment of $10 is taken from both lines).
- Invoice Line 2 – Price = $60 + 6 (VAT)) = $66
- If Expended from fund is selected: All $66 is expended from the invoice line’s fund, and the VAT note displays $6 included in the line’s total price.
- If Expended from fund is not selected: $60 is expended from the line’s fund, and $6 is included in the VAT Adjustment line (an adjustment of $10 is taken from both lines).
- Invoice Line 1 – Price = $40 + 4 (VAT)) = $44
Working With Accrual Accounting
- A fiscal year is set in Alma that runs from January 1, 2014 – December 31, 2014, called FY - 2014.
- Another fiscal year is set in Alma that runs from January 1, 2015 – December 31, 2015, called FY - 2015.
- If Accrual Mode is disabled: All of the invoice’s charges are attributed to the current fiscal year (FY – 2014), regardless of the invoice’s Subscription from date value.
- If Accrual Mode is enabled: The invoice’s charges are distributed proportionally between FY – 2014 and FY – 2015.
- For accrual accounting to work properly, all the past and future fiscal periods must be defined, and the funds must be active and able to accept transactions. If a future fiscal year is not active in Alma (or if the fund does not exist), the invoices’ expenditures are attributed to the latest active fiscal period in Alma that is covered by the invoice. In the above example, if FY – 2015 was not active, all of the invoice’s expenditures would be attributed to FY – 2014, even if accrual mode is enabled.
- If the Subscription from date is not part of the previous, current, or next fiscal period, you will receive an error that the fund is not valid in accrual mode.
- When accrual accounting is enabled, the option to Add/Replace Selected Fund in the Invoice Lines List is not available.
- When accrual accounting is enabled, using the Release remaining encumbrance checkbox in an invoice line is not available.
- Ensure that acquisition_accrual_mode is enabled (see Configuring Other Settings).
- Ensure that you have rolled over the ledger and the required fund from the first fiscal year to all required fiscal years (see Rolling Over Legders).
Configure the fund to accept expenditure transactions prior to (or later than) the start of (end of) the fiscal period. To do this, ensure that you have selected a value (such as 365) in the Expenditures prior to fiscal period (days) field in the Rules section of the Summary Details page for the specified fund (see the table Ledger Rules in Adding a Legder).For Alma to automatically distribute the amounts to the funds in each fiscal year (see below), all funds in the different fiscal years must have the same fund code. (If you choose allocate amounts manually, in which case the fund codes do not matter.)
- On the Invoice Details Page (Acquisitions > Receiving and Invoicing > Create Invoice, select Manually and select Next), configure the relevant fields to create an invoice.
- Select Save and Create Invoice Lines. The Invoice Lines tab of the Invoice Details page appears.
- Select Add Invoice Line. The Add Invoice Line dialog box opens.
- In the PO line field, select a continuous PO line. The dialog box refreshes with the Accrual Mode checkbox selected.
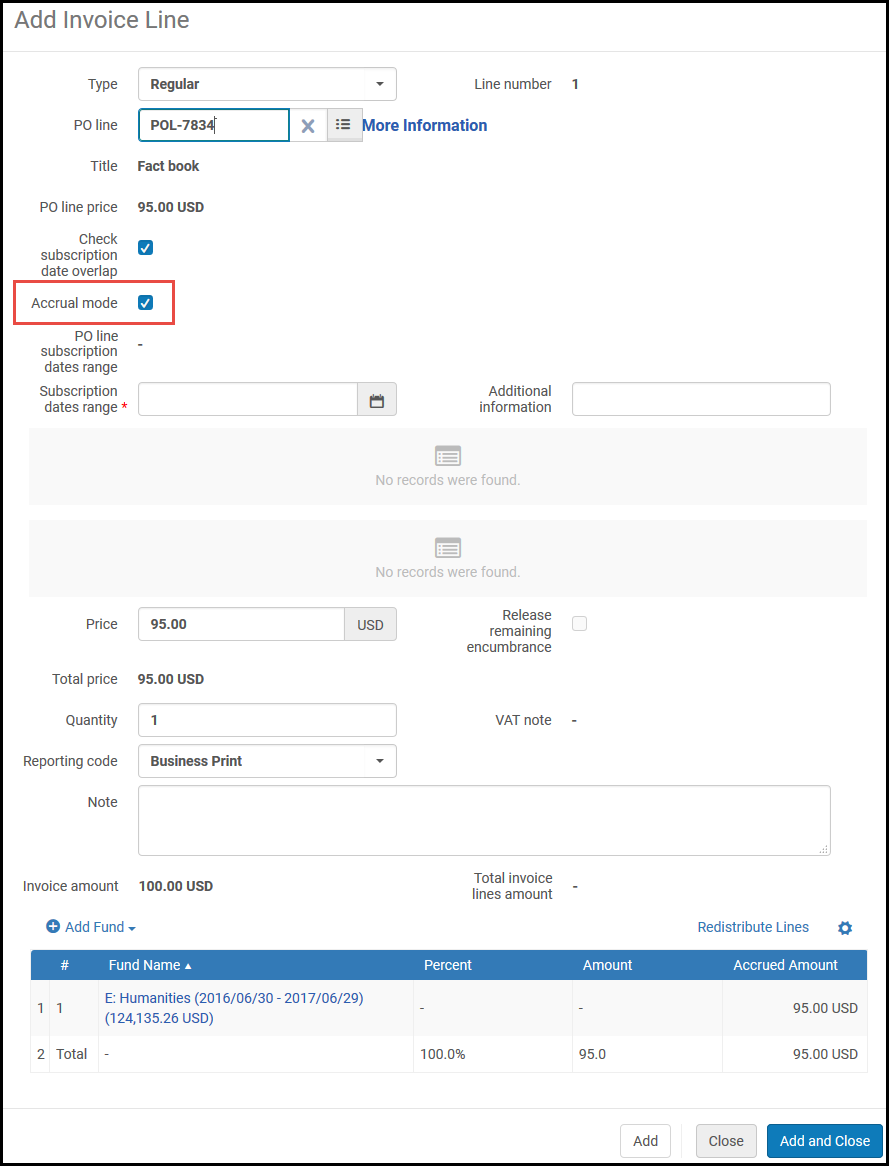 Add Invoice Line Dialog Box – Accrual Mode CheckboxThe fund is typically pre-filled from the PO line. To remove the fund, clear Accrual Mode, delete the fund, and re-select Accrual Mode.
 - In Subscription date range, select a start date and end date for the invoice line, respectively. The distribution of the expenditures among the relevant fiscal periods is displayed.
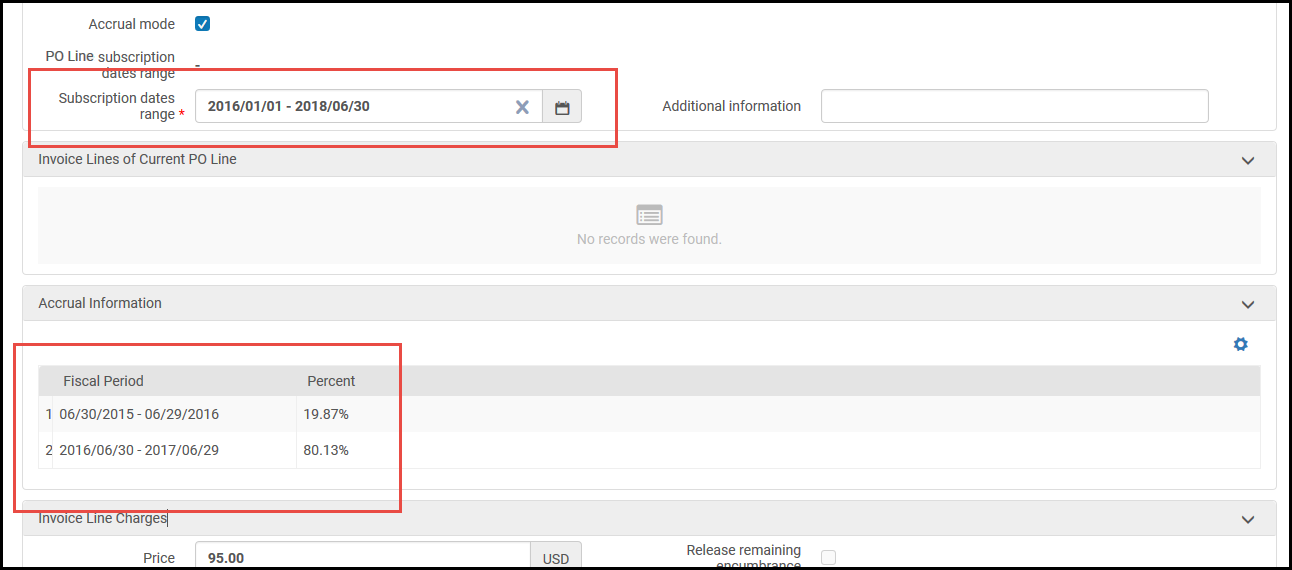 Add Invoice Line Dialog Box – Fiscal Period DistributionThe above figure presents an example where 19.87% of the invoice line’s expenditures fall in the fiscal period ending 06/29/2016, and 80.13% of the invoice line’s expenditures fall in the fiscal period ending 06/29/2017.
 - Select Add Fund to add a fund and enter the relevant information.
- You must configure the fund to accept expenditure transactions prior to (or later than) the start of (end of) the fiscal period. Ensure that you have selected a value (such as 365) in the Expenditures prior to fiscal period (days) field in the Rules section of the Summary Details page for the specified fund (see the table Ledger Rules in Adding a Ledger).
- For Alma to automatically distribute the amounts to the funds in each fiscal year, select a fund that has a matching fund (with the same fund code) in each fiscal year required for the invoice. If there are any fiscal years that do not have funds, then the fund associated with the latest fiscal year is assigned the remaining balance of the invoice. For example, if you want to spread the invoice over three years, 10% the first year, 60% the second year, and 30% the third year, but the fund you select only exists in the first two fiscal years, then the first year's fund will cover 10% and the second year's fund will cover 90%.
- Alternately, you can simply add the funds you require and manually assign the amounts to each one, as required.
- Select Add Fund. The accrued amounts appear in the Accrued Amount column, according to the displayed percentages (as described in step 7 above).
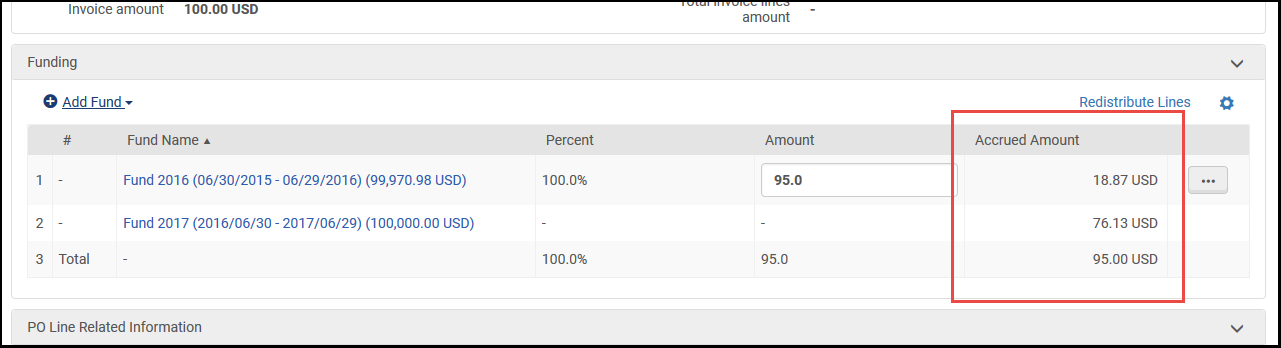 Add Invoice Line Dialog Box – Accrued AmountsThe fund that covers the Fiscal Period in the Subscription from date is called the Baseline Fund. Delete appears next to this fund only. Selecting Delete deletes both accrued amounts covered by this fund.
 - To disable accrual mode, clear the Accrual Mode checkbox. The amounts then exist independently in the invoice line, and Delete appears next to each. Additionally, the Accrued Amount heading changes to Amount.
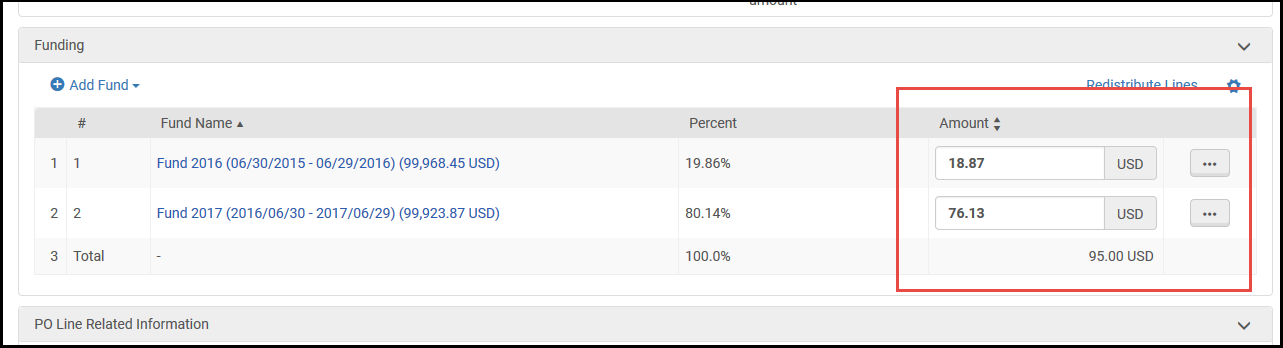 Accrual Mode Disabled
 - Select Add and Close.
Editing the Invoice Lines of Closed Invoices
Most of the fields in the lines of a closed invoice cannot be modified. However, by default the following invoice-line fields can be edited even when the invoice is closed:
- Subscription dates range (unless Accrual mode is enabled; see Creating Invoices)
- Additional information
- Check subscription date overlap
- Price note
- Note
- Reporting Codes 1-5
- In the persistent search box, search for the invoice (see Searching for Invoices). The invoice appears in the Find Invoices page.
- In the row actions of the invoice, select Edit. The Invoice Details page opens.
- In the Invoice Lines tab, in the row actions of the line you want to edit, select Edit. The Invoice Line Details page opens.
.png?revision=1&size=bestfit&width=840&height=595)
Editable fields in the Invoice Line Details page
- Edit the editable fields as required.
- Select Save to save the changes.
The editable fields of invoice lines in closed invoices can also be edited via the API (except for Reporting Codes 4 and 5). For additional information, see Invoices in the Developer Network.
The option to edit fields of invoice lines that are in closed invoices can be disabled in an institution. When the option is disabled, the row actions of invoice lines in closed invoices contain the View option instead of the Edit option.
- In the Mapping Table at Configuration menu > Acquisitions > General > Other Settings, set the allow_edit_closed_invoice_line Customer Parameter to false.
Adding Invoices for Cancelled Orders
-
Reopen the PO line.
-
Attach the PO line to the invoice.
-
Cancel the PO line once more.