Integrating Alma with the Aleph Central Catalog
- Copy cataloging from the central catalog to Alma
- Contribute changes to the central catalog from Alma
- Publish inventory to the central catalog from Alma
- Import changes from the central catalog to Alma
Aleph Configuration
-
Set VST server definitions:
- Enter the following:
vim $alephe_root/aleph_start.private
Requests are stored in the library defined as vst_library. By default, this is the USR00 library (as defined in aleph_start). If you want to use another library, define it in aleph_start.private as follows:setenv vst_library XXXNN
Generally you should use the USR00. So, there is no additional entry in aleph_start.private that is necessary.The server for the data replication interface (VST server) runs by default under port 522x. If you want to use another port, you may enter it in aleph_start.private:setenv VST_SERVER_PORT nnnn
For example:setenv VST_SERVER_PORT 4711
- Enter the following:
vim $alephe_tab/tab_low_group
In tab_low_group, the local catalog IDs are defined. Z115 records are only created if a local catalog ID is present. A local catalog ID may represent 1 to n sublibrary codes. For every local system for which you want to generate Z115 messages, you need to define a sublibrary code.If a library wants to trigger a Z115 message to the VST server regardless of the BIB's LOW field, set the tab_low_group as follows:
! 1   2     3     4     5     6     7
!!!!!-!!!!!-!!!!!-!!!!!-!!!!!-!!!!!-!
ALMA  ALL
The above setup results in a message each time a BIB record is updated, without any dependency in LOW tag.
For example:! 1 2 3 4 5 6 7 !!!!!-!!!!!-!!!!!-!!!!!-!!!!!-!!!!!-! VST01 LOC28 VST02 LOC69 LOC70 LOC75 VST05 LOC75 VST06 VST06
The VST02 local catalog ID contains several sublibrary codes. If you correct a BIB record that contains at least one ownership verification from the VST02 list, a Z115 record for the correction is created. If the first ownership verification is generated for a BIB record or the last one is deleted, a Z115 record for creation or deletion is generated.When correcting series or collective titles, Z115 records are created for all local catalog IDs. This applies to authority records as well. For holdings records, the table tab_low_group acts as concordance, since there is always one sub library code (OWN) per holdings record.For Alma:! 1 2 3 4 5 6 7 !!!!!-!!!!!-!!!!!-!!!!!-!!!!!-!!!!!-! ALMA #####
For libraries that use a parent-child link between records, you can configure that when a child BIB record is updated, a Z115 is created for its parent, in addition to the child's Z115 record.In order to activate the above functionality, column 7 in tab_low_group should be set to 'Y'.For example:
! 1 2 3 4 5 6 7 !!!!!-!!!!!-!!!!!-!!!!!-!!!!!-!!!!!-! ALMA ##### Y
Parent record links are based on the definitions in the ./[bib_library]/tab/tab_relink_link table. Therefore, in order to activate the Send Parent functionality, tab_relink_link should be defined with all parent links.For example:! 1 2 3 4 5 6 7 8 9 !!!!!-!-!!!-!-!!!!!-!-!!!-!-! 010## a 001 DN Y
- Enter the following:
vim $alephe_unicode/tab_character_conversion_line
When sending messages via the VST server, a character conversion may be activated. The server sends the data - if no conversion is defined - as UNICODE characters (UTF8). You assign a conversion with the entry "UTF_TO_VST".For example:!!!!!!!!!!!!!!!!!!!!-!!!!!-!-!!!!!!!!!!!!!!!!!!!!!!!!!!!!!!-!!!!!!!!!!!!!!!!!!!!-! UTF_TO_VST ##### L line_utf2line_sb unicode_to_8859_1 Y
If required, further conversion programs and tables may be implemented. - Activate the vst library.
Requests are generated only if this function is activated in the vst library. In order to do this, you need to add the following entries in the file_list of the VST library and initialize the Z115 table via UTIL A 17/1.
TAB z115 100K,128K,128K,128K,128K,128K 0K ts0,TS1D,TS1D,TS1D,TS1D,TS1D
IND z115_id 100K,128K,128K,128K,128K,128K 0K ts1,TS1X,TS1X,TS1X,TS1X,TS1X
The size of the table depends on the number of expected requests. Requests are not automatically deleted. They should be manually deleted in regular intervals or archived.In addition, the counter "last-vst-number" needs to be defined via UTIL G / 2. No prefix is assigned, and leading zeros must not be suppressed.As soon as Z115 is established and the related counter is defined, requests for the local catalog IDs from tab_low_group are written. Restart VST server.
- Enter the following:
-
Set Z39.50 definitions Aleph z39_server
- Verify that the port is correct under $alephe_tab/z39_server/z39_server.conf.
- MAB environment:
Change 'Z39' staff to ADMIN (User library) and add permissions for 'MAB01' library (Allow all common tab).
For USMARC environment:
Change 'Z39' staff to ADMIN (User library) and add permissions for 'USM01' library (Allow all common tab).
- In order to return UTF via Z39, change in ./alephe/tab/z39_server/z39_server_MAB01.conf (or z39_server_USM01.conf ) the following:
MAB environment:
The MAB2MARC section should have a matching section in tab_expand, and the MB2MC section should have a matching section in tab_fix.- out-record-syntax USMARC
- out-record-format USMARC
- out-record-char-conv
- out-record-expand MAB2MARC
- out-record-fix MB2MC
USMARC environment:
The Z39_SERVER section should have a matching section in tab_expand, and the "Z39_server" section should have a matching section in tab_fix / tab_expand. .- out-record-syntax USMARC
- out-record-format USMARC
- out-record-char-conv
- out-record-expand Z39_SERVER
- Optionally, (MAB environment only) - define a new base for Alma Z39.50 searches that use the new MB2MC conversion in order to keep the original settings (old MAB -> MARC conversion). See details in the sections below: Convert MAB To MARC .
- Optionally, (USMARC environment) - define a new base for Alma Z39.50 searches that use a new expand "Z39_SERVER" that adds the 003 field with a predefined code, and 035 field that contains the System number from 001 + Prefix from 003. See Expand - Add 003 and 035.
- Verify that the port is correct under $alephe_tab/z39_server/z39_server.conf.
-
Convert MAB To MARC: (MAB environment only)
- Add a new section in ./[bib_library]/tab_expand similar to the following example:
!!!!!!!!!!-!!!!!!!!!!!!!!!!!!!!!!!!!!!!!!-!!!!!!!!!!!!!!!!!!!!!!!!!!!!!>
MAB2MARC   expand_doc_bib_bib_mab2marc    DOWN-MAX=10
MAB2MARC   fix_doc_clear                  DUP-FLD=Y
- Add a new section in ./[bib_library]/tab_fix (For Alma) entry similar to the following example:
!!!!!-!!!!!!!!!!!!!!!!!!!!!!!!!!!!!!-!!!!!!!!!!!!!!!!!!!!!!!!!!!!!>
MB2MC fixexp_docx_parallel           INIT
MB2MC fixexp_docx_parallel           COPY,PTR-FROM=0,PTR-TO=I
MB2MC expdoc_43obv_bib_bib_mab2marc  DN-MAX=10,SRD-MAX=10
MB2MC fix_doc_mab                    FUNC=OUTPUT,FILE=alma_obvsg.tab_fix_mab.bib_mab2marc
MB2MC fix_doc_mab                    FILE=alma_obvsg.tab_fix_mabaseq.bib_mab2marc
MB2MC fix_doc_clear                  DUP-FLD=Y
MB2MC fix_doc_43obvos_recode_ind2tag
MB2MC fixexp_docx_parallel           COPY,PTR-FROM=0,PTR-TO=B
MB2MC fixexp_docx_parallel           FIXROUT,MBPR1,PTR-FROM=0,PTR-TO=H
MB2MC fixexp_docx_parallel           CAT,PTR-FROM=0,PTR2FROM=H
MB2MC fixexp_docx_parallel           CAT,PTR-FROM=0,PTR2FROM=H
MB2MC fixexp_docx_parallel           FIXROUT,MBPR2,PTR-FROM=0,PTR-TO=W
MB2MC fixexp_docx_parallel           CAT,PTR-FROM=0,PTR2FROM=W
MB2MC fix_doc_convtb                 FILE=alma_obvsg.convtb.bib_mab2marc.main
MB2MC fixexp_docx_parallel           FIXROUT,MBOS1,PTR-FROM=B,PTR-TO=1
MB2MC fixexp_docx_parallel           PARFUNC,copyfld,"LDR,LDRMC",PTR-FROM=0,PTR-TO=1
MB2MC fixexp_docx_parallel           FIXROUT,MBOS2,PTR-FROM=1,PTR-TO=2
MB2MC fixexp_docx_parallel           PARFUNC,43obvos_catlink,PTR-FROM=0,PTR2FROM=2,PTR-TO=0
MB2MC fix_doc_mab2marc_synind_880lnk
MB2MC fix_doc_convtb                 FILE=alma_obvsg.convtb.bib_mab2marc.post_01
MB2MC fix_doc_convtb                 FILE=alma_obvsg.convtb.bib_mab2marc.upd_lnkidn
MB2MC fixexp_docx_parallel           FIXROUT,MBNOM,PTR-FROM=I,PTR-TO=M
MB2MC fixexp_docx_parallel           CAT,PTR-FROM=0,PTR2FROM=M
MB2MC fix_doc_sort_marc21            USECODE=Y
MB2MC fix_doc_clear                  DUP-FLD=Y

MBPR1 fix_doc_convtb                 FILE=alma_obvsg.convtb.bib_mab2marc.pre_h_fields
MBPR2 fix_doc_convtb                 FILE=alma_obvsg.convtb.bib_mab2marc.pre_wk_fields

MBOS1 fix_doc_convtb                 FILE=alma_obvsg.convtb.bib_mab2marc.os1
MBOS2 fix_doc_convtb                 FILE=alma_obvsg.convtb.bib_mab2marc.os2

MBNOM fix_doc_convtb                 FILE=alma_obvsg.convtb.bib_mab2marc.nomapp
In MAB environment - this fix routine should match the fix routine used in $alephe_tab/z39_server/z39_server_MAB01.conf for the line:out-record-fix MB2MC
- In MAB environment Define user-specific values via the global variables table.
The name of the table in $data_tab is tab_globalvar_convtb.m2m.Copy the table ./mab01/tab/ttt_49bvb.tab_globalvar_convtb.m2m to ./[bib_library]/tab/tab_globalvar_convtb.m2m and change the ISIL-Code user.
- Add a new section in ./[bib_library]/tab_expand similar to the following example:
-
Convert MARC to MAB: (MAB environment only)
- Add a new section in ./[bib_library]/tab_expand and/or ./[bib_library]/tab_fix (For Alma, in MAB01).
The section is similar to the following example (only fix-lines) :
!!!!!-!!!!!!!!!!!!!!!!!!!!!!!!!!!!!!-!!!!!!!!!!!!!!!!!!!!!!!!!!!!!!!!!!>
MC2MB fix_doc_remove_punctuation_usm
MC2MB fix_doc_convtb                 FILE=ttt.tab_fix_convtb.bib_marc2mab.49kobv_p0_tt_pp
MC2MB fix_doc_convtb                 FILE=ttt.tab_fix_convtb.bib_marc2mab.49kobv_p1
MC2MB fix_doc_convtb                 FILE=ttt.tab_fix_convtb.bib_marc2mab.49kobv_p2
MC2MB fix_doc_clear                  DUP-FLD=Y
MC2MB fix_doc_overlay                TMARC2MABI
MC2MB fix_doc_sort_mab
- Set the merge of the input record and the DB record by adding a merge section as defined for fix_doc_overlay routine in tab_fix.
See the template option in ./mab01/tab/addon_ttt_m2m.bib.tab_merge table.For example, for the above TMARC2MABI, add the following in ./[bib_library]/tab/tab_merge :! 1 2 3 !!!!!!!!!!-!!!!!!!!!!!!!!!!!!!!!!!!!!!!!!-!!!!!!!!!!!!!!!!!!!!!!!!!!!!!!!!> TMARC2MABI merge_doc_overlay 08
- In ./[bib_library]/tab/tab_merge_overlay, add the merge definitions. The merge set should match the merge set defined in tab_merge.
See the template option in the ./mab01/tab/addon_ttt_m2m.bib.tab_merge_overlay table.For example, for the above merge set '08' add the following lines:!1 2 3 4 !!-!-!-!!!!!!!!!!!!!!!!!!!!!!!!!!!!!! ... ! 08 1 N ##### 08 1 Y CAT## 08 1 Y LOW## 08 1 Y OWN## 08 2 Y #####
When the LOW field is defined in ./[bib_library]/tab/tab_cat_hidden_fields as a hidden field, remove the following line from the definition of tab_merge_overlay above:
08 1 Y LOW##
- Add a new section in ./[bib_library]/tab_expand and/or ./[bib_library]/tab_fix (For Alma, in MAB01).
-
Expand - Add 003 (Prefix) and 035 (System number + Prefix) (USMARC environment)
In tab_expand, add (xxx01 $data_tab ):The 'alma.fix' is defined as follow (xxx01 $data_tab/import/ ) :! Z39_SERVER expand_doc_sysno Z39_SERVER fix_doc_do_file_08 alma.fix Z39_SERVER fix_doc_create_035_1 !Z39_SERVER fix_doc_create_035
!   2   3  4  5   6    7                 8                           9
!-!!!!!-!!-!-!!!-!!!-!!!!!-!!!!!!!!!!!!!!!!!!!!!!!!!!!!!!-!!!!!!!!!!!!!!!!!!!!!!!!!!!!!!!!!!!!!!!!!!!!!!!!!!!!!!!!!!!!!!!!!!!!!!!!!!!!!!!!!!!!!!!!!!!!!!!!!!!!
!
1 FMT                      DELETE-FIELD
! Handles system number etc.
1 003##                    DELETE-FIELD
2 035##                    DELETE-FIELD-COND              Y,$$a(ALM)
2 LDR                      ADD-FIELD                      003  ,L,ALM
The prefix - 'ALM' in the above example - is defined also in Alma, in the Aleph integration profile.
This is used for the contribution from Alma to Aleph via the X-service. -
Configure update-doc-alma X-service:
- In MAB environment : To handle MARC-MAB conversion in 'update-doc-alma' X-Service , add fix routines for section 'ALMA1' in ./[bib_library]/tab/tab_fix.
Example of 'MARC to MAB' conversion for a MAB-ALEPH-Central Catalog:!!!!!-!!!!!!!!!!!!!!!!!!!!!!!!!!!!!!-!!!!!!!!!!!!!!!!!!!!!!!!!!!!!!!!!!> ALMA1 fixexp_docx_parallel INIT ALMA1 fix_doc_clear DUP-FLD=Y ALMA1 fix_doc_mab2marc_rm_punct_usm ALMA1 fixexp_docx_parallel COPY,PTR-FROM=0,PTR-TO=M ALMA1 fix_doc_convtb FILE=alma_obvsg.convtb.bib_marc2mab.pre_01 ALMA1 fixexp_docx_parallel COPY,PTR-FROM=0,PTR-TO=O ALMA1 fix_doc_convtb FILE=alma_obvsg.convtb.bib_marc2mab.49dnb_p0_tt_pp ALMA1 fix_doc_convtb FILE=alma_obvsg.convtb.bib_marc2mab.49dnb_p1 ALMA1 fix_doc_convtb FILE=alma_obvsg.convtb.bib_marc2mab.49dnb_p2 ALMA1 fix_doc_convtb FILE=alma_obvsg.convtb.bib_marc2mab.post_01 ALMA1 fixexp_docx_parallel FIXFUNC,fix_doc_convtb,"FILE=alma_obvsg.convtb.bib_marc2mab.osc",PTR-FROM=O,PTR-TO=O ALMA1 fixexp_docx_parallel CAT,PTR-FROM=0,PTR2FROM=O ALMA1 fixexp_docx_parallel FIXFUNC,fix_doc_convtb,"FILE=alma_obvsg.convtb.bib_marc2mab.nomapp",PTR-FROM=M,PTR-TO=M ALMA1 fixexp_docx_parallel CAT,PTR-FROM=0,PTR2FROM=M ALMA1 fix_doc_char_conv_z GND-UTF-TO-UTF ALMA1 fix_doc_clear DUP-FLD=Y ALMA1 fix_doc_sort ALMA1 fix_doc_overlay ALMA1MC2MB ALMA1 fix_doc_sort
The fix section can be sent as a parameter to the X-service. In this case, each member should have a section defined in tab_fix with the above lines.To enable the loading of records with long fields (over 2000 characters), add the following line in . /alephe/aleph_start.private:setenv ENABLE_LONG_FIELDS Y
-
To set the merge of the input record and the DB record, add a merge section as defined for fix_doc_overlay routine in tab_fix. Each member can have a different merge section.For example, for the above ALMA1MC2MB, add the following in ./[bib_library]/tab/tab_merge:
!   1                   2                               3
!!!!!!!!!!-!!!!!!!!!!!!!!!!!!!!!!!!!!!!!!-!!!!!!!!!!!!!!!!!!!!!!!!!!!!!!!!>
ALMA1MC2MB merge_doc_overlay              AA
- In ./[bib_library]/tab/tab_merge_overlay, add the merge definitions. The merge set should match the merge set defined in tab_merge.
For example, for the above merge set AA, add the following lines:
!1 2 3          4
!!-!-!-!!!!!!!!!!!!!!!!!!!!!!!!!!!!!!
...
! For Alma X-service
AA 1 N #####
AA 1 Y CAT##
AA 1 Y OWN##
AA 1 Y OSC##
AA 2 Y #####
- In MAB environment : To handle MARC-MAB conversion in 'update-doc-alma' X-Service , add fix routines for section 'ALMA1' in ./[bib_library]/tab/tab_fix.
-
Configure the load holdings information (Bib record LOW field)
This section describes the loading of Holding information on the Bibliographic record, using the LOW field.- To handle deletion of LOW field,
add the following line in ./[bib_library]/tab/tab_fix with the required section:
!!!!!-!!!!!!!!!!!!!!!!!!!!!!!!!!!!!!-!!!!!!!!!!!!!!!!!!!!!!!!!!!!!!!!!!>
LOWRM fix_doc_do_file_08 delete_low_fields
- To delete the LOW field via a fix routine, verify that the ./[bib_library]/tab/import/delete_low_fields table contains the following line:
- To handle deletion of LOW field,
!   2   3  4  5   6    7                 8                           9
!-!!!!!-!!-!-!!!-!!!-!!!!!-!!!!!!!!!!!!!!!!!!!!!!!!!!!!!!-!!!!!!!!!!!!!!!!!!!!!!!!!!!!!!!!!!!!!!!!!!!!!!!!!!!!!!!!!!!!!!!!!!!!!!!!!!!!!!!!!!!!!!!!!!!!!!!!!!!!
1 LOW##                    DELETE-FIELD-COND              Y,$$uDEL
- Add the LOW index to ./[bib_library]/tab/tab00.LNG (field codes and names):
! 2     3     4 5  6  7 8   9  10    11
!-!!!!!-!!!!!-!-!!-!!-!-!---!!-!!!!!-!!!!!!!!!!!!!!!!!!!!
H LOW## IND     07 00       00       LOW - Local Owner
- Add the LOW filing to ./[bib_library]/tab/tab_filing (definition of filing and normalization routines). The filing section should match the definition in tab00.LNG.
For example (of tab_filing):
!1 2        3                                    4
!!-!-!!!!!!!!!!!!!!!!!!!!-!!!!!!!!!!!!!!!!!!!!!!!!!!!!!!!!!!!!!!!!!!!!!!!!!!
! * for LOW
07   suppress
07   to_blank             -
07   to_lower
07   compress_blank
07   get_subfields        a
- Verify that the match configuration in ./[bib_library]/tab/tab_match contains the following line:
! 1                 2                              3
!!!!!-!!!!!!!!!!!!!!!!!!!!!!!!!!!!!!-!!!!!!!!!!!!!!!!!!!!!!!!!!!!!!!!!!!!!!!!!!!!!!!!!!!!!!!!!!!!!!!!!!!!!!!!!!!!!!!!!!!!!!!!!!!!!!!!!!!!
ALM   match_doc_gen                  TYPE=IND,TAG=001,CODE=IDN
...
- Add the following line to ./[bib_library]/tab/tab_merge:
!   1                   2                               3
!!!!!!!!!!-!!!!!!!!!!!!!!!!!!!!!!!!!!!!!!-!!!!!!!!!!!!!!!!!!!!!!!!!!!!!!!!>
LOADHOL    merge_doc_alma_overlay         09
- Add the following lines to ./[bib_library]/tab/tab_merge_adv_overlay:
!1 2 3 4   5   6    7
!!-!-!-!-!!!!!-!-!!!!!!!!!!!>
! Alma load holdings
09 1 # Y #####
09 1 # U LOW##
09 2 # N #####
09 2 # Y LOW##
- To load holdings information from Alma to Aleph, add the following lines to ./alephe/tab/job_list.
This loads changes from Alma on a daily basis:
!     2     3        4                   5
!!-!!!!!!!!-!-!!!!!!!!!!!!!!!!!!!!-!!!!!!!!!!!!!!>
!     2     3        4               5               6                    7
!!-!!!!!!!!-!-!!!!!!!!!!!!!!!!!!!!-!!!!!-!!!!!!!!!!!!!!!!!!!!!!!!!!!!!!-!!!!!!
!Load holdings
W2 12:35:00 N untar-alma           csh -f /exlibris/aleph/a23_3/aleph/proc/untar_files /exlibris/aleph/alma/bvb/ /exlibris/aleph/a23_3/mab01/scratch alma_inventory
W2 08:56:00 Y                      MAB01 p_file_02                      MAB01,all_alma_inventory,all_alma_inventory.seq,06,
W2 08:56:00 Y                      MAB01 p_manage_36                    MAB01,all_alma_inventory.seq,all_alma_inventory.seq.new,all_alma_inventory.seq.upd,all_alma_inventory.seq.dup,IDN,
W2 08:56:00 Y                      MAB01 p_manage_18                    MAB01,all_alma_inventory.seq.upd,all_alma_inventory.seq.upd.rejected,all_alma_inventory.seq.upd.doc_log,OLD,,,FULL,MERGE,M,,LOADHOL,
W2 08:56:00 Y                      MAB01 p_manage_18                    MAB01,all_alma_inventory.seq.new,all_alma_inventory.seq.new.rejected,all_alma_inventory.seq.new.doc_log,NEW,,,FULL,MERGE,M,,LOADHOL,
W2 08:56:00 Y                      MAB01 p_manage_37                    MAB01,DOC_LIST,b_manage_36,000000000,000000000,manage_37.out,LOWRM,Y,MASTER,
This performs the following:- The 'untar-alma' script runs and untars the Alma published file and moves it to $data_scratch (under [bib_library]).
- The p_file_02 converts the Alma MARC XML file to an Aleph Sequential file.
- The p_manage_36 runs and locates the matching Aleph record in the central DB.
- The p_manage_18 runs twice:
- To merge the matched records with Aleph records using 'LOADHOL' merge routine
- To insert new records to Aleph
- The p_manage_37 deletes the LOW fields using the LOWRM fix routine
- Define the first parameter ('W2') in job_list.conf to run each day that Alma publishes the holdings information.
- Replace mab01 with your [bib_library].
- Replace the parameters of the untar_files with the correct path of your environment.
- Configure the load holdings records information:
This section describes the loading of Holding records into the HOL library.
- Verify that "001" index exists in ./[hol_library]/tab/tab11_ind.
For example:
! 1    2    3     4        5            6           7 8
!!!!!-!!!!!-!-!!!!!!!!!!-!!!!!-!!!!!!!!!!!!!!!!!!!!-!-!
001                      IDN
- Verify that match configuration in ./[hol_library]/tab/tab_match contains the following line:
! 1                 2                              3
!!!!!-!!!!!!!!!!!!!!!!!!!!!!!!!!!!!!-!!!!!!!!!!!!!!!!!!!!!!!!!!!!!!!!!!!!!!!!!!!!!!!!!!!!!!!!!!!!!!!!!!!!!!!!!!!!!!!!!!!!!!!!!!!!!!!!!!!!
HOL   match_doc_uid                  I-IDN
...
- Add the following line to ./[hol_library]/tab/tab_merge:
!   1                   2                               3
!!!!!!!!!!-!!!!!!!!!!!!!!!!!!!!!!!!!!!!!!-!!!!!!!!!!!!!!!!!!!!!!!!!!!!!!!!>
LOADMABHOL merge_doc_overlay              07
- Add the following lines to ./[hol_library]/tab/tab_merge_overlay:
!1 2 3          4
!!-!-!-!!!!!!!!!!!!!!!!!!!!!!!!!!!!!!
07 2 C #####
07 1 Y #####
- Add a new configuration file ./[hol_library]/tab/import/fix_alma_001 with the following lines:
!   2   3  4  5   6    7                 8                           9
!-!!!!!-!!-!-!!!-!!!-!!!!!-!!!!!!!!!!!!!!!!!!!!!!!!!!!!!!-!!!!!!!!!!!!!!!!
1 001                      CHANGE-SUBFIELD                 ,a
- New or updated Holding records:
Add the following lines to ./alephe/tab/job_list to load new or updated holdings from Alma to Aleph.
This loads changes from Alma on a daily basis:It is assumed that the published file is located on the Aleph server.
If it is not, transfer it from the FTP server using an ftp utility or a command, for example, run the following:wget --ftp-user=USER --ftp-password='PASSWORD' ftp://ftp.exlibris.co.il/Aleph/Pub_Aleph_mab_hol_..._new.xml.tar.gz
addition to job_list:! 2 3 4 5 !!-!!!!!!!!-!-!!!!!!!!!!!!!!!!!!!!-!!!!!!!!!!!!!!> ! 2 3 4 5 6 7 !!-!!!!!!!!-!-!!!!!!!!!!!!!!!!!!!!-!!!!!-!!!!!!!!!!!!!!!!!!!!!!!!!!!!!!-!!!!!! ... !Alma load holdings !Load holdings W2 10:02:00 N move-prev-alma-hol csh -f /exlibris/aleph/a23_3/aleph/proc/move_files /exlibris/aleph/a23_3/mab60/scratch /exlibris/aleph/a23_3/mab60/scratch/backup pub_aleph_mab_hol W2 10:03:00 N untar-alma-hol csh -f /exlibris/aleph/a23_3/aleph/proc/untar_files /exlibris/aleph/load_holdings /exlibris/aleph/a23_3/mab60/scratch pub_aleph_mab_hol W2 10:04:00 Y MAB60 p_file_02 MAB60,all_new_pub_aleph_mab_hol,all_pub_aleph_mab_hol_pre.seq,06, W2 10:05:00 Y MAB60 p_file_08 MAB60,all_pub_aleph_mab_hol_pre.seq,all_pub_aleph_mab_hol.seq,all_pub_aleph_mab_hol_pre.rej,fix_alma_001 W2 10:06:00 Y MAB60 p_manage_36 MAB60,all_pub_aleph_mab_hol.seq,all_pub_aleph_mab_hol.seq.new,all_pub_aleph_mab_hol.seq.upd,all_pub_aleph_mab_hol.seq.dup,HOL, W2 10:08:00 Y MAB60 p_manage_18 MAB60,all_pub_aleph_mab_hol.seq.new,all_pub_aleph_mab_hol.seq.new.rejected,all_pub_aleph_mab_hol.seq.new.doc_log,NEW,,,FULL,MERGE,M,,LOADMABHOL, W2 10:10:00 Y MAB60 p_manage_18 MAB60,all_pub_aleph_mab_hol.seq.upd,all_pub_aleph_mab_hol.seq.upd.rejected,all_pub_aleph_mab_hol.seq.upd.doc_log,OLD,,,FULL,MERGE,M,,LOADMABHOL,
This performs the following:- The move_files script runs and cleans / moves aside the input files generated in the previous run.
- The untar-alma script runs and untars the Alma published file and moves it to $data_scratch (under [hol_library]).
- The p_file_02 converts the Alma MARC XML file to an Aleph Sequential file.
- The p_file_08 add subfield 'a' to tag '001'
- The p_manage_36 runs and locates the matching Aleph record in the central DB.
- The p_manage_18 runs twice:
- To merge the matched records with Aleph records using 'LOADHOL' merge routine
- To insert new records to Aleph
- Define the first parameter ('W2') in job_list.conf to run each day that Alma publishes the holdings information.
- Replace mab60 with your [hol_library].
- Replace the parameters of the untar_files with the correct path of your environment.
- Delete holding records:
Add the following lines to ./alephe/tab/job_list to delete holdings from Alma to Aleph.
This loads changes from Alma on a daily basis:It is assumed that the published file is located on the Aleph server. If it is not, transfer it from the FTP server using an ftp utility or a command, for example, run the following:wget --ftp-user=USER --ftp-password='PASSWORD' ftp://ftp.exlibris.co.il/Aleph/Pub_Aleph_mab_hol_..._del.xml.tar.gz
addition to job_list:!Alma delete holdings !Delete holdings !W2 13:00:00 N untar-alma csh -f /exlibris/aleph/a23_2/aleph/proc/untar_files /exlibris/aleph/load_holdings /exlibris/aleph/a23_2/mab60/scratch pub_aleph_mab_hol W2 11:23:00 Y MAB60 p_file_02 MAB60,all_delete_pub_aleph_mab_hol,all_del_pub_aleph_mab_hol_pre.seq,06, W2 11:23:00 Y MAB60 p_file_08 MAB60,all_del_pub_aleph_mab_hol_pre.seq,all_del_pub_aleph_mab_hol.seq,all_del_pub_aleph_mab_hol_pre.rej,fix_alma_001 W2 11:23:00 Y MAB60 p_manage_36 MAB60,all_del_pub_aleph_mab_hol.seq,all_del_pub_aleph_mab_hol.seq.new,all_del_pub_aleph_mab_hol.seq.upd,all_del_pub_aleph_mab_hol.seq.dup,HOL, W2 11:23:00 Y MAB60 p_manage_18 MAB60,all_del_pub_aleph_mab_hol.seq.upd,all_del_pub_aleph_mab_hol.seq.upd.rejected,all_del_pub_aleph_mab_hol.seq.upd.doc_log,OLD,,,FULL,DELDOC,M,,LOADMABHOL,
This performs the following:- The untar-alma script runs and untars the Alma published deleted file and moves it to $data_scratch (under [hol_library]).
- The p_file_02 converts the Alma MARC XML file to an Aleph Sequential file.
- The p_file_08 add subfield 'a' to tag '001'
- The p_manage_36 runs and locates the matching Aleph record in the central DB.
- The p_manage_18 deletes the matched records from Aleph (no match = error).
- Define the first parameter (W2) in job_list.conf to run each day that Alma publishes the holdings information.
- Replace mab60 with your [hol_library].
- Replace the parameters of the untar_files with the correct path of your environment.
- Verify that "001" index exists in ./[hol_library]/tab/tab11_ind.
- Configure load items information:
This section describes the process of Create Items in Aleph center (manage-60).
- In the BIB library, create the following directory. Place the tar files of the items to load in this directory.
mkdir ./[BIB library]/items_to_centerThe files in this directory should be zipped tar files, ending with tar.gz. When the file name contains the word new, the items in the file are loaded as new/updated items. When the file name contains the word delete, the items in the file are handled as deleted items.
- Add the following lines to load new, updated, or deleted items from Alma to Aleph:
It is assumed that the published file is located on the Aleph server. If it is not, transfer it from the FTP server using an ftp utility or a command, for example, run the following:
wget --ftp-user=USER --ftp-password='PASSWORD' ftp://ftp.exlibris.co.il/Aleph/Pub_Aleph_mab_hol_..._new.xml.tar.gz
addition to job_list:! 2 3 4 5 !!-!!!!!!!!-!-!!!!!!!!!!!!!!!!!!!!-!!!!!!!!!!!!!!> ! 2 3 4 5 6 7 !!-!!!!!!!!-!-!!!!!!!!!!!!!!!!!!!!-!!!!!-!!!!!!!!!!!!!!!!!!!!!!!!!!!!!!-!!!!!! !Alma load items W2 10:10:00 Y MAB01 p_manage_60 MAB01
The service can be configured to run several times a day by defining additional lines of p_manage_60 job in different run hours.
- In the BIB library, create the following directory. Place the tar files of the items to load in this directory.
Alma Configuration
Configuring the Central Catalog Integration Profile for Aleph
- From the Integration Profile List page (Configuration Menu > General > External Systems > Integration Profiles), select Add Integration Profile.
- Enter a Code and Name for the integration profile.
- Select Central Catalog Integration from the Integration Type drop-down list.
- Select Aleph as the system type in System.
- Select Next. The next page of the Integration Profile configuration appears.
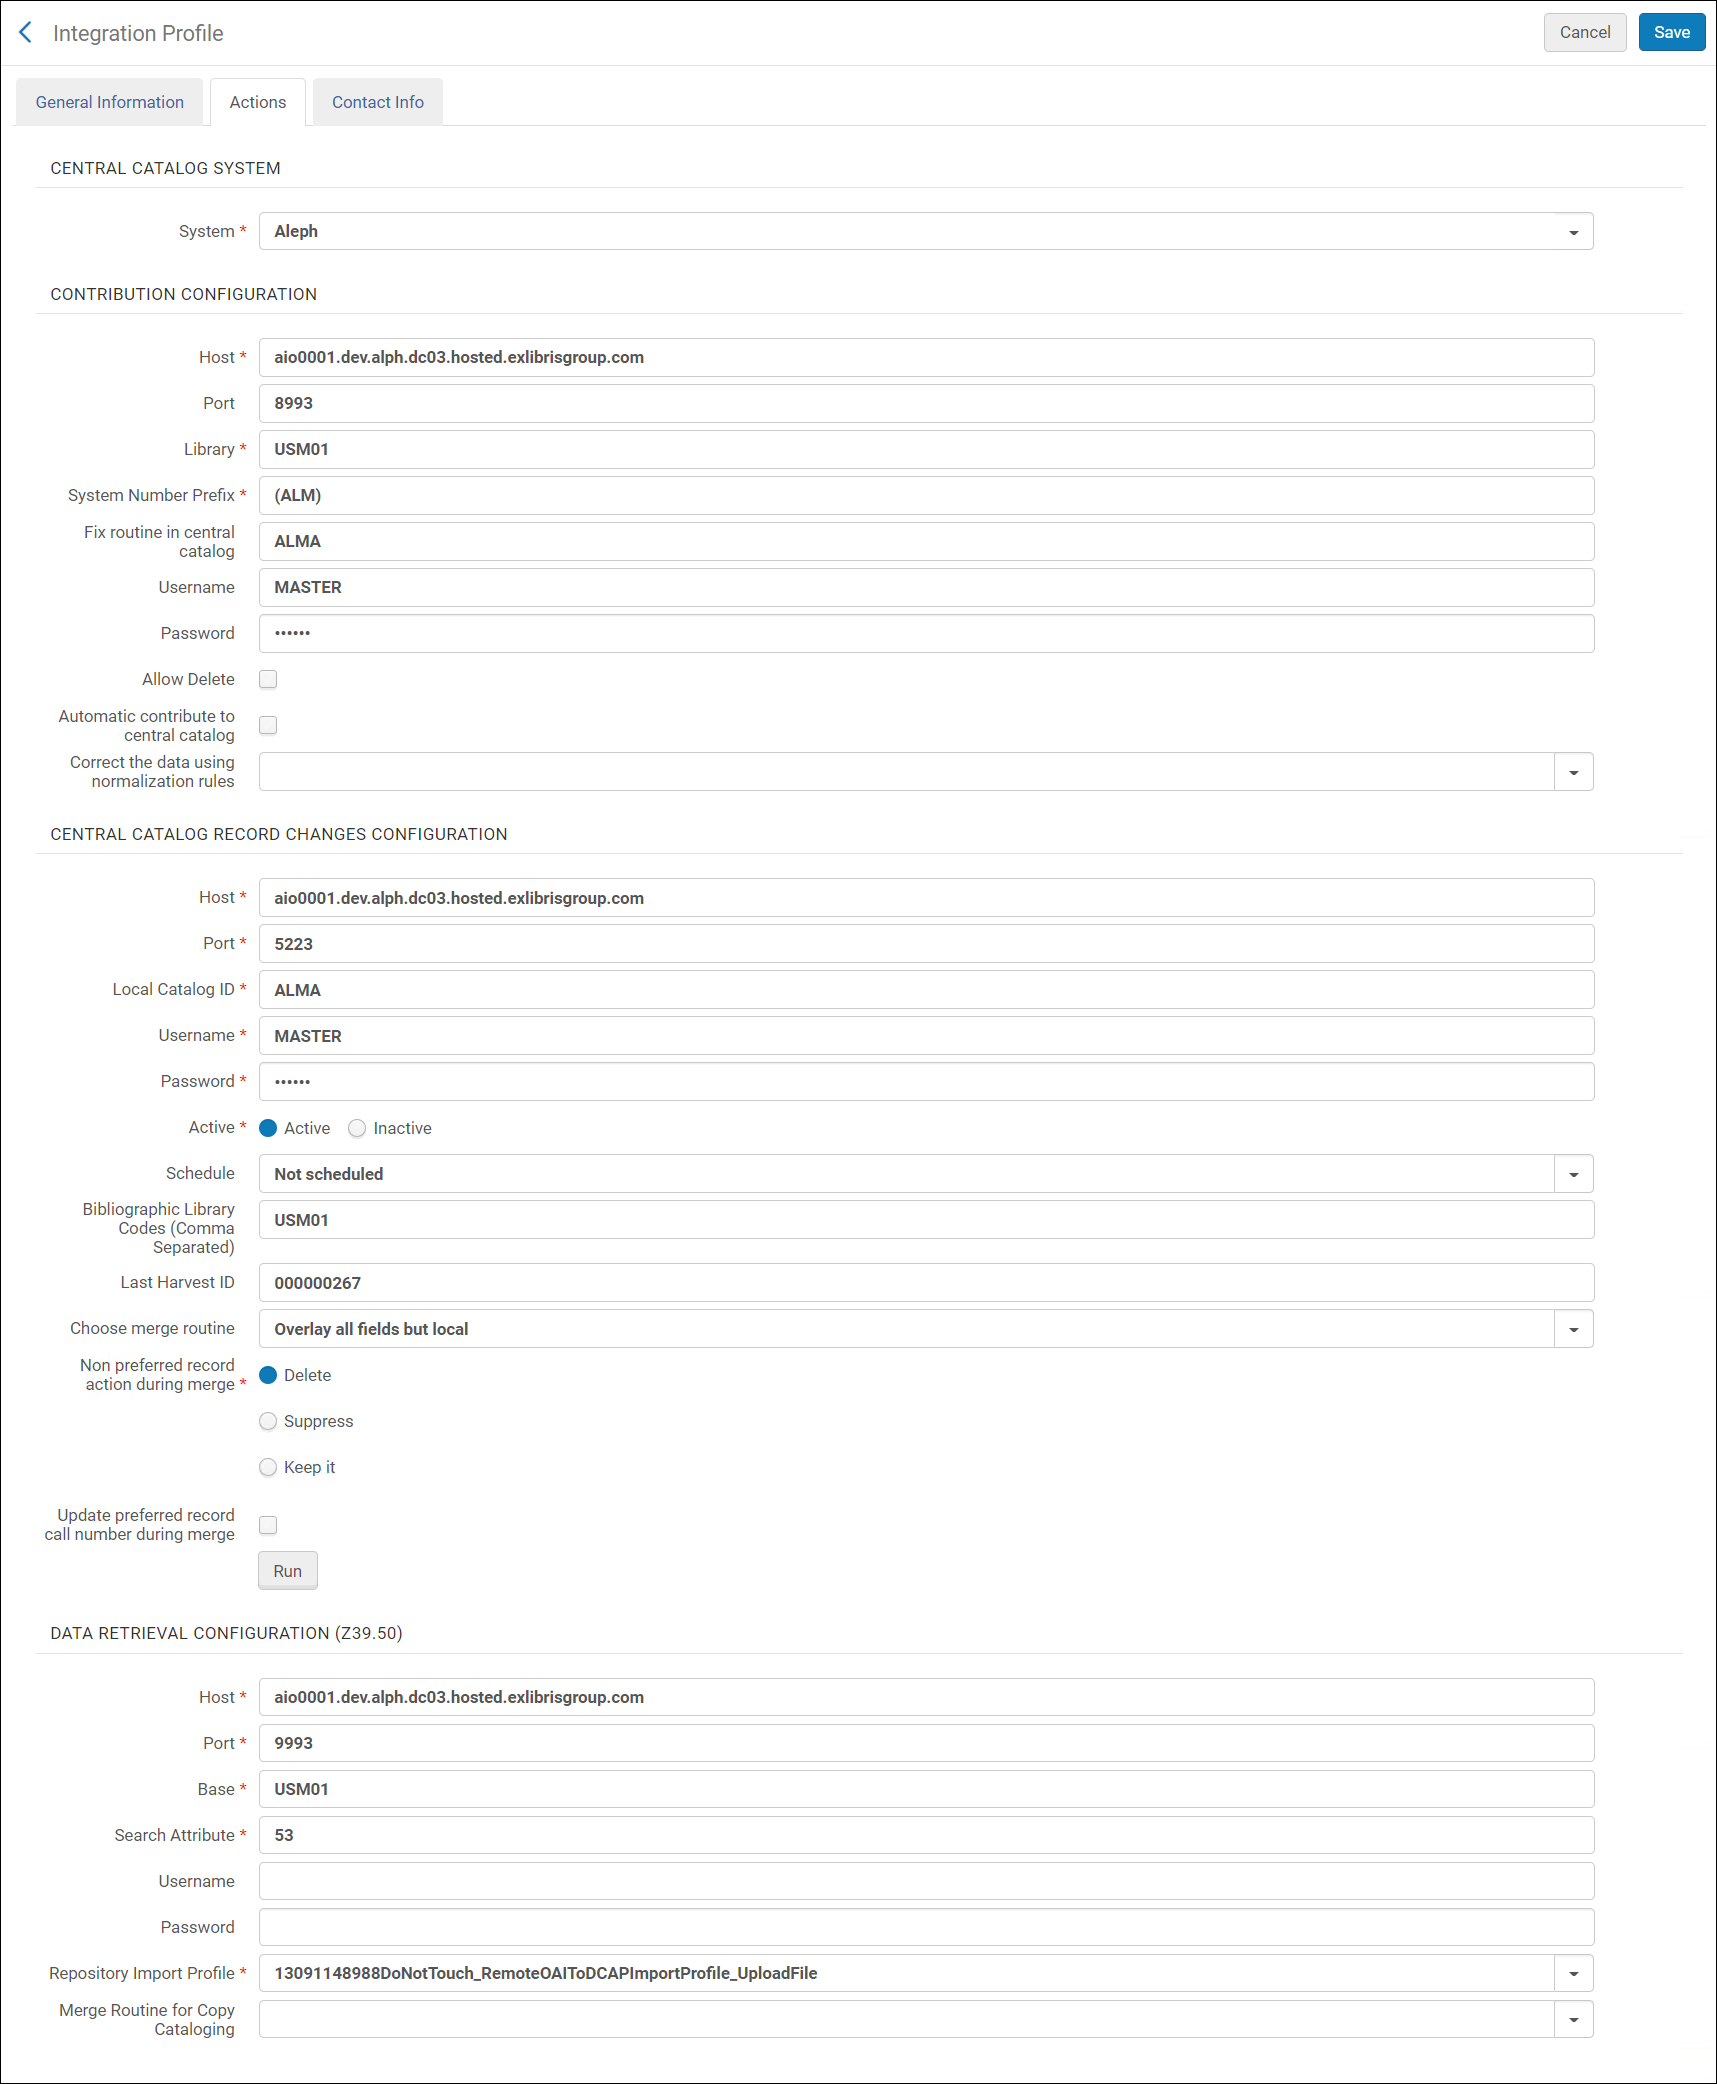 Central Catalog Integration
 - Fill in the fields according to the following table:
Central Catalog Integration Field Description Central Catalog System System Select Aleph as the central catalog system type that you are configuring. - You must select System > Aleph on this page, even though you also selected it on the first page.
- Only one Central Catalog Integration profile can be configured per institution.
Contribution Configuration (contribution server setup) Host The IP address of the Aleph central catalog. Port The port of the Aleph central catalog. Library The Aleph library in which the document is updated. System Number Prefix The library unique system number prefix (for example, DE-604). Fix routine in central catalogEnter the fix routine to be used by Aleph.Username The user name in Aleph. Password The password in Aleph. Allow Delete Select to enable the deletion of records in the central catalog.
When the "Automatically contribute to central catalog" option is selected (see below), then when deleting a centrally-managed record in the Metadata Editor, it is deleted both in the Network Zone and in Aleph (in both systems, the deletion only takes place if neither of the two systems prevents this deletion).
Automatically contribute to central catalog This checkbox is only available when the institution is a member of a Network Zone.
When saving a centrally-managed record in the Metadata Editor, select to update the record in the Aleph Central Catalog as well as in the Network Zone.
If this checkbox is not selected, then saving a record saves it in the Network Zone, but not in Aleph Central Catalog. To save the record in Aleph Central Catalog, the cataloger will activate the "Contribute record to Central Catalog" action. Only centrally-managed records are updated in the Aleph Central Catalog. For records that are not centrally managed (newly-created records and existing records without the 035 identifier), the cataloger will activate the "Contribute record to Central Catalog" action.
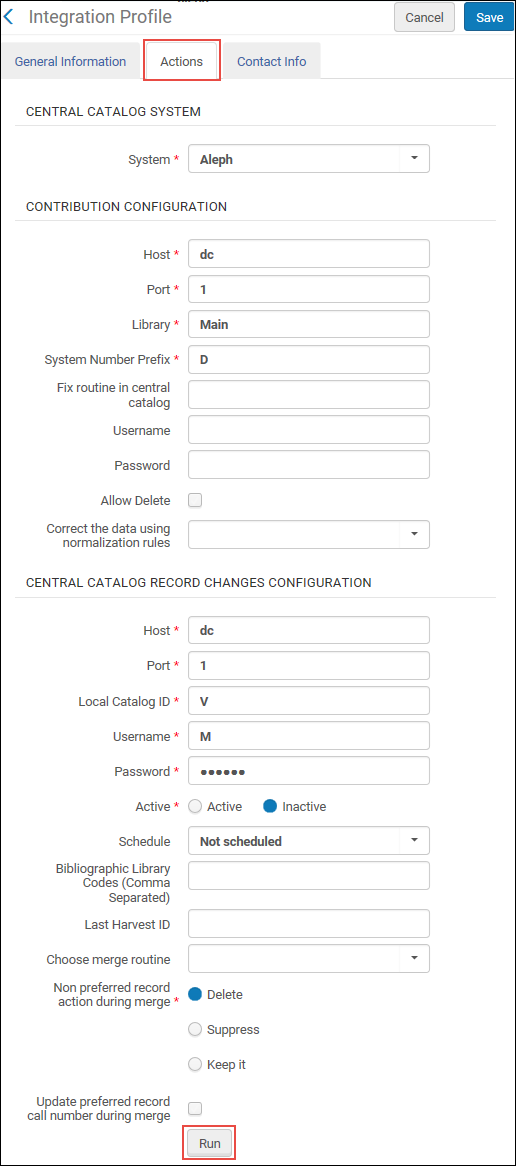
Central Catalog Record Changes Configuration (VST server setup) Host The IP address for the VST server in the Aleph central catalog. Port The Aleph central catalog port to send the TCP/IP call. Local catalog ID Used to identify the library in Aleph. Username The user name to send to the Aleph central catalog. Password The password to send to the Aleph central catalog. Active Select Active for the import profile to be active or Non-active for the profile to be non-active. Schedule To schedule the import process, select a schedule from the drop-down list. The available options are:- Not scheduled
- Every 12 hours, starting at 11:00
- Every 6 hours, starting at 05:00
- Hourly
When this job runs, the lock on records that are being edited is ignored and the record is imported.Bibliographic Library Codes (Comma Separated) Enter the Aleph library codes that hold the bibliographic records (coma separated). Last Harvest ID This field is populated after the first successful run of the process, indicating that start point of the next run. You can edit this value if you want to retrieve data from a specific record ID.Choose merge routineWhen records are redirected, you can choose how the old record is merged with the new one. Select a merged routine based on the merge rules defined by your institution. For example:- Overlay all fields but local
- Replace 245 and 035 OCoLC if exist
- Conditional subject headings
- Keep only old value
For information on configuring Alma to take an identifier from the secondary record and place it in the primary record when merging records, see Configuring BIB Redirection Fields.Non preferred record action during merge Select one of the options Delete, Suppress, or Keep it to indicate how the secondary (nonpreferred) record from a merger of records (in the Aleph central catalog) is to be handled when synchronized with the records in your Alma database.See Retrieving Changed Records from the Aleph Central Catalog for more information.Update preferred record call number during merge Select this option to indicate that when records are merged in the Aleph central catalog and, subsequently, synchronized with your Alma database (when the Aleph central catalog job is run), the holdings call number should be updated in the preferred record that remains in your Alma database.Run Click to start the process. The process involves: - Getting hbz IDs via the VST server,
- Fetching the full records via z39-server,
- Loading those records to Alma via the Metadata import.
Data Retrieval Configuration (Z39.50) Host The IP address of the Aleph central catalog. Port The Aleph central catalog port to send the Z39.50 calls. Base The database in Aleph to send the Z39.50 query. Search Attribute The unique identifier of the location of the system number in the central catalog (equivalent to the Marc 001 field). Username The user name to send to the Aleph central catalog for z39.50. Password The password to send to the Aleph central catalog for z39.50. Repository Import Profile Select a repository import profile on which the bibliographic import is based. Specifically, the import profile needs to specify matching on the Aleph central catalog prefix. See Configuring the Import Profile for the Aleph Central Catalog Integration Profile for more information.Merge Routine for Copy Cataloging From the merge rules defined by your institution, select a merge routine for copy cataloging. These rules address some of the following merge considerations when you perform copy cataloging:- Overlay all fields but local
- Replace 245 and 035 OCoLC if exist
- Conditional subject headings
- Keep only old value
This merge routine determines how the external record will be merged with the existing one when copy cataloging.See Working with Merge Rules for more information. - Select Save.
Configuring the Import Profile for the Aleph Central Catalog Integration Profile
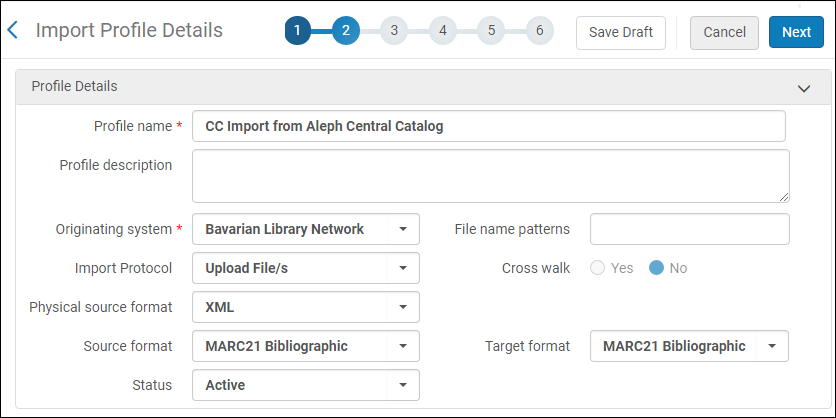
- Originating system – From the drop-down list, select the Aleph consortial catalog originating system.
- Import protocol – Select Upload File/s.
- Physical source format – Select XML.
- Source format – Select MARC 21 Bibliographic.
- Status – Select Active.
- File name patterns – You can leave this option blank.
- Cross walk – Select No.
- Target format – Select MARC 21 Bibliographic.
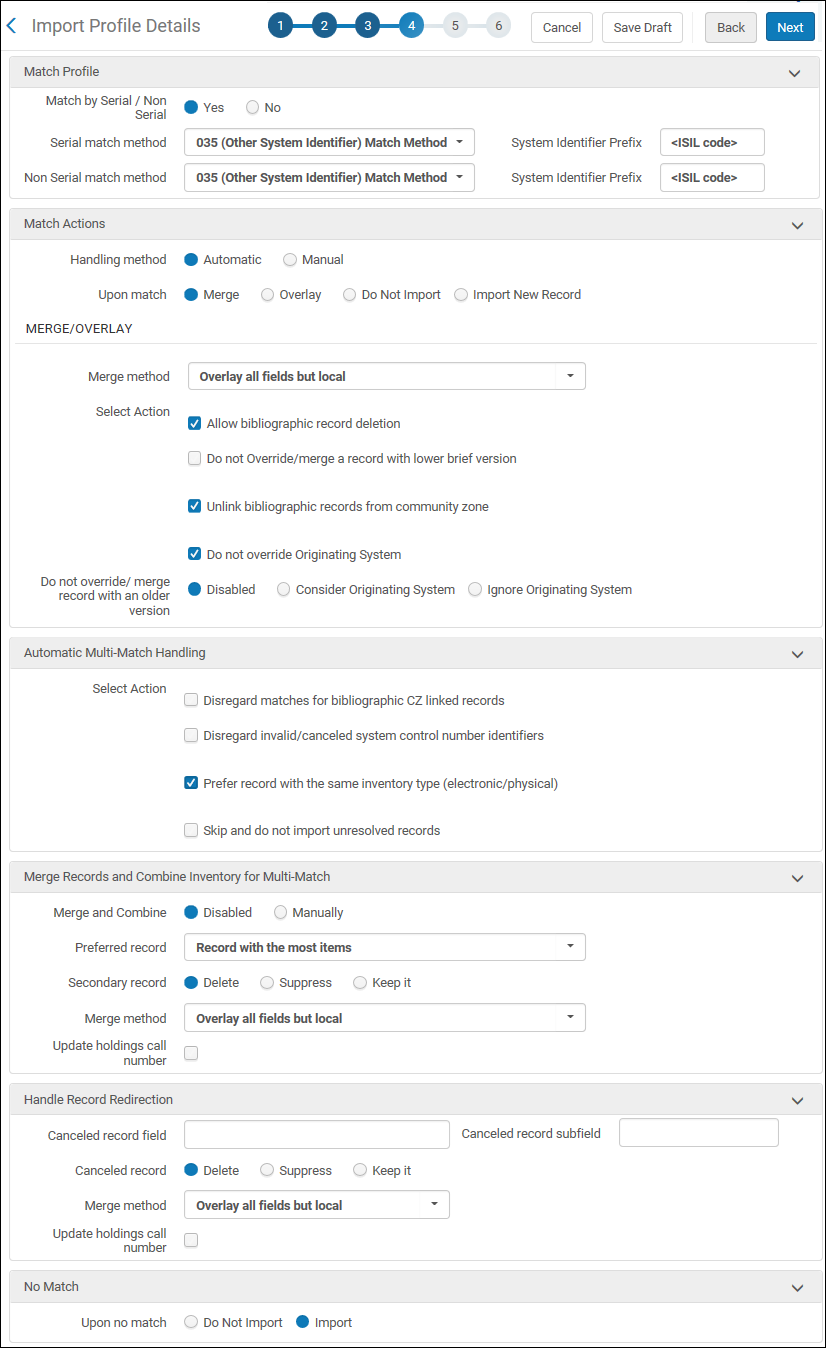
- Serial match method – Select the 035 (Other System Identifier) Match Method.
- System Identifier Prefix (for serial match method) – Enter the library ISIL code (International Standard Identifier for Libraries and Related Organizations) of the Aleph central catalog. This corresponds to the system number in the MARC 035 field on which to match.
- Non Serial match method – Select the 035 (Other System Identifier) Match Method.
- System Identifier Prefix (for non serial match method) – Enter the library ISIL code (International Standard Identifier for Libraries and Related Organizations) of the Aleph central catalog. This corresponds to the system number in the MARC 035 field on which to match.
- Handling method – Select Automatic.
- Upon match – Select Merge.
- Merge method – Select the relevant merge method. Selecting Overlay all fields but local saves all local fields and replaces all other fields with the record from the Aleph central catalog.
- Select the following actions:
- Allow bibliographic record deletion (if records deleted in the Aleph central catalog should be deleted from the Alma institution)
- Unlink bibliographic records from community zone
- Do not override/ merge record with an older version – Disabled
- Select the Prefer record with the same inventory type (electronic/physical) option.
- Select the Import option for the Upon no match parameter.
Configuring Publishing Profiles for Integration with the Aleph Central Catalog
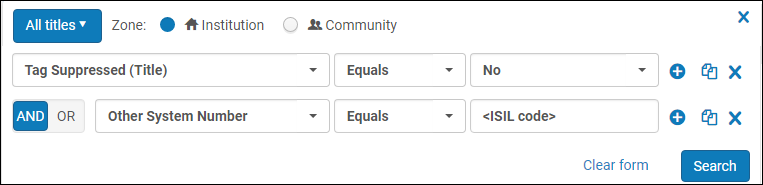
Set
- Find - All titles
- Tag Suppressed condition = No
- Other System Number condition = <ISIL code>
Normalization Rules
| LOW Field Normalization Example: |
|---|
|
rule "Move Aleph BIB ID to 001"
priority 6 when (exists "035.a.(<ISIL code>)*") then removeControlField "001" removeField "900" if (exists "900") copyField "035.a" to "900.a" if (exists "035.a.*<ISIL code>*") copyControlField "900.a" to "001" replacecontrolcontents "001.{0,8}" with "" end rule "Combine 852"
priority 5 when (exists "852") then combineFields "852" excluding "a" end rule "Add Library code to LOW field when 852 exist"
priority 4 when (exists "852") then addField "LOW.a.<library code> " if (not exists "LOW.a.<library code>") end rule "Add Delete tag to 852.u for deleted BIB"
priority 3 when (existsControl "LDR.{5,1}.d") then addField "LOW.a.<library code>" if (not exists "LOW.a.<library code>") replacecontents "LOW.u" with "DEL" if (exists "LOW.u") addSubField "LOW.u.DEL" if (not exists "LOW.u") end rule "Add Delete tag & Library code when there is no 852"
priority 2 when (not exists "852") then addField "LOW.a.<library code>" if (not exists "LOW.a.<library code>") addSubField "LOW.u.DEL" if (not exists "LOW.u") end rule "Remove all BIB fields but 001 & LOW"
priority 1 when (TRUE) then removeControlField "002" removeControlField "003" removeControlField "004" removeControlField "005" removeControlField "006" removeControlField "007" removeControlField "008" removeControlField "009" removeField "01*" removeField "02*" removeField "03*" removeField "04*" removeField "05*" removeField "06*" removeField "07*" removeField "08*" removeField "09*" removeField "1*" removeField "2*" removeField "3*" removeField "4*" removeField "5*" removeField "6*" removeField "7*" removeField "8*" removeField "9*" end |
| Holdings Normalization Example: |
|---|
|
rule "Delete 852 when 852.8 doesn't exist"
priority 7 when (exists "852") then removeField "852" if (not exists "852.8") end rule "Move Aleph BIB ID to 012.a"
priority 6 when (exists "035.a.(<ISIL code>)*") then copyField "035.a" to "012.a" if (exists "035.a.*<ISIL code>*") replaceContents "012.a.(<ISIL code>)" with "" end rule "Add Library code to 012 $l"
priority 5 when (TRUE) then addField "012.l.<library code>" end rule "Convert holdings Marc to Mab when 852 exist"
priority 4 when (exists "852") then removeControlField "001" copyControlField "852.8" to "001" copyField "852.a" to "200.b" if (exists "852.a") copyField "852.b" to "OWN.a" if (exists "852.b") copyField "852.c" to "200.g" if (exists "852.c") copyField "852.h" to "200.f" if (exists "852.h") end rule "Remove BIB LDR only if holdings LDR lies in 009"
priority 3 when existsControl "009" then removeControlField "LDR" changecontrolField "009" to "LDR" end rule "Remove all BIB fields but 001 & 012"
priority 2 when (TRUE) then removeControlField "002" removeControlField "003" removeControlField "004" removeControlField "005" removeControlField "006" removeControlField "007" removeControlField "008" removeControlField "009" removeField "01*" if (not exists "012") removeField "02*" removeField "03*" removeField "04*" removeField "05*" removeField "06*" removeField "07*" removeField "08*" removeField "09*" removeField "1*" removeField "2*" if (not exists "200") removeField "3*" removeField "4*" removeField "5*" removeField "6*" removeField "7*" removeField "8*" removeField "9*" end rule "Combine 012 & 200"
priority 1 when (TRUE) then combineFields "012" excluding "" combineFields "200" excluding "" end |
| Items Normalization Example: |
|---|
|
rule "Move Aleph BIB ID to 001"
priority 2 when TRUE then removeControlField "001" copyField "035.a" to "999.a" if (exists "035.a.*<ISIL code>*") replacecontents "999.a.(<ISIL code>)" with "" copycontrolField "999.a" to "001" end rule "Remove all BIB fields but 001"
priority 1 when (TRUE) then removeControlField "002" removeControlField "003" removeControlField "004" removeControlField "005" removeControlField "006" removeControlField "007" removeControlField "008" removeControlField "009" addControlField "009.<library code>" removeField "01*" removeField "02*" removeField "03*" removeField "04*" removeField "05*" removeField "06*" removeField "07*" removeField "08*" removeField "09*" removeField "1*" removeField "2*" removeField "3*" removeField "4*" removeField "5*" removeField "6*" removeField "7*" removeField "8*" removeField "9*" end |
Process
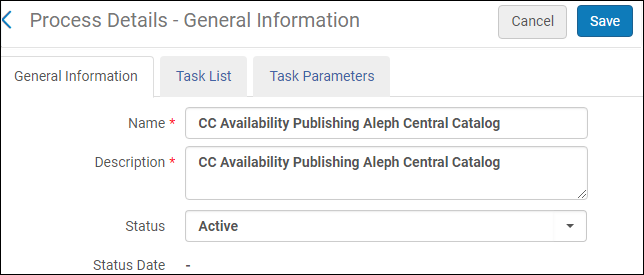
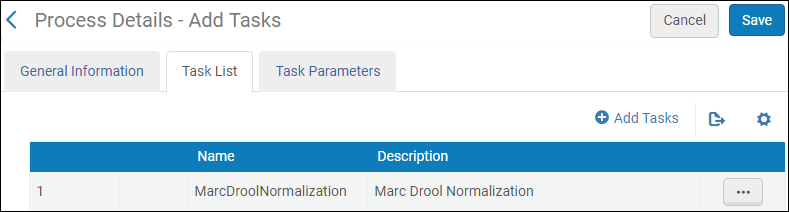
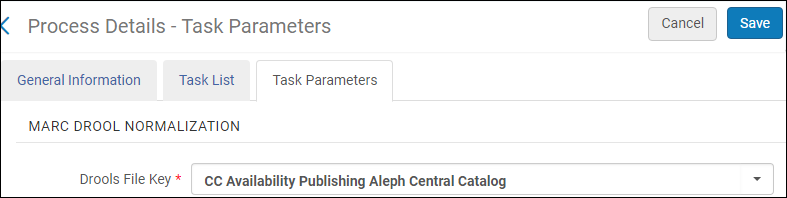
- Business Entity – Select Bibliographic title.
- Type – Select MARC 21 Bib normalization.
- Process – Select MarcDroolNormalization.
- Drools File Key – Select the name of the normalization rule that you created.
Publishing Availability Configuration
- Enter a profile name.
- Select one of the daily scheduling options from the drop-down list.
- Specify the name of the set that you created earlier for the publishing profile.
- Select the Bibliographic level for the Publish on parameter.
- Select the MARC 21 Bibliographic output format.
- Select the Incremental publishing mode.
- Select FTP for the publishing protocol. See Configuring S/FTP Connections for instructions to configure an FTP account.
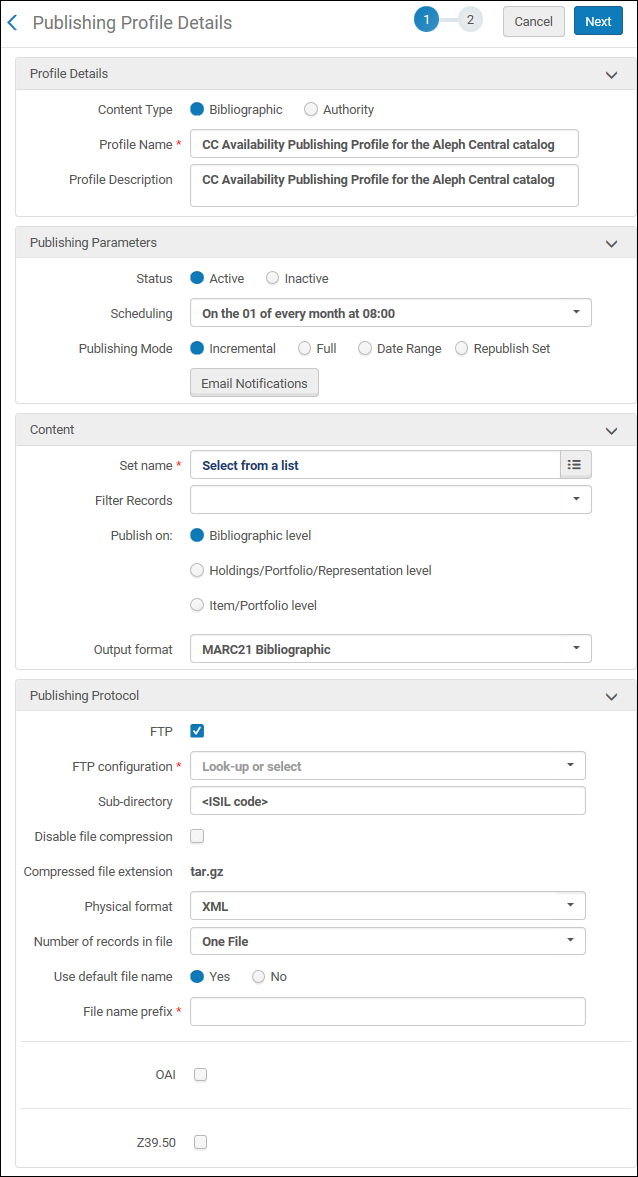
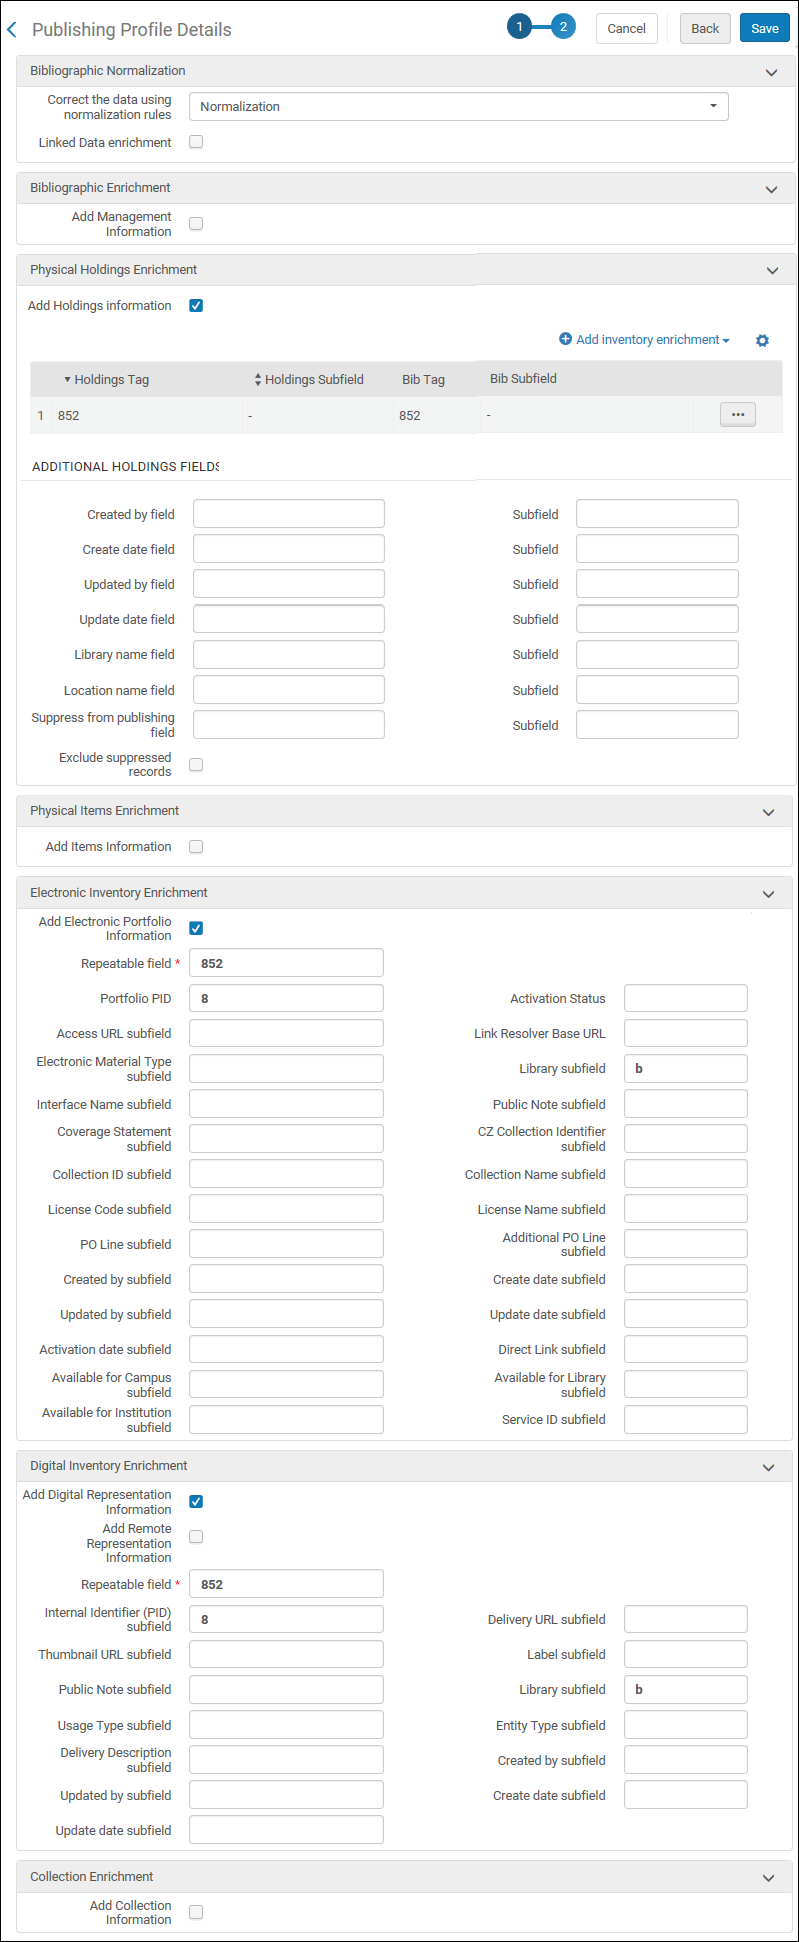
- Select the LOW field normalization rule that you created for the availability publishing profile from the Correct the data using normalization rules drop-down list.
- Select Add Holdings Information and map the 852 holdings tag to an 852 bibliographic tag.
- Select Add Electronic Portfolio Information and specify:
- Mapping to the 852 as a repeatable field
- Mapping the portfolio PID to $8
- Mapping the library to $b
- Select Add Digital Representation Information and specify:
- Mapping to the 852 as a repeatable field
- Mapping the internal identifier (PID) to $8
- Mapping the library to $b
Publishing Holdings Configuration
- Enter a profile name.
- Select a scheduling option from the drop-down list.
- Specify the name of the set that you created earlier for the publishing profile.
- Select the Holdings/Portfolio/Representation level for the Publish on parameter.
- Select the MARC 21 Bibliographic output format.
- Select the Incremental publishing mode.
- Select FTP for the publishing protocol. See Configuring S/FTP Connections for instructions to configure an FTP account.
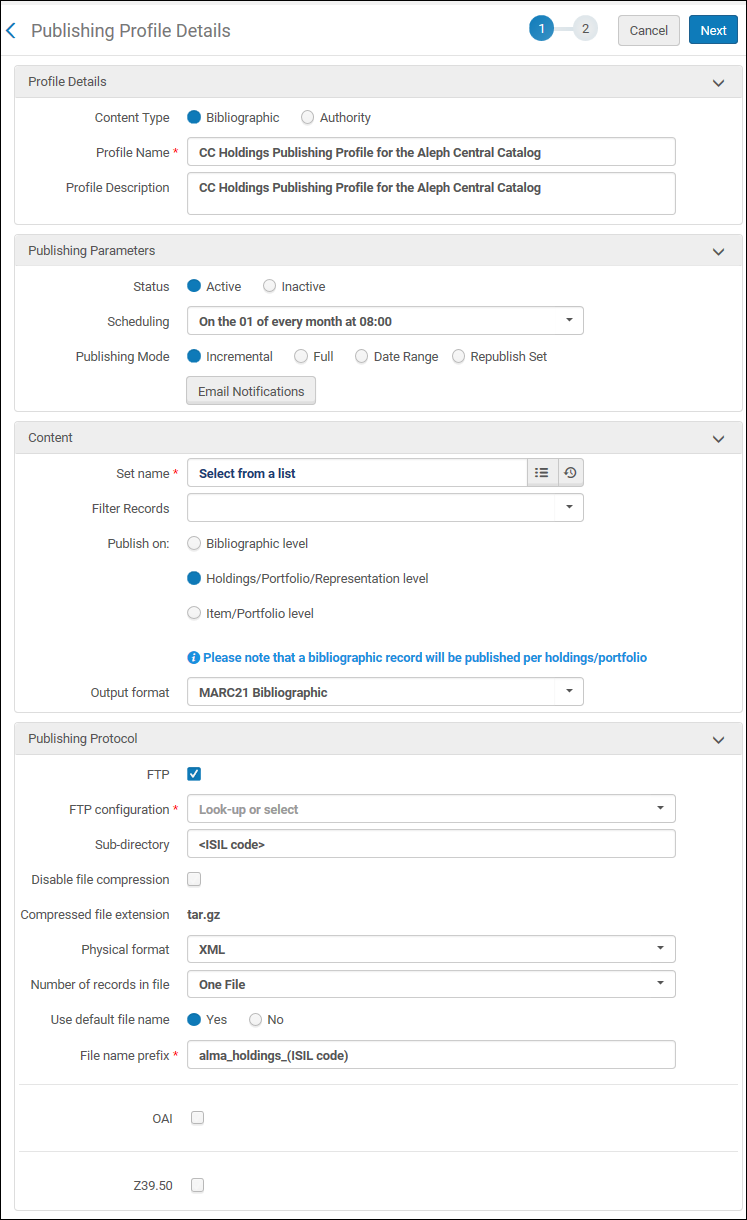
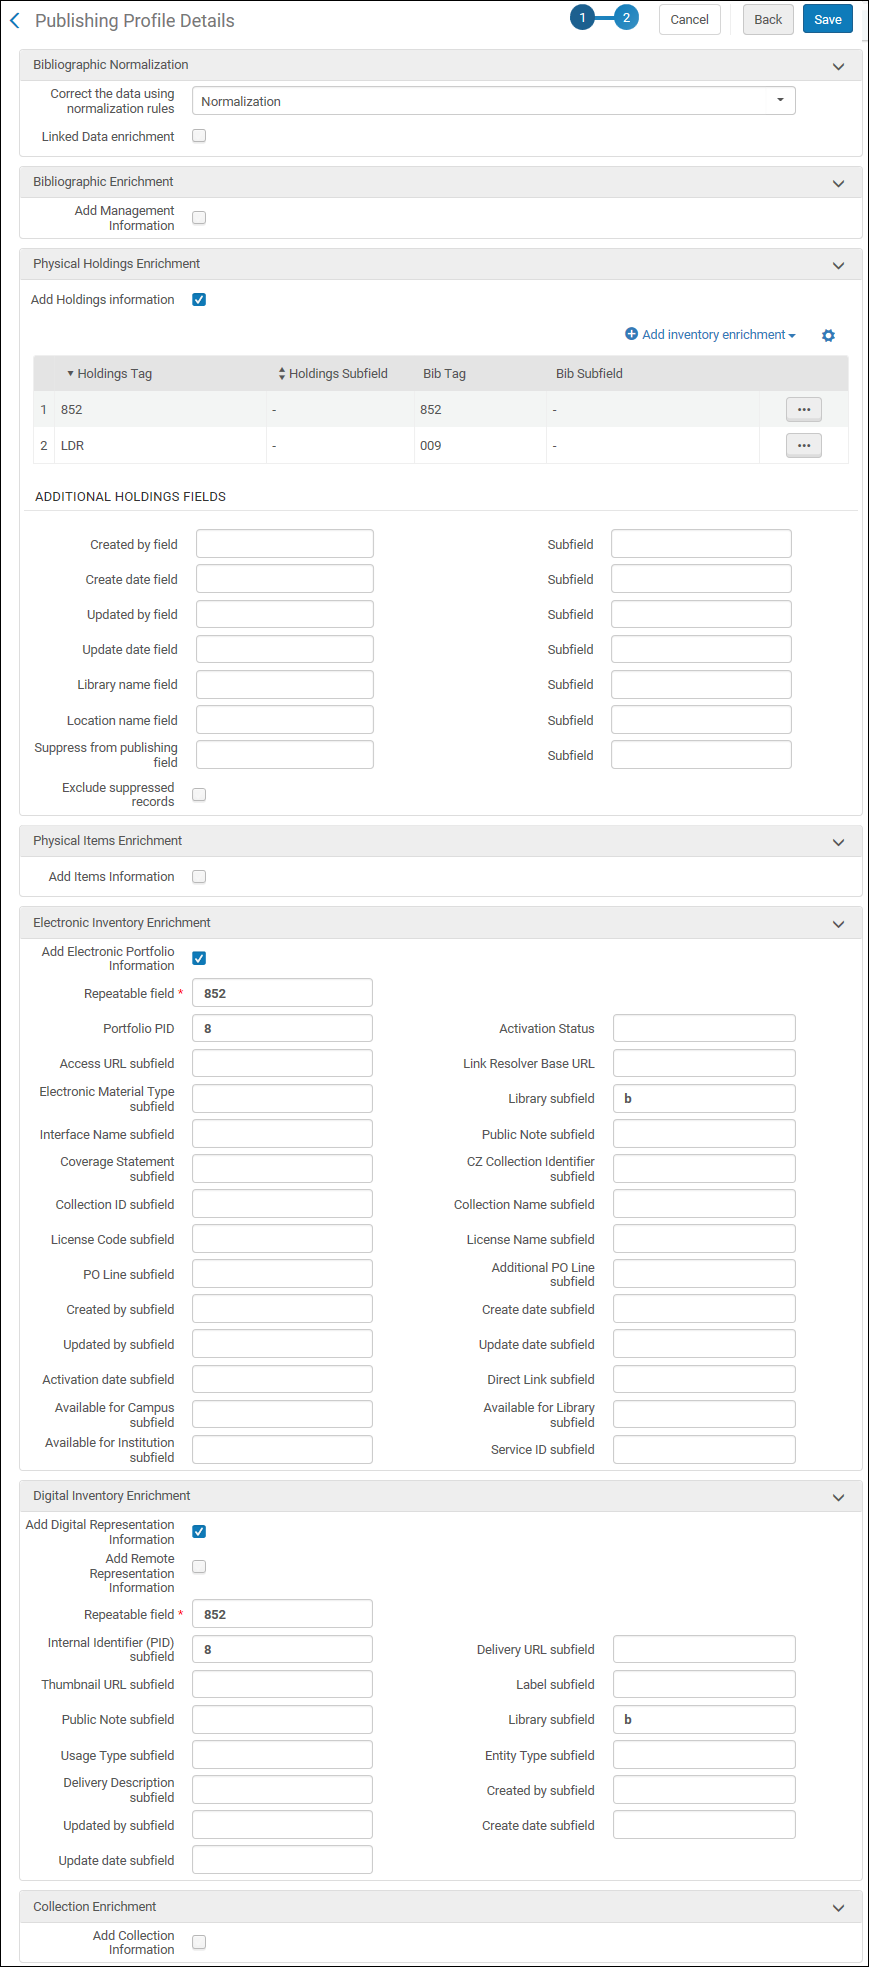
- Select the holdings normalization rule that you created for the holdings publishing profile from the Correct the data using normalization rules drop-down list.
- Select Add Holdings Information and map:
- the 852 holdings tag to an 852 bibliographic tag
- the LDR to the 009 bibliographic tag
- Select Add Electronic Portfolio Information and specify:
- Mapping to the 852 as a repeatable field
- Mapping the Portfolio PID to $8
- Mapping the library to $b
- Select Add Digital Representation Information and specify:
- Mapping to the 852 as a repeatable field
- Mapping the internal identifier (PID) to $8
- Mapping the library to $b
Publishing Items Configuration
- Enter a profile name.
- Select a scheduling option from the drop-down list.
- Specify the name of the set that you created earlier for the publishing profile.
- Select the Item/Portfolio level for the Publish on parameter.
- Select the MARC 21 Bibliographic output format.
- Select the Incremental publishing mode.
- Select FTP for the publishing protocol. See Configuring S/FTP Connections for instructions to configure an FTP account.

- Select the items normalization rule that you created for the holdings publishing profile from the Correct the data using normalization rules drop-down list.
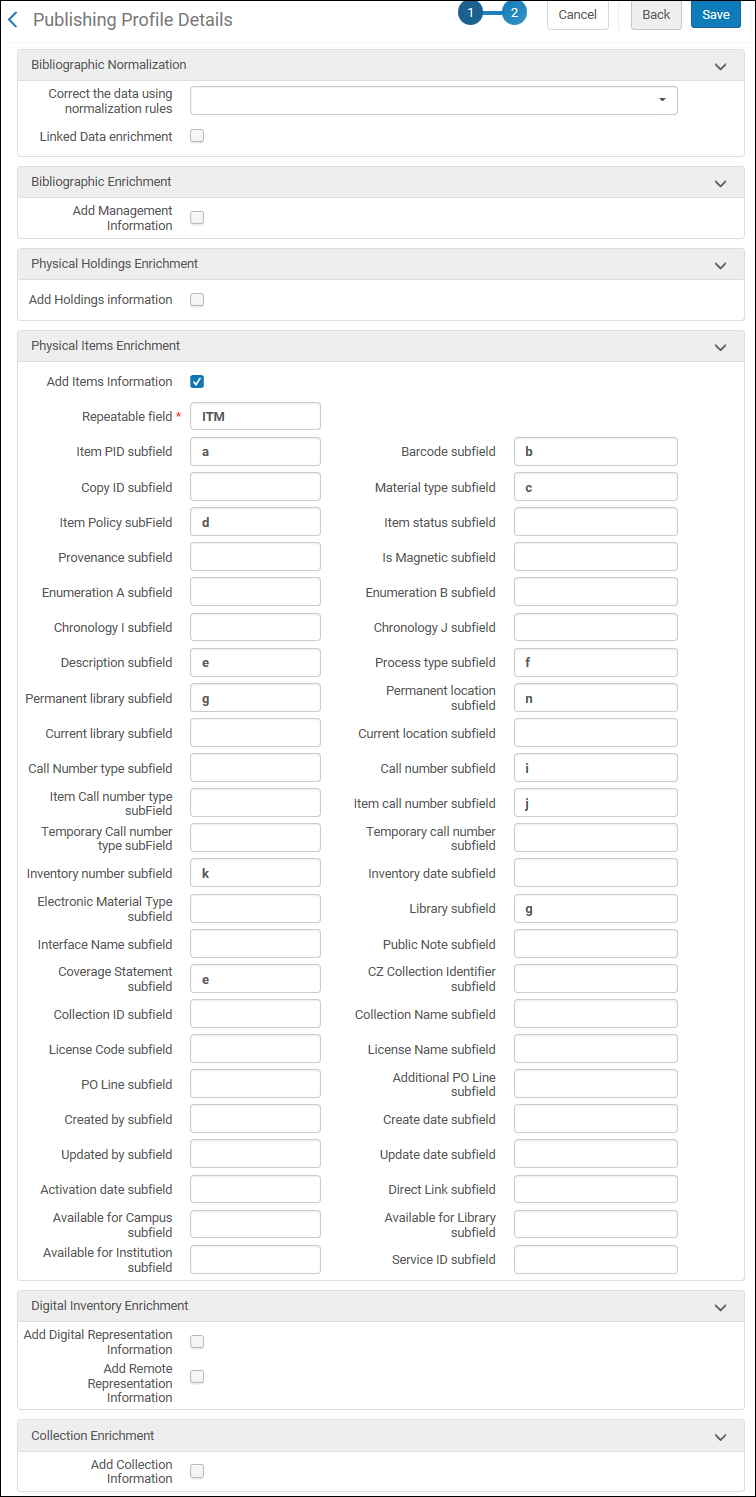
- Select Add Items Information and specify:
- Mapping to the ITM field as a repeatable field
- Mapping the Item PID subfield to $a
- Mapping the Item Policy subfield to $d
- Mapping the Description subfield to $e
- Mapping the Permanent library subfield to $g
- Mapping the Inventory number subfield to $k
- Mapping the Barcode subfield to $b
- Mapping the Material type subfield to $c
- Mapping the Process type subfield to $f
- Mapping the Permanent location subfield to $n
- Mapping the Call number subfield to $i
- Mapping the Item call number subfield to $j
- Select Add Electronic Portfolio Information and specify:
- Mapping to the PRT field as a repeatable field
- Mapping the Portfolio PID to $a
- Mapping the Coverage Statement subfield to $e
- Mapping the library to $g
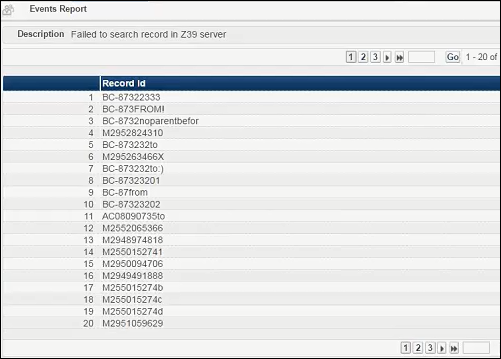
Retrieving Changed Records from the Aleph Central Catalog
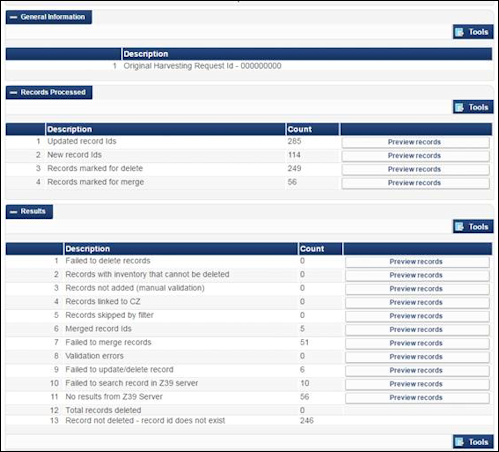
Aleph Central Catalog Integration Job Report
| Section | Description |
|---|---|
|
Records Processed
|
|
|
Results
|
|
Using Contribute Record to Central Catalog
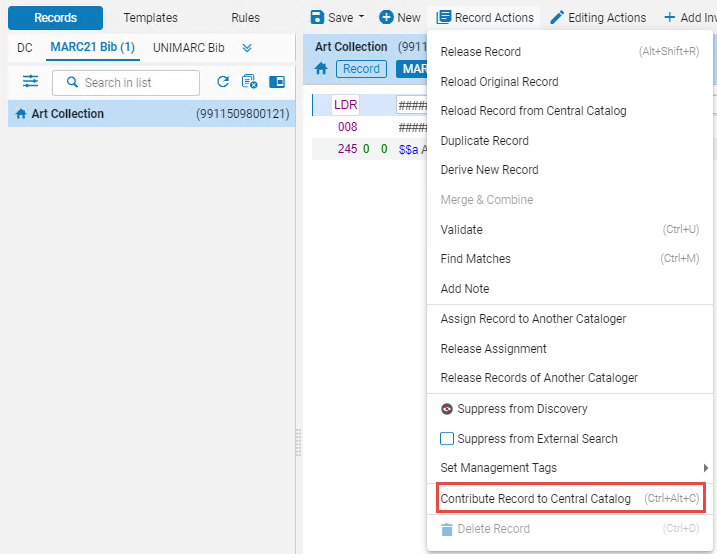
If the "Automatically contribute to central catalog" option is selected in the integration profile (see above), the '"Contribute record to Central Catalog" action will not be active for records already contributed to Aleph (records with 035$a with the system prefix, e.g DE-605). Such records are automatically sent to Aleph when you save them.
The "Contribute Record to Central Catalog" action will not send a record to Aleph if the record fails any of the "Marc21 validation on save" routines (see Configuring Processes).
$form
{'con_lng'} = 'lng' ;
$form{'con_lng'}
= 'ger' ;
Originating System Version for the Aleph Central Catalog
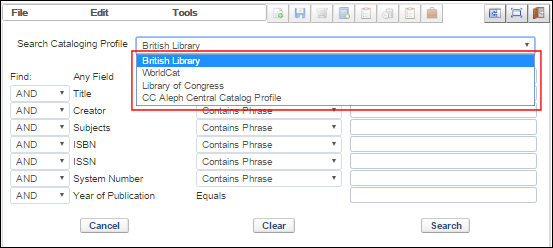
Using External Search with an Aleph Central Catalog Integration Profile