
Go VE: Replacing Pipes in Primo with Import Profiles in Primo VE
Primo VE allows you to load records from external sources (such as for LibGuides) into Primo VE for discovery only, which means that these records are managed outside of Alma, but they are indexed automatically as they are imported. Currently, Primo VE supports generic XML, Dublin Core, and MARC21 records from external sources.
This guide provides instructions on how to configure import profiles to replace the pipes that you were using to load data sources in Primo.
Background
Main Principles and Differences between Primo and Primo VE
Before you begin to create import profiles in Primo VE, it might be helpful to understand how Primo VE's configuration and processing of external data sources differs from Primo:
-
In Primo, the data is mapped to PNX during the execution of the data source's pipe. For Primo VE, the records (DC and Generic XML) are mapped into an extended DC format during the execution of the data source's import profile, and for MARC21 records, the records are mapped to Alma-MARC21 during the execution of the data source's import profile. For more information, see Configuring Normalization Rules for External Resources.
-
For records uploaded during the import profile process (in MARC21 or DC formats), Primo VE provides out-of-the-box mapping. For more information, see Mapping to the Display, Facets, and Search Sections in the Primo VE Record.
-
In Primo, the configuration to load external records includes many settings in a number of places, but since Primo VE's configuration is task oriented, most of the settings are in a single place. The following table summarizes the configuration differences:
| Functionality | Primo | Primo VE |
|---|---|---|
|
Define data source |
Data Source configuration |
Import Profile |
|
File splitter (for generic xml) |
File Splitter mapping table |
Import Profile |
|
Normalize the source metadata |
NR |
NR |
|
Delivery calculation |
NR |
Import Profile |
|
Thumbnail links |
NR |
Import Profile |
|
Upload external resource process |
pipe |
Import Profile |
Documentation and Training
In preparation for this task, it is recommended that you familiarize yourself with the following documents and training videos:
Preparation
Before you begin the configuration in Primo VE, it is important to see which Pipe settings are used for your external data resources. When reviewing your Primo configuration, analyze and decide how you want to present this information in Primo VE to end users.
-
Check the Pipe List (Primo Home > Publishing > Pipe List) to see which data sources are external (not cataloged and managed in Alma).
-
Gather the harvesting type for each external data source (FTP, OAI, or Copy).
-
Gather the server and password information if using the FTP or OAI harvesting type.
-
On the Data Sources page (Primo Home > Local Data > Data Sources), gather the source format for each external data source (DC, MARC21 or Generic XML).
-
If the source format is Generic XML, open the File Splitters Params mapping table (Primo Home > General > Mapping Tables) and gather the details for each parameter used in the file splitter. The following table maps the fields in Primo to the fields used in the associated import profile for Primo VE:
Primo Field in Pipe Primo VE Field in Import Profile RootXpath
Root element tag
FullRecordXPath
Record elements tag
IdentifierXpath
XPath to the identifier tag
StatusXpath
XPath to the location of the deleted status
StatusWhenDeleted
Delete record regular expression
-
In Primo's UI, search for records from the external data sources and compare their PNX records with the source record to understand how the source is mapped to PNX. This will be important when creating normalization rules for your external data sources in Primo VE.
Configuration: Importing Records from External Data Sources into Primo VE
In general, the following steps are used to import your external records into Primo VE for discovery by patrons:
-
Creating the Normalization Rules
-
Creating the Normalization Process Task List
-
Creating the Import Profile
Step 1: Creating the Normalization Rules
Normalization rules allow you map information from the external source data records into Primo VE. This mapping is based on the format of the external source's records:
-
For MARC21 and DC (Dublin Core), the out-of-the-box mapping rules are applied during the import. For more information, see Mapping to the Display, Facets, and Search Sections in the Primo VE Record. If you want to map additional information or modify how the data is currently mapped, you will need to create normalization rules for these differences.
You can map additional fields, either to another field that is mapped out of the box or to a local field in Primo VE. In the following DC example, a DC field is stored in the first local field:
rule "move <aaa> field to local field #1"
when
exist "dc"."<aaa>"
then
move "dc"."<aaa>" to "dc"."local1"
end
If you need to manipulate the data in DC records, you should use Generic XML normalization rules to map your source records.
-
For Generic XML, you will need to create a full set of normalization rules to map the XML records to DC format so that system can apply the out-of-the-box DC mapping rules (see Mapping to the Display, Facets, and Search Sections in the Primo VE Record) to them. Make sure that you include normalization rules additional fields that are not mapped with the out-of-the-box mapping rules.
For example, if you want to map the title to DC, use something like the following:
rule "copy title"
when
true
then
copy "(/record/Title)" to "dc"."title"
end
Instead of using the normalization rules to map resource type for DC sources, you can use the Dublin Core Type to Discovery Type Mapping mapping table to map resource types to Primo VE (see Using the Mapping Table Method to Map Resource Types).
For more information on how to create normalization rules, see Configuring Normalization Rules for External Resources (Primo VE).
Go VE tip:
Before you begin to create normalization rules, upload sample records to see how they look in Primo VE. You can use the test tool to display how records will appear in DC format. For more information, see Testing Normalization Rules for External Data Sources.
-
Open the MD Editor (Configuration Menu > Discovery > Loading External Data Sources > Normalization rules for External Data sources). The normalization rules are grouped by the supported formats:
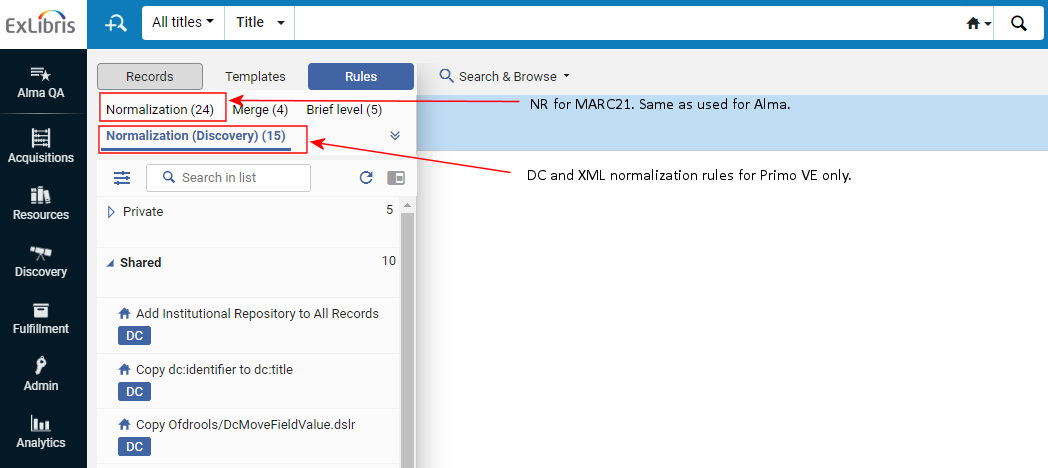 Alma's MD Editor
 -
Create a new rule by selecting either New > Normalization (MARC21 rules) or Normalization (Discovery) (DC and XML rules), which depends on the format of the Discovery import files that you are receiving from the external source.
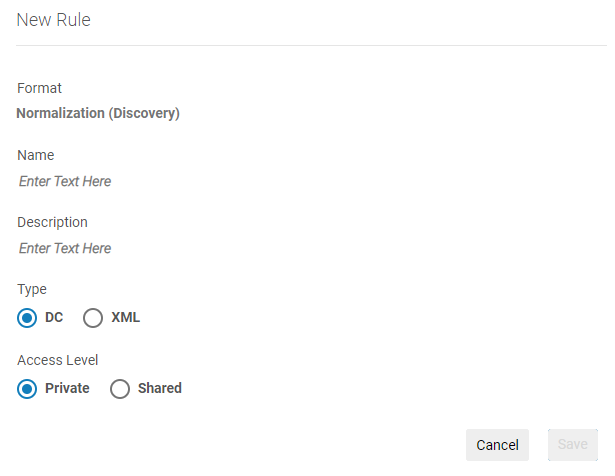 Configure the Normalization Rule File's Properties
 -
Specify the following properties and then click Save:
-
Name – Specify an identifiable name for the rule file, which may contain related types of rules.
-
Description – Enter text to describe the contents of your rule file.
-
Type – For Discovery rules, select either DC or XML. For MARC21 rules, select Drool.
-
Access Level – Select one of the following subfolder locations: Private (for your use only and cannot be included in a normalization process) or Shared (public rule file).
-
-
Add your rules to the editor pane. For more information, see Normalization Rule Syntax (DC and Generic XML) or Working with Normalization Rules (MARC21).
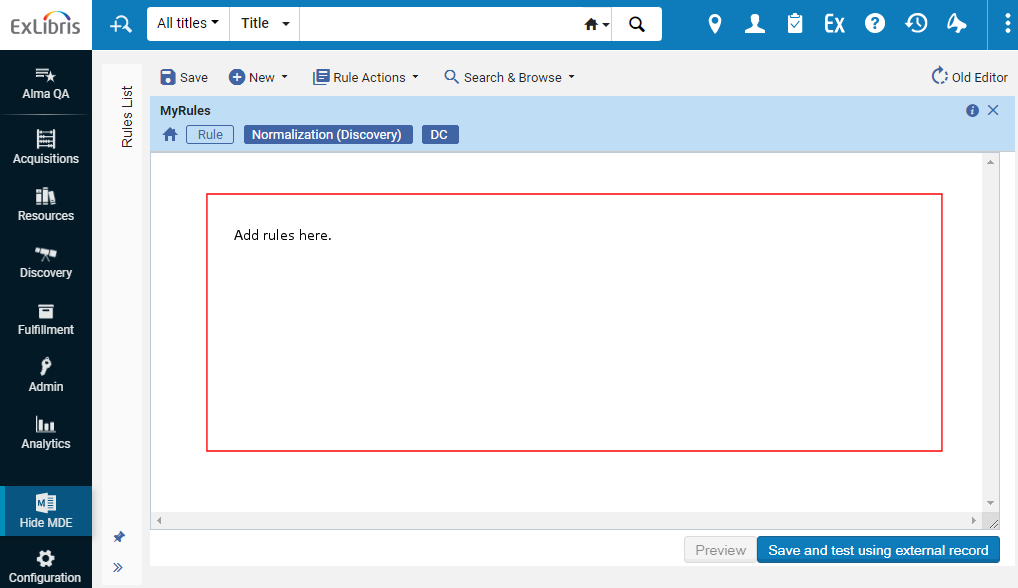 Normalization Rule Editor Pane
 -
Click Save and test using external record to save your changes and to test the normalization rules.
Step 2: Creating a Normalization Process Task
The page allows you to group all the normalization rule files that are needed map the data for an external data source into a single task list. This list is attached to your import profile. For more information, see Creating a Normalization Rules Process.
This procedure is needed only if your import requires custom normalization rules.
-
Open the Process List page (Configuration Menu > Discovery > Loading External Data Sources > Normalization Process Task).
-
Click Add Process to open the Process Details page and then step through the wizard. For more information, see Creating a Normalization Rules Process.
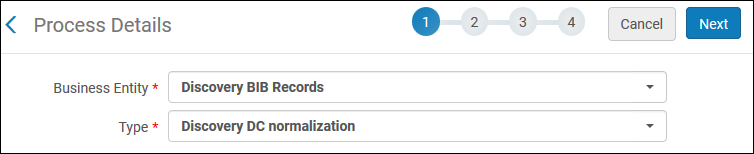 Process Details - General Information (DC Source Example)
Step 3: Creating an Import Profile for Your External Data Source
The Import Profile Details page allows you to create the import profile for a specific external data source. Each import profile includes the following information about the import of records from an external source: source format, import protocol, target format, normalization task process, and linking information. For more information, see Configuring Import Profiles for Primo VE.
-
Open the Import Profiles page (Configuration Menu > Discovery > Loading External Data Sources > Discovery Import Profiles), which lists all of the Discovery import profiles.
-
Click Add New Profile to open the Import Profile Details page.
 Import Profile - Choose Discovery Type (Step 1)
 -
Make sure that the Discovery option has been selected and then click Next.
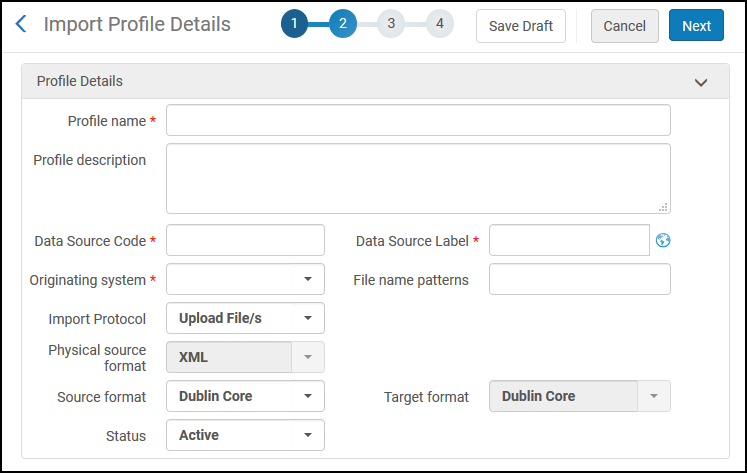 Import Profile Details Page (Step 2 - Profile Details Tab)
 -
Configure the Profile Details based on the information collected during the preparation step, and then select Next. For more information, see Profile Details Tab.
-
Configure the normalization information if this data source requires normalization and you have prepared a normalization process task, and then select Next. For more information, see Normalization Tab.
-
Configure the delivery links for resources (online resource), requests (physical resource), and thumbnails. Select the correct option based on the data source information: Template or Static URL from source. For more information, see Delivery Tab.
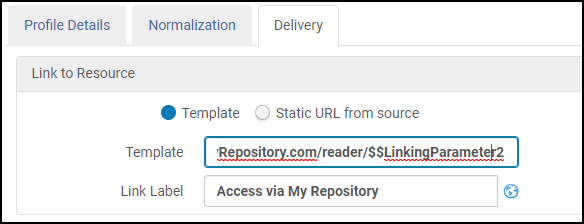 Link to Resource Example
 -
Select Save.