Editing an Institution
Editing a new institution enables you to define advanced information in addition to the basic information defined when you created the institution. If you would like load a list of libraries at one time, you can create a tab-delimited file and export the list into Primo. For more information, see Loading Libraries.
When modifying parameters (such as the Primo Institution Name) other than the Delivery Base URLs and IP Range parameters, it is necessary to deploy the changes by clicking the Deploy button in the Institution Wizard.
-
On the Institutions List page, click Edit next to the institution that you want to update.
The Edit Institution page opens.
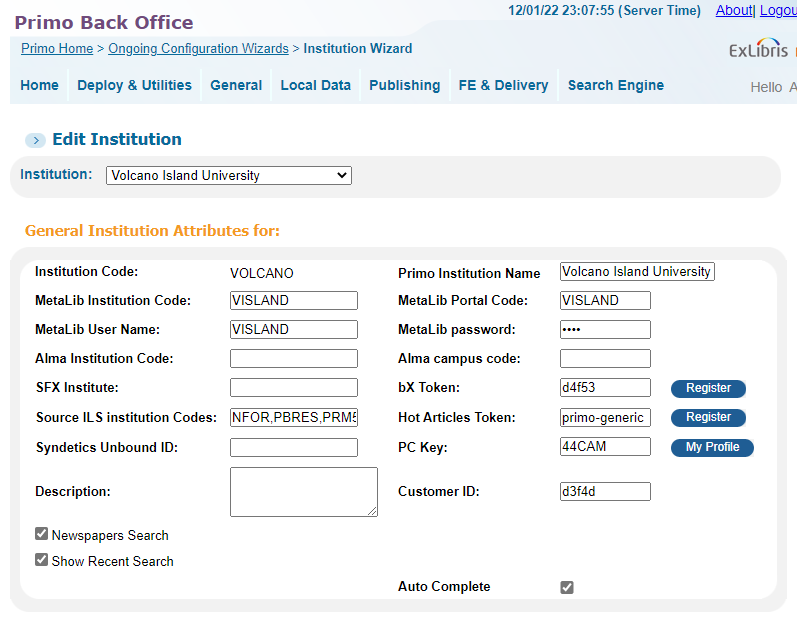
 Edit Institution Page (1 of 4)
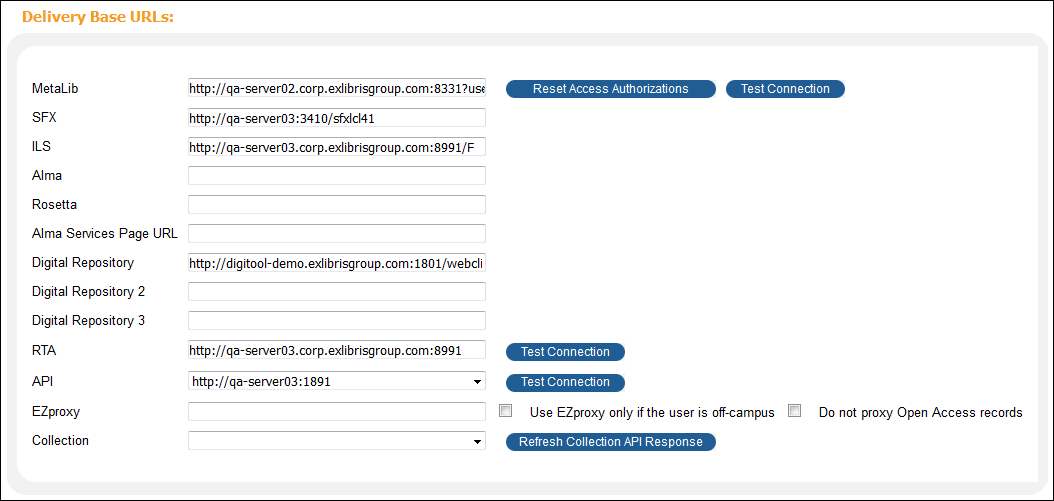
 Edit Institution Page (2 of 4)
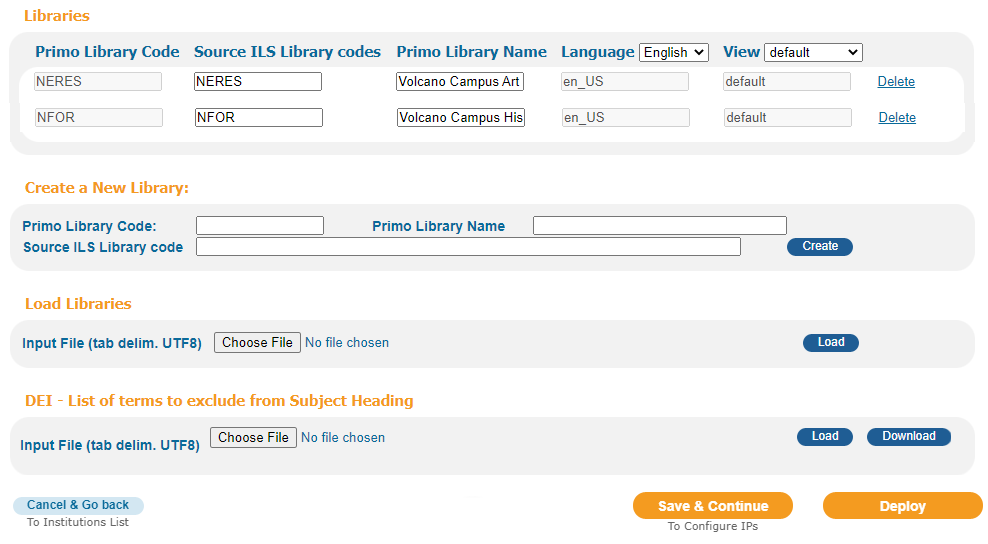
 Edit Institution Page (3 of 4)
 Edit Institution Page (4 of 4)
 -
In the General Institution Attributes for area, edit the attributes for the institution (see General Institution Attributes Details for a list of fields).
General Institution Attributes Details Field name Description Institution Code
Primo institution ID code. This cannot be edited.
Since lowercase letters cannot be used in institution codes, the system will automatically save all lowercase letters to uppercase letters.
Primo Institution Name
The name of the institution.
MetaLib Institution Code
Indicates to the system which MetaLib institution to use during a remote search for this institution.*
MetaLib Portal Code
Specify the portal code if it is different from the MetaLib Institution Code.
MetaLib User Name
If you want to use a user name other than the MetaLib institution to access QuickSets in MetaLib, specify the user name.
If this field is left blank, the system will use the MetaLib institution for the user name.
MetaLib password
If you want to specify a password other than the MetaLib institution to access QuickSets in MetaLib, specify the user name.
If this field is left blank, the system will use the MetaLib institution for the password.
Alma Campus Code
The Alma Campus Code identifies the Alma inventory network group, which represents a set of campuses and/or libraries for which you want to manage electronic resources as a group.
Alma Institution Code
The Alma institution code that the system converts to the Primo institutution code via the out-of-the-box Alma templates.
Source ILS Institution Codes
The ILS data-source codes that can be mapped to the Primo institution code. If there is more than one code mapped to the same institution, separate the entries with commas.* For example, Aleph uses the ADM library or sub-library codes.
SFX Institute
Specify the SFX institute that is sent in the request to the SFX Journal Subscription API to determine if full-text results are available.
bx Token
Specify the bX authentication token received during the registration of bX recommendations. For more information on configuring bX, see the Primo Interoperability Guide.
You cannot use the authentication token that was obtained while registering for bX via SFX.
Hot Articles Token
This service is not supported in the new Primo UI.
Defines the token that the system uses to authenticate the bX Hot Articles service for use in Primo. By default, the system uses the primo-generic token.
If your institution has already registered for this service, you can replace the generic token with your institution’s token. If you want to create a token for your institution, click the Register button to register for the service.
Specify the key received during the registration of CDI (Central Discovery Index). For more information, see Registering Institutions for Central Discovery Index.
After you save your PC Key and Customer ID, the My Profile link replaces the Register link, enabling you to modify your customer and contact details, unsubscribe institutions, and configure your client applications. For more information, see My Profile for CDI.
Customer ID
Specify the Customer ID received during the registration of CDI. For more information, see Registering Institutions for Central Discovery Index.
Institution is part of the shared user database/Resource sharing
Resource sharing indicator (on-premises customers only). This field indicates whether the institution is part of a shared resource/user database.
This field only displays when the Shared User Database & Resource sharing field is set to P on the Primo Home > Advanced Configuration > General Configuration > Delivery subsystem page.
Description
Descriptive information about the institution.
Newspapers Search
This check box enables the Newspapers Search feature for your entire institution, but you must also enable it per view (see Views Wizard).
Show Recent Search
This check box indicates whether autocomplete suggestions for Primo simple searches are extended to include suggestions based on simple searches stored in My Favorites > Search History.
When selected:
-
For unsigned users, suggestions are based on the search history of the current session only and search history is not retained between sessions.
-
For signed-in users, suggestions are based on the user's Search History, which may include searches from the current session or any searches retained in Search History between sessions. By default, up to 100 searches are retained in Search History between sessions and used for recent search suggestions. For information on how to disable persistent search history, see the Institution properties mapping table.
Auto Complete
This checkbox registers the Auto Complete feature for your institution and allows you to enable this functionality per view and then to disable this functionality per scope.
For more details, see Auto Complete Configuration Guide.
* These codes are mapped to the Primo institution code and used by the Normalization mapping table. -
-
In the Delivery Base URLs section, enter the base URLs of the servers providing access to the following delivery systems:
Delivery Base URLs Field Name Description MetaLib
This URL requires the mladmin user name and password for MetaLib 4.3 and later releases.
If the MetaLib server is configured to send responses to Primo in ZIP format, set the Data is Compressed field to Yes for the institution in the MetaLib Institution Configuration mapping table.
SFX
The base URL of the SFX link resolver.
ILS
The base URL of your ILS.
Alma
The base URL of the Alma U-resolver, which is formatted as follows:
http://<Alma server>:<port>/view/uresolver/<Alma institution code>/openurlIf you have defined an Alma campus code, it should be appended to the Alma base_url to ensure that delivery is specific to the campus:
http://<Alma server>:<port>/view/uresolver/<Alma institution code>/openurl-<Alma campus code>Alma Services Page URL
Enter the base URL for the Services Page view. For more information, see Base_URL for the Services Page. Currently, this field is used for the bX Recommendations service in the new Primo UI. For more information, see bX Recommendations.
Use the following format for the new Primo UI:
http://<primo server host:port >/primo-explore/openurl?institution=<Primo_Inst_Code>&vid=<Primo_View_Code>For the new Primo UI, it is no longer necessary to create a separate view for the Services page.
Digital Repository
The base URLs for your digital repositories.
RTA
The base URL of the RTA service.
API
Enables OPAC via Primo functionality if supported by the institution. If this field is left blank, Primo will provide OPAC via link functionality.
The base URL of the EZproxy server, which allows access to articles when direct links are invoked from CDI and EBSCO records. Primo proxies the following types of links on the record's Full Display page:
-
Links section: Back links, Link to resource, and Quicklinks
-
View It section: Link to resource, Additional links to resource, openurl Full Text, and additional openurl
-
Citation section: All links
For additional information, see CDI and Linking to Electronic Full Text.
If you want to use a proxy, enter the base URL for the EZproxy server, and then specify the following proxy options:
-
Use EZproxy only if the user is off-campus – select this check box if you want to use the EZproxy server for direct links when the user is off campus only. Otherwise, the EZproxy server is used for all direct links regardless of the user's location.
-
Do not proxy Open Access records – select this check box if you do not want to use the EZproxy server for open access CDI records.
Collection
The base URL of the collection repository. For Alma customers who are using Alma for collections, this field should be set to the same value as the API field. If Rosetta is used for collections, set this field to the base URL for Rosetta.
A collection API request is sent once an hour and is cached in memory. The Refresh Collection API Response button (which appears next to the Collection field) allows you to refresh the API response manually as needed.
DB Category
The base URL of your database repository. For Alma customers who are using the Database Search interface with database categories, this field should be set to the same value as the API field. For more information, see Configuring the Database Search Interface.
If necessary, you can add new types of delivery base URLs to the list. To do so, add the new delivery base URL to the Institution Base URL mapping table, using the instructions in Edit a CSS Mapping Table.
-
-
In the New UI Migration section, specify the view that you will be using for the new Primo UI. If you switched previously to the new UI, this field is disabled.
-
To add libraries to your institution, see Creating a Library or Loading Libraries.
-
To create or update a list of offensive words that should be omitted from Subject fields, see Loading the DEI File. Note that this configuration is a stand-alone operation and does not require you to save your changes to the page or deploy the changes to the Front End UI.
-
Click Save & Continue to save your changes to the institution and continue to the Edit IPs page. If you want to configure IPs, see Creating an IP Range and Editing an IP Range.
The institution's details are updated and appear in the Institutions List page (see Institutions List Page).
If you want to edit an institution other than the one you are currently editing, select the institution in the Institution drop-down list and repeat Steps 2 through 5.

