
Mapping Table Reference
This section lists the Primo mapping tables, which are grouped by the following subsystems:
Back Office Subsystem
| Table Name | Description |
|---|---|
|
At both the installation and institution levels, this table allows you to configure who receives the following:
You can configure a list of email addresses per notification type (Pipe or Front End process) by separating addresses with a semicolon. For example: Ryan_Hardy@myinst_1.edu;Joe_Carroll@myinst_2.edu When defined, these email addresses override the email address defined in the Contact Personal E-Mail parameter (Primo Home > Advanced Configuration > General Configuration Wizard > E-Mail and SMS Configuration). |
|
|
Fiction Profile Fields and Subfields1 |
Fiction Profile fields and subfields. |
|
III Millennium RTA Locations |
Maps the III Millennium locations to the Primo institution, library, and sub-location. For for more information, see the Primo Interoperability Guide. |
|
III Millennium RTA Statuses |
Maps the III Millennium statuses to the statuses used in Primo. For for more information, see the Primo Interoperability Guide. |
|
LibraryThing Review Files1 |
Defines the review content for LibraryThing. This table contains the following fields:
|
|
LibraryThing Tag Files1 |
Defines the tag content for LibraryThing. This table contains the following fields:
|
|
Mapping Keys1 |
Mapping keys. For every key, the following columns should be defined:
|
|
PNX Extension Sources1 |
Configures the enrichment content sources for all content import. To configure a source or add content, enter the following fields:
|
|
Real-Time Availability1 |
This table defines the configuration information for real-time availability (RTA). This table is used with the mapping_tables mapping method. |
|
Real-Time Availability (using normalization rules) |
This table defines the configuration information for real-time availability (RTA). This table is used with the normalization_rules mapping method. |
|
This table is used for the classic UI only. Defines the user groups that display in Primo Analytics reports. You can define up to eight user groups. To create a user group for display in Primo Analytics, specify the following fields for each mapping row:
The user group value that is sent to Primo Analytics is determined as follows:
|
Common Tables Subsystem
| Table Name | Description |
|---|---|
|
General Configuration |
This table defines the following general configuration parameters at the installation and institution levels:
|
Delivery Subsystem
For more information on delivery, see Delivery Functionality and Configuration.
| Table Name | Description |
|---|---|
|
GetIt! Link 1 Configuration |
This table configures the GetIt! 1 links, based on the calculated availability status, delivery category, and data source. For more information, see GetIt! Links. |
|
GetIt! Link 2 Configuration |
Configuration of the GetIt! 2 link, based on the calculated availability status, delivery category, and data source. |
|
GetIt! Tab 1 Text Configuration |
Configuration of the GetIt! Tab1 Label, based on the calculated availability status, delivery category, and data source. |
|
GetIt! Tab 2 Text Configuration |
Configuration of the GetIt! Tab2 Label, based on the calculated availability status, delivery category, and data source. |
|
Get It! Text Configuration |
Configuration of the GetIt! Text, based on the calculated availability status, delivery category, and data source. |
|
Templates |
This table defines the link templates. Because Primo encodes the values for placeholders in the templates that include ampersands, placeholders for templates should be added only to the links fields and the addata/url field in the PNX. When defining a template, the following parameters may be used:
Primo provides the following templates for links to Aleph and Voyager library cards:
When the svc.fulltext=yes parameter is added to the following codes, the system forces the SFX menu to display only full-text targets and suppress all other targets:
This allows you to focus specifically on the full-text target links and hide other options, such as ILL requests. Because bX is not a full-text target, bX recommendations are also suppressed when the svc.fulltext=yes parameter is used. |
|
URLs Attributes |
This table defines special functions for specific URLs. This table is checked when the GetIt! links are created. To configure a special function, enter the following fields:
For example, if you want to display the holdings information in a new window when the user clicks the Request tab, create the following mapping row:
|
|
Using 856 links in Remote Search Records |
This feature allows Primo to combine the use of the Alma and SFX link resolvers and 856 links to deliver full text. It can be configured for all or specific databases. Out-of-the-box, availability is first determined by the link resolver (Alma/SFX). If the link resolver returns no full-text, the system checks to see if there is a link in the record itself. To configure each database, enter the following fields:
Availability for EBSCO records returned from the EBSCO API is also based on this table. For more information, see Configuring EBSCO Availability and Delivery. |
Front End Subsystem
| Table Name | Description | ||||||||||||||||||||||||||||||||||||||||||||||||
|---|---|---|---|---|---|---|---|---|---|---|---|---|---|---|---|---|---|---|---|---|---|---|---|---|---|---|---|---|---|---|---|---|---|---|---|---|---|---|---|---|---|---|---|---|---|---|---|---|---|
|
This table enables you to control the order in which actions appear in the Actions drop-down lists in the Front End. For more information, see Configuring the Send To Actions. This table contains the following fields:
|
|||||||||||||||||||||||||||||||||||||||||||||||||
|
bX Token |
This table maps the bX authentication token to an institution. For information on bX, refer to the Primo Interoperability Guide. This table is automatically populated after a bX token is assigned to an institution in the Institutions wizard. |
||||||||||||||||||||||||||||||||||||||||||||||||
|
Browse Lists |
This table configures the following aspects of Browse:
For more information on this table, refer to the Primo Technical Guide. |
||||||||||||||||||||||||||||||||||||||||||||||||
|
Bulk Definition |
This table configures the parameters that are associated with bulk processing in the Front End. The following parameters are supported:
|
||||||||||||||||||||||||||||||||||||||||||||||||
|
This table defines which OpenURL fields can be entered per citation type. You can enable/disable the display of fields on the Fetch Item (Citation Linker) page, but you cannot change their order by updating the value in the Order column, which defines their fixed order per citation type. The display and mapping of additional fields is not supported. |
|||||||||||||||||||||||||||||||||||||||||||||||||
|
Citation Source Types
|
This table maps Primo resource types to EasyBib source types. If you have created additional resource types in Primo, you can map each of them to an EasyBib source type. The following source types are supported: book, chapter, newspaper, journal, and website.
If no mapping is defined, the EasyBib source type defaults to book.
|
||||||||||||||||||||||||||||||||||||||||||||||||
|
Citation Style Language |
This table manages the citation styles that are supported in your Primo institution. For more information, see Managing Citation Styles. If you use an Excel file to import styles, make sure that the values in the Order field are prefixed with an apostrophe (for example, '7). |
||||||||||||||||||||||||||||||||||||||||||||||||
|
CSS |
The list of CSS files that are supported by the application. |
||||||||||||||||||||||||||||||||||||||||||||||||
|
Export RIS encodings |
This table defines the character sets supported by the Export to RIS option. Out-of-the-box, the following character sets are defined and enabled:
Additional character sets can also be defined. |
||||||||||||||||||||||||||||||||||||||||||||||||
|
Featured Results |
This table enables you to configure the display of Featured Results bars in the Front End at the institution level only. For more information, see Featured Results Bar. To change the display labels for Featured Results bars, use the Featured Results Labels code table. |
||||||||||||||||||||||||||||||||||||||||||||||||
|
Find Database Full Display |
This table configures the fields that display when users select the Show Info link in the Find Databases tabs (such as the All Databases tab). To configure the fields, enter the following:
|
||||||||||||||||||||||||||||||||||||||||||||||||
|
Front End Redirect Definitions |
This table enables you to define Front End redirection URLs per DNS. The assumption is that multi-institution environments have a different DNS per institution. This table contains the following required fields:
|
||||||||||||||||||||||||||||||||||||||||||||||||
|
Hot Articles Token |
This field is relevant only to the classic Primo UI. This table contains the bX Hot Articles tokens that have been assigned to an institution. When an institution is added, the system automatically creates a generic Primo token that is called primo-generic. |
||||||||||||||||||||||||||||||||||||||||||||||||
|
Hypertext Linking Definitions |
The old and new UIs support hypertext linking in the following PNX display fields: creator, contributor, subject, relation, unititle, ispartof, and lds30-lds39 fields. When a link is clicked, the system performs an advanced search using the exact contents of the entire field, which is created from multiple subfields. For more information, see Enhanced Hypertext Linking. This table enables you to define whether an exact or contains search is performed when users select the link provided for each type of display field. The Context field indicates whether the search is relevant to ANY (all scopes) or L (local scopes only) scopes. You may need to enable the rows that contain the following new hypertext linking fields: relation, unititle, and ispartof. |
||||||||||||||||||||||||||||||||||||||||||||||||
|
Institution Base URLs |
Institutions Base URLs. |
||||||||||||||||||||||||||||||||||||||||||||||||
|
Defines miscellaneous configuration properties at the institution level. To add an option if it has not already been added, create a new mapping row and specify the following fields:
For a list of supported institution properties, see Configuring Institution Properties in Primo. |
|||||||||||||||||||||||||||||||||||||||||||||||||
|
Languages |
This table defines the language drop-down lists in the Institution and Views wizards and the view in the FE. To modify the language label, refer to the Interface Language code table. |
||||||||||||||||||||||||||||||||||||||||||||||||
|
This table configures language-specific links for the Main Menu. To configure a language-specific link, enter the following fields:
|
|||||||||||||||||||||||||||||||||||||||||||||||||
|
Mendeley API Configuration |
This table configures the connection between your Primo server and the Mendeley application. After you have registered your Primo server with the Mendeley application (see Registering Your Primo Institution), specify the following fields and then save and deploy your changes:
|
||||||||||||||||||||||||||||||||||||||||||||||||
|
MetaLib Institution Configuration |
This table enables you to indicate whether MetaLib is sending compressed data in responses to Primo. To indicate to Primo that MetaLib is sending compressed data for an institution, create a mapping row for each Primo institution code and set the Data is Compressed field to Yes. In order to use this feature, MetaLib must be configured to send compressed data. For more information, see the MetaLib System Configuration and Administration Guide. |
||||||||||||||||||||||||||||||||||||||||||||||||
|
My Account Links |
This table enables you to define up to three links per My Account section. This table can be defined at the installation or institution level. For example, if you want to add a link to My Accounts > Personal Settings, create a new mapping row using the following fields:
To modify the associated labels, see the My Account Links Labels code table in Code Table Reference. |
||||||||||||||||||||||||||||||||||||||||||||||||
|
Personalize Your Results Degrees Fields |
Manages the Personalize Your Results drop-down field for degrees. For on-premises installations, you can define this table at the installation and institution levels. At the institution level, you can define the Degrees drop-down field per view. Once the view has one or more rows, the Front End uses only the rows that are defined for the view. This enables you to remove values from the list more easily, and it also prevents duplicate views if the the lower level inherits a row from a higher level in the code tables. If you disabled rows via the Personalize Your Results Degrees code table, you also need to disable them in the mapping table. Otherwise, the code of the degree displays in the Front End. |
||||||||||||||||||||||||||||||||||||||||||||||||
|
Personalize Your Results Disciplines Fields |
Manages the Personalize Your Results drop-down field for disciplines. For on-premises installations, you can define this table at the installation and institution levels. At the institution level, you can define the Disciplines drop-down field per view. Once the view has one or more rows, the Front End uses only the rows that are defined for the view. This enables you to remove values from the list more easily, and it also prevents duplicate views if the the lower level inherits a row from a higher level in the code tables. If you disabled rows via the Personalize Your Results Disciplines code table, you also need to disable them in the mapping table. Otherwise, the code of the discipline displays in the Front End. |
||||||||||||||||||||||||||||||||||||||||||||||||
|
PNX_EXTENSIONS_ |
Defines the PNX Extensions to PNX tags mapping. To enable tagging in the Front End, enable the row that contains the TAG extension name. |
||||||||||||||||||||||||||||||||||||||||||||||||
|
Maps views in Primo to libraries in Alma to control the display of collections for institutions in a consortium or for libraries by view in a single institution. When this table is configured, collections are filtered by library as follows:
To map a view to Alma libraries, enter the following fields:
|
|||||||||||||||||||||||||||||||||||||||||||||||||
|
Recommendation Systems |
This table configures and enables the recommendation systems per institution. To configure a recommendation system, enter the following fields:
|
||||||||||||||||||||||||||||||||||||||||||||||||
|
Refworks Fields |
Enables you to create the mapping from PNX fields to RIS fields when users export records to ExportRIS, Refworks, and EndNote. You can map multiple PNX fields to a single RIS format field by separating the entries in the PNX field with a semicolon. The system attempts to use the first defined field if it exists. If it does not exist in the active record, the system will try the second field, and so forth. To add mapping for a RIS field, populate the following fields:
Out-of-the-box, the following mappings are provided for you:
You can create a new mapping row with any of the following PNX fields: We are aware that there are typos in some of the field names. These field names should be used exactly as listed. Display:
Addata:
|
||||||||||||||||||||||||||||||||||||||||||||||||
|
Related Items |
This mapping table enables you to disable the Related Reading functionality for your view. To disable this functionality, create a new mapping row using the following fields:
|
||||||||||||||||||||||||||||||||||||||||||||||||
|
Report a Problem |
This mapping table enables you to activate and configure the Report a Problem tool, which is configured at the view level only. For more details, see Configuring the Feedback Tool for the New Primo UI. |
||||||||||||||||||||||||||||||||||||||||||||||||
|
Saved Search Email Alert Customization |
This mapping table enables you to configure the color and other settings for the following components in Saved Search Email Alert messages:
|
||||||||||||||||||||||||||||||||||||||||||||||||
|
SE 221 Char Conversion1 |
This table enables you to define how decomposed Unicode characters are normalized for indexing and searching. To configure normalization for a set of decomposed characters, populate the following fields:
For example, if you want to normalize the decomposed Unicode characters A and a diaeresis (¨) to a single character Ä, define a mapping row containing the following entries:
Changes to this table require you to deploy the Search Engine configuration, clear the search indexes, and then re-index. |
||||||||||||||||||||||||||||||||||||||||||||||||
|
SE Char Conversion1 |
This table is used to convert a range of Unicode characters to another character during indexing. For more information about using the SE Char Conversion mapping table, see the Primo Technical Guide. |
||||||||||||||||||||||||||||||||||||||||||||||||
|
Share Action Configuration |
This table enables/disables the supported social media applications for the Share export action. |
||||||||||||||||||||||||||||||||||||||||||||||||
|
SMS Provider Configuration |
SMS Provider Configuration. Add institutions to the SmsProxyConfig.xml file, which is located in the following directory: /exlibris/primo/p<r>_<x>/ng/primo/home/system/search/conf
When this table is deployed, the definitions in the SmsProxyConf.xml file located on the server are updated. For more information about configuring the SMS provider, see the Configuring the SMS Proxy section in the Primo Technical Guide. |
||||||||||||||||||||||||||||||||||||||||||||||||
|
Defines the settings for snippets if the Show snippet if query terms are not found in fields parameter is selected in the Brief Results tile in the Views wizard. For more information, see Snippet Display Options. If this option is enabled and the search term is not found in the abstract, toc, or fulltext fields, the system displays the first 160 characters of the highest priority field, as defined in this table. To configure snippets per view and type, specify the following fields:
In order to display snippets in the results, PNX records that contain snippets must include the search/rsrctype field, which is populated by the out-of-the-box templates. |
|||||||||||||||||||||||||||||||||||||||||||||||||
|
Snippets Extensions Mapper1 |
Defines the fields for which you can display snippets. Currently, only the TOC, Abstract, and FULLTEXT fields can be defined. For more information on snippets, see Snippet Display Preferences. |
||||||||||||||||||||||||||||||||||||||||||||||||
|
This table configures the fields that can appear in the Sorted By drop-down list on the Brief Results page. To configure a sort field, update the following fields:
After you have configured the sort field:
Out-of-the-box, the following sort configurations are defined:
|
|||||||||||||||||||||||||||||||||||||||||||||||||
|
User Login Links |
For the new UI, this table enables you to define up to four links that display on the Primo Sign-In page. If only a single link is defined, the link appears without selecting Need help on the Primo Sign-In page. |
||||||||||||||||||||||||||||||||||||||||||||||||
|
Defines miscellaneous configuration properties associated with a specific view. To add an option if it has not already been added, create a new mapping row and specify the following fields:
For a list of supported view properties, see Configuring View Properties. |
|||||||||||||||||||||||||||||||||||||||||||||||||
|
WS and XS IP1 |
IP restriction for Web Services and X-Services. Primo's Web services and X-Services are IP authenticated. Only requests originating from IP addresses listed in the WS and XS IP mapping table are processed. Previously, every request performed a query against the WS and XS IP mapping table. In order to improve performance, the IP list is loaded into memory, and no query is done in real time. Because of this, any change to the WS and XS IP mapping table requires the table to be deployed. Note that you can also use the All Client IP Ranges (WS and XS IP mapping table) option on the Deploy All page. For more information, see Deploy All Configuration Settings. |
Normalization Subsystem
| Table Name | Description |
|---|---|
|
Alma Institution Codes1 |
Maps the Alma institution codes to their associated Primo institution codes. This is a read-only table. |
|
FMT |
Used to map MARC21 leader positions 6 and 7 to the format. |
|
Format_mean |
Used to define the resource type filter in the Facets section. |
|
Genre |
Used to define the Genre in the Additional data section. |
|
ILS Institution Codes1 |
Used by the Normalization process to map the institution codes from the ILS to the codes used in Primo. This is a read-only table. |
|
ILS Library Codes1 |
Used by the Normalization process to map the library codes from the ILS to the codes used in Primo. This is a read-only table. |
|
MetaLib Institution Codes1 |
Used by the Normalization process to map the institution codes from MetaLib to the codes used in Primo. This is a read-only table. |
|
pre_filter |
Used to define the prefilter facet in the Facets section. |
|
RIStype |
Used to define the RIStype in the Additional data section. |
Plugins Subsystem
| Table Name | Description |
|---|---|
|
Deep-Search Plugins |
Registers each deep search plugin with the system. To register a plugin, enter the following fields:
To use an RTA plugin, you must configure the base URL of the RTA system on the Institutions page. For more information, see the following page in the Ex Libris Developer Network: For additional information on EBSCO adaptors, see Configuring the EBSCO Plug-In. |
|
Deep Search Plugin Parameters |
Defines the parameters used by the deep search plugins. For more information, see the following page in the Ex Libris Developer Network:
|
|
Plugins1 |
Registers each plugin with the system. To register a plugin, enter the following fields:
To use an RTA plugin, you must configure the base URL of the RTA system on the Institutions page. |
|
Plugins Parameters |
Defines the parameters used by the plugins.
With the exception of customer-defined plugins and the PicaRTAPlugin and RTAPluginSymphony plugins, the parameters should not be modified. For more information on the new RTA plugin mechanism, refer to the following page on EL Commons: https://developers.exlibrisgroup.com...s/frontend/rta |
Publishing Subsystem
| Table Name | Description |
|---|---|
|
Datasource Index Extensions |
This table notifies the system which data source extensions require indexing. This table contains the following fields:
If you do not configure the data source in this mapping table, the system will load the extensions into the database, but it will not index them, making them unsearchable. |
|
File Splitters |
This mapping table defines the file splitter plug-ins that are supported and enabled in Primo. This mapping table contains the following fields:
|
|
File Splitters Params |
This mapping table defines the parameters that are passed to each file splitter plug-in. It allows you to create generic file splitters that support different structures. This mapping table contains the following fields:
By default, the OAI file splitter parses the record ID defined in the IdentifierXpath parameter and uses only the characters after the colon. For example, if the IdentifierXpath parameter contains oai:digi-tool.com:233566, the splitter uses 233566 only. If you want to prevent this split, add the SplitRecordId parameter to this mapping table and set its value to false. |
|
For MARC Exchange data sources, you can define which MARC tag to use as the source for the original record ID. This is necessary when the original record ID is not stored in 001, which is the default. The MARC Exchange file splitter, which is a program Primo uses to split MARC Exchange source files for normalization, checks the MarcExchangeIdField parameter to determine which tag to use. For more information on file splitters, refer to the Primo Version 3.0 Highlights document. To specify a different source for the original record ID:
|
|
|
Popularity Sort Boosts1 |
Used to define the multiplier for the popularity rank of the following clicks in the Front End:
The number of clicks is counted across all scopes and applies to local records only. The count is stored in P_PNX_EXTENSIONS and indexed so that the SE can sort by the information. |
|
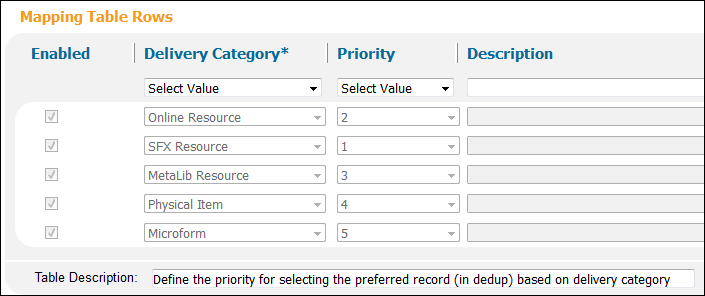
Preferred Record-Delivery Category Priority |
This table allows you to set the priority for each type of delivery category to determine the preferred record in a Dedup group.
|
|
Source Format |
The source format not only contains information about the format, but it also defines the physical format of the harvested records, which the publishing platform uses to process records differently. Currently, there are five possible physical formats that are identified by numeric codes. Four of these formats are XML, which differ to a certain extent. If you add a new source format, it is important to define the correct physical format. Note that physical formats cannot be added. The following physical formats are valid:
For every source format, the following fields should be defined:
|
Static Facets Subsystem
| Table Name | Description |
|---|---|
|
Static Facets1 |
Defines the static facets. |
|
facet_fsize_values1 |
Defines the facet file size values. |
|
facet_lang_values1 |
Defines the facet language values. |
|
facet_pfilter_values1 |
Defines the facet pre-filter values. Populates the Basic Media Type code table and the media types on the Basic Search tile in the Views wizard. |
|
facet_tlevel_values1 |
Defines the top-level facet values. By default, the Available and Online Resources top-level facets have been defined as static facets to ensure that they display when they are not in the top hits. |
|
facet_rtype_values1 |
Defines the facet resource type values. |
Adaptors Subsystem
| Table Name | Description |
|---|---|
|
ILS Gateway Adaptors1 |
This mapping table configures the OPAC via Primo adaptors that are used for each type of ILS gateway. For more information, see the Primo Interoperability Guide. |
|
PushTo Adaptors1 |
Allows hosted and local Primo customers to configure PushTo plug-in adaptors at the installation level. To configure an adaptor, populate the following fields:
Currently, new PushTo adaptors can be added to the classic UI only. |
|
PushTo Adaptors Configuration |
This table allows you to override the default URL used for RefWorks. To use a different URL for RefWorks, update the following fields:
|
|
RTA Adaptors1 |
Configures RTA plug-in adaptors. |
ILS Gateway Subsystem
| Table Name | Description |
|---|---|
|
ILS Adaptors Templates1 |
This mapping table configures the templates that are used in ILS requests and responses for OPAC via Primo. To ensure that Voyager sends all items for each location, you must disable ID 73001, enable IDs 73001a and 73001b, and then deploy this mapping table. This allows Primo to send separate requests for holdings and items to Voyager. |
|
ILS Templates Parameters1 |
This mapping table configures the parameters that are used in ILS requests and responses for OPAC via Primo. |
|
ILSG Configuration1 |
This mapping table defines the general configuration settings for the ILS gateway: |
OPAC Via Primo Subsystem
OPAC Via Primo Subsystem: (For more information, see Configuring OPAC Via Primo.)
| Table Name | Description |
|---|---|
|
Acquisition Request Detailed Display |
This table configures the display mappings for acquisition requests. To prevent duplication of information in the new UI, do not include fields that already display in the brief display of the item. |
|
Call Slip Request Detailed Display |
This table configures the display mappings for call slip requests. To prevent duplication of information in the new UI, do not include fields that already display in the brief display of the item. |
|
CallSlip Optional Request Parameters |
This table configures the display settings for optional call slip request parameters. |
|
Fines Brief Display |
(New UI only) This table defines which fields display in the brief display of an item in the My Library Card > Fines tab. The first row of the brief display contains the most important information and is not configurable. The second row, which is configurable, allows you to define up to three parameters per field and the delimiter that separates them. The Library card Labels code table defines the labels for the brief display. Out of the box, only the fields that require text have been defined. |
|
Fines Detailed Display |
This table configures the display mappings for the fines and fees list. To prevent duplication of information in the new UI, do not include fields that already display in the brief display of the item. |
|
Hold Optional Request Parameters |
This table configures the display settings for optional hold request parameters. |
|
Holdings Record Configuration |
This table configures the display mappings for holding records. |
|
Hold/Recall Request Detailed Display |
This table configures the display mappings for hold and recall requests. To prevent duplication of information in the new UI, do not include fields that already display in the brief display of the item. |
|
ILL Request Detailed Display |
This table configures the display mappings for ILL requests. To prevent duplication of information in the new UI, do not include fields that already display in the brief display of the item. |
|
ILL Optional Request Parameters |
This table configures the display settings for optional ILL request parameters. |
|
ILS API Configuration |
This table maps the ILS gateway adaptor to base URLs. For more information, see the Primo Interoperability Guide. For OPAC via Primo customers, the Match for holdings filter column defines which subfields from the Library Availability field in the PNX record should be used to match with holdings and items sent by the ILS. The following options are available:
|
|
Items Brief Display |
(New UI only) This table defines which fields appear in the brief display of an item on the Full Display page. You can define up to three parameters per field and the delimiter that displays between them. |
|
Library card alerts |
(New UI only) This table allows you to configure the alerts next to the various tabs (such as Loans) in My Library Card. For loans, you can configure the number of days before a loan is due to display the alert. This alert indicates that a loan is due soon or is overdue. If you want display the loans with the alert at the top of the list, you will need to configure the ILS to retrieve the list by due-date ascending. |
|
Loans Brief Display |
(New UI only) This table defines which fields display in the brief display of an item in the My Library Card > Loans tab. The first row of the brief display contains the most important information and is not configurable. The second row, which is configurable, allows you to define up to three parameters per field and the delimiter that separates them. The Library card Labels code table defines the labels for the brief display. Out of the box, only the fields that require text have been defined. |
|
Loans Detailed Display |
This table configures the display mappings for the loans list. To prevent duplication of information in the new UI, do not include fields that already display in the brief display of the item. |
|
Loans List Configuration |
This table defines which fields display in the My Account > Loans tab. For the active list, use the loans.brief.active.column2 through loans.brief.active.column7 values in the Column column to configure the order of the fields. For the historical list, use the loans.brief.history.column2 through loans.brief.history.column7 values in the Column column to configure the order of the fields. |
|
Location Item content |
This table configures the columns that display in the list of items on the Locations tab. Column names that cannot be found will be ignored by the system. |
|
My Account Menu Configuration - OvP |
For the classic UI, this table defines which tabs appear in My Account and the order in which they appear. The order of the tabs is determined by the myaccount1 (top) through myaccount5 (bottom) values in the My Account function column. For the new UI, this table configures only the existence of the tabs in My Library Card and does not configure the order of the tabs. You must use CSS to configure the order. The Overview tab always appears and cannot be hidden. |
|
OvP Funtionality |
Enables miscellaneous functionality for OvP configurations. For more information, refer to the Primo Interoperability Guide. |
|
Personal Setting Fields |
This table configures the display mappings for personal settings. |
|
Photocopy Optional Request Parameters |
This table defines the optional mapping fields for photocopy requests. |
|
Photocopy Request Detailed Display |
This table configures the display mappings for photocopy requests. To prevent duplication of information in the new UI, do not include fields that already display in the brief display of the item. |
|
Recall Optional Request Parameters |
This table configures the display settings for optional recall request parameters. |
|
Requests Brief Display |
(New UI only) This table defines which fields display in the brief display of an item in the My Library Card > Requests tab. The first row of the brief display contains the most important information and is not configurable. The second row, which is configurable, allows you to define up to three parameters per field and the delimiter that separates them. The Library card Labels code table defines the labels for the brief display. Out of the box, only the fields that require text have been defined. |
|
Requests List Configuration |
This table defines which fields display in the My Account > Requests tab. The order of the fields is determined by the request.brief.column1 (first) through request.brief.column7 (last) values in the Column column. |
|
Short Loan Display |
This table configures the display mappings for short loan requests. |
|
Short Loan and Booking Request Detailed Display |
This table configures the display mappings for the short loan and booking requests. To prevent duplication of information in the new UI, do not include fields that already display in the brief display of the item. |
|
Templates for Link to ILS Requests |
Defines the link templates for Aleph requests. |
|
UB Request Optional Request Parameters |
This table configures the display settings for optional UB request parameters. |