
Publishing and Inventory Enrichment (General Publishing)
- Catalog Administrator
- Repository Administrator
- General System Administrator
- Incrementally published data through files or OAI-PMH (Open Archives Initiative Protocol for Metadata Harvesting).
- Optionally enriching the data with non-bibliographic record data (such as inventory-related data).
- Normalization (reformatting) of the published data.
- Notification about inventory deletion.
The General Publishing job compares processed records with the last published value to ensure that records are not published and republished if data did not change.
The 005 field is removed from the last published value and current processed value before the comparison, thus a change to the 005 field is not considered a change.
This is because the record is often changed due to a "Save" operation or editing + Save operations, but no relevant change has been done.
The input to ongoing incremental General Publishing is all records (bibliographic, holdings, circulation data, and optional course reserves data - depending on the profile definitions) that were changed and "touched" (saved without a change) since the last incremental job run, and all records whose related entity was changed. The General Publishing works according to the same principles as Publishing to Primo
Creating a General Publishing Profile
- On the Publishing Profiles page (Resources > Publishing > Publishing Profiles), select Add Profile > General Profile. The first page of the Publishing Profile wizard appears.
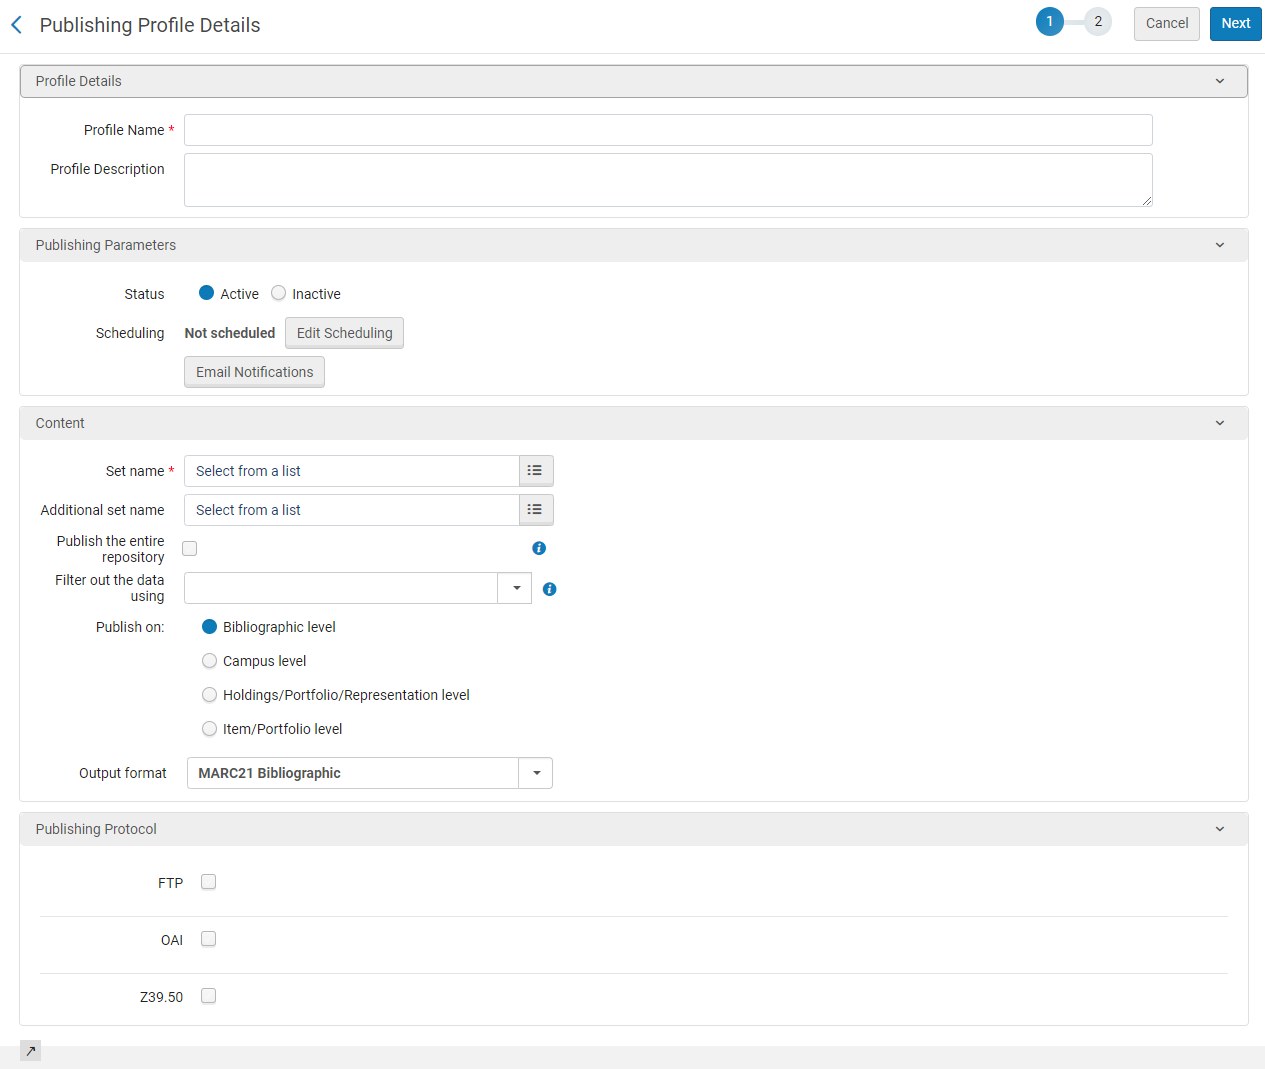 Publishing Profile Details Page - Wizard Step 1
 - Complete the following fields in the Publish Profile Details wizard:
Some of the fields described below are only displayed when certain options are selected.
Publishing Profile Details Page - Wizard Step 1 Field Description Content Type When available, select the type of record that you are publishing – bibliographic or authority. The remaining fields on the page change depending on what you select. Profile Name A unique profile name. Profile Description A free text description of the profile. Publishing Parameters section Status
Select Active or Inactive.
Scheduling
Select a scheduling option. The exact times are dependent on your time zone and data center.
If you select Not scheduled, the publishing profile does not run automatically.
Email Notifications Specify the email addresses of users to receive email notifications when the publishing profile is complete. You can choose whether to send notifications for successful jobs and/or jobs that contain errors. Content section Set name Select the set of records to publish. When you select an electronic collections set, the published content is the bibliographic or portfolio level associated with the set identified by your setting for Publish on (see below). Note that if you are publishing from the Network Zone, you cannot select an itemized set.
When you change the set, the previous set is published as deleted, because the new set is the new population that should be published by the job. Records that appear in both sets are not published as deleted.
Additional set name Optionally, select another set of records to publish.
If the publishing is on the Bibliographic level, the output from both sets will include one title, with all the information--Physical / Electronic (Network Zone) / Electronic (Institution Zone)--linked to a single title.
Publish the entire repository Enables users to export the complete content of their bibliographic records. Users can customize pertinent publishing profiles that encompass the entire repository. Once selected, the fields Set name and Additional set name are disabled.
This option is relevant only for bibliographic-level publishing.
Additional information:
- When selecting this option, the set name automatically changes to "Entire repository default set". Additionally, the set characteristics (The query for the set/set creating principle) is MMS ID > 0.
- The principle of publishing behind the scenes differs from the classical general publishing in that behind the scenes publishing is based on all changes logged since the last run in a designated table than compared to the last published records. The regular flow is based on the comparison of a specified set with the last published records.
- There is no limitation on the number of general publishing profiles.
- The first run of the profile is based on the regular concept of processing all records in the set. No special configuration is needed, but it is expected to take some time.
- Switching an already functioning profile to the "entire repository" is possible if your current set represents all your records.
- There is no difference between "republishing" and the classic general publishing. Both publishing mechanisms work the same.
A filter for the set of records that you selected in Set name. The list of filters that appears is a list of the indication rules that you have created in the MD Editor. See Working with Indication Rules for more information. When you run the publishing job, the filter that you select is applied to the set of records after the enrichment of records occurs (if you specify enrichment, as shown below) and before the filtered set of records is normalized and published.Records in the selected set that match the true condition specified in the indication rule are filtered out of the set and published as deleted. In case such a record is changed to match the false condition specified in the indication rule, it will be published as updated again.- The filter rule should not be used if more than 50% of the set is filtered out and the set has more than 10,000 members. When you exceed these conditions, the publishing job runs very slowly. Any members that can be removed by the set definition should be done there and not in the filter rule.
- If this rule is modified, republishing (rebuild index) needs to be performed.
Publish on (Bibliographic records only) The level at which the records are published. - Bibliographic level (standard) – Publish records at the bibliographic level. If this option is selected, one bibliographic record is published containing the holdings, portfolio, and item details from the inventory data enrichment.
- Campus level – Publish records at the level of a campus' holdings. When this option is selected, one bibliographic record is published for each campus' holdings associated with the bibliographic record. If one bibliographic record is associated with holdings in multiple campuses, the bibliographic record is published multiple times. A campus is defined either by Alma's campus list or the OCLC symbol mapping, as defined in the "Institution OCLC symbol" configuration table. If a holdings' library or location is not associated with a campus, the default configured in the profile is used.
- Holdings/portfolio level – Publish records at the holdings or portfolio level. This option is useful if your institution needs to publish holdings records separately from the bibliographic record. When this option is selected, one bibliographic record is published for each unique holdings or portfolio associated with the bibliographic record. If one bibliographic record is associated with multiple holdings or portfolios, the bibliographic record is published multiple times.
Additional normalization processes must be applied to remove the bibliographic information from the record.
- Item/portfolio level – Publish records at the item or portfolio level. When this option is selected, one bibliographic record is published for each unique item or portfolio associated with the bibliographic record. If one bibliographic record is associated with multiple portfolios or items, the bibliographic record is published multiple times. Alma displays a message to alert you to this method of output processing. This functionality may be useful for integration with external sources such as the Hathi Trust and Aurora (State Library of Queensland).
Output format (Bibliographic records only) An output format (The options that appear in this list are determined by the Active Registry settings for your system. To have these settings changed, contact Ex Libris Support): - MARC 21 Bibliographic
- BIBFRAME Bibliographic - BIBFRAME records are supported for publishing as "BIBFRAME records" as part of general publishing. Users can use BIBFRAME works and Instances that are held in Alma also in external systems.
BIBFRAME can be published as BIBFRAME and as MARC.
- UNIMARC
- KORMARC
- Dublin Core (Simple). For MARC/DC mapping, see MARC21 to Dublin Core Crosswalk and Dublin Core to MARC21 Crosswalk.
- Dublin Core (Qualified) - This aim of this output is mainly to support publishing Alma's core qualified DC records without losing data (as if it was published in Dublin Core (Simple). The publishing job will import records from Marc to Qualified Dublin Core, but will convert them to Simple DC fields.
- MODS (This option is configured in Configuration > General > Integration Profiles > OAI Repository Definition integration profile > Metadata Prefixes)
- ETD-MS
- RDA/RDF
Publish records with Alma URI This option is only displayed when the BIBFRAME Bibliographic output format is selected! This option enables users to decide whether to include an Alma URI in the record when publishing MARC records that are converted to BIBFRAME format.
- When selected - publishes the BIBFRAME records with the Alma URI. If the aim is to provide records to a third party, it is important to include the Alma URI. This ensures the information can be effectively connected back to Alma.
- When unselected - publishes the BIBFRAME records without the Alma URI. If the intention is to republish records as BIBFRAME to Alma through third-party linked data editors, it is recommended to publish the records without an Alma URI.
Publishing Protocol section – FTP
The following options are displayed only when the FTP option is selected in the Publishing Protocol section.
FTP Select to publish the records using FTP. Once selected, the following fields appear: FTP configuration and Sub-directory FTP configuration field values come from your institution’s setup (see Configuring S/FTP Connections). The Sub-directory field is an additional relative path to the FTP configuration. For example, if you specified Alma in the Sub-directory field during S/FTP connection configuration and you enter exports in this field, the data is exported to the Alma/exports directory. For a pre-defined list of sites (maintained by Ex Libris), you can disable compression for an FTP connection used by a general publishing profile. After selecting one of the defined sites, select Disable file compression. The Compressed file extension field is removed from the page (since the extension is not used for this profile). The sites are ftp.exlibris.co.il and scp.oclc.org.Ex Libris support can add an address to the Uncompressed files hostnames list.Records that were not modified since the last run are not published. Select this option to publish all the non-deleted records in the set (specified in the Content section of this profile) to the FTP file.
If this parameter is not selected, only records that were modified, created, or deleted since the last run are published to the FTP file.
If you work with third parties that require you to publish the whole set (because they are not able to work with a partial set/only modified records), select this parameter.
When this parameter is selected, the job report contains the Total records written to file counter in addition to Records processed counter.
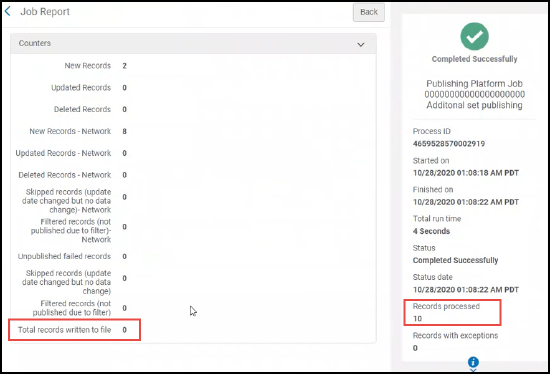
Total records written to file counter shows the total number of records in the set, all of which are published since you selected the Include all records each time file is published parameter. The Records processed counter shows the number of records that were processed because they were modified since the last time the publishing job ran.When this option is selected, the deleted records are not published. The published files are only those that contain ‘New’ in the File name. Files that contain ‘Update’ or ‘Delete’ are not published. The number of files depends on the Number of records in the file definition. See Number of records in the file.
Disable file compression Select this option if you do not want to compress the output to a tar.gz file. Compressed file extension This extension identification for compressed output of tar.gz appears when Disable file compression is not selected. Physical format Select XML or Binary. For XML output, the file extension is .xml.For binary output, the file extension is .mrc.Only MARC XML is compressed. When selecting MARC binary, the published files are not compressed.The maximum number of records for each file published.Choose a maximum of 1,000, 5,000, or 10,000 records per file or select a single file option with no maximum records specified. The default is 1,000. This enables you to limit how many records are included in each file to align with external source requirements regarding file structure. The final number of records per file is not precise.It is not recommended to choose the single file option when publishing large sets.If publishing to FTP, the file size for one file cannot exceed 8GB.Example:If a set of 25,000 records is published, and the Number of records in file is set to 10,000 in the publishing profile, the resulting files are:- File 1 = up to 10,000 records
- File 2 = up to 10,000 records
- File 3 = remaining records
Select Yes or No to indicate your preference to use or not use the default file name. See the following in this table for more information regarding the file naming conventions:
.xml and .mrc file extensions might be missing for some institutions. If this is the case for you, contact Ex Libris Customer Support to enable a customer parameter that allows you to automatically add the .xml and .mrc extensions to the file name.
When you select Yes for Use default file name, you must specify a file name prefix. The output file is named in the following manner:
<prefix>_<time stamp>_<job ID>_<new or update or delete>.<xml or mrc>.<tar.gz>You are only able to enter allowable characters in this field. The system automatically deletes any characters that are not permitted.File name When you select No for Use default file name, you must specify a file name. You may specify a static or dynamic file name in the following manner: - Enter a single file name to be used for the publishing output that is created.
- For dynamic file names, enter the file name variables as indicated below. Use the information icon for assistance.
<name of your choice>_{JOB_ID}_{TIMESTAMP}The {JOB_ID} inserts the publishing job ID in the file name. The {TIMESTAMP} inserts the date and time stamp in the following format: YYYYMMDD_HHMMSS[mmm]. This is year, month, day and hour, minutes, and seconds plus milliseconds.This creates a file with a name in the following format:<name>_<job ID>_<time stamp>_<new or update or delete>.<xml or mrc>.<tar.gz>When you use the dynamic file naming convention, the system generates new, additional files instead of overwriting a previous file with the new file and using the same name.
You are only able to enter allowable characters in this field. The system automatically deletes any characters that are not permitted.Publishing Protocol section – OAI
The following options are displayed only when the OAI option is selected in the Publishing Protocol section.
OAI Select his option to publish using the OAI protocol, that is, publish the records so that they are exposed as an OAI set. OAI publishing profiles always publish records incrementally and the published records include deleted records.
If the target to which you are publishing cannot process record deletions, you can use FTP publishing with the option to include all records (see Include all records each time file is published). Another option is to use the Rebuild Entire Index option available with the Republish action to republish the whole set as new that has the same result as the previously available (prior to April 2019) Full publishing mode.
If the institution configures Alma as an OAI repository (see Setting Up OAI Integration), it is able to see the published records by OAI set using the standard OAI-PMH protocol. Note that the format of the records (the content in the metadata element) is in the format selected as the output format, for example, MARC 21.
When OAI is selected, the parameters described below appear.
Set Spec A colon (:) separated list indicating the path from the root of the set hierarchy to the respective node. It must be unique for each set. Set Name The name of the set. The set must be defined according to the OAI requirements. Metadata Prefix The prefix on the output. Publishing Protocol section – Z39.50 (Bibliographic Records Only)
The following options are displayed only when the Z39.50 option is selected in the Publishing Protocol section.
- Host
- Port
- Database Name
- Group ID
- User Name
- Password
Publish using Z39.50. These settings must be provided by/coordinated with the group/service (such as KERIS) to which you are connecting. These are the target's connection parameters. - Select Next.
Depending on the Output format selected, page 2 of the Publishing Profile Details wizard differs in its display of options.
See below the differing pages that are displayed when the particular Output format is selected. The options for each page are further described in step 4. Publishing Profile Details Page - Content Section - Output format
If you selected a MARC format as the output format: 
If you selected as the output format
- Dublin Core (Simple or Qualified)
- ETD-MS
- MODS
For authority records 
- Complete the fields using the table below. Many fields are self-explanatory, and are not described below.
| Field | Description | ||||||||||||||||||||||||
|---|---|---|---|---|---|---|---|---|---|---|---|---|---|---|---|---|---|---|---|---|---|---|---|---|---|
| Bibliographic Normalization section | |||||||||||||||||||||||||
| Correct the data using normalization processes | Select a normalization process (if required), from the processes previously created and saved. See Working with Normalization Processes. | ||||||||||||||||||||||||
|
Linked data enrichment (MARC only) |
Select to add linked data URIs to certain records when publishing in accordance with the definitions in the Linked Data Enrichment Configuration. Note that when you select the RDA/RDF option for the Output format parameter (see above), the Linked data enrichment check box is automatically selected. |
||||||||||||||||||||||||
| Bibliographic Enrichment section (MARC only) | |||||||||||||||||||||||||
| Add Management Information | Select to add management information to the output record. When selected, the following parameters appear.
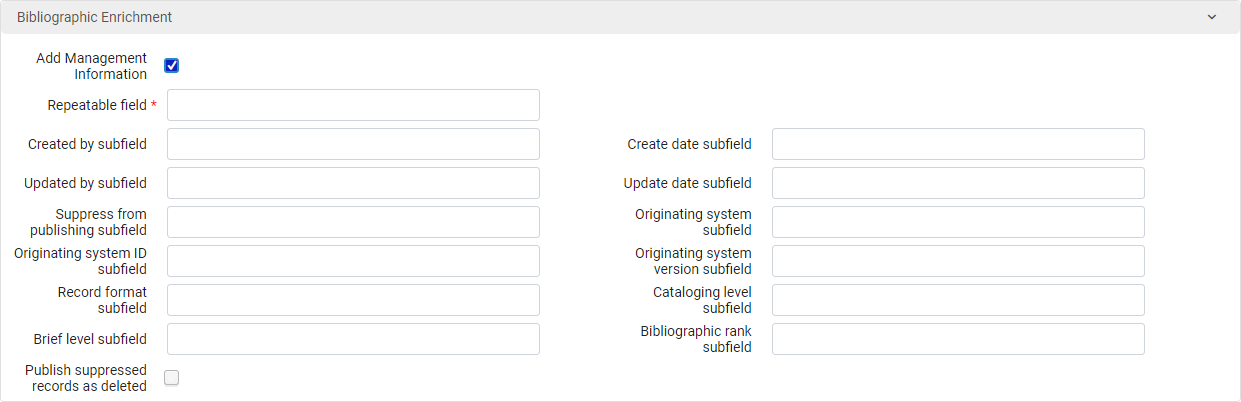 Enter the following information:
These fields are maintained internally by Alma. Originating system fields represent information about the external system from which the record was imported. For information about cataloging level, see Cataloging Privileges. For information about brief level, see Working with Brief Record Levels.
|
||||||||||||||||||||||||
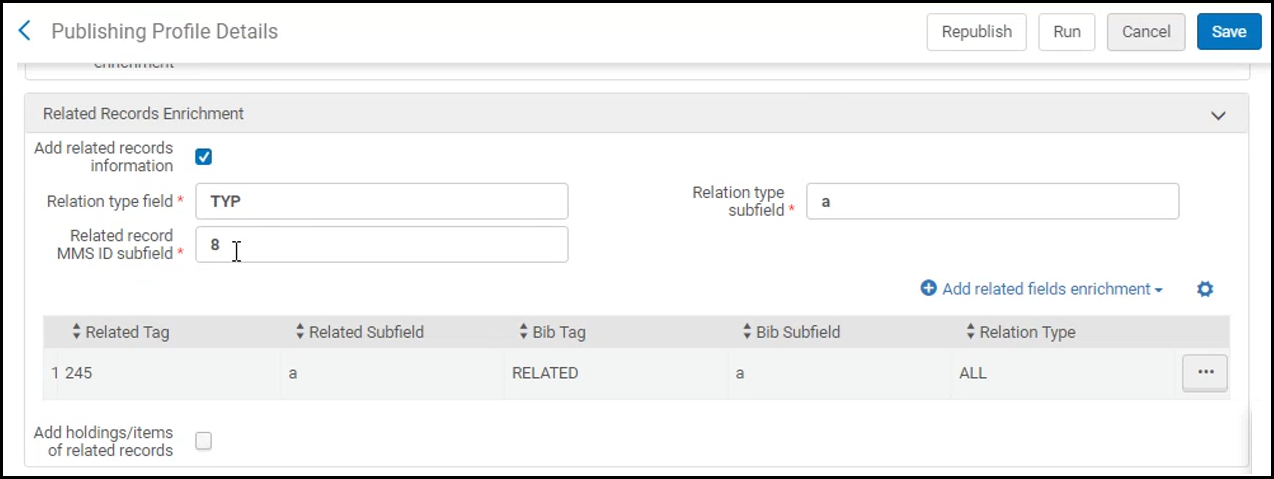
| Related Records Enrichment section (MARC only) | |||||||||||||||||||||||||
| Add Related Records Information |
Use the Related Records Enrichment configuration to enrich the bibliographic record published to third-party systems with the content of any field from related records. This enables the external catalog to have a full representation of the catalog and inventory of your library. The related records must be published during the initial publishing. Any update of the related record or the related physical inventory triggers re-publishing of the data. When selected, the following parameters appear:
|
||||||||||||||||||||||||
|
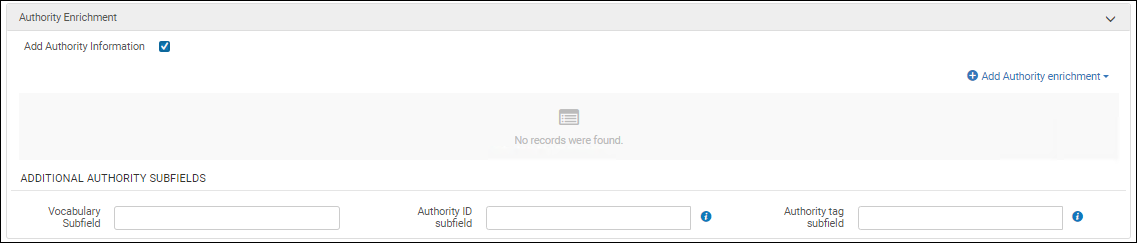
Authority Enrichment section (MARC only) To enable this section, contact Ex Libris customer support.
|
|||||||||||||||||||||||||
| Add Authority Information |
Use the Authority Enrichment configuration to enrich the bibliographic record published to third-party systems with the content of any field from the bibliographic-linked authority record. Any update of these terms triggers re-publishing of the data. This is useful for example, when the Name 'Mark Twain' is embedded within a bib record and library would like to publish both 'Mark Twain' and non-preferred term 'Samuel Clemens'. When selected, the following parameters appear.
Enter the following information:
|
||||||||||||||||||||||||
| Physical Holdings Enrichment section (MARC only) | |||||||||||||||||||||||||
| Add Holdings Information | Select to add holdings information to output. The output will contain a record with merged holdings and bibliographic record data.
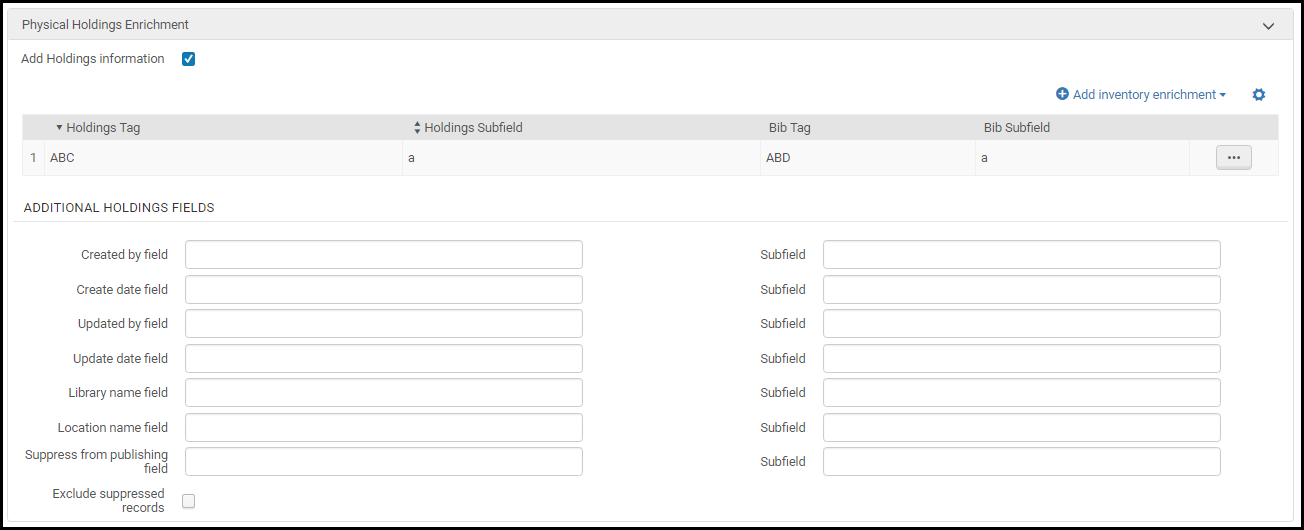 Holdings control fields (such as LDR) are added to the output as if they were bibliographic fields of the same number.
Use Add inventory enrichment to add other holdings fields to the output as if they were bibliographic fields. Each time you select Add inventory enrichment, enter the holdings field number (Holding Tag) and subfield (Holding Subfield) and then enter the output field (Bib Tag) and subfield (Bib Subfield) in which you want to place it and select Add. For subfields, enter just the letter, such as b (not $b or $$b).
If you select Exclude suppressed record, suppressed holdings records will not be published. This field does not affect the publishing of the bibliographic records. Bibliographic records will continue to be published unless they are marked Suppress from Discovery (see Suppress from Discovery).
For all other fields: For each item that you want included in the output file (if it exists), enter the field and subfield in which you want it to appear: holdings created by, holdings create date, holdings updated by, holdings update date, library name, location name, and suppress from publishing (see Suppress from Discovery). For subfields, enter just the subfield letter, such as b (not $b or $$b).
If configured, you can also map the IE ID field/subfield for integration with Primo. Contact Ex Libris for more information.
If you choose to publish on Holdings/Portfolio/Representation level, Add Holdings Information should not be selected. |
||||||||||||||||||||||||
| Physical Items Enrichment | |||||||||||||||||||||||||
| Add Items Information | Select to add physical item information to the output. The output will contain a record with merged item and bibliographic record data.
When you select Add Holdings Information and you select Exclude suppressed record to suppress holdings from publishing that are marked Suppress from Discovery, any items attached to the suppressed holdings will not be published, even when Add Items Information is selected.
 Publishing profile - General Physical Items Enrichment
Enter the following information:
Items PID is an internal ID used primarily for publishing. For other fields, see Adding a New Book or Journal Article and Updating Item-Level Information.
Note that for item information such as library, location, and material type that may have both a code and description, only the code is published, not the description.
Note that you can use either the permanent library/location or the current library/location fields. When you use the current library/location fields, the output includes either the permanent library/location or the temporary library/location information, depending on the item’s library/location at the time of publishing.
Note that dates are published according to the UTC time zone.
For more details about adding item information, refer to the General Publishing Profile: Add Holdings and Item Info video (8:16 mins).
|
||||||||||||||||||||||||
| Electronic Inventory Enrichment section (MARC only) | |||||||||||||||||||||||||
| Add Electronic Portfolio Information | Select to add electronic inventory information to the output. The output will contain a record with merged portfolio and bibliographic record data.
Enter the following information:
|
||||||||||||||||||||||||
| Portfolio PID | The subfield (other than $8) into which to place the portfolio PID.
By default, $8 contains the portfolio ID. Use this field if you prefer to have the portfolio ID stored in a subfield other than $8 and use a normalization rule to remove $8.
|
||||||||||||||||||||||||
| Activation status | The subfield into which you want to place the activation value. The values displayed in this field are either Available or Not Available. | ||||||||||||||||||||||||
|
URL Type subfield |
This information is pulled from the portfolio record as shown in the Electronic Portfolio Editor on the Linking tab. The URL type values are Static URL, Dynamic URL, and Parser Parameters. For stand-alone portfolios:
For electronic collection-linked portfolios, the settings on the portfolio (if defined) override the settings on the service and:
If the portfolio has no content in the Static URL, Dynamic URL, or Parser parameters (override) fields (regardless of the URL type selected):
|
||||||||||||||||||||||||
| Access URL subfield | The subfield into which you want to place the access URL for the electronic resource.
If you specify this field, you must enter the Link Resolver Base Resolver field.
|
||||||||||||||||||||||||
| Link Resolver Base URL | The base URL for your link resolver. For the Alma Link Resolver, use the following format and insert your institution's information where indicated:
http://<Primo server host:port>/openurl/<Primo_institution_code>/<Primo_view_code>?
For Primo VE, use the following format:
https://<Primo_domain>/discovery/openurl?institution=<Alma_institution_code>&vid=<Primo_view_code>&
|
||||||||||||||||||||||||
| Static URL | This publishes the field and the selected subfield that extract the portfolio-level Static URL. | ||||||||||||||||||||||||
|
Electronic Material Type |
This publishes the electronic material type of the electronic inventory that is from the electronic portfolio entity. |
||||||||||||||||||||||||
| Library | This publishes the library name. | ||||||||||||||||||||||||
|
This information is pulled from the portfolio record as shown in the Electronic Portfolio Editor on the Linking tab. The Proxy selected parameter identifies the proxy profile used for authentication. When there is no combination of Proxy enabled set to Yes (in the portfolio record) and no Proxy selected value at the portfolio and group, portfolio, service and group, or service level (in the portfolio record), the resolver proxy settings are published. The resolver proxy settings are published in the following manner:
Note the following:
|
|||||||||||||||||||||||||
|
Proxy Enabled subfield |
This information is pulled from the portfolio record as shown in the Electronic Portfolio Editor on the Linking tab. The Proxy enabled options are Yes and No. When the Proxy enabled parameter is set to No, see the Proxy Selected subfield explanation for how publishing is handled. |
||||||||||||||||||||||||
| Interface Name | This publishes the interface name. | ||||||||||||||||||||||||
|
Authentication Note subfield |
This information (a note regarding authentication that is visible to patrons) is pulled from the portfolio record as shown in the Electronic Portfolio Editor on the Notes tab. Authentication notes are published from:
|
||||||||||||||||||||||||
| Public Note | This publishes the public note, if there is one. | ||||||||||||||||||||||||
|
Portfolio/Service Internal Description subfield |
This information (viewable by staff only) is pulled from the portfolio record as shown in the Electronic Portfolio Editor on the Notes tab. The data that is published is determined by all of the following:
When there are notes from more than one entity, all notes are reported by repeating the subfield. |
||||||||||||||||||||||||
| Coverage Statement | This publishes the coverage statement. | ||||||||||||||||||||||||
| CZ Collection Identifier | This publishes the Community Zone electronic collection ID. | ||||||||||||||||||||||||
|
Collection ID |
This publishes the ID associated with the Collection Name option. This is the ID for the institution-level electronic collection (not the Community Zone-level ID). |
||||||||||||||||||||||||
| Collection Internal Description subfield | This information (viewable by staff only) is pulled from the portfolio record as shown in the Electronic Portfolio Editor on the Electronic Collection Description tab. | ||||||||||||||||||||||||
| Collection Name | This publishes the electronic collection name. | ||||||||||||||||||||||||
|
License Code |
This option publishes the electronic portfolio's license. If the License field for the electronic portfolio is empty, the electronic collection license information is published instead. |
||||||||||||||||||||||||
|
License Name |
This publishes the license name from the electronic portfolio entity (specific to the license code). |
||||||||||||||||||||||||
|
PO Line |
This publishes the purchase order related to the electronic inventory. |
||||||||||||||||||||||||
|
Additional PO Line |
This publishes the additional purchase orders that are related to the electronic inventory. |
||||||||||||||||||||||||
| Created by | This publishes the created by information. | ||||||||||||||||||||||||
| Create date | This publishes the created dated. | ||||||||||||||||||||||||
| Updated by | This publishes the updated by information. | ||||||||||||||||||||||||
| Update date | This publishes the updated date (when it was modified). | ||||||||||||||||||||||||
| Activation date | This publishes the activation date. | ||||||||||||||||||||||||
| Direct Link | This publishes a link resolver URL with the portfolio ID that directly resolves to the portfolio's target URL. | ||||||||||||||||||||||||
| Available for Campus subfield | These fields appear only when distributed access restrictions for electronic resources are configured in a multi-campus environment or for institutions implementing a Network Zone. Available for Institution subfield appears only for institutions implementing a Network Zone. | ||||||||||||||||||||||||
| Available for Library subfield | |||||||||||||||||||||||||
| Available for Institution subfield | |||||||||||||||||||||||||
|
Service ID |
This option publishes the ID of the service to which the electronic portfolio is related. |
||||||||||||||||||||||||
| IE ID subfield | If configured, the subfield into which to place the IE ID of the electronic resource.
This field is for integration with Primo. Contact Ex Libris for more information.
|
||||||||||||||||||||||||
| Portfolio Coverage Information | |||||||||||||||||||||||||
| Repeatable field |
Enter a field number into which to put the coverage information in the output record (one that is not used by the bibliographic record); this field is mandatory. For example, if you enter 950, the output will contain <datafield tag="950" ind1=" " ind2=" "> ... </datafield>, with the information you enter in this area in subfields of this field. |
||||||||||||||||||||||||
| Portfolio id subfield | For each piece of coverage information that you want included in the output file (if it exists), enter the subfield in which you want it to appear. See rows below for the coverage information you can add. | ||||||||||||||||||||||||
| From Year subfield |
The Coverage and Embargo information is exported according to the selection made in the "Which coverage statement will be applied?" option in the portfolio editor's Coverage tab:
|
||||||||||||||||||||||||
| Until Year subfield | |||||||||||||||||||||||||
| From Month subfield | |||||||||||||||||||||||||
| Until Month subfield | |||||||||||||||||||||||||
| From Day subfield | |||||||||||||||||||||||||
| Until Day subfield | |||||||||||||||||||||||||
| From Volume subfield | |||||||||||||||||||||||||
| Until Volume subfield | |||||||||||||||||||||||||
| From Issue subfield | |||||||||||||||||||||||||
| Until Issue subfield | |||||||||||||||||||||||||
| Portfolio Embargo Information | |||||||||||||||||||||||||
| Repeatable field |
Enter a field number into which to put the embargo information in the output record; this field is mandatory. For example, if you enter 950, the output will contain <datafield tag="950" ind1=" " ind2=" "> ... </datafield>, with the information you enter in this area in subfields of this field. |
||||||||||||||||||||||||
| Portfolio ID subfield | For each piece of embargo information that you want included in the output file (if it exists), enter the subfield in which you want it to appear. See rows below for the embargo information you can add. | ||||||||||||||||||||||||
| Operator subfield |
See above. In the Embargo section of the output file, the "Operator" field exports the below operators. Since '<' and '>" characters are special characters in XML, using them within the XML content might cause errors in the output. Thus, these characters are encoded in the XML output as follows:
The number of years/months included/excluded (based on the selected operator) from the portfolio coverage. |
||||||||||||||||||||||||
| Number of Years subfield | |||||||||||||||||||||||||
| Number of Months subfield | |||||||||||||||||||||||||
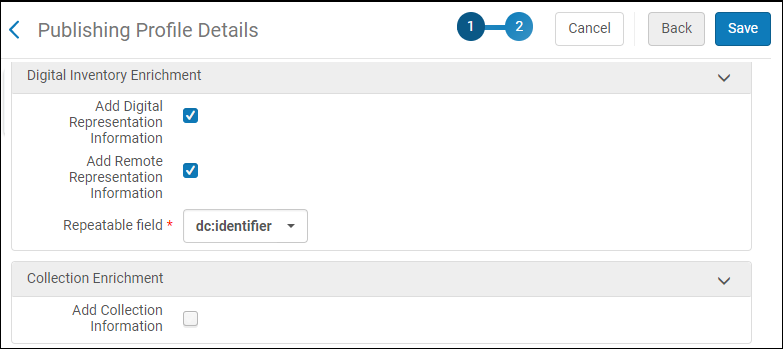
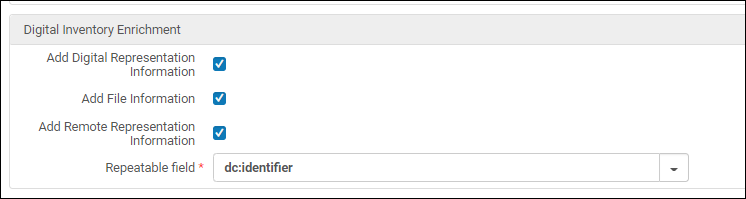
| Digital Inventory Enrichment section | |||||||||||||||||||||||||
| Add Digital Representation Information
Add File Information
Add Remote Representation Information
|
Select one or more of the following options:
For Dublin Core and ETD-MS only the Repeatable field appears, which will contain the delivery URL of the representation.
The following fields are displayed for a MARC21 record: 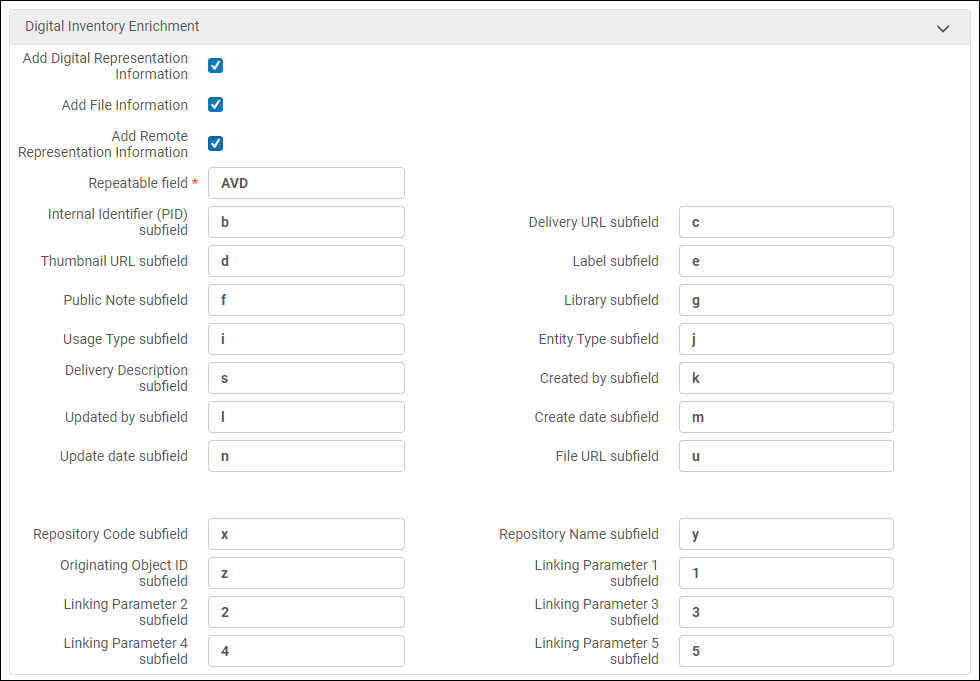 The following appears for a Dublin Core and ETD-MS record:
Enter the following information:
See the following rows for an explanation of certain fields.
|
||||||||||||||||||||||||
| IE ID subfield | If configured, the subfield into which to place the IE ID.
This field is for integration with Primo. Contact Ex Libris for more information.
|
||||||||||||||||||||||||
| Collection Enrichment section (MARC only) | |||||||||||||||||||||||||
| Add Collection Information | Select to add collection inventory information to the output. The output will contain a record with merged collection and bibliographic record data.
Collection enrichment applies only to digital collections and not electronic collections.  Enter the following information:
|
||||||||||||||||||||||||
| Institution Code Enrichment | |||||||||||||||||||||||||
| Institution Code Subfield |
When publishing a combined-results set that contains both records from the Institution Zone and activated records from the Network Zone, the data enrichment may include elements both from the member and from the Network. To differentiate between local information and Network Zone information, optionally enter the institution code. This institution code is added to all enriched entities, including all types of inventory and local extensions.
When publishing other types of sets, leave empty. |
||||||||||||||||||||||||

- Select Save to enter the profile in the database and return to the Publishing Profiles list page.
Working with an Existing General Publishing Profile
You can do the following with existing general publishing profiles.
- On the Publishing Profiles page (Resources > Publishing > Publishing Profiles), select General Profiles in the Publishing Profile Type filter.
- Select one of the following row actions:
To: Do: Edit the profile Select the Edit row action. View the profile's run history Select the History row action. Manually run the profile Select the Run row action. Note that you can also run a profile from inside the profile. Republish a subset, date range, or all of the records in the set, instead of an incremental updateSelect the Republish row action. Note that you can also run a profile from inside the profile. This action is only available for publishing profiles that you can edit.A job triggered by General Publishing > Republish method processes all input records, and includes them in the product, without skipping records whose processed value is identical to the last published value (unlike the regular ongoing incremental jobs).When the Republish row action is selected, select one of the following publishing modes from the pop-up dialog box:- Date Range – Enter a date range (from the beginning of the first day until the end of the last day) to identify the records in the set that you want to be published. When running the publishing using a date range, the modification date of the record is consulted. This option will also republish the records that were processed within the selected date range, not only the records that were actually published.
- Republish Subset – Select a separate (sub)set of records to publish. Note that you need to preplan your work for this option and have the set created that you want to use.
- Rebuild Entire Index – Republish the entire set and rebuild the entire publishing index. This option will recalculate the entire set and publish all the records as new. Use this option with caution. This action is not reversible.
The Rebuild Entire Index operation might take time for big sets, as the system first deletes the entire index. A workaround can be to duplicate the profile and run it from scratch.
- Select Run Now to republish runs immediately (as soon as available in the job queue). There is no scheduling option for this action.
Note that when you select Run Now, Alma saves the profile. If you made changes to the profile in addition to selecting Republish, those actions are saved before the publishing job starts.
Any additional job triggered (aside from the current job running) is not queued in the system and is marked as SKIPPED. Users need to run the additional jobs after the current job is completed.
Contribute the publishing profile to the Community Zone Select the Contribute row action to contribute the publishing profile to the Community Zone where other institutions can copy and use the profile. For details, see below. Delete the profile Select the Delete row action. Copy the profile Select the Duplicate row action.
When you edit a general publishing profile, the Run and Republish row actions are also available as buttons on the Publishing Profile Details page. These buttons perform the same actions as described in the procedure above. Note that when you use the Run and Republish buttons, they also save the profile.
Sharing Publishing Profiles in the Community Zone
- Catalog Administrator
- From the row actions, select Contribute for a publishing profile on the Institution tab of the Publishing Profiles page.
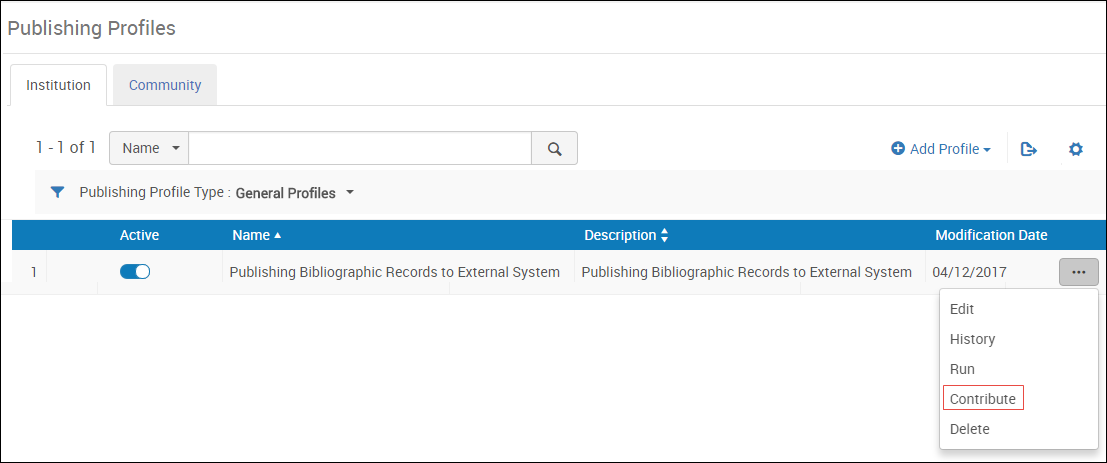 Publishing profiles PageA confirmation message dialog box appears.
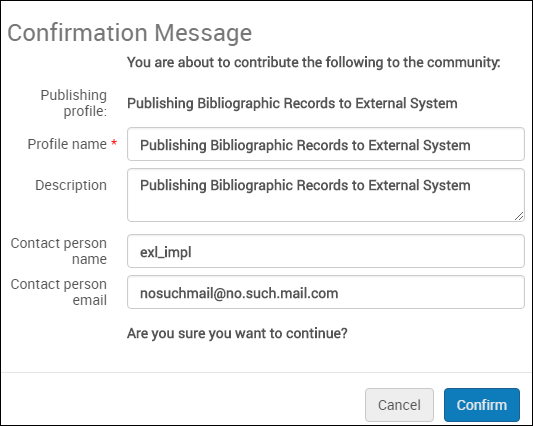 Publishing Profile Contribution Confirmation Message
 - You can optionally change the Profile name.
- It is recommended that you change the Description to include detailed information for institutions that will copy the profile. Include institution information such as the library information, FTP information, and/or vendor information.
- You can optionally enter or change an email address for the Contact person.
- Select Confirm. The profile appears in the Community tab and can be copied by any institution.
- Open the Community tab on the Publishing Profiles page (Resources > Publishing > Publishing Profiles).
To view more information about the profile, from the row actions, select View. The profile details appear. - Select Copy in the row actions list of the profile. The publishing profile is copied to your institution and the new profile is opened for editing. The profile is copied and Its status is Inactive by default.
- Edit the publishing profile details to match your requirements.
- When you are done, select Save.
- Select the Institution tab to view the profile that you copied.
Format of Published Data
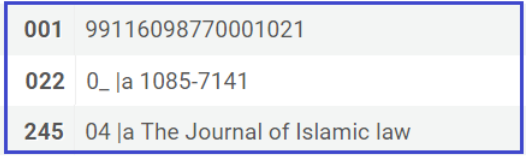
In the General publishing profile, Alma adds a root element 'collection' for DC and MARC formats, and 'modsCollection' element for MODS format.
This is an example of the a published file header in MARC format:
<?xml version="1.0" encoding="UTF-8"?>
-<collection>
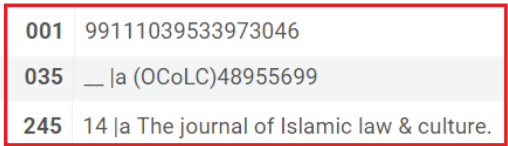
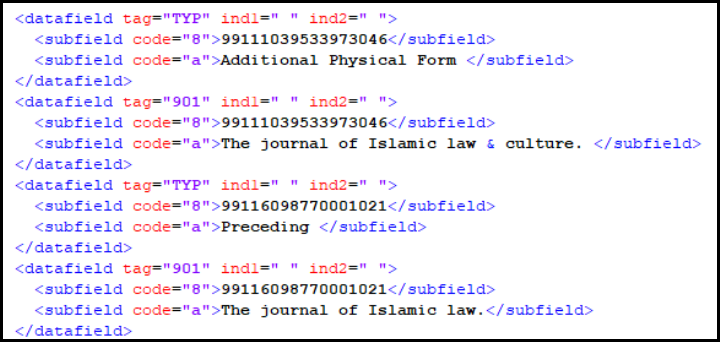
The bibliographic record retrieved from Alma is enriched with additional identifiers. The MMS ID of the Network Zone and the Alma Community Zone ID are added to the record in additional 035 marc fields. The Community Zone ID is added with the prefix (EXLCZ) while the Network Zone ID is added with the prefix (EXLNZ-network_code). The local MMS ID is in the 001 marc field. These additional shared IDs can be used for better identification of a common record. The local MMS ID should be used when there is a need to call an API in the institution for the record.