
Working with Bibliographic Records
- Cataloger
- Cataloger Extended
- Catalog Administrator
- Catalog Manager
Creating Bibliographic Records
Creating a MARC 21 Bibliographic Record
- Open the Metadata Editor (Resources > Cataloging > Open Metadata Editor).
- Select New > MARC 21 Bibliographic and select the default template for entering a bibliographic record.
The Metadata Editor opens this template.
- Enter the data for your bibliographic record. See the Metadata Editor Menu and Toolbar Options section for additional information regarding working with the Metadata Editor.
For information regarding entering record content in Hebrew, see Show Directional Characters and Insert Directional Characters.
For additional information on cataloging in Hebrew, see Special Issues in Hebrew Cataloging.When you catalog the 010 or 035 fields, enter a hash sign (#) for each space that you want saved for this field. The content is saved to the Alma database as spaces (for each hash sign entered), but appears in the Metadata Editor as the hash sign, to more clearly identify the exact number of spaces in the field.In the following fields, the system provides pop-up assistance after you type the first three characters (see the illustration below):- 260 $$a, b, e, f
- 264 $$a, b
- 505 $$r, t
- 561 $a
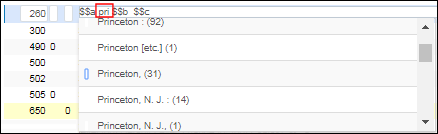 Pop-Up Assistance Example (Not Suggested Headings)When entering special characters, the pop-up assistance was implemented in the following manner with a customer parameter setting:
- When entering record content and the Metadata Editor provides suggestions (after typing the first few characters) and using the Eszett character or ss in place of the Eszett , the suggestions provided are specific to what you type. That is, typing values with ß, such as Großbritannien, displays only results that contain ß, and typing values with ss, such as Grossbritannien, displays only results that contain ss.
- When entering record content and the Metadata Editor provides suggestions (after typing the first few characters) and using the umlaut character or the letter without the umlaut, the suggestions provided are specific to what you type. So, if you type Müller, you get suggestions with the ü; and if you type Muller, you get suggestions without the ü.
- When entering record content and the Metadata Editor provides suggestions (after typing the first few characters) and you type a hyphen, only results appear that contain a hyphen, such as Baden-Baden. If, for example, you type Baden Baden without the hyphen, only results that do not contain a hyphen appear.
Contact Support to set the customer parameter for subfield suggestions to handle Metadata Editor suggestions in the manner that you prefer.The pop-up assistance provided for these fields is not suggested for authority or bibliographic headings. This pop-up assistance is determined by the descriptions that you create and save in the Controlled Vocabulary Registry (see Configuring Controlled Vocabulary Registry) and then, subsequently, identify in your metadata configuration using Choose Controlled Vocabulary (see Editing Fields) to select the Controlled Vocabulary Registry list of descriptions that you previously created.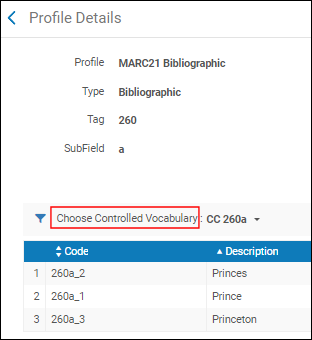 Choose Controlled VocabularyTo access suggested authority and bibliographic headings, press F3 from the field that you are entering/checking. The system opens a list of options from which to choose (note that the subfields are extracted according to their original cataloging order). If no headings suggestions are available, Alma displays No matching headings found. See Using F3 for more information.
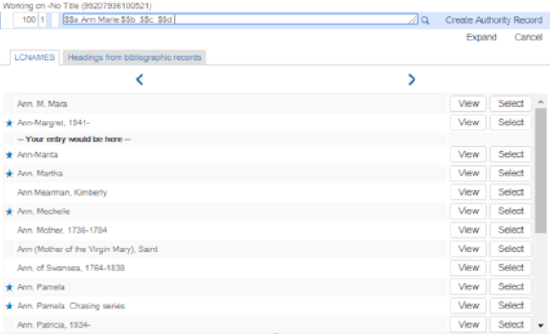 F3 Example - Suggested Authority and Bibliographic HeadingsIf you are working in IE and press F3, make sure that you press Enter while the focus is on the text. Otherwise, the headings list may not display properly.When priorities have been defined for multiple authority vocabularies, the system checks for matches in priority order and displays the results on separate tabs (such as GND and LCSH) in priority order from left to right when F3 is used. See Authority Priorities for more information.
- Local authorities are identified with the word (Local) in parentheses.
- Preferred terms are identified with a star. Non-preferred terms are blank at the left (the absence of a star).
- Select View to display the entire authority record.
- Select Select to insert the content into the record on which you are working.
- Select the Headings from bibliographic records tab to view the suggested bibliographic headings.
- For additional information, refer to Working with Authority Records.
- Select the Save icon. For additional information regarding saving records, refer to Saving Records in the Metadata Editor.
Working with Uniform Title Headings for GND Records
- 075 $b u
- 130 field and a 500, 510, or 511 with $9 that contains one of the following:
- 4:auta
- 4:koma
- 4:regi
- 4:kuen
Generating Uniform Title Authority Headings that Begin with $t
Working with the 240 Field and Uniform Title Bibliographic Headings
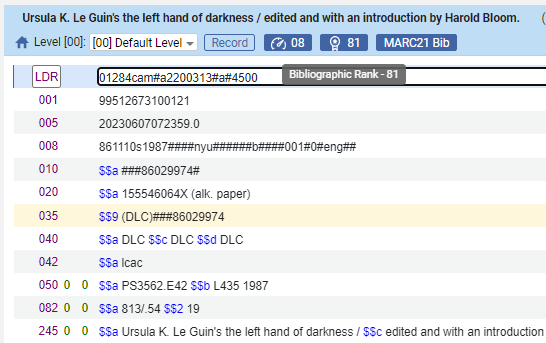
Bibliographic Ranking in Metadata Editor
Alma evaluates the completeness and richness of MARC 21 bibliographic records based on information that includes identifiers, names, subjects, informative LDR and 008 fields, publication details, etc. This is reflected in the Bibliographic Rank, meant to provide a helpful tool for libraries to identify records that may need attention. The new bibliographic rank is displayed in the record view and in the Metadata Editor.
For more information on the bibliographic ranking, see Bibliographic Rank Algorithm.
Bibliographic Ranking in Community Zone Collections
This information is displayed on the Collection level: Collection search results for all management labels (Managed by Ex Libris, Managed by community, Contributed, Not Maintained, Pending Deletion).
The Bibliographic Rank field is visible in Community Zone collections. This field presents the average rank of the bibliographic records within the collection and operates across three distinct levels:
- Low - 0-39
- Med 40-79
- High 80-150
The bibliographic ranking range is between 1 - 150. Generally, records that are ranked higher than 75 are considered good records.
The three quality categories mentioned above are based on the distribution within the collection of Bibliographic Ranking of Bib records. The logic of the Bibliographic Ranking is to display on the collection level the average of the Bibliographic Ranking of all associated Bib records so users know which collection is better to activate, and also what kind of quality to expect from the collection before they activate it.
The inclusion of Community Zone collection quality data, such as the average Bibliographic Rank, empowers users to address inquiries about the quality of MARC records within a specific Community Zone collection.
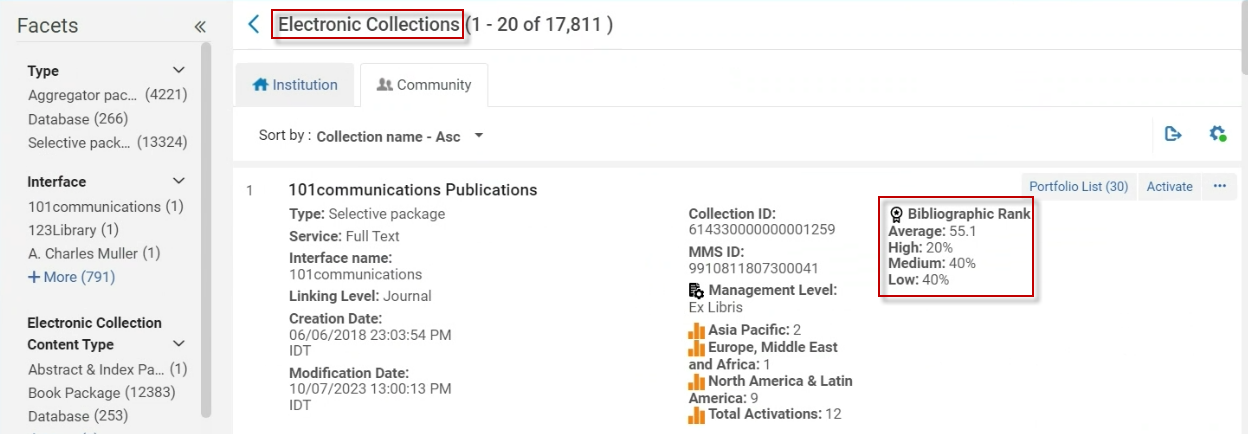
Users are presented with the following additional information on the level of the Community Zone collections:
| Bibliographic Ranking | Description |
|---|---|
| Average | The sum of all the individual Bibliographic Rankings, divided by the total # of records. |
| High | % of records with "High" Bibliographic Ranking (as calculated by the three distinct level mentioned above - 80-150). |
| Medium | % of records with "Medium" Bibliographic Ranking (as calculated by the three distinct level mentioned above - 40-79). |
| Low | % of records with "Low" Bibliographic Ranking (as calculated by the three distinct level mentioned above - up to 39). |
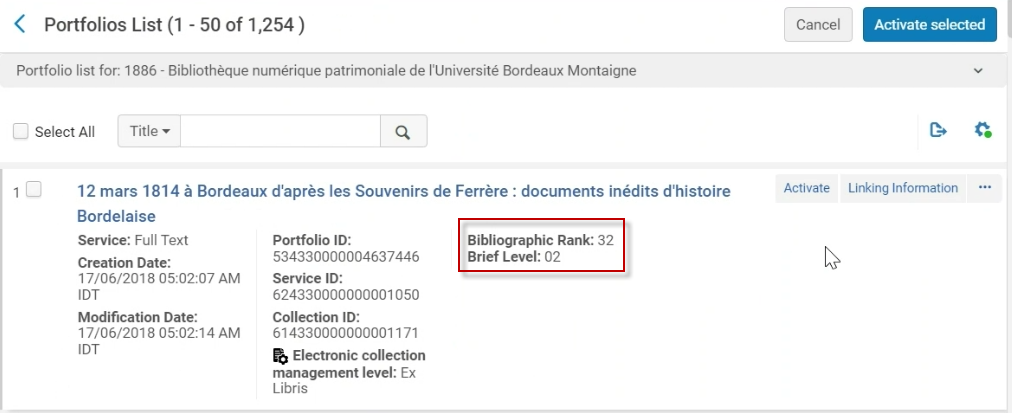
The option to customize views has been expanded to include the Bibliographic Rank and Brief Level fields for portfolio-level information. Users can select to display these details in the search results if desired. For more information on the Brief Level field calculation, refer to Level 1 - Breadth in the Bibliographic Rank Algorithm.
- Access any search Record entity and select the Manage Column Display icon (
 ).
). - In Column 4 of the Customize view screen, select the "Bib Rank and Brief Score" option.
Note: To disable the view, de-select the Bib Rank and Brief Score option. - Select Save.

Bibliographic Rank Algorithm
Alma evaluates the completeness and richness of MARC 21 bibliographic records based on information that includes identifiers, names, subjects, informative LDR and 008 fields, publication details, etc. This is reflected in the Bibliographic Rank, meant to provide a helpful tool for libraries to identify records that may need attention. The new bibliographic rank is displayed in the record view and in the Metadata Editor.
The bibliographic ranking range is between 1 - 150. Generally, records that are ranked higher than 75 are considered good records.
The bibliographic ranking is generated through an algorithm that is further described below.
General Model
This is a two-level approach:
- Level 1 - Breadth: The focus here is on coverage: Fields are grouped into categories and where a record has any one of the fields in a category it is given a score according to the importance of the category.
- LOW importance gives 1 point
- MEDIUM importance gives 3 points
- HIGH importance gives 7 points
For example, Subjects category has high importance, so it is assigned a score of 7. Canceled identifiers category is less important, so it has a score of only 1. There are 27 categories. The full list is described below in Categories.
- Level 2 - Depth: The second focus is on depth. For example, rather than just checking that there is a 6XX field, attention is paid to how many 6XX fields are included.
Depth is relevant only for some of the categories. When a record has such a category, the fields in the category are counted. The number of fields is the depth score of the category.Each relevant category has a "depth limit" to avoid giving too much weight to having many fields.
The total score is breadth score + depth score.
Categories
The following is the full list of categories. For each category, this information is included:
- List of the fields in the category
- Importance
- Indication if it is relevant for depth, and if so:
- Depth limit
| # | Category Name | Fields | Importance | Relevant for depth? | Depth limit |
|---|---|---|---|---|---|
| 1 | Canceled identifier |
|
LOW |
No |
|
| 2 | Classification and Call Number |
|
HIGH |
Yes |
3 |
| 3 | Coded language/place/time |
|
LOW |
Yes |
3 |
| 4 | Control fields |
|
MEDIUM |
No |
|
| 5 | 008 Common data |
One or more of the following, must have value that is not | nor #:
|
HIGH |
Yes |
5 |
| 6 | 008 Books data
(If Leader/06 = a and Leader/07 = a, c, d, or m) |
One or more of the following, must have value that is not | nor #:
|
LOW |
No |
|
| 7 | 008 Computer files data
(Leader/06 = m) |
One or more of the following, must have value that is not | and not #:
|
LOW |
No |
|
| 8 | 008 Music data
(Leader/06 = c, d, i, or j) |
One or more of the following, must have value that is not | and not #:
|
MEDIUM |
Yes |
5 |
| 9 | 008 Visual Materials data
(Leader/06 = g, k, o, or r) |
One or more of the following, must have value that is not | and not #:
|
MEDIUM |
Yes |
5 |
| 10 |
008 Maps data Leader/06 = e, or f) |
One or more of the following, must have value that is not | and not #:
|
MEDIUM |
Yes |
5 |
| 11 | 008 Continuing Resources
(Leader/06 = a and Leader/07 = b, i, or s) |
One or more of the following, must have value that is not | and not #:
|
MEDIUM |
No |
|
| 12 | Edition |
250 - Edition Statement |
HIGH |
No |
|
| 13 | Identifier |
|
HIGH |
Yes |
10 |
| 14 | Leader |
|
HIGH |
No |
|
| 15 | Names |
|
HIGH |
Yes |
5 |
| 16 | Note |
|
LOW |
No |
|
| 17 | Bibliography |
|
LOW |
No |
|
| 18 | Subjects |
One or more of the following, must have second indicator that is 0/1/2/3/5/6/7.
|
HIGH |
Yes |
15 |
| 19 | Other Physical information |
|
MEDIUM |
Yes |
3 |
| 20 | Physical description |
• 300 - Physical Description |
MEDIUM |
Yes |
5 |
| 21 | Publication details |
• 260 - Publication, Distribution, etc. (Imprint) |
HIGH |
No |
|
| 22 | Related items |
One or more of the following. Must include $a or $t: |
LOW |
No |
|
| 23 | Series |
One or more of the following. Must include $a: 780 - Preceding Entry 785 - Succeeding Entry |
MEDIUM |
Yes |
3 |
| 24 | Summary |
• 520 - Summary, etc |
MEDIUM |
No |
|
| 25 | Table of content |
• 505 - Formatted Contents Note |
MEDIUM |
No |
|
| 26 | Title |
• 245 with a minimum of either $a or $k |
HIGH |
No |
|
| 27 | Uniform title |
• 130 - Main Entry - Uniform Title |
LOW |
No |
Validations
In addition to breadth and depth scores, some Alma validations are done to check the basics of the MARC21 format. The following validations are invoked:
- Mandatory fields exist (LDR and 245)
- Control fields have legitimate data
- Indicators have legitimate data
- Only fields that are repeatable appear multiple times
- Only subfields that are repeatable appear multiple times
- All sub-fields are valid according to MARC standard
If there is an issue, the total score is reduced by 1 point.
Accuracy
In addition to the above validation, there is a check to make sure the data is accurate:
- ISBN check digit
- ISSN check digit
- "Other Standard Number" check digit
- Form of material in 006 field (position 0) matches the material type in the leader (LDR)
If there is an issue, the total score is reduced by 1 point.
Generating Author Numbers Automatically
- 905 $d - Created by copying the 093 $a using an Alma normalization rule
- 905 $e - Created based on the content in $a of the 100, 110, 111, or 245 fields, the mapping table configured in the Author Number Lists mapping table, and the Generate Author Number menu option in the Metadata Editor (see the procedure below)
- 905 $s - Created using an Alma normalization rule to concatenate the content of 905 $d, 905 $e, 905 $v (not mandatory), and 905 $y (not mandatory) with a forward slash (/) used to separate each subfield's content.
- Configure the author number list in the Author Number Lists mapping table.
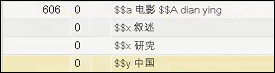
Note that the standardized list of Chinese author call numbers (obtained from the Cutter Sanborn Three-Figure Author Table) is maintained in Alma and can be configured with the Author Number Lists mapping table. See Configuring Author Number Lists for more information regarding how to configure this table.
- Create the normalization rules for generating the 905 $d and 905 $s.
- In the Metadata Editor, open a bibliographic record to which you want to add the 905 author number.
- Make the 100, 110, 111, or 245 field the active field. The field that you select as the active field must have content in $a.
- Select Editing Actions > Generate Author Number (or press F4). The 905 $e is automatically generated with the author number.
- Save your record.
Creating a UNIMARC Bibliographic Record
- Open the Metadata Editor (Resources > Cataloging > Open Metadata Editor).
- Open the default bibliographic template (New > UNIMARC Bibliographic).
- Enter your bibliographic content.
Similar to MARC 21 bibliographic records, the Metadata Editor for UNIMARC bibliographic records provides validation support specific to UNIMARC using the Alerts tab.Similar to the pop-up assistance capability in Alma’s Metadata Editor for several MARC 21 fields, this same autocomplete functionality is provided to assist catalogers by providing content suggestions for certain UNIMARC fields.There is a known issue related to UNIMARC 327 $a and 327 $b. These subfields are based on the same functionality. As a result, the pop-up suggests the values of both subfields when entering content in either the 327 $a or the 327 $bRefer to the table below for a list of the equivalent UNIMARC fields that are being provided with the autocomplete feature. After typing the first three characters, the system attempts to provide a suggestion for the field/subfield being entered.
Equivalent UNIMARC Fields Provided for Autocomplete MARC 21 Bibliographic Fields UNIMARC Fields 260 $a 210 $a 260 $b 210 $c 260 $e 210 $e 260 $f 210 $g 505 $r 327 $z 505 $t 327 $a 505 $t 327 $b 561 $a 317 $a
User assistance is not provided for the 4XX UNIMARC fields. - Before saving your changes, open the Record Actions and Editing Actions menus to view all the active options for working with the UNIMARC record. Similar to working with MARC 21 records, you can create templates, enhance the record (using normalization), expand from a template, and so forth.
- Select Save to save your UNIMARC bibliographic record.
Implemented Punctuation for Displayed UNIMARC Records
| UNIMARC Mapping | Punctuation | Explanations |
|---|---|---|
| 700ab, 701ab, 710a,b,c,d,f,e, 711a,b,c,d,f,e if $7=ba or does not exist | 70X a, b Example: Vian, Boris 71X a. b. c (d ; e ; f) Example: Canadian andrology society. Meeting (4th ; 1976 ; Toronto) |
70X b is prefixed with ,^ (where ^ is a space) 71X b is prefixed with .^ c is prefixed with .^ e is prefixed with ^;^ f is prefixed with ^;^ Subfield group def is prefixed with ( and suffixed with ) - Note that the 3 subfields are not always present and could be (d) or (d ; f) or (d ; e ; f) etc. |
| 700a-z, 701a-z, 710a-z, 711a-z if $7=ba or does not exist | All subfields a to z are displayed | 70X subfields bc are prefixed with ,^ Subfields fg are prefixed with ( and suffixed with ) All other subfields are prefixed with ^ 71X c is prefixed with .^ e is prefixed with ^;^ f is prefixed with ^;^ Subfield group def is prefixed with ( and suffixed with ) - Note that the 3 subfields are not always present and could be (d) or (d ; f) or (d ; e ; f) etc. All other subfields are prefixed with ^ |
| 500a-z (first indicator = 1) if $7=ba or does not exist | all subfields a to z are displayed | m is prefixed with ( and suffixed with ) i is prefixed with , if behind h. If not, i is prefixed with .^ All other subfields (but subfield a) are prefixed with .^ |
| 200a,e if $7=ba or does not exist | 200 a : e | e is prefixed with ^:^ (where ^is a space) |
| 200a,e | 200 a : e | e is prefixed with ^:^ (where ^is a space) |
| 200a,b,c,e,d,h,i,f,g if $7=ba or does not exist | 200 a [b] . c : e d .h, i /f ; g | b is prefixed with [ and suffixed with ] c is prefixed with .^ d is not prefixed, the punctuation is cataloged in the record e is prefixed with ^:^ f is prefixed with ^/^ g is prefixed with ^;^ h is prefixed with .^ i is prefixed with , if behind h. If not, i is prefixed with .^ |
| 200a,b,e,h,i,f,g if $7=ba or does not exist | 200 a [b] : e .h, i /f ; g | b is prefixed with [ and suffixed with ] e is prefixed with ^:^ f is prefixed with ^/^ g is prefixed with ^;^ h is prefixed with .^ i is prefixed with , if behind h. If not, i is prefixed with .^ |
| 205a if $7=ba or does not exist | ||
| 205a,b,f,g if $7=ba or does not exist | 205 a b / f ; g | f is prefixed with ^/^ g is prefixed with ^;^ |
| 206a-z, 208a,b, 230a | ||
| 210a if $7=ba or does not exist | ||
| 210c if $7=ba or does not exist | ||
| 210d | ||
| 328a-z, 210c if $7=ba or does not exist | each subfield is prefixed with ^ | All subfields are prefixed with ^ |
| 210d (1),h (2), 100/09-16 (3), 207a (4) | 100/09-12 - 13-16 | 100/09-16 has a hyphen added between position 12 and 13 |
| Example: 1981-2003 | ||
| 326a | ||
| 326b | ||
| 3XX -3X9 -39X,327,330 | each subfield is prefixed with ^ | |
| 3X9, 39X | each subfield is prefixed with ^ | |
| 225a,e,i | 225 a : e . i | e is prefixed with ^:^ (where ^is a space) i is prefixed by .^ 225 field is prefixed with ( and suffixed with ) |
| 225v | ||
| 60Xa-z -23, 616a-z -23, 617a-z -23, 610a | each subfield is prefixed with ^ | |
| 69X and 6X9 | each subfield is prefixed with ^ | |
| 010a | ||
| 019 (Sudoc) | ||
| 011a,f | ||
| 011f if LDR/06 is not l | ||
| /001 | ||
| 200b | ||
| 327a-z, 330a | each subfield is prefixed with ^ | |
| LDR | ||
| 101a | ||
| 700a-z, 701a-z, 710a-z, 711a-z if $7 exists and is not equal to ba | All subfields a to z are displayed | 70X subfields bc are prefixed with ,^ Subfields fg are prefixed with ( and suffixed with ) All other subfields are prefixed with ^ 71X b is prefixed with .^ c is prefixed with .^ e is prefixed with ^;^ f is prefixed with ^;^ Subfield group def is prefixed with ( and suffixed with ) - Note that the 3 subfields are not always present and could be (d) or (d ; f) or (d ; e ; f) etc. All other subfields are prefixed with ^ |
| 500a-z if $7 exists and is not equal to ba | m is prefixed with ( and suffixed with ) i is prefixed with , if behind h. If not, i is prefixed with .^ All other subfields (but subfield a) are prefixed with .^ |
|
| 200a,e if $7 exists and is not equal to ba | 200 a : e | e is prefixed with ^:^ (where ^is a space) |
| 200a,b,c,d,e,h,i,f,g if $7 exists and is not equal to ba | 200 a [b] . c : e d .h, i /f ; g | b is prefixed with [ and suffixed with ] c is prefixed with .^ d is not prefixed; the punctuation is cataloged in the record e is prefixed with ^:^ f is prefixed with ^/^ g is prefixed with ^;^ h is prefixed with .^ i is prefixed with , if behind h. If not, i is prefixed with .^ |
| 205a if $7 exists and is not equal to ba | ||
| 205a,b,f,g if $7 exists and is not equal to ba | 205 a b / f ; g | f is prefixed with ^/^ g is prefixed with ^;^ |
| LDR/06 | ||
| LDR/07 | ||
| 200 $b | ||
| 100a/08 | ||
| 100a/09-12 | ||
| 100a/13-16 | ||
| 102a,c | ||
| 010a,z | ||
| 200a,b,c,d,e,h,i,f,g | 200 a [b] . c : e d .h, i /f ; g | b is prefixed with [ and suffixed with ] c is prefixed with .^ d is not prefixed; the punctuation is cataloged in the record e is prefixed with ^:^ f is prefixed with ^/^ g is prefixed with ^;^ h is prefixed with .^ i is prefixed with , if behind h. If not, i is prefixed with .^ |
| 020a | ||
| 035a(1),z (2) | ||
| 700a-z, 701a-z, 710a-z, 711a-z | All subfields a to z are displayed | 70X subfields bc are prefixed with ,^ Subfields fg are prefixed with ( and suffixed with ) All other subfields are prefixed with ^ 71X b is prefixed with .^ c is prefixed with .^ e is prefixed with ^;^ f is prefixed with ^;^ Subfield group def is prefixed with ( and suffixed with ) - Note that the 3 subfields are not always present and could be (d) or (d ; f) or (d ; e ; f) etc. All other subfields are prefixed with ^ |
| 410 a,t,o,h,i,x | 400 a t : o. h, i | h is prefixed with .^ i is prefixed with , if behind h. If not, i is prefixed with .^ o is prefixed with ^:^ |
| 203a,b | ||
| 203c | ||
| No match | ||
| 126a,b | ||
| 125a,b | ||
| 115a,b | ||
| 135a, 230a | ||
| No match | ||
| 145a-i,146a-i |
Working with Multiscript UNIMARC Bibliographic Records
Latin Display
- 200, 205, 206, 207, 208, 210
- 327
- All 4XX fields: 410, 411, 412, 413, 421, 422, 423, 424, 425, 430, 431, 432, 433, 434, 435, 436, 437, 440, 441, 442, 443, 444, 445, 446, 447, 448, 451, 452, 453, 454, 455, 456, 461, 463, 464, 470, 481, 482, 488
- All 5XX fields: 500, 501, 503, 510, 511, 512, 513, 514, 515, 516, 517, 518, 520, 530, 431, 532, 540, 541, 545
- 600, 601, 602, 605
- All 7XX fields: 700, 701, 702, 710, 711, 712, 716, 720, 721, 722
Authority Control
- Authorities - Link BIB Headings
- Authorities - Preferred Term Correction
- F3
Using Multiple Access Points for UNIMARC
Creating a KORMARC Bibliographic Record
- Open the Metadata Editor (Resources > Cataloging > Open Metadata Editor).
- Open the default bibliographic template (New > KORMARC Bibliographic).
- Enter your bibliographic content.
When entering the following fields, the system provides pop-up assistance after you have typed the first three characters:
- 260 $$a, b, e, f
- 264$b
- 505 $$r, t
- 561$a
Similar to MARC 21 bibliographic records, the Metadata Editor for KORMARC bibliographic records provides validation support specific to KORMARC using the Alerts tab.When you open the form editor (Editing Actions > Open Form Editor) for the KORMARC 008 control field, the following KORMARC field options are provided:- Korea government agency
- Korea University
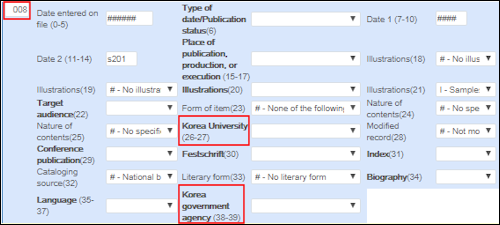 KORMARC 008 Control Field Options in the Metadata Editor
 - Select Save to save your KORMARC bibliographic record.
Generating the Author Numbers Automatically for the 090 Local Call Number Field in a KORMARC Bibliographic Record
- 090 $a - Dewey call number that is copied from the 082 $a
- 090 $b - Author number that is pulled from a standardized list of author numbers with a prefix consisting of the first initial of the author's last name and a suffix containing the first initial of the title such as G329w
- 090 $c - Year that is copied from the 260 $c
- Open a bibliographic record to which you want to add the 090 author number in the Metadata Editor.
- Make a 100 or 700 author field the active field.
-
Select Editing Actions > Generate Author Number (or press F4).If you have enabled only one author number list in the Author Number Lists configuration (Configuration Menu > Resources > Cataloging > Author Number Lists), the target field and subfield that you identified in the Author Number Lists configuration is automatically generated with the author number.If you have enabled more than one author number list configuration in the Author Number Lists configuration, the system prompts you to select the author number list to use.
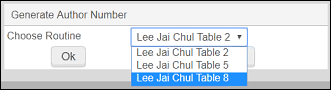 Select Author Number ListSee Configuring Standard Author Number Lists for more information.
 - Save your record.
Creating a CNMARC Bibliographic Record
- Open the Metadata Editor (Resources > Cataloging > Open Metadata Editor).
- Open the default bibliographic template (New > CNMARC Bibliographic).
- Enter your bibliographic content.
Similar to MARC 21 bibliographic records, the Metadata Editor for CNMARC bibliographic records provides validation support specific to CNMARC using the Alerts tab. Validation criteria can be customized in the CNMARC metadata profile (see Editing Validation Routines).
- Use the File menu or select the Save icon to save your CNMARC bibliographic record.
Using Multiple Access Points for CNMARC 6XX Fields

Creating a Dublin Core Bibliographic Record
- Open the Metadata Editor (Resources > Cataloging > Open Metadata Editor).
- Select New > Dublin Core.
The Metadata Editor opens the default template for entering your Dublin Core record.
- Enter the data for your Dublin Core record. See the Metadata Editor Menu and Toolbar Options section for more information.
Creator of a Bibliographic Record
The "Creator" field of a bibliographic record indicates how the record was created:
- "import" (lowercase "i") when the record came from migration
- "System" when the record came from an import profile
- "CKB" when the record came from a Community Zone Update

Merging Bibliographic Records
- Cataloger Extended
- PO line
- Electronic collections
- Electronic portfolios
- Physical items
- Digital representations
- Loans
- Requests
- Reading lists
- Related record relationship (based on MMS ID)
When the secondary record has a related record with the MMS ID of the secondary record specified in any of the 76X–78X fields, then during the merge process the MMS ID is updated to the MMS ID of the primary record in order to maintain a relationship (and avoid having a related record with no parent relationship, an "orphan record").
-
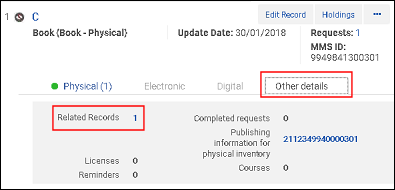
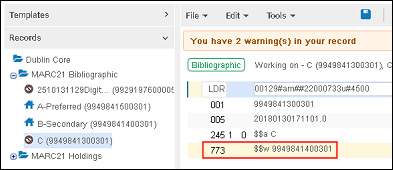 Record Related to Secondary Record Prior to Merge / MMS ID in 773$w
 Secondary Record with Related Record Prior to Merge
- You can merge two bibliographic records only when both records are Institution Zone records, or both are Network Zone records. You cannot merge an Institution Zone bib record with a Network Zone bib record.
- For information on placing an identifier from the secondary record in the primary record when merging records, see Configuring BIB Redirection Fields.
- When merging bibliographic records in the Network Zone, the process checks if the non-preferred bibliographic record is held by other members. If so, the process moves the inventory of all the members to the preferred bibliographic record. In this case, if a non-preferred record is suppressed, the suppression will be inherited by the preferred record.
- Locate the two bibliographic records that you want to merge. The primary record will be updated with the information from the secondary record.
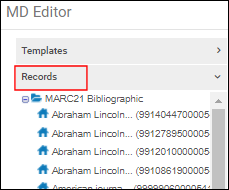
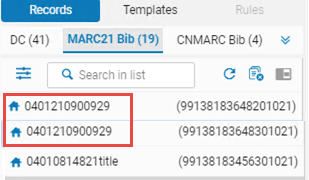
- Edit both records so that they both appear under the Records tab in the Metadata Editor.
 Bibliographic Records under the Records Tab
 - From the Navigation pane under the Records tab, select the primary record.
- Select the Split Editor icon and select the secondary record so that it appears on the right.
- Select Record Actions > Merge Records & Combine.
The Merge Records and Combine Inventory dialog box appears.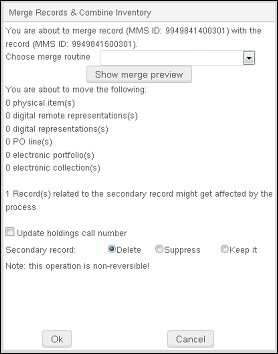 When doing Merge & Combine, the inventory of the secondary (non preferred) record to be moved is shown in the counter only if it is a local record. This is true in both the below cases:
- If you are logged in to the institution that has a local (cached) version of the NZ record, with inventory.
- When Merge & Combine is performed in a standalone institution, where both records are local in any case. - Review any messages displayed. In particular, note that this operation is not reversible.
Under You are about to move the following, the system lists the changes that will occur after the merge. In addition, holdings requests, loans, and reading lists attached to the secondary record will be updated. Plus, in a record related to the secondary record, the MMS ID specified in any of the 76X–78X fields of the related record will be changed to the MMS ID of the primary record specified in the Merge Records and Combine Inventory process.If there are any requests, the number of requests appears. Due to a technical limitation, when there are no requests, the dialog box does not display "0 requests"; instead, the line about requests simply does not appear.
- Select a merge routine from the drop-down list. The merge routines that appear in the list are pulled from the Merge Rules list under the Rules tab in the Metadata Editor.
- To preview the merge results, select Show merge preview. Select OK to close the Merge Preview view.
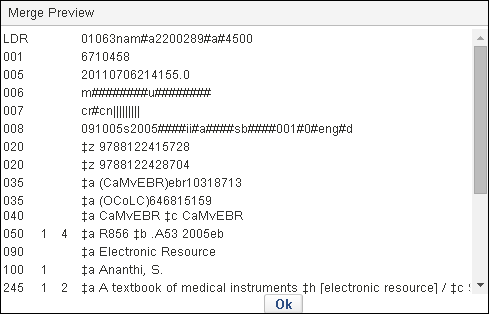 Merge Preview
 - Optionally, select Update holdings call number. When you select this option, the system updates the call number information (using the bibliographic call number) for all the holdings associated with the primary record. This change is applied to the holdings associated with the primary record after the bibliographic merge was processed. Note that if one of the call number fields is updated in the bibliographic record, this may affect the call number that eventually appears in the holdings records.
- Select how you want to handle the secondary bibliographic record (after the merge) from the following options:
- Delete
- Suppress
- Keep it
- When you are ready to merge the two records, select OK.
Viewing Bibliographic Records
Managing Bibliographic Records
Deleting Bibliographic Records
- Cataloger Extended
Records need to be localized before they can be deleted in the Metadata Editor. To do so, see Remove Community Zone Bibliographic Records without Portfolios from the Institution Zone.
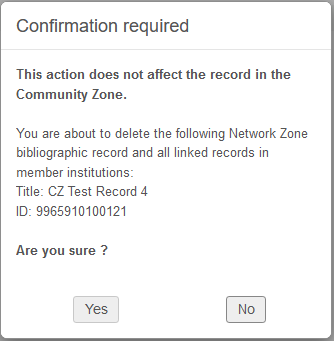
Users are able to delete a Network Zone bibliographic record from the Institution tab, even if the record has its origins in the Community Zone.
Records marked for Bibliographic Record Retention are prevented from being deleted. For more information, see Bibliographic Record Retention.
- Select Delete Bibliographic Record from the Metadata Editor toolbar under Record Actions.
A bibliographic record can be deleted only when there are:
-
No PO lines
-
Closed PO lines
-
Canceled PO lines
-
No Active Purchase Requests
If you delete a bibliographic record in the Institution Zone, and you're the last library in the consortium to hold it, the record is deleted automatically in the Network Zone. If you do not want it to be deleted automatically in the NZ, but would like to delete it manually from the Network Zone instead, set the delete_nz_bib_without_inventory customer parameter (Configuration > Resources > General > Other Settings) to false (see Configuring Other Settings (Resource Management)).
When deleting a bibliographic record that originated from the community zone, a notification message is displayed to the user indicating the community zone record is not deleted, only the local record is deleted.
Deleting Sets of Bibliographic Records
- Catalog Administrator
- Catalog Manager
- Run the Delete bibliographic records job. Records that cannot be deleted due to one of the conditions described above are identified in the job report.
Select the "Delete all associated inventory resources" option if you would like to delete the inventory associated with these records.
Bibliographic Record Retention
Alma enables libraries to prevent the deletion of a bibliographic record. To implement this, the Bibliographic Collection Retention Definition table (Configuration menu > Resources > Collection Retention > Bibliographic Collection Retention Definition) can be configured. Administrators can specify conditions for record retention. Add a field and subfield in order for the record to be protected from deletion if the subfield contains any value. Alternatively, specify a specific value, and only records with that value in the subfield are retained.

After configuring the table, Alma performs verifications when attempting to delete a bibliographic record. It verifies if the record contains the specified content from the table. If the content is present, the bib record is protected from deletion. Furthermore, after the table is updated, any record that matches the defined criteria will be marked as committed to retain the next time it is indexed (when changed and saved, or during the semi-annual re-indexing). This allows the retained records to be searched within the system.
Records marked as Committed to Retain display the Committed to Retain icon (![]() ), indicating that the record is protected from deletion.
), indicating that the record is protected from deletion.
In the case of network zone records, the retention policy is determined based on the configuration specified in the Network Zone table. When attempting to delete a bibliographic record that is linked to the Community Zone, the removal of the linked record from the local institution is restricted based on the specific configuration set by that institution. Local extension fields cannot be used as retention fields. A field that is used in the Institution Zone without being a local extension may be used as a retention field.
Using Linked Data While Working with Bibliographic Records
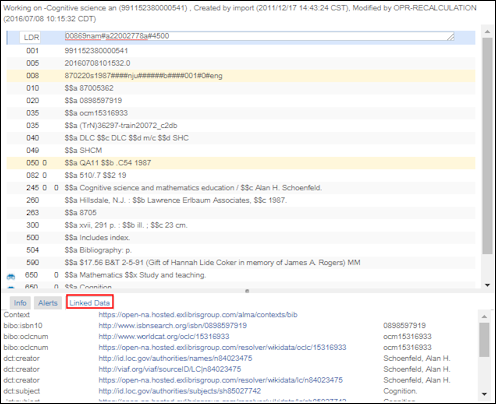
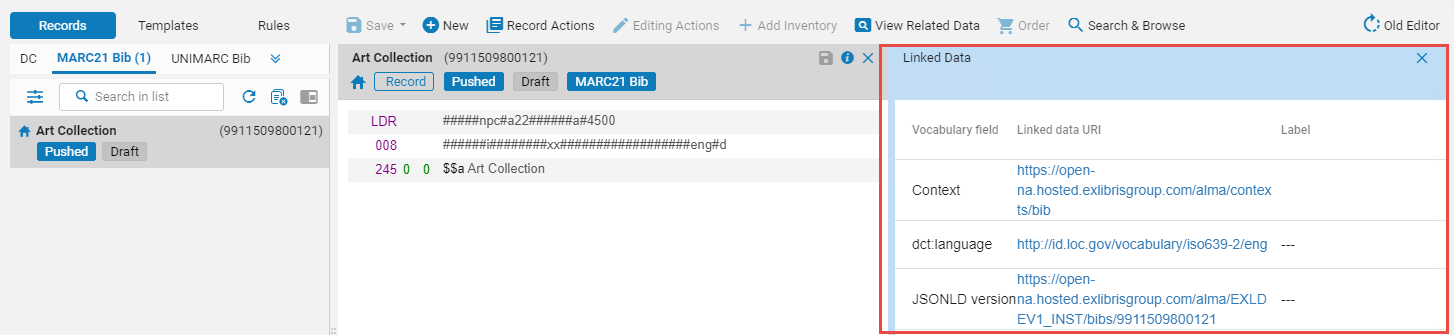
- Vocabulary field - This is pulled according to context. The default context is cname.alma.exlibrisgroup.com/[format]/[works_or_instances]/[MMSID]. For example, bgu.alma.exlibrisgroup.com/bf/instances/9922819700121.
If there is an active Linked Data integration profile (see Linked Data) with a path to a context, this context is used.Any former Alma URI format is redirected to the new Alma URI format: cname.alma.exlibrisgroup.com/[format]/[works_or_instances]/[MMSID].
If an institution prefers, they can change the beginning of the web address (URL prefix) from cname.alma.exlibrisgroup.com to their own or any other prefix. For example, bgu.ac.il. This change can be made in the linked data integration profile, and records will be resolved as long as the domain is registered to the same IP address by the institution’s IT department.You do not need to create a Linked Data integration profile to access linked data from the Alma Repository Search results. However, you are required to expose linked data in the JSON-LD format (see Linked Data for more information). - Linked data URI
Linked Data for bibliographic records that are linked to IdRef authorities now also generate URIs to the IdRef authority records.
- Label - For ISBN, ISSN, and OCLC, the field content is displayed. For creator and subject, the value of the heading is displayed.
Handling UTF Composed/Decomposed Unicode Representations (UTF-8 and Characters with Diacritics)
Alma supports normalizing decomposed characters to their composed form when saving a bibliographic or authority record.
For example, the word Amélie can have two canonically equivalent Unicode forms:
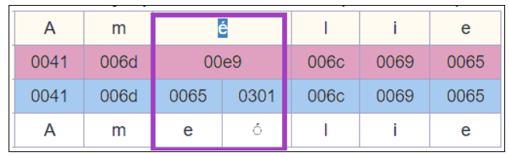
With this functionality, when records containing these characters are saved, the decomposed form (0065+0301) will be normalized to the composed form (00e9).
When you set Alma to handle UTF composed/decomposed representations, you also avoid heading updates in the preferred term correction job. In cases where the bibliographic record's heading and authority heading have the same equivalent UTF representation (composed vs. decomposed), the PTC skips the correction. This filters out the redundant headings update from the Authority Task Control List and publishing.
Note that this can be defined for all Alma records, or for specific local vocabularies.
This feature is disabled by default. Contact Ex Libris staff to activate it in coordination with your institution.