
2020 RN 09 Main
New Alma Layout Enhancements
September 2020 Administration and Infrastructure
Continuing the rollout of the new Alma layout, the new layout is now available for Alma users. Starting from the August release, Alma Administrators can turn the new functionality on (Opt-in). In September release, users who were opted in can switch between the current and the new layout as they please. (For instructions, see Turning On the New Layout for Users.) In the November release, the new layout will become the default.
Ex Libris recommends that all users gain experience with the new Alma layout before the new layout becomes the default, which was moved from September 2020 release to November release.
The layout enhancements introduced in the September release cover the following areas:
- Configuration Area:
- A new home page for the Configuration area was introduced, to better emphasize the switch to the Configuration area.
- The navigation in the configuration area was made clearer. The Cancel/Back button workflow was emphasized for better clarity.
- 'Switching a library' dropdown was visually emphasized and contains a few functional improvements as well.
- Menu Improvements:
- The way tab navigation works with the menu was improved.
- We are working toward having the menu accessible according to WCAG 2.1 standard.
- The menu supports right-to-left alignment.
- Action Icons:
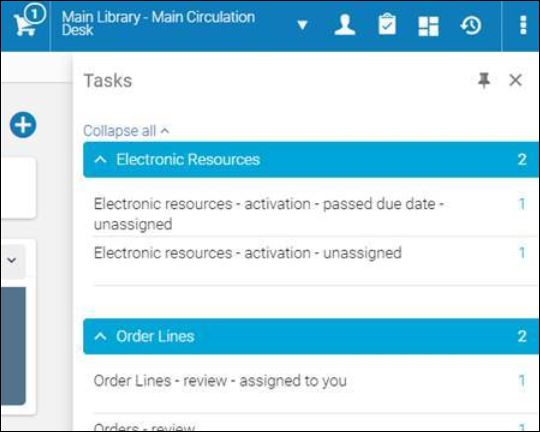
- The Task list was changed to a panel that can be collapsed
New Metadata Editor Enabled
September 2020 Resource Management URM-132477
Ex Libris announces the rollout of the new Metadata Editor. In the current release, the new Metadata Editor contains the Records Management core functionality (the functionality available in the original Metadata Editor plus new features). Template and Rule management will be rolled out in the upcoming releases (see Rollout Plan), giving users enough time to adjust to the changes. Starting from the September release, Alma users can switch back and forth between the new and the original Metadata Editors.
- to the new Metadata Editor, select
 on the left-hand side of the top toolbar of the Editor.
 - back to the original Metadata Editor, select
Old Editor on the left-hand side of the top toolbar of the Editor.
Ex Libris recommends that all relevant users start familiarizing themselves with the new Metadata Editor prior to its Go-Live, which is planned to take place with the deployment of January 2021 release.
New Metadata Editor - Loading Records from Community Zone
In the new Metadata Editor, this is how you can load records from the Community Zone.
- To check if there are draft records in the Community Zone waiting to be edited, select the Load Community Zone Records button at the bottom of the navigation pane.

- Loading the records might take a few moments, at which time the button changes its text to Loading from Community Zone and is not clickable.

- Once records have been loaded:
- Records loaded from the Community Zone are displayed in the records list. The button changes to Auto-Loading from Community Zone and is not clickable.
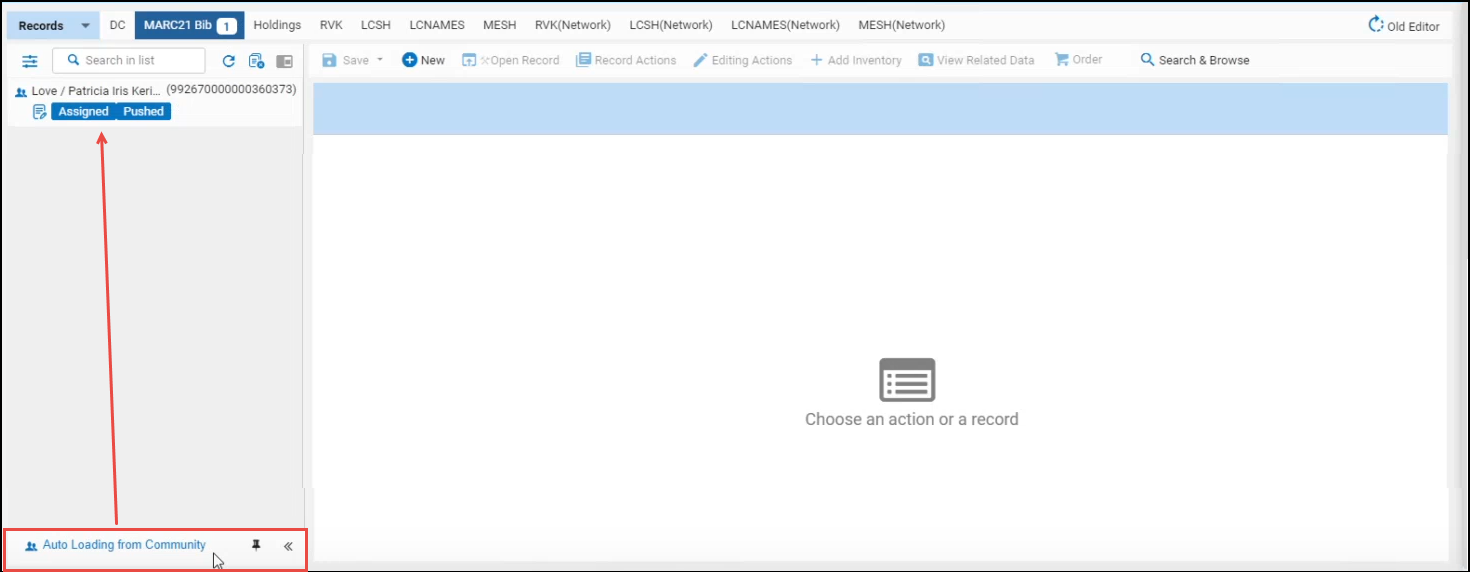
- If there were no records to load (or after the last community record was released from the list), the button returns to its initial state Load Community Zone Records, enabling you to come back at a later time and try again.
New Metadata Editor - Editing Cataloger Level Enhancements
In the new Metadata Editor, enhancements were made to editing cataloger levels that allow you to access easily the cataloger level and change it.
-
Open a bibliographic record in the MD Editor (Resources > Cataloging > Open Metadata Editor).
The MD Editor displays the current cataloging level. Any user assigned this or higher cataloging level can edit the record.
In addition, you can change the cataloging level for the record. You can set any cataloging level equal to or below your cataloging level as the cataloging level for the record.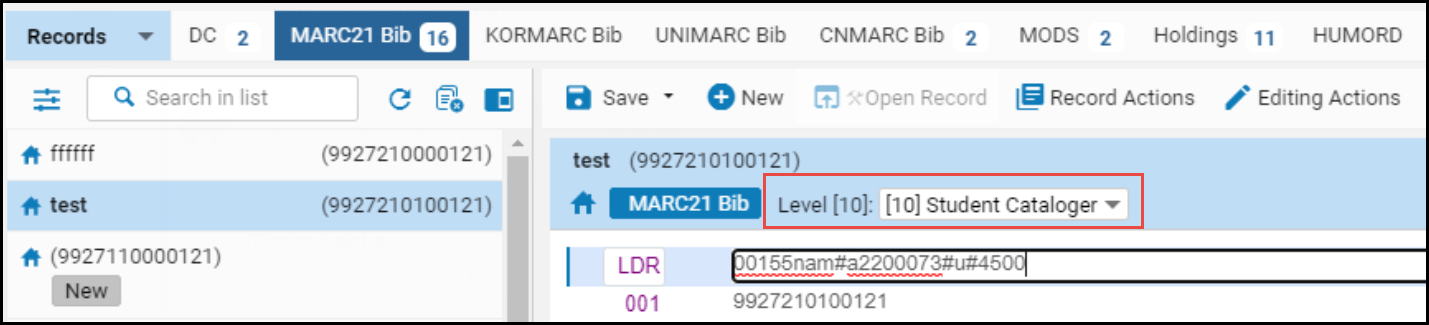 Cataloging Permission Levels in the MD Editor
 - Select a new cataloging level for the record from the dropdown list.
- Select Save. The current cataloging level of the record is updated to reflect your change.
For your convenience, you can specify the default cataloging level to be displayed in the dropdown, as follows:
| To: | Do: |
|---|---|
| To always display in the dropdown your cataloging permissions level. | Set the use_record_cataloging_level_by_default customer parameter to False (default). |
| To always display in the dropdown the record's current cataloging level. | Set the use_record_cataloging_level_by_default customer parameter to True. When this is set to True, an overt action on your part is required to change the cataloging level to a different cataloging level. If you are making record changes that do not affect the cataloging level, you may prefer this option. See use_record_cataloging_level_by_default for more information. |
| To always display in the dropdown the cataloging level you selected most recently for a record. | Set the cataloging_level_user_preferences customer parameter to True. |
New Metadata Editor - Catalog Set Actions
In August release, the Sets tab was added on the Metadata Editor toolbar. Clicking the tab displays the sets sent for cataloging by the Manage Sets page.
Now on this page you can release multiple records from a specific catalog set in a single action. You can reload all set members, including the new ones, and remove these that were excluded from the set. Previously, you could only release records from a catalog set one by one, which could be time-consuming.
Now when right-clicking on a catalog set, the following actions are available:
- Release set - releases all the records and removes the set
- Release displayed records - if you filtered out some records, releases only the visible records.
- Reload set - if changes were done on the bib records elsewhere in Alma, refreshes the records.
See Working with Catalog Sets in the Metadata Editor and Managing Search Queries and Sets.
Activate Collection for Full Text in CDI Only
If you have electronic collections in Alma that are not active but you would like to make the content of the collection marked as available in CDI, you can now do this using the Add CDI-only text activation option. This is relevant for electronic collections that are defined as Full Text Linking in CDI: Link in record.The collection level record is published to CDI in the zero title file with the effect that the collection is set to full text available and is discoverable in CDI
Coverage Percentage of CDI Records
Items that are available for CDI now indicate the coverage percentage of the records in CDI. This indicator also includes the last date of calculation for this statistic. This information only displays if the coverage percentage has been calculated. If the date is not populated, it will not be displayed.
Check Version of a Central Catalog Bibliographic Record
In July 2020 Alma release, the ability was introduced to reload on demand the most recent version of the Bib record that was loaded previously from the Central Catalog (see Reload Bibliographic Records from Central Catalog On Demand). With the September release, bibliographic records in Central Cataloging (Aleph, SBN, CALIS, etc.) will be loaded automatically from the central catalog by the Metadata Editor.
To support users, in this release Alma automatically loads the most recent version of Bib records when opening a Central Catalog record for editing. To enable this, set the reload_record_from_central_catalog customer parameter to True (the default is False).
Create Itemized Set from File: Support for matching ISBNs on 020 and 022 subfield a
Now, when creating an itemized set from ISBNs or ISSNs, you can select whether to match on both valid as well as canceled / invalid fields (020/022 $a and $z) (as before) or to match only on valid fields (020/022 $a).
In the existing functionality, when a set is created from an input file and the input file has ISBN or ISSN as the column header, the identifiers in the input file are also compared to the identifiers which are “Canceled/invalid” (020 z and 022 z). Now you can indicate in the input file's header column that you want to create an itemized set based on the valid ISBNs and ISSNs.
To do that, indicate one of the following header types in the input file's column header:
| Content Type | Header | ID Prefix |
|---|---|---|
| All Titles |
ISSN_A
ISBN_A
|
99 |
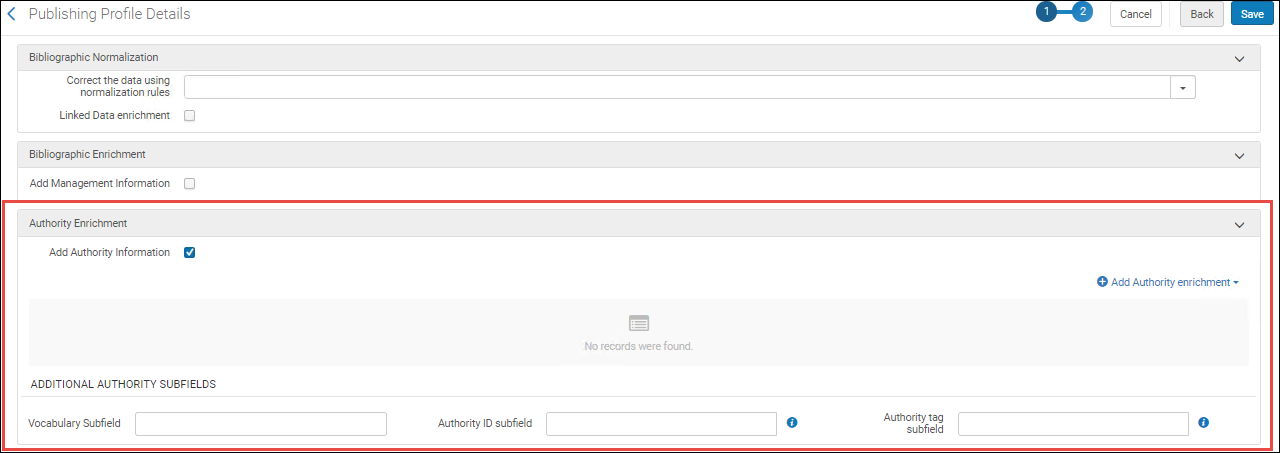
General Publishing Profile - Option to Include Authority Headings
The General Publishing profile now supports the ability to enrich the published data with Authority headings. Any update to the selected authority headings triggers re-publishing of the data. The functionality of updating a record when preferred terms are updated will keep its current functionality.
This is useful, for example, when the name 'Mark Twain' is embedded within a bib record and library would like to publish both 'Mark Twain' and the non-preferred term 'Samuel Clemens'.
The ability to enrich published data with Authority headings is disabled by default. If your institution would like to activate this behavior, please contact Ex Libris customer support.
To support this development, the Authority Enrichment section was added to the General Publishing Profile. Here you can set up your authority enrichment scheme.
See Publishing and Inventory Enrichment (General Publishing).
Moving Information between Electronic Portfolios
Now you can move local administrative information, such as PO-line, license and notes details, between portfolios in different collections, even if these portfolios do not share bibliographic records. Previously, it was only possible if both portfolios shared bibliographic records. This is possible if the portfolios share any of the following:
- The same bibliographic record (the same MMS ID, as before)
- ProQuest Title ID (the 'bkey' - populated in the "Parser" parameter of the portfolio)
- ISSN
- e-ISSN
- ISBN
- e-ISBN
This enables moving portfolio details from a local electronic collection to a Community Zone-activated electronic collection and encourages customers to move a locally-managed electronic collection to a Community Zone-managed electronic collection.
In addition, now you can move the 'Public access model' information between electronic portfolios. To support this, the checkbox "Move public access model" was added to the third step of the Move electronic portfolio information job wizard.
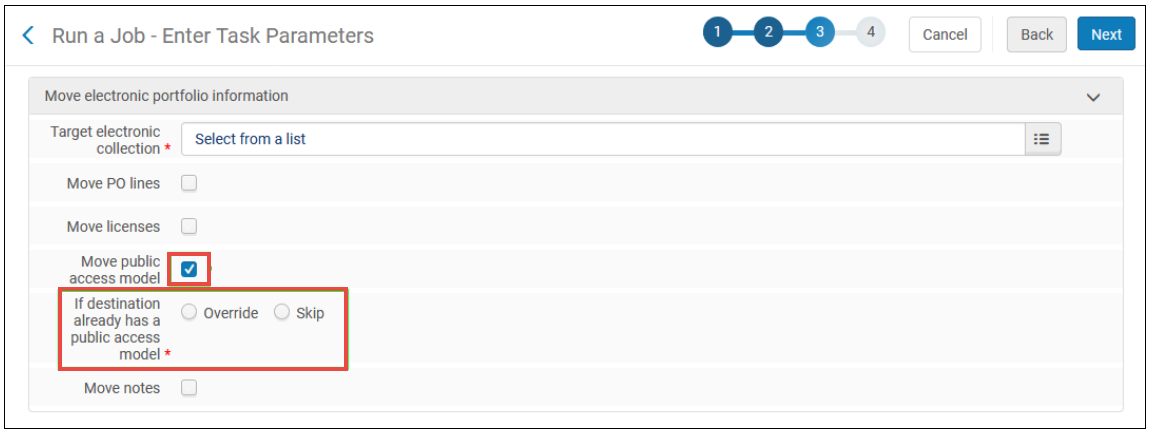
This functionality will be available as part of the September Release Update.
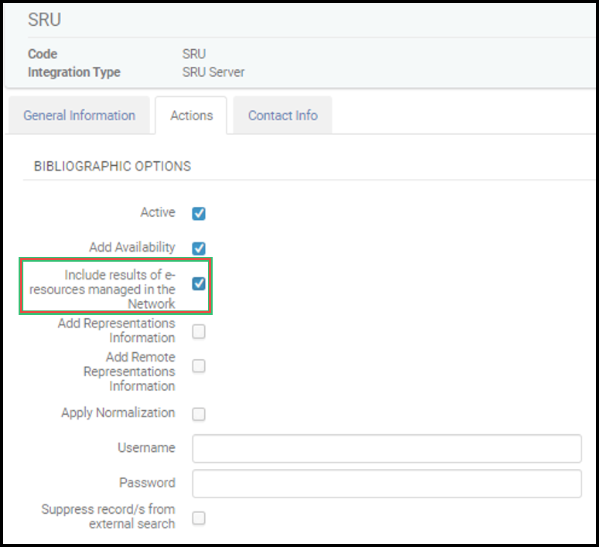
SRU Institution Zone Holding Lookup - Look Up Electronic Inventory Managed in the Network Zone
In a consortia environment, electronic inventory can be managed on behalf of the members in the Network Zone. SRU Institution Zone holding lookup now includes electronic inventory that is managed in the Network Zone on behalf of the Institution Zone.
For this purpose,the SRU Server integration profile was enhanced with a new "Include results of e-resources managed in the Network" option, available in the Institution Zone-level only. When this option is activated, then when searching in the Institution Zone repository, not only the bibliographic data and inventory availability from the Institution Zone is retrieved, but also the Network's bibliographic data and inventory availability for the specific member (if exist).
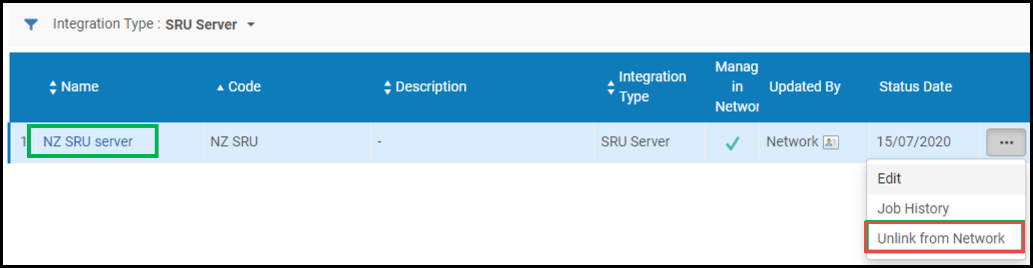
In some consortia with many members, the configuration of SRU integration profile is done by the Network and is distributed to all members, in order to reduce redundancy of the configuration by all members. In such cases, when the SRU integration profile is marked as "Managed in Network", the new option "Include results of e-resources managed in the Network" is visible in the Network Zone institution as well. The network can determine whether this profile is distributed to members with this option activated or disabled.
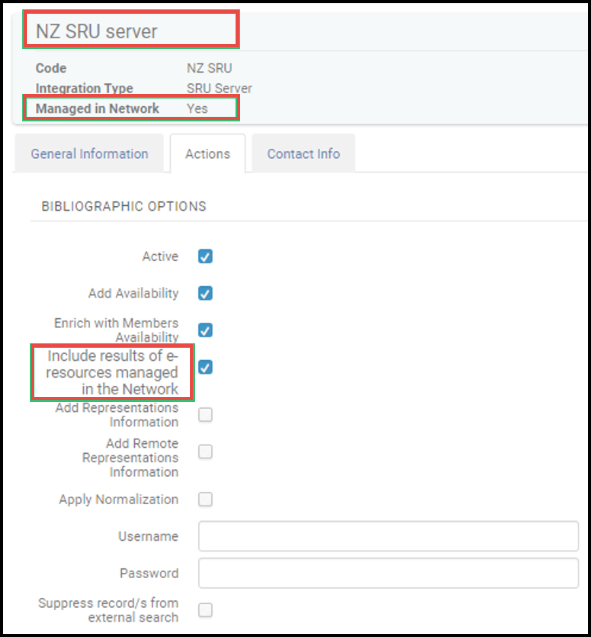
Any member using this profile can decide to opt out and manage the profile locally by editing the Network configuration:
See SRU/SRW Search.
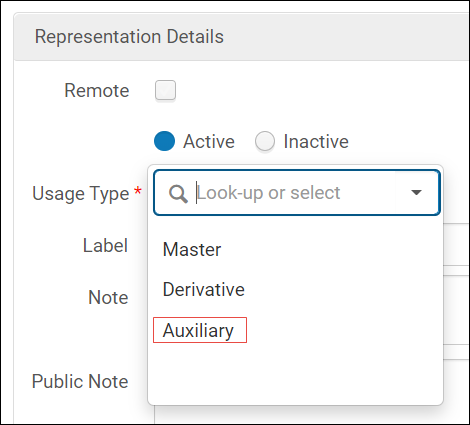
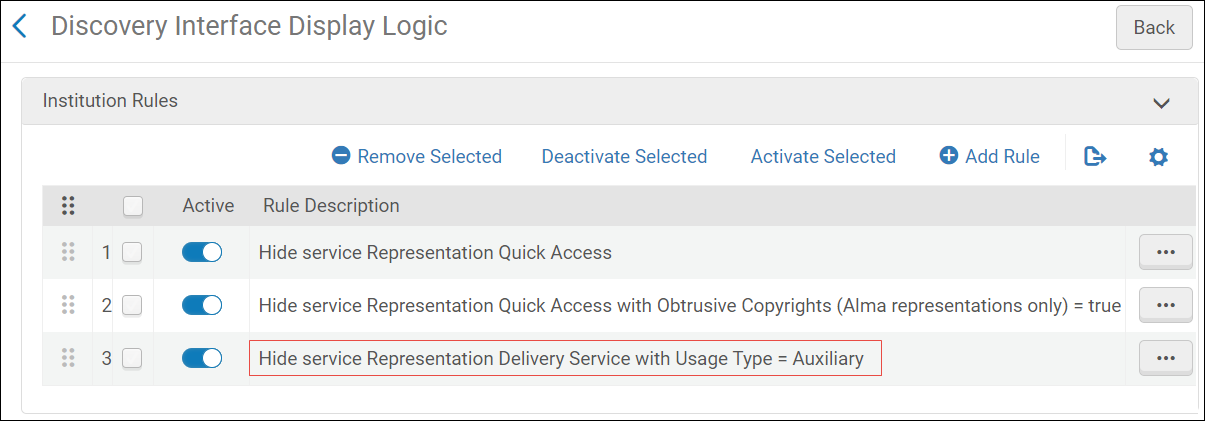
New Auxiliary Digital Usage Type
You can now mark digital representations with the Auxiliary usage type. This is primarily used when the digital file is a table of contents for the other representations and so should be excluded from the representation delivery services. It will still appear in the Quick Access section of Primo's full record display.
List View in the New Alma Viewer
You can now display the list of files of a representation in the new Alma Viewer in List View. Click the icons to toggle between List View and Thumbnail View.

Vendor-Controlled PO Line Renewal
To save duplication of work, by simultaneously renewing the vendor subscription and the matching continuous PO line in Alma, you can enable a vendor to automatically update a PO line once the subscription is renewed on the vendor side. At this time, the option is available only for ProQuest renewable subscriptions. In Alma, a new check box is available on the Vendor Details page, System Integration tab, Renew at Vendor System. When enabling this option, you must supply the vendor with your API key to allow the vendor to perform the update to the relevant PO line. For ProQuest RenewMe, the API key is sent to e-renewals@proquest.com. To generate the API key, see the Developer Network. When the check box is selected, a new button appears on the continous Purchase Order Line Details page, Renew at Vendor System. Selecting this button opens a ProQuest RenewMe form, which includes the Alma PO line number. When the renewal process completes (in a separate browser tab), the Alma PO line is updated with the updated List Price, Renewal Date and Renewal Note.
Accrual accounting - Create Invoice from PO for One-Time Orders
 Idea Exchange URM-130458
Previously, institutions using accrual accounting could not create invoices from a PO. Now, these institutions have the option to create an invoice from a purchase order for one-time orders only.
Currency Exchange Rate Overrides
Idea Exchange URM-20366For institutions that purchase resources with a currency different than the default currency, and have agreements on specific exchange rates with their vendors, you can now define a fixed exchange rate in a new Explicit Exchange Rates code table (Configuration Menu > Acquisitions > Invoices > Explicit Exchange Rates). Any time a transaction is calculated, it will look for an exchange currency value here. For instance, if purchasing a resource in GBP, while your institution default currency is AUD, you can enter that 1 native currency (AUD) = 1.6 GBP and this value will be calculated when ever a transaction which requires a convertion between AUD and GBP will take place. The list of available currencies in the currency table is based on the currencies entered in the Currency Subset table (Configuration Menu > Acquisitions > Currency Subset). All currencies can be added to the new table with an explicit exchange rate except for the institution's default currency.
- If an explicit exchange rate is defined on an invoice, that value is used. The new configuration table is not considered.
- Otherwise, if the fixed currency exists in the new table, the exchange rate is calculated from the value defined in the Explicit Exchange Rates table.
- If the currency is not defined in the new table, the daily exchange rates table is used to calculate the exchange rate (same existing functionality as today).
Example calculations
Setup:
- Institution default currency is AUD.
- Explicit conversion rates are:
- USD - 0.70 (1 AUD=0.70 USD)
- GBP - 0.55 (1 AUD=0.55 GBP)
- EUR - 0.60 (1 AUD=0.60 EUR)
- CAD - 0.95 (1 AUD=0.95 CAD)
Example 1
The PO line price is in USD
- PO line price - 25 USD
- Fund currency - AUD
- Calculation - 25 USD / 0.7 = 35.71 AUD
Example 2
The PO line price is in USD. The fund currency is in ILS. In this case, the previous functionality performs the conversion from AUD to ILS.
- PO line price - 25 USD
- Fund Currency - ILS
- Calculation - 25 USD / 0.7 = 35.71 AUD. Because there is no ILS in the table rates, the 35.71 AUD is then converted to ILS at the rate of 1 ILS = 0.42 AUD, so 35.71 AUD / 0.42 = 85.02 ILS
The same calculation is performed in the Recalculate Exchange Rate job.
RFID Multi-Scan Function
Idea Exchange URM-125885You can now configure your RFID reader to scan more than one item at a time. When the new check box on the RFID integration profile, Handle Multiple Items, is selected, the integration profile will accept multiple items on the RFID reader.
Once it is enabled, RFID can process the scans, either a single item, or multiple item as follows:
When the RFID button is pressed, the items on the RFID pad will be processed. When processing is complete, a summary confirmation popup will appear, detailing how many items were handled successfully, and presenting any alerts that came up during the scan. If all items are successfully processed, a success message is displayed. If an item requires action, the process is paused until you select Confirm or Cancel. Selecting Cancel only stops processing for the specific item. When multi-scan processing is completed, a summary of the processing is provided. Items that require an action appear under Failed/Canceled Items. Items that do not need action appear under Items Requiring Attention.
You can use the RFID button on the following pages when there is either a single item or multiple items on the RFID pad:
- Scan in items
- Scan in items > change item information - On this tab, multiple items can be processed as stated above with the exception of the following circumstances;
- When a new barcode is created.
- When the RFID integration profile is configured to update items and Update RFID is selected on the tab.
- Manage patron services > Loans tab
- Manage patron services > Returns tab
- Return Items
For Bibliotecha, this is only supported when using staffConnect Link (using the Other type in the integration profile) or D-Tech. For additional assistance with StaffConnect link, contact support-ch@bibliotheca.com.For a list of supported RFID vendors, see Alma - RFID Integration on the Developer Network.
Lender request Manage Fulfillment Option
The Manage Fulfillment Options action can now link directly to the article. If the lending request is for an electronically owned resource and has enough information to create a link to the article (e.g. publication date and pages). This depends on the electronic resource vendor’s platform supporting of article level linking.
Merge Records and Combine Inventory Job Enhancements
Multiple “Merge Records and Combine Inventory” instances can now run simultaneously if each has a separate input file with different record groups. In addition, the performance of this job is improved.
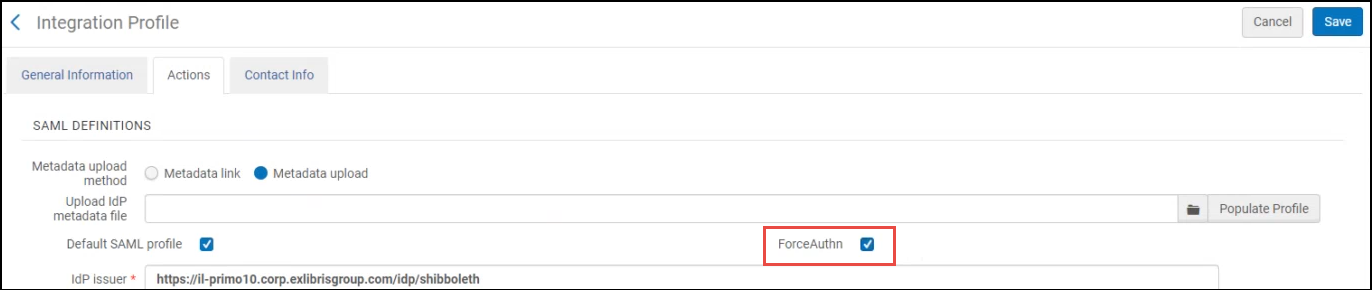
Support for Authentication Forcing in SAML Authentication
Now the SAML authentication of Alma supports authentication forcing when Alma authenticates users via SAML. Typically, when Alma authenticates users via SAML, it does so directly through the institutional IDP, thus providing end users with an SSO experience. As such, SAML-2 ForceAuthN was previously not supported by Alma. For more information on SAML ForceAuthN, see here.
If you want to force authentication when Alma authenticates users via SAML, select the ForceAuthN checkbox in the SAML Integration Profile (Alma Configuration > General > External System > Integration Profiles).
New Analytics Objects Subject Area
The new Analytics Objects subject area is now available. You can use the fields of this subject area to create reports concerning analytics objects, such as scheduled reports and widgets. For more information, see Analytics Objects.
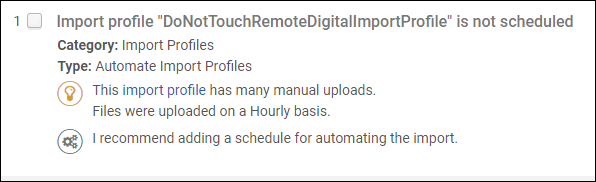
DARA Recommendation to Automate MD Import Profiles
DARA now identifies if you are manually running an MD import and recommends that you configure an MD import profile. Additionally, DARA can identify that you have an MD import profile configured without scheduling and that the vendor has an FTP server. DARA recommends that you configure the MD import profile to access the FTP server and to add scheduling to the profile.
For more information on DARA Recommendations, see DARA – Data Analysis Recommendation Assistant.e