
Working with Records
When you open the Metadata Editor, you may create a new record (see Menu Bar of the Records Area) or select an existing draft record from the Navigation pane.
For more information about working with the different types of records, see the following:
Size Limitations on Records
- The maximum size of a record is 1MB.
- The maximum size of an individual field in the record is 32KB (even if the record to which this field belongs is below 1MB).
Records exceeding these limitations cannot be saved in the Metadata Editor.
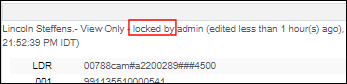
Locked Records While Working
Cursor Placement While Editing
The MD Editor provides flexible cursor placement when editing a field. You can position your cursor anywhere within a field to begin editing.
Draft Records
- If you made changes to the record but did not save it, then your changes are available only to you. Other users see the record version prior to your changes.
- If you made changes to the record and saved it but did not release it, then your changes are reflected in the draft record that other users see.
- If changes have been made to the draft within the last 30 days, the draft record is kept for up to one year; however, the draft record is not loaded and not displayed in the list if it was not modified in the last 30 days
- OR until the draft record is released
- OR until another user starts editing the draft record
Releasing Draft Records
Pushed Records

- From your search results list, select these records and select Push Selected to MDE. This pushes these records to the Draft Records area of the Metadata Editor. See Pushing Records to Metadata Editor for more information.
When select records are pushed to the Metadata Editor using Push selected to MDE, any errors that prevent the action from completing will no longer deselect the records. This ensures that users can still view the selected records and retry the action as needed.
Pushing Records to Metadata Editor
From the search results page you can push a single record or multiple records (up to 200 records in a single push) to the Metadata Editor. Pushing the records adds the records to the relevant Metadata Editor format list (MARC 21, UNIMARC, etc.)
The below reasons prevent records from being pushed to the Metadata Editor:
- You have insufficient cataloger privileges (see Cataloging Privileges).
- The record is currently locked by another user (see locked-by notation)
The limit on open records in the Metadata Editor is 200 records per format (MARC21, UNIMARC, etc.). When you push records to the MD Editor:
- If there are less than 200 open records there, they are pushed to the Metadata Editor. Any records beyond the 200 will remove the oldest records in the list.
- If you selected to push records that are already open in the Metadata Editor, they are pushed and are included in the count of 200 records.
Records in the records list that were not modified in the last 30 days are not loaded and not displayed in the record list, even if there are less than 200 records in the list. To display these records, see Draft Records.
- To push a single record, select Push to MDE in the record action list.
- To push multiple records, select the records and select Push Selected to MDE on the search results.
When select records are pushed to the Metadata Editor using Push selected to MDE, any errors that prevent the action from completing will no longer deselect the records. This ensures that users can still view the selected records and retry the action as needed.
Load Community Records
(Only for the Records List)
- To check if there are draft records in the Community Zone waiting to be edited, select the Load Community Zone Records button at the bottom of the navigation pane.

- Loading the records might take a few moments, at which time the button changes its text to Loading from Community Zone and is not clickable.

- Once records have been loaded:
- Records loaded from the Community Zone are displayed in the records list. The button changes to Auto-Loading from Community Zone and is not clickable.
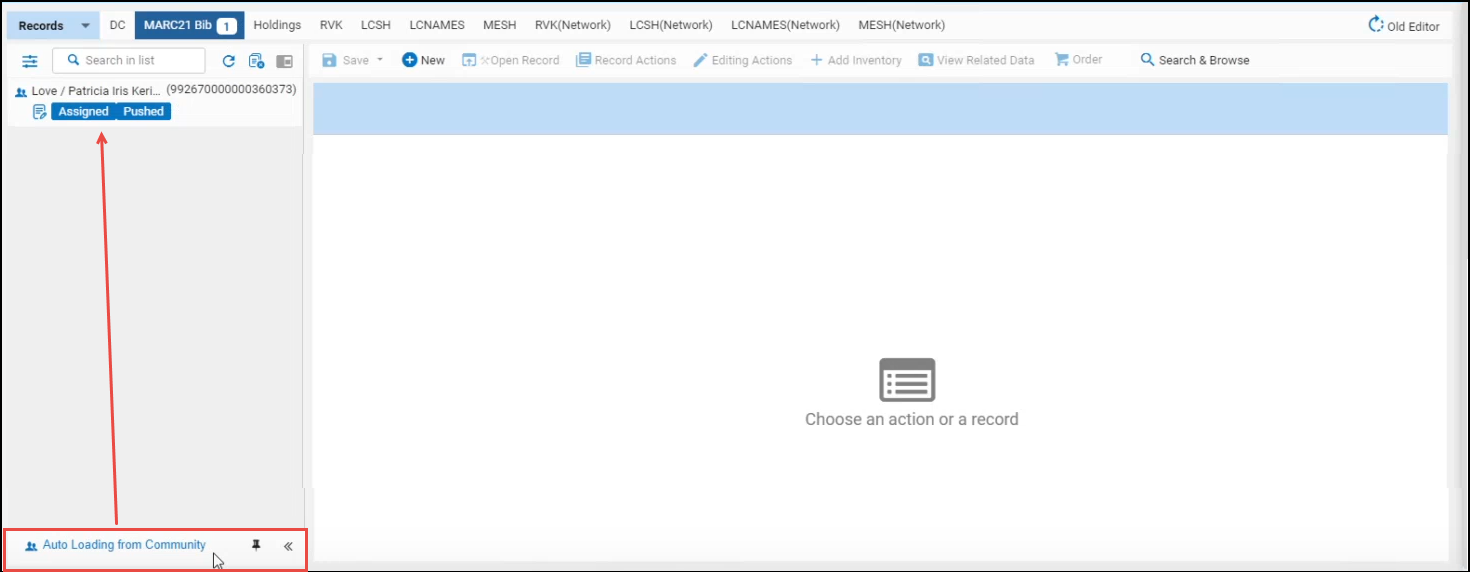
- If there were no records to load (or after the last community record was released from the list), the button returns to its initial state Load Community Zone Records, enabling you to come back at a later time and try again.
Saving Records in the MD Editor
The MD Editor has an auto-save function that helps prevent changes from being lost before you manually save the draft. The auto-save occurs every 30 seconds after a change is made. Draft records are available for editing only to the user working on them. Draft records are deleted if they have not been modified for thirty days.
When you save a record in the repository, Alma automatically backs up the previous version and saves it for future reference. Previous versions continue to be available even after an open record has been saved and released in the repository, and may be restored in the repository. When you restore a previous version, you overwrite the current version in the repository. For details, see View Versions.
When you finish working on a record, you can save the record from the Save menu or press Ctrl+S. The modified record is saved in the repository but remains checked out to you until you specifically release it (Save > Save and Release Record).
Alternatively, you can reload the original record from the repository. This replaces the current draft with the current version of the record and deletes any changes you have made. The record remains checked out to you.
While editing a record, you can also save a draft record, without checking the record in (Save > Save Draft or press Ctrl+Alt+S).
See Cataloging Privileges for additional information regarding saving records when you have implemented cataloging permission levels.
Normalizing on Save
When you save a record in the MD Editor, the following normalizations are processed:
- The 035 fields are derived from the 001 and 003 fields (if the 003 field exists)
- For new records, the 001 value is saved as the originating system ID (MMS ID)
- For existing records the 001 field is updated with the MMS ID
- The 008 field is updated if it exists.
- The 005 field is updated
- Part of the LDR (leader) field is updated (mostly the length of the record)
- Any additional, custom normalize on save processes/tasks configured in MARC 21 Bib normalize on save or MARC 21 Holding normalize on save, for example, by your institution are processed (refer to Working with Normalization Processes for more information)
Expanding a Record from a Template
You can expand a record's data fields using a specified template. The record may be any of the following types: bibliographic, holdings, and authority. When the Expand from Template option is applied to a record in the MD Editor, the system uses the following process to expand data fields in the record:
- Regardless of the template's indicators, the system groups all of the template's data fields according to their tags, keeping the occurrence order.
- For each template group, the system performs the following:
- Regardless of the indicators, the system groups all of the record's data fields that match the template group's tag, keeping the occurrence order.
- Performs the following comparisons on the first data field in the template's group with the first data field in the record's group as follows (followed by the next data field in each group and so forth).
- If the template's data field contains a subfield that is not in the corresponding record's data field, the subfield is added to the corresponding record's data field.
- If there is no corresponding data field in the record's group, the entire data field from the template is added to the record.
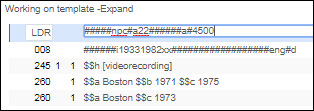
For example, if the template's group contains the following data fields:
Field 1: 260 _3 $$a Boston $$c 1971
Field 2: 260 _3 $$a Boston $$c 1973
And the record's group contains only one matching data field:
Field 1: 260 __ $$a New York
The system will add the subfields from the first data field in the template's group to the first corresponding data field (ignoring the indicators) in the record's group, and also add the full second data field from the template's group to the record since the bibliographic record does not have a second matching data field:
260 __ $$a New York $$c 1971
260 _3 $$a Boston $$c 1973
Learn more about expanding a record using a template in the Expand a Record Using a Template video (4:24 mins).
See Working with Record Templates for more information.
- Open the record you want to expand in the MD Editor.
- Select Editing Actions > Expand from Template to display the Expand from Template dialog box.
The following template is used for this example:
 Example Expand Template
 - In the Expand from Template dialog box, select a template from the Choose Template drop-down list and select OK to expand the record.
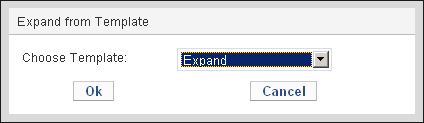 Expand from Template Dialog Box
The following figure shows the expanded record, which includes new 008 and 260 fields and expanded 245 and 260 fields:
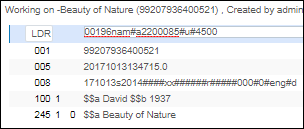
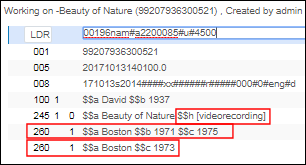 Example Record Before and After Expansion
Assigning Records to Collections
To view and assign collections, you must have the Collection Inventory Operator role and it must be scoped to the institution.
You can view the collections to which a record is assigned, and assign and unassign a record to a collection.
- Edit a record (MARC, Dublin Core, DCAP, ETD, or MODS) in the MD Editor and select View Related Data > View Collections. The Collections tab appears.

- Select Add to Collection and select a collection to which you want to assign the digital record. The collection appears in the Collections pane.
- To unassign a collection, select Remove (appears once the record was added to a collection).
Note: Digital records must be assigned to at least one collection, so the Remove link does not appear for digital records that are assigned to only one collection.
For more information on collections, see Managing Collections.
"An external process has changed the original record" Message when Editing Community Zone Records
When attempting to release Community Zone records from the Metadata Editor, you might get this message: "An external process has changed the original record. It is recommended to reload original record".
This message occurs when a record is open in the Metadata Editor (which means that it exists as draft), and while it is open, another process changes the record in the repository. The "other process" may be, for example, an API, a job running a normalization process on a set, or the authorities preferred term correction job. As a result of the change made by this change, the record opened in draft mode in the Metadata Editor is now different from the record saved in the repository.
This message notifies you of the change, and recommends reloading the record to get the most up-to-date version. To reload the record, select Record Actions > Reload Original Record.
Menu Bar of the Records Area

| Action | Description | ||||||||||||||||||||||||
|---|---|---|---|---|---|---|---|---|---|---|---|---|---|---|---|---|---|---|---|---|---|---|---|---|---|
|
Save Menu Select Save to save your work, or select the arrow next to it to open the list of Save options. |
|||||||||||||||||||||||||
| Save Record (Ctrl+S) |
Saves the changes in the repository but does not release the record. The modified record is saved in the repository but remains checked out to you until you specifically release it (Save > Save and Release Record). Other users will see the previous version of this record (before your changes).
When you exit the MD Editor without releasing the record, it remains in the left pane. This prevents other users from modifying the same record, and perhaps overriding your changes. See Locked Records While Working.
|
||||||||||||||||||||||||
| Save and Release Record (Ctrl+Alt+R) | Saves and releases the record. When you release a record, it is no longer available in the left pane of the Metadata Editor. | ||||||||||||||||||||||||
| Save Draft (Ctrl+Alt+S) | Runs validation routines and saves the record as a draft. Your changes are saved, but the changes are not updated in the repository at this time. The record remains checked out to you and is not available to other catalogers for editing.
Draft records are deleted if they have not been modified for thirty days.
|
||||||||||||||||||||||||
| Save as Template | Saves the current record as a template for recurrent use. | ||||||||||||||||||||||||
|
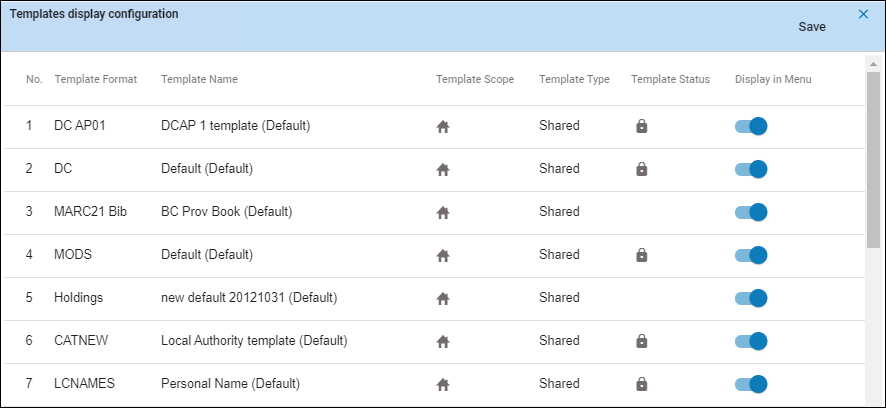
New Menu The New menu presents a list of templates for the different types of entities that you may want to create. This list varies depending on the templates that you have identified to appear in the New menu. This list can be customized with the Templates display configuration option.
|
|||||||||||||||||||||||||
| Templates Display Configuration |
Select to hide or display templates in the New menu. This allows you to display only the templates that you work with, and make the list of available templates shorter.
To customize the list of templates that appear in the New menu:
New templates can easily be created from the records on which you are working. See Save as Template.
|
||||||||||||||||||||||||
| Placement Options | Appears only for Network Zone consortia members. Select where to save new records, templates, and rules - whether locally or in a network institution. Note that this selection is per user. 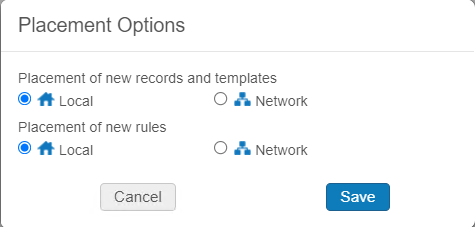 |
||||||||||||||||||||||||
| Record Actions Menu | |||||||||||||||||||||||||
| Release Record (Alt+Shift+R) | Releases the record without saving the changes. When you release a record, it is no longer available in the left pane of the MD Editor. | ||||||||||||||||||||||||
| Reload Original Record | Reloads (overwrites) the active record with the last version of the record saved in the repository and, thereby, discarding any draft changes made. | ||||||||||||||||||||||||
| Duplicate Record | Creates a copy of the record. | ||||||||||||||||||||||||
| Derive New Record | Create a new bibliographic record based on the related bibliographic record and the default template. In addition, it also includes the relations supported by either the 773 or 775 field. For more information, see Deriving a New Bibliographic Record - MARC 21 and Deriving a New Bibliographic Record - UNIMARC. | ||||||||||||||||||||||||
| Merge and Combine | Merge two bibliographic records and combine the inventory of those two bibliographic records under one bibliographic record. You have the option of deleting, suppressing, or keeping the bibliographic record with no remaining inventory as a result of the merge process. See Merging Bibliographic Records for more information. | ||||||||||||||||||||||||
| Validate (Ctrl+U) | Execute validation routines on the bibliographic record. Validation issues are displayed in the Alerts tab. The validation routines are configured in the Metadata Configuration for Resources. See Editing Validation Routines for more information. | ||||||||||||||||||||||||
| Validate in Network Zone | Validate the local bibliographic record according to the validation rules of the Network Zone. See Copying and/or Linking Local and Network Zone Bibliographic Records. | ||||||||||||||||||||||||
| Find Matches (Ctrl+M) |
Bibliographic: When editing a local record, check whether there are matches for the current record in your local catalog. When editing a record that is linked to Community Zone, checks whether there are matches for the current record in the Community Zone. To define the correct match profile to be used, you must configure the appropriate file key for serial_match_profile and non_serial_match_profile (see Configuring Other Settings (Resource Management)).
Authority:
While editing an authority record in the MD Editor, display any records that contain duplicate authority headings content.
When matches are found, you have the option to view and edit the record(s).
|
||||||||||||||||||||||||
| Show Linkage Information |
If your institution uses alternate graphic representation using fields with subfield $$6, toggle this option on and off to view and hide these linked fields. For an example see Working with Linked 880 Fields in Bibliographic Records. |
||||||||||||||||||||||||
| Add Note |
Select to add a note to the record. When the record has a note, the
Alternatively, to view the record's notes, select View Related Data > View Notes.
|
||||||||||||||||||||||||
| Assign Record to Another Cataloger |
Reassigns the record to another cataloger. The record is displayed in bold in the list of open records in the MD Editor and a note is added under Tools > View Notes. The record is displayed in bold in the list of open records in the MD Editor and a note is added under View Related Data > View Notes. To send an email to the new cataloger, select the "Send as Email" checkbox. The Assign To Letter is sent. For more information, see Configuring Alma Letters. |
||||||||||||||||||||||||
| Release Assignment | Releases a lock on a bibliographic record that is assigned to you so that someone else can work on it. | ||||||||||||||||||||||||
| Release Records of Another Cataloger | Release all of the bibliographic and holdings records assigned to a specific user. The released records become unassigned and are available to all other catalogers for processing.
When a record is being edited, it is locked for use by the user who is performing the edits. For details about locked records, see Locked Records While Working. |
||||||||||||||||||||||||
| Suppress from Discovery (Alt+Shift+S) |
Select the checkbox to exclude record from being published to the end-user discovery system (Primo, Google Scholar, Primo Central, Z39.50, or Libraries Australia for holdings only).
Clear the checkbox to include it in the publishing.
If a record has been suppressed, the Suppressed icon
Collection records can also be suppressed. However, the records in the collection are still discoverable. |
||||||||||||||||||||||||
| Suppress from External Search | Exclude the record from being searched by external systems. | ||||||||||||||||||||||||
| MARC Bibliographic: | |||||||||||||||||||||||||
| Contribute Record to Central Catalog (Ctrl + Alt + C) |
Contribute changes to an external central catalog. Appears only if you have configured a Central Catalog integration profile. See Integrating an Aleph Central Catalog. When working in a Network Zone, you can ensure that updates made by one of the members on a centrally-managed record are automatically saved in the Central Catalog record as well. This removed the need to use the "Contribute Record to Central Catalog" option. To activate automatic saving in the Central Catalog, select the "Automatic contribute to central catalog" checkbox in the integration profile for Aleph Central Cataloging (Alma configuration > Integration profiles > Aleph system > Action tab). |
||||||||||||||||||||||||
| Align Record Version with Central Catalog | This option is enabled only if a central catalog integration profile for SBN is defined. For details, see Aligning Record Version with SBN. | ||||||||||||||||||||||||
| Merge Records in Central Catalog (Alt+Shift+T) | Select to update SBN of a Fusione record directly from Alma. This is available for both SBN bibliographic and authority (AU,MA,TU,UM,SO,CL) record types. This option is enabled only if a central catalog integration profile for SBN is defined. This option is available only for UNIMARC bibliographic and authority records. | ||||||||||||||||||||||||
|
Manage Location Information (Alt+Shift+L) |
This option is enabled only if a central catalog integration profile for SBN is defined. For details, see Sending Location Information and Updating the UNIMARC 899 Field in Alma. | ||||||||||||||||||||||||
| MARC Authorities
Note that the MARC Authorities options are available for any authority records such as MARC 21, UNIMARC, and GND. |
|||||||||||||||||||||||||
| Change Authority Placement | While working in draft mode with an authority record, you can change the placement of the record to the Community Zone, Network Zone, or the Institution Zone. When you select Change Authority Placement, the options provided in the New Authority Record Placement dialog box vary depending on how your Metadata configuration is set for locally managed or community managed authority records (see Controlling the Display and Access of Global Authorities in the MD Editor).
After you have saved the authority record, the Change Authority Placement option is disabled. You can no longer change the record's placement. |
||||||||||||||||||||||||
| See Also |
With the focus on the 5XX field in an authority record, show both records, the authority record being edited and the linked authority record. For vocabularies that use text matching, there might be more than one authority record that matches; and in this case, all authority records are listed. |
||||||||||||||||||||||||
| Set Management Tags | |||||||||||||||||||||||||
| Export to WorldCat |
Tag the record to be included/excluded in the OCLC synchronization.
Select one of the following options to indicate how to handle the record: Don’t Publish, Publish Holdings Only, Publish Bibliographic Record.
The Publish Bibliographic Record option is the default setting in the following workflows:
For OCLC Connexion, the value is determined according to the OCLC Connexion integration profile. See Importing Records from OCLC Connexion for more information.
Records that are exported to OCLC and then suppressed by changing this export parameter to another value are published as deleted.
|
||||||||||||||||||||||||
| Force Export to WorldCat |
Include holdings records linked to the bibliographic record in the next export to OCLC. Note that if publishing the holdings level (LHRs), the holdings records are republished only if they were changed. |
||||||||||||||||||||||||
| Export to Libraries Australia |
Tag the record to be included/excluded in the Libraries Australia synchronization.
Select the radio button to indicate how to handle the record by either Don’t Publish or Publish bib.
When the bibliographic record management tag is set to Publish bib for Export to Libraries Australia, then the holding level suppression is the deciding factor as to whether the record is published or not to Libraries Australia.
|
||||||||||||||||||||||||
| Force Export to Libraries Australia | Include holdings records linked to the bibliographic record in the next export to Libraries Australia. | ||||||||||||||||||||||||
| Create PO Line (Order) | Create a PO line based on the bibliographic information in the active record. This requires the Inventory Operator role permissions. See Manually Creating a PO Line for more information. | ||||||||||||||||||||||||
| Contribute Record to Central Catalog | Contribute changes to an external central catalog. Appears only if you have configured a Central Catalog integration profile. See Integrating an Aleph Central Catalog. | ||||||||||||||||||||||||
| Copy to Catalog |
Copies a shared bibliographic record to the local repository (Institution Zone) of your institution. This copy of the record is unlinked from the Community Zone.
In subsequent activations, the copied bibliographic record is not copied again to the Institution Zone. To prevent duplicates, Alma attempts to identify the original system ID; and if it matches an Institution Zone bibliographic record, the Institution Zone bibliographic record is used.
|
||||||||||||||||||||||||
| Share with Network | Shares a locally created record with the Network Zone. See Network-Managed Records in a Collaborative Network. | ||||||||||||||||||||||||
| Validate in Network | Validate the local bibliographic record according to the validation rules of the Network Zone. See Copying and/or Linking Local and Network Zone Bibliographic Records. | ||||||||||||||||||||||||
| Update from Bibliographic | Add fields from the bibliographic record to the 852 field in the holdings record, according to the following rules:
The above rules are the out-of-the-box settings, which are defined on the Call Number Mapping page. For more information, see Mapping Call Numbers to Holdings. When you use the Update from Bibliographic option (Tools > MARC21 Holdings > Update from Bibliographic), holdings record subfields are reordered after import call number normalization.
The subfields are reordered in the following sequence: 6, 8, 3, and then any alphabetic subfield in alphanumeric order (a, A, 1).
The 852 subfields are reordered in the following sequence: 6, 8, 3, and then any alphabetic subfield in alphanumeric order (a, A, 1) except that t is directly after b, and k is directly before h, and then 2.
|
||||||||||||||||||||||||
| Relink to a Different Record | Relink the holdings record to a different bibliographic record. For more information, see Moving Holdings Between Physical Records (Relinking). | ||||||||||||||||||||||||
| Next Predicted Item's Information | See Prediction Patterns. | ||||||||||||||||||||||||
| Open Predicted Items | See Prediction Patterns. | ||||||||||||||||||||||||
| Change Authority Placement | While working in draft mode with an authority record, you can change the placement of the record to the Community Zone, Network Zone, or the Institution Zone. When you select Change Authority Placement, the options provided in the New Authority Record Placement dialog box vary depending on how your Metadata configuration is set for locally managed or community managed authority records (see Controlling the Display and Access of Global Authorities in the MD Editor).
After you have saved the authority record, the Change Authority Placement option is disabled. You can no longer change the record's placement. |
||||||||||||||||||||||||
| See Also | With the focus on the 5XX field in an authority record, show both records, the authority record being edited and the linked authority record. For vocabularies that use text matching, there might be more than one authority record that matches; and in this case, all authority records are listed. | ||||||||||||||||||||||||
| Delete Record (Ctrl+D) | This option is enabled for a user with the Cataloger Extended role. Note that this option is grayed out when working on a bibliographic record that is linked to the Community Zone.
The Delete Record function deletes the following:
For information about deleting bibliographic records in bulk, see Deleting Sets of Bibliographic Records.
|
||||||||||||||||||||||||
|
Editing Actions Menu
|
|||||||||||||||||||||||||
|
Add Field (F8) |
Adds a new empty row that can be set with a field value when cataloging.
Alternatively, press F8 to add a row for a new field.
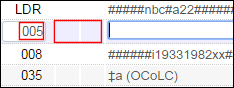
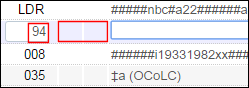
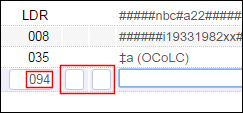
When the field/row being added is a control field such as the LDR, 005, or 008, the space for the first and second indicators does not appear. For some fields, you need to be certain to enter the beginning zero to make it a full three-digit field for the first and second indicator to appear. Refer to the figures below.
   |
||||||||||||||||||||||||
| Add Subfield (F9) |
Adds a new subfield with the defined separator, for example $$ or ‡, to allow inline cataloging of the active field. Alternatively, press F9 to add a subfield separator for a new field. |
||||||||||||||||||||||||
| Remove Field (Ctrl+F6) | Use this option to remove one or more fields.
Select the row you want to delete or use Ctrl+select to select multiple rows, and then choose Remove Field or Ctrl+F6. |
||||||||||||||||||||||||
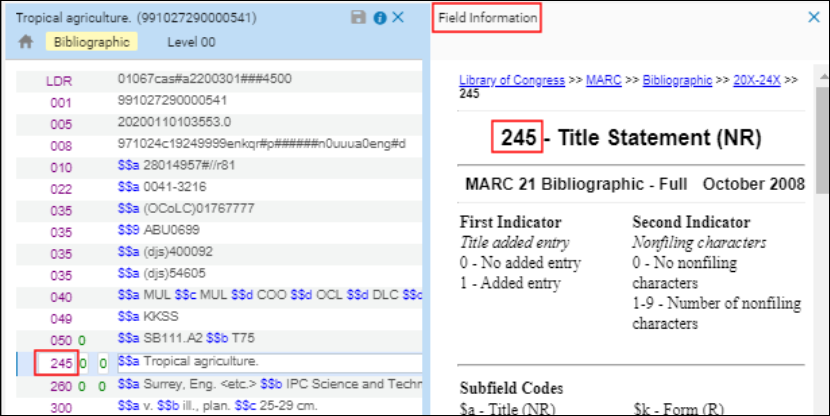
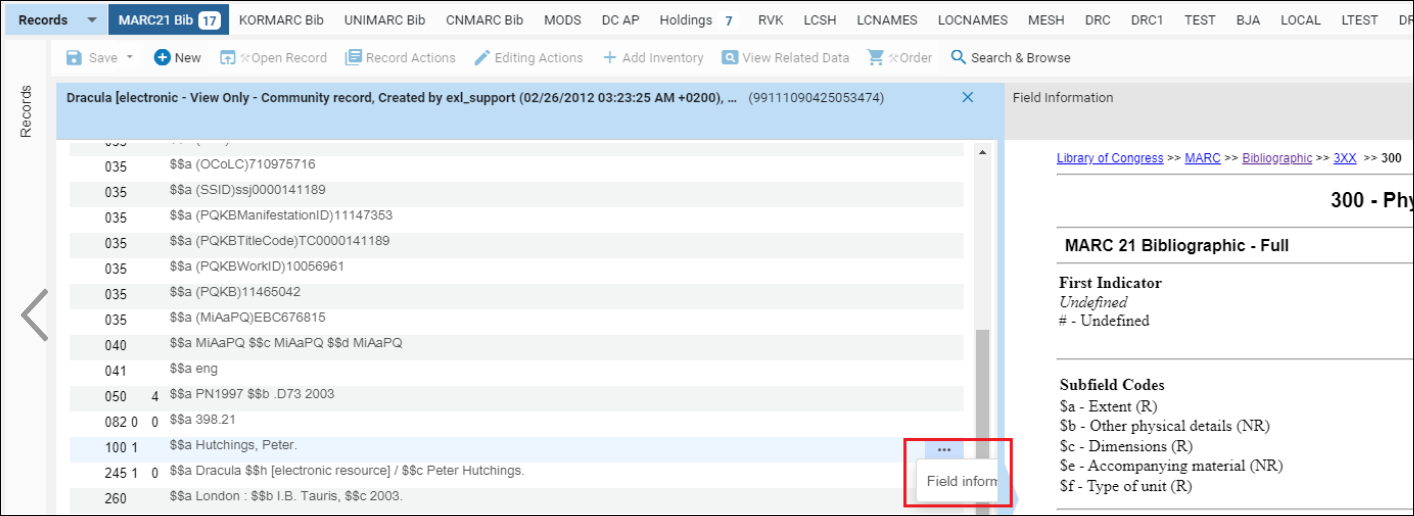
|
Select this option to display the vocabulary explanation for the field that you are editing. The field information appears in the editor split mode next to the record that you are editing.
Alt+F is per field. To display field information of another field, select Alt+F again. Alternatively, to display the Field information, select
Field Information is controlled by the Help URL, see Editing Fields. |
|||||||||||||||||||||||||
| Cut (Ctrl+X) | Cuts the selected text. | ||||||||||||||||||||||||
| Copy (Ctrl+C) | Copies the selected text. To copy multiple fields simultaneously, press Ctrl and select all the fields to be copied. | ||||||||||||||||||||||||
| Paste (Ctrl+V) | Pastes text that was previously cut or copied. Fields are pasted at the cursor location. Pasting multiple fields simultaneously pastes the fields in their numerical sort order. | ||||||||||||||||||||||||
|
Runs pre-configured normalization routines. Normalizations are intended to correct or update metadata records. For example, sorting a record's fields, removing empty fields, or stripping out fields containing order information. For more information, see Working with Normalization Rules. When working on a Network Zone record, this functionality is applied only to shared fields and not to local fields. If you want to run a normalization rule on a local field, you can do so using one of the Bib normalization jobs (see Running Manual Jobs on Defined Sets), which take into account only local fields. |
|||||||||||||||||||||||||
| Expand from Template (Ctrl+E) | Expands a record's data fields using a specified template. The record may be any of the following types: bibliographic, holdings, and authority.
When multiple panels are open in the Metadata Editor, the Expand from Template function is applied to the panel that is the focus. See Expanding a Record from a Template and Working with Record Templates for more information.
|
||||||||||||||||||||||||
| Generate Author Number (F4) | Generates the author number.
The author number is generated for the following:
|
||||||||||||||||||||||||
| Add Alternate Graphic Representation (Alt+F1) |
When you set the alternate_graphic_representation_editing parameter to True, the Add Alternate Graphic Representation option enables you to create linked 880 fields. See alternate_graphic_representation_editing for more information. When enabled, the following options are enabled in the Editing Actions menu:
When this parameter is set to False, this option enables you to edit paired fields without the complexity of 880 linkage. For example, if you have the 245 field selected, this option enables you to choose a relevant script for input. An additional line opens in the editor for input in the designated script. For more information, see Working with Linked 880 Fields in Bibliographic Records. |
||||||||||||||||||||||||
| Show Directional Characters | Select this option to show directional control characters when you are cataloging. These characters are used to control the direction of the text when cataloging text that has both left-to-right and right-to-left languages. See below for an example of a right-to-left Hebrew title with the Latin C++ entered in left-to-right mode and the ⌈ and ▼ directional symbols as part of the text.
Directional Control Characters By selecting this menu option, the symbols that represent a directional change in the text appear in the text. See the table below for the graphical representation of the directional control characters. The graphical representation that is visible when you select Show Directional Characters is followed by the hidden UNICODE character that controls the direction. Note that if you want to copy/paste or cut/paste directional characters, you need to copy/cut both the hidden UNICODE directional character and the graphical representation that is prepended to it to successfully paste directional characters.
When you have selected Show Directional Characters to display the symbols, there is a check mark to the left of this option.
Show Directional Characters Selected Select this option again to turn it off. When you do this, the check mark no longer appears to the left of this option. For additional information on cataloging in Hebrew, see Special Issues in Hebrew Cataloging. |
||||||||||||||||||||||||
| Insert Directional Characters | Select one of the directional options from this menu item to identify the direction for entering text from the field/subfield that you are cataloging. Alternatively, you can use the keyboard shortcuts that appear in this menu list. See the table above for more information.
There is a known issue that when you select one of these options from the menu and Show Directional Characters is selected, the directional symbol does not appear until you begin typing. However, when you use a keyboard shortcut to change directions, the directional symbol appears as soon as the keyboard shortcut is entered. |
||||||||||||||||||||||||
| Generate Accession Numbers (Ctrl+Shift+A) |
Available only for holdings records. Select to update holdings-level information for items and generate the call number. For more information, Holding-level Call Number Generation. |
||||||||||||||||||||||||
|
Add Inventory Menu With the Add Inventory menu, you can choose the type of inventory to add to the bibliographic record.
The Add Inventory menu is disabled for authority records.
|
|||||||||||||||||||||||||
| Add Holdings |
Add a holdings record that is linked to the current bibliographic record. The holdings options are identical are identical the New menu and in the Add Inventory menu. You can choose which template to use for creating the holdings in the same way as it is done in the New menu. |
||||||||||||||||||||||||
| Add Item | Add a physical item. Move to the Physical Item Editor to add an item for this holdings record. This is active for holdings records. | ||||||||||||||||||||||||
| Add Portfolio | Add a portfolio. Opens the New Portfolio page with the Use existing title radio button selected and the Choose title field filled in and identified as a required field with a red asterisk. See the section Managing Local Portfolios for more information. | ||||||||||||||||||||||||
| Add Representation | Add a representation. Opens the Representation Details page that allows you to add a representation to the bibliographic record (for MARC records only). For more information, see Adding a Representation. | ||||||||||||||||||||||||
| View Related Data Menu | |||||||||||||||||||||||||
| View Inventory (Ctrl+I) | Checks for inventory linked to the bibliographic record and displays the results in the Editor Split mode.
|
||||||||||||||||||||||||
| View Notes (Ctrl+Shift+N) | Displays a working copy notes. | ||||||||||||||||||||||||
|
View Related Bibliographic Records (Ctrl+Shift+B) |
Displays bibliographic records related to the primary record that you are viewing. |
||||||||||||||||||||||||
|
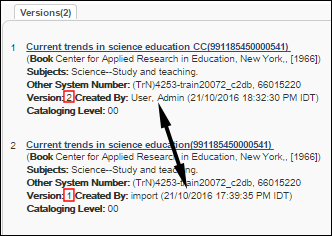
Use this option to view and restore a previous version of the record, when you are editing bibliographic, holdings, and authority records. 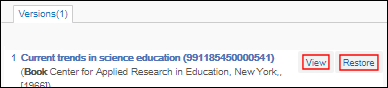 View and Restore Previous Versions
Note that when the Restore Record Version privilege is disabled for your user role, the Restore option does not appear. By default, the Restore Record Version privilege is enabled for the Cataloger, Catalog Manager, Catalog Administrator, and Cataloger Extended roles. When the Restore Record Version privilege is disabled, the role can still view past versions of a record. See Privileges Report for more information. Contact Support, if you want to have this privilege configured for one or more of these roles for your institution.
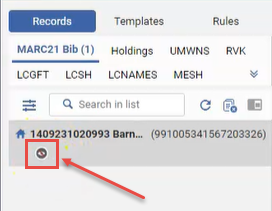
The version counter starts after the first modification of a record. The creation of a record via import or manually in the Metadata Editor does not count as a version. As a result, when you select View Versions for a new record, the system responds with the message No revisions were found:
 After the first modification to the record, the version counter starts; and selecting View Versions opens the Metadata Editor in split screen mode with the Versions tab:
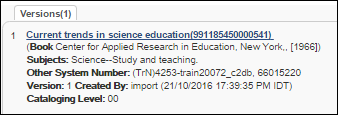 In the figure above, "Version: 1" indicates that the record has had its first modification. For subsequent modifications, the version number increases.
The Created By: label is followed by the:
Record versions for changes in a Record's Management Tag:
Management tags, such as Suppressed from discovery, are logged in record versions making it possible to track when or by whom a record was suppressed or unsuppressed. Whenever a record's management tag changes, a new version will be generated, displaying the previous tag value. Restoring a previous version will only affect the metadata, not other information on the versions page, such as cataloging level or management tags.
Record versions for Record's Management Tags are available only for showing changes that were locally done. For seeing locally done changes for Community Zone records, select View Versions of Original Record.
The management tag labels that are displayed for changes in the record versions are as follows:
Record version label for change in Record's Management Tag
Record versions created before the May 2024 release have null values for all management tags. The values for management tags will only be recorded when the record undergoes any subsequent update. Therefore, in the version created for that update, it may seem as though the user initiating the first update post-release "updated" the management tags to their existing values. |
|||||||||||||||||||||||||
| View Versions of Original Record | View previous versions of a local record before you save it to the Network Zone. See Network-Managed Records in a Collaborative Network. View local changes saved on Community Zone records. |
||||||||||||||||||||||||
| View Collections |
Display the collections to which the bibliographic record is assigned and enables you to assign and unassign the record to a collection. For more information, see Assigning Records to Collections. To view this option, you must have the Collection Inventory Operator role and it must be scoped to the institution. |
||||||||||||||||||||||||
| View Bibliographic Record | Display the associated bibliographic record when working with MARC 21 holdings in split editor mode. | ||||||||||||||||||||||||
| View in Search | Display the record in the results list format on the Repository Search page. | ||||||||||||||||||||||||
| View Linked Data | See Using Linked Data While Working with Bibliographic Records for more information. | ||||||||||||||||||||||||
| View Orders | Display the record in the PO line list format on the Select PO Line page (when there is an order). | ||||||||||||||||||||||||
| Order Menu | |||||||||||||||||||||||||
| Order |
Select to create a purchase order line for the selected record (this requires the Inventory Operator role permissions). This opens the PO Line Owner and Type page (the first step in manually creating a PO line), exits the MD Editor page, and creates a PO line based on the bibliographic information in the active record. See Manually Creating a PO Line for more information. |
||||||||||||||||||||||||
| Search and Browse Menu | |||||||||||||||||||||||||
| Browse Shelf Listing (Alt+C) | Displays the following options in order for you to do a call number browse:
This functionality is also available by selecting Resources > Cataloging > Browse Shelf Listing. When you select the link in the Description column for a call number, the bibliographic record opens in the Metadata Editor for editing. When you select the Holdings link in the Level column for a call number, the holdings record opens in the Metadata Editor for editing. The way in which this browse works cannot be configured.
|
||||||||||||||||||||||||
|
Browse Bibliographic Headings (Alt+H) |
Use this option to view bibliographic headings determined by the following search criteria that you select:
See Browsing Bibliographic Headings for more information. This capability can also be accessed from Resources > Cataloging > Browse Bibliographic Headings. |
||||||||||||||||||||||||
| Search Resources (Alt+E) | Exclude the record from being searched by external systems. | ||||||||||||||||||||||||


Entering Diacritics and Special Characters in the MD Editor
When cataloging, you may need to enter diacritics, special characters, or non-Latin characters in the MD Editor.
To enter diacritics or special characters into the MD Editor:
- From the Windows Start menu, select All Programs > Accessories > System Tools > Character Map.
- Select a font from the Font drop-down list.
- Select the special character that you want to insert into the MD Editor.
- Select Select, and then select Copy.
- Paste the character in the MD Editor.
For more information, see How to Input Special Characters in Alma.
UTF-8 special characters (with diacritics) may be represented in both the composed or decomposed version of the character in bibliographic or authority records. You have the option to configure your system with normalize on save always to save the composed version of special characters, to implement to avoid the use case where multiple records are changed due to their conversion to composed representation. Such records are marked for preferred-term correction (PTC) and cause heading updates (the only difference is the composed/decomposed nature of a special character). If you are interested in this method of handling UTF-8 special characters, please contact Ex Libris Support.
Using Non-Filing Markers/Indicators
Using Non-Filing Markers/Indicators in MARC 21
For MARC 21 records, Alma supports the following capabilities related to non-filing markers and indicators:
-
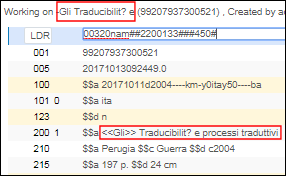
The cataloging convention of using angle brackets, << >>, to indicate non-filing markers is supported.
For example, angle brackets are used when cataloging MARC 21 records with Hebrew content. -
The second indicator of the 240 and 245 fields is used to specify sorting functionality.
The non-filing markers and indicators are used for display, sorting/browsing, and cataloging, as described in the table.
| Component | Description |
|---|---|
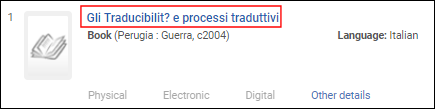
| Display | When there is text within the angle brackets, the brackets are removed when the text appears. |
| Sort/Browse | For sorting or browse purposes, the text within the angle brackets is ignored. |
| MD Editor | In the MD Editor, the angle brackets and the text within the brackets appear in the area where cataloging records are entered. However, where text such as a title appears in the MD Editor, the angle brackets are removed. |
Using Non-Filing Markers in UNIMARC
For UNIMARC records, Alma supports the cataloging convention of angle brackets, << >>, which are used in different regions to indicate non-filing markers. For example, UNIMARC uses the angle brackets to specify non-filing text such as il or le at the beginning (or middle) of a field.
See the table above that describes the manner in which Alma handles display, sorting/browsing, and cataloging when angle brackets are used for non-filing markers. See the illustrations below for examples.
Using Non-Filing Markers/Indicators in KORMARC
When working with KORMARC records, searching in the Alma repository and browsing headings has been enhanced to include logic for processing records with non-filing indicators and characters. Sorted results lists ignore non-filing characters and when browsing headings, the non-filing characters are ignored. For example, articles such as a, an, and the can be ignored.
In KORMARC, non-filing characters are identified by surrounding the non-filing text in parentheses at the beginning of $a, and an indicator value of 1 in either the first or second indicator position, as identified in the table below.
| Indicator Position | KORMARC Field |
|---|---|
| 1 | 630, 740 |
| 2 | 130, 222, 240, 242, 243, 245, 440, 490, 730, 830 |
Even though the non-filing characters are ignored for sorting purposes, the system displays the complete entry. For example:
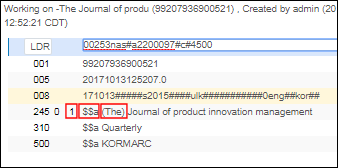
- Record: 245 0 1 $$a (The) Journal of product innovation management.
- Sort: Journal of product innovation management.
- Display: The Journal of product innovation management.
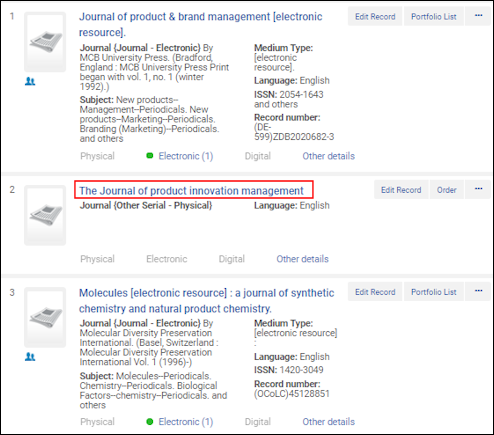
Using the same KORMARC record example above, the result The Journal of product innovation management. is returned when any of the following searches have been specified:
- Keyword search contains the or journal
- Search phrase contains the journal of product or journal of product
- Search starting with contains the journal of product or journal of product