ExLibris
  • Subscribe by RSS
  • Ex Libris Knowledge Center

    Configuring Discovery Interface Display Logic for Alma-Summon

    Return to menu

    The Discovery Interface Display Logic options under the Fulfillment Configuration menu allow you to configure the following discovery options for Alma-Summon:
    • Hiding fulfillment services from user groups
    • Enabling related record services
    • Enabling direct linking
    • Configuring general electronic services
    • Configuring the order of general electronic services
    • Configuring the order of online services
    • Configuring the order of locations in search results
    • Configuring miscellaneous display options

    Hiding Fulfillment Services from User Groups

    To configure display logic rules, you must have one of the following roles:
    • General System Administrator
    • Fulfillment Administrator

    For a concise "How To" format of the topics covered on this page, see Defining Link Resolver Library Preferences.

    Display logic rules define when the following fulfillment services should not appear in Primo and Primo VE:

    • Booking request – Request to reserve an item at a specific time.

    • DB service – Link to the core interface of a third-party database.

    • Digitization – Request to have an item or part of an item scanned so that it can be viewed on a computer.

    • Full text – View the full text for an item online.

    • General electronic services – Links that can be created by an institution for any purpose. For information about general electronic services (GES), see General Electronic Services.

    • General hold request – Request to have an item held at a circulation desk when the holdings record is empty or request an issue for a journal regardless of whether any of its issues have been cataloged. For more information on general hold requests, see Creating a General Hold Request.

    • Hold request – Request to have an item held at a circulation desk.

    • Open Access – View open access full text (for example, hide open access if full text exists or hide full text if open access exists).

    • Purchase request – Request an item to be purchased. For more information, see Purchase Requests.

    • Representation Delivery Service – View a digital item.

    • Resource sharing request – Request to retrieve an item from another institution when the patron's institution does not have the item.

    • Selected full text – Links to full text (full text may not be available to all articles in the Journal).

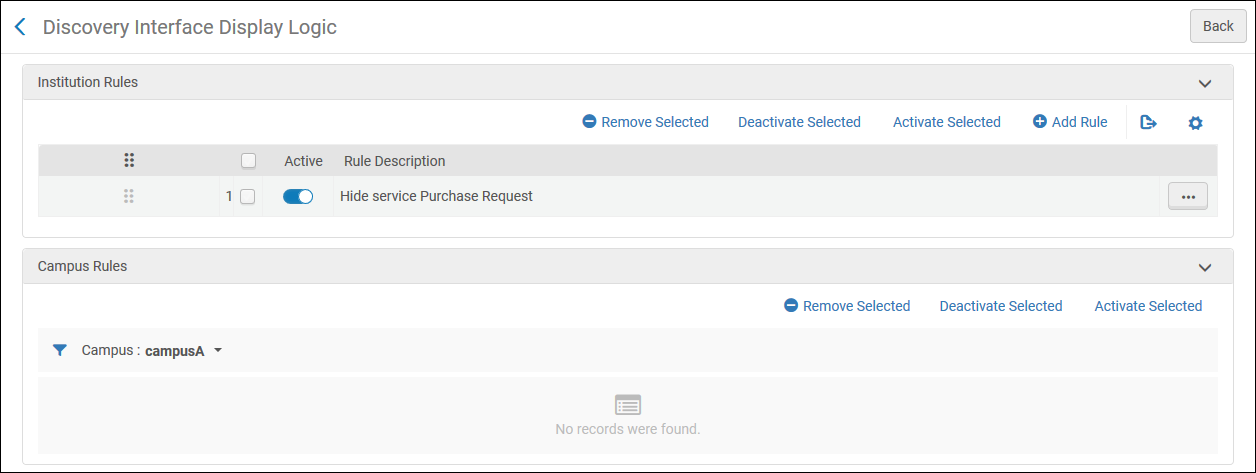
    You configure display logic rules on the Discovery Interface Display Logic page (Configuration Menu > Fulfillment > Discovery Interface Display Logic > Display Logic Rules).
    Discovery Interface Display Logic.png
    Discovery Interface Display Logic Page
    • Display logic rules can be configured at the network, institution, and campus levels (if campuses are defined in the system). For configuring campus-level display logic rules, see Defining Display Logic Rules at the Campus Level.

    • If display logic rules are configured in the network, the behavior is affected by the network_display_logic_distribution_members_behavior and network_display_logic_rules_precedence customer parameters. See Configuring Other Settings (Fulfillment)

    • All relevant and applicable rules are applied. If a subsequent (lower) rule conflicts with a previous (higher) rule, Alma applies the first rule.

    The following actions can be performed on this page:
    • Add a display logic rule (see Adding Display Logic Rules)

    • Edit a display logic rule (select Edit from the row actions list)

    • Duplicate a display logic rule (select Duplicate from the row actions list)

    • Enable or disable a display logic rule. Each row can be enabled or disabled individually with the Active slider. Or select a group of rules and select Deactivate Selected or Activate Selected from the actions.

    • Delete a display logic rule (select Remove from the row actions list)

    You cannot edit the parameters of an existing display logic rule. You can delete the rule and then add a new rule.
    See the Configuring Services Displayed to Patron training session.

    For examples of working with discovery display logic, see Display Logic Rules Examples.

    The following display logic rules are available out-of-the-box. These rules are active, by default:

    • Hide service Representation Quick Access – hides the Quick Access section in Primo and Primo VE.

      For Quick Access to be available, you must enable the New Digital Viewer. For more information, see To configure the Digital Viewer.

    • Hide service Representation Quick Access with Obtrusive Copyrights (Alma representations only) = true – hides representations with obtrusive copyrights from the Quick Access section in Primo and Primo VE.

    • Hide service Representation Delivery Service with Usage Type = Auxiliary – hides representations with the usage type of Auxiliary from the Quick Access section in Primo and Primo VE.

    Adding Display Logic Rules

    You can add new display logic rules. Rules apply for all libraries in the institution. By default, new rules are enabled.

    Representation-related services (such as Representation Quick Access) are applicable to Alma-D records only.

    To add a new display logic rule:
    1. On the Discovery Interface Display Logic page (Configuration Menu > Fulfillment > Discovery Interface Display Logic > Display Logic Rules), select Add Rule. The Add Rule dialog box appears.

    2. From the For user from groups drop-down list, select one or more groups to which to apply the rule. If you do not select a group, the rule applies to all user groups.

    3. In the hide service drop-down list, select the service(s) that the rule should hide. For some services (for example Full Text), the with and with value fields appear, enabling you to select additional options for this service. The fields that appear depend on your selection. See the following table.

      Add Rule Fields
      hide service with with value
      Booking, Digitization, General Hold Request, Hold Request N/A N/A
      DB Service Electronic Collection Select one or more electronic collection name(s).
      Full Text, Selected Full Text, General Digitization Request Interface Select one or more interface or electronic collection name(s).
      Both Community Zone and local interfaces are available.
      Electronic Collection
      General Electronic Service Service Select a general electronic service.

      Open Access

      Note that this service appears when the enable_open_access_services_from_unpaywall_api customer parameter is set to true. See Open Access for more information.

      N/A

      N/A

      Purchase Request Availability by the campus Select true to hide the service if the physical resource cannot be requested for availability on the campus. Otherwise, select false.
      Availability by the institution Select true to hide the service if the physical resource cannot be requested for availability on the institution. Otherwise, select false.
      Ownership by the campus

      Select true to hide the service if the resource cannot be requested due to physical ownership by the institution. Otherwise, select false.

      To enable self-ownership checks to be performed for serial titles, make sure to set the parameter check_self_ownership_serial to true.
      See also Configuring Other Settings (Fulfillment).

      To block requesting resources owned by the institution in a non-physical format, set the if exists service field as follows:
      • For digital resources – representation delivery service
      • For electronic resources – full text
      Ownership by the institution

      Select true to hide the service if the resource cannot be requested due to physical ownership by the institution. Otherwise, select false.

      To enable self-ownership checks to be performed for serial titles, make sure to set the parameter check_self_ownership_serial to true.
      See also Configuring Other Settings (Fulfillment).

      To block requesting resources owned by the institution in a non-physical format, set the if exists service field as follows:
      • For digital resources – representation delivery service
      • For electronic resources – full text
      Representation Delivery Service,
      Representation Quick Access
      Access Rights Select true to hide the service if the resource has access rights configured. Otherwise, select false.
      Public Note Hide a representation in Primo, depending on the value of the Public Note field of the representation.
      The following are examples of regular expressions with which you can configure the Display Logic Rules to hide representations when the expressions are in the Public Note field. A flag can be used to determine if the expression is case sensitive or not:
      • /Restricted Access/ - Matches a public note containing the phrase Restricted Access, case sensitive.
      • /Restricted Access/i - Matches a public note containing the phrase Restricted Access, case insensitive.
      • /^(?!Open Access$)- Matches a public note that does not equal Open Access, case sensitive.
      • /^((?!Open Access).)*$/i - Matches a public note that does not contain the phrase Open Access, case insensitive.
      Usage Type Select primary (master) to hide the service for representations with the usage type of primary (master) and select derivative to hide the service for representations with the usage type of derivative.
      Representation Type Select remote to hide the service for remote representations and select non-remote to hide the service for remote representations.
      Viewer

      Select a viewer to hide the service if the resource is configured to be displayed by that viewer.

      For Quick Access to be available, you must enable the New Digital Viewer. For more information, see To configure the Digital Viewer.

      Obtrusive Copyrights (Representation Quick Access only) Hide the service if the resource is configured with obtrusive copyrights enabled.
      Resource Sharing Request Availability by the campus Select true to hide the service if the resource is available on campus. Otherwise, select false.
      Availability by the institution Select true to hide the service if the resource is available at the institution. Otherwise, select false.
      Ownership by the campus Select true to hide the service if the resource is owned by the campus. Otherwise, select false.
      Ownership by the institution Select true to hide the service if the resource is owned by the institution. Otherwise, select false.
      Resource Sharing System Select a resource sharing system.
      Resource type
      Select a resource type for which the resource sharing link will be hidden.
      The with value kit, is only supported for Primo VE customers, not Primo customers.
    4. If you want hide a service, only in the case when another service already exists, in the If exists service multiple select drop-down list, select the other service(s).

      For some services (for example Full Text), the with and with value fields appear, enabling you to select additional options for this service. See the table above for information about the fields.

      For resource sharing requests, if a resource has holdings without items, it is not considered self-owned. To hide resources that have holdings without items, hide the Resource Sharing Request service if the General Hold Request service exists.

    5. Select one of the following:

      • Add – Add the rule but leave the dialog box open so that you can add additional rules.

      • Add and Close – Add the rule and close the dialog box.

    6. If you define more than one rule, on the Discovery Interface Display Logic page, use the Move Up and Move Down arrows to set the order of the rules. Alma applies the enabled rules in the configured order.

    Display Logic Rule Examples

    The following rule hides the display of EBSCOhost Consumer Health Complete if the service page includes or displays any full text from EBSCOhost.

    EBSCOhost is identified as the interface in this example.

    Display Logic Rule Sample.png
    Example Display Logic Rule
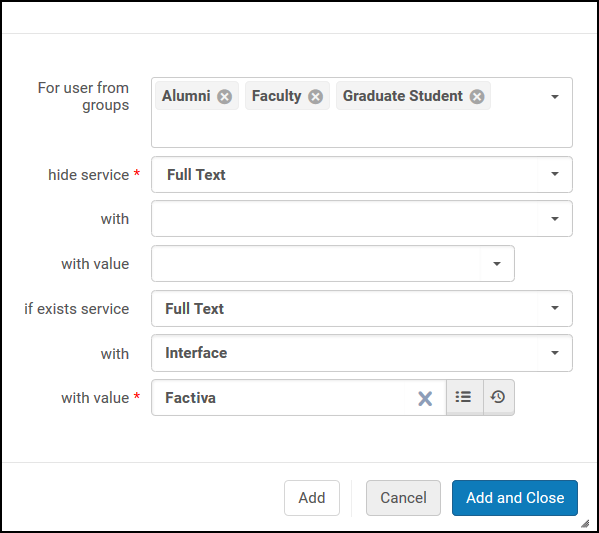
    The following rule specifies that if full text is available from Factiva, hide the display of full text from all other packages and interfaces (which is indicated by the blank options associated with the hide service parameter).
    Display Logic Rule Sample 2 New UI.png
    Example Display Logic Rule

    Configuring Related Record Services

    Related records indicate to the OpenURL link resolver that, when a user receives a certain record in the search results, another record should also be returned as related. The MARC linking entries (MARC fields 76X-78X) are used to link bibliographic records and to differentiate their relationships to users. For electronic services, the configuration of related records are useful for the following reasons:
    • Articles sought by users may be available only in related versions of the journal.
    • Metadata in the OpenURL can be for one publication, but in fact, a related journal by another name is what the end user sought.
    • Vendors may list previous or newer versions in their holdings causing inconsistencies in the Community Zone. For example, the journal Civil Engineering Systems is now named Civil Engineering and Environmental Systems.
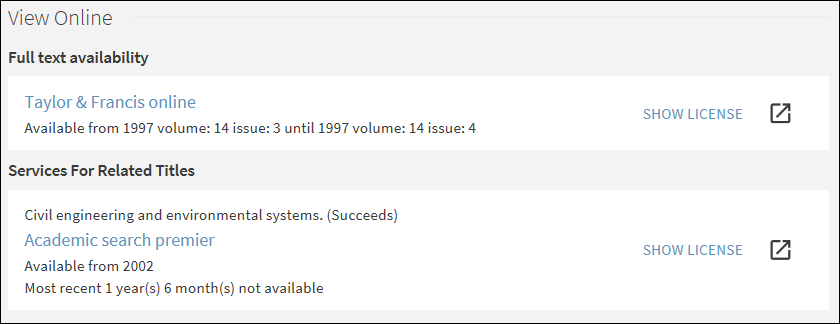
    In the following example, View It displays the available services for the discovered record and the related record that succeeds it:
    RelatedRecordsExample_PrimoVE.png
    Related Records as Shown on the Services Page
    A close relation indicates that the two records should be considered identically useful in the search results. If the record requested in the OpenURL has close relations (MARC 773 and 774) with another record, electronic services for the related record are included in View It, with no indication that these services are for the related record. To the user, it seems as if these services are for the record sent in the OpenURL. Since the relation type is very close, it can be considered equivalent; and as far as the user is concerned, no distinction needs to be made. Other types of relations are considered remote and are listed under the Services for Related Titles section in View It.
    • To configure close relations to appear in the same section as the related titles in View It, see the Display closely related record services option in Enabling the Display of Related Records in Alma-Summon.

    • For Get It, the related records appear under the Locations for Related Titles section, regardless of this configuration.

    The following table presents the correlation between the MARC fields defined in the bibliographic record and the out-of-the-box labels that appear for each type of relation in View It. For physical inventory, Get It supports the display of related records defined with the 773 and 774 fields only.
    Related Record Types
    Relation/Type MARC Field Location in Alma
    Main series entry (remote)
    760
    Indicators 0#
    $w, $x

    View It: c.uresolver.viewit.related_type_list.MAIN_SERIES = Main Series

    Subseries entry (remote)
    762
    Indicators 0#
    $w, $x

    View It: c.uresolver.viewit.related_type_list.SUBSERIES = Subseries

    Original language entry (remote)
    765
    Indicators 0#
    $w, $x, $z

    View It: c.uresolver.viewit.related_type_list.ORIGINAL_LANGUAGE = Original Language

    Translation entry (remote)
    767
    Indicators 0#
    $w, $x, $z

    View It: c.uresolver.viewit.related_type_list.TRANSLATION = Translation

    Supplement entry (remote)
    770
    Indicators 0#
    $w, $x, $z

    View It: c.uresolver.viewit.related_type_list.SUPPLEMENT = Supplement

    Supplement parent entry (remote)
    772
    Indicators 00
    $w, $x, $z

    View It: c.uresolver.viewit.related_type_list.SUPPLEMENT_PARENT = Supplement Parent

    Host item entry (close)
    773
    Indicators 0#
    $w, $x, $z

    View It: c.uresolver.viewit.related_type_list.PART_OF = Part Of

    Get It: Get It does not display the type of relation after the title, and closely related items will always appear under the Locations for Related Titles section.

    Constituent unit entry (close)
    774
    Indicators 0#
    $w, $x, $z

    View It: c.uresolver.viewit.related_type_list.CONTAINS = Contains

    Get It: Get It does not display the type of relation after the title, and closely related items will always appear under the Locations for Related Titles section.

    Other edition entry (remote)
    775
    Indicators 0#
    $w, $x, $z

    View It: c.uresolver.viewit.related_type_list.OTHER_EDITION = Other Edition

    Additional physical form entry (remote)
    776
    Indicators 0#
    $w, $x, $z

    View It: c.uresolver.viewit.related_type_list.ADDITIONAL_FORM = Additional form

    Issued with entry (remote)
    777
    Indicators 0#
    $x, $w

    View It: c.uresolver.viewit.related_type_list.ISSUED_WITH = Issued With

    Preceding entry (remote)
    780
    Indicators 00
    $w, $x, $z

    780
    Indicators 01
    $w, $x, $z

    780
    Indicators 02
    $w, $x, $z

    780
    Indicators 03
    $w, $x, $z

    780
    Indicators 04
    $w, $x, $z

    780
    Indicators 05
    $w, $x, $z

    780
    Indicators 06
    $w, $x, $z

    780
    Indicators 07
    $w, $x, $z

    View It: c.uresolver.viewit.related_type_list.PRECEDES = Precedes

    Succeeding entry (remote)
    785
    Indicators 00
    $w, $x, $z

    785
    Indicators 01
    $w, $x, $z

    785
    Indicators 02
    $w, $x, $z

    785
    Indicators 03
    $w, $x, $z

    785
    Indicators 04
    $w, $x, $z

    785
    Indicators 05
    $w, $x, $z

    785
    Indicators 06
    $w, $x, $z

    785
    Indicators 07
    $w, $x, $z

    785
    Indicators 08
    $w, $x, $z

    View It: c.uresolver.viewit.related_type_list.SUCCEEDS = Succeeds

    Data source entry
    786

    $w, $x, $z

    View It: c.uresolver.viewit.related_type_list.CONTAINS = Contains

    Other relationship entry (remote)
    787
    Indicators 0#
    $w, $x, $z

    View It: c.uresolver.viewit.related_type_list.OTHER_RELATIONSHIP = Other Relationship

    Series added entry-personal name
    800

    $w, $x

    View It: c.uresolver.viewit.related_type_list.CONTAINS = Contains

    Series added entry-corporate name
    810

    $w, $x

    View It: c.uresolver.viewit.related_type_list.CONTAINS = Contains

    Series added entry-meeting name
    811

    $w, $x

    View It: c.uresolver.viewit.related_type_list.CONTAINS = Contains

    Series added entry-uniform title
    830

    $w, $x

    View It: c.uresolver.viewit.related_type_list.CONTAINS = Contains

    Valid ISBN, ISSN, or other standard number (remote)
    020 $a, $e

    022 $a, $e

    024 $a

    View It: c.uresolver.viewit.related_type_list.REPLACED_BY = Replaced By

    Cancelled/invalid ISBN, ISSN, or other standard number (remote)
    020 $z

    022 $y, $z

    024 $z

    View It: c.uresolver.viewit.related_type_list.REPLACES = Replaces

    Linking ISSN (remote)
    022 $l

    View It: c.uresolver.viewit.related_type_list.LINKS_TO = Links To

    Enabling the Display of Related Records in Alma-Summon

    To configure related records, you must have one of the following roles:
    • General System Administrator
    • Fulfillment Administrator
    The Related Record Services Configuration page enables you to configure the electronic services and physical inventory for related titles that appear in View It and Get It for Primo/Primo VE.
    To enable related record services:
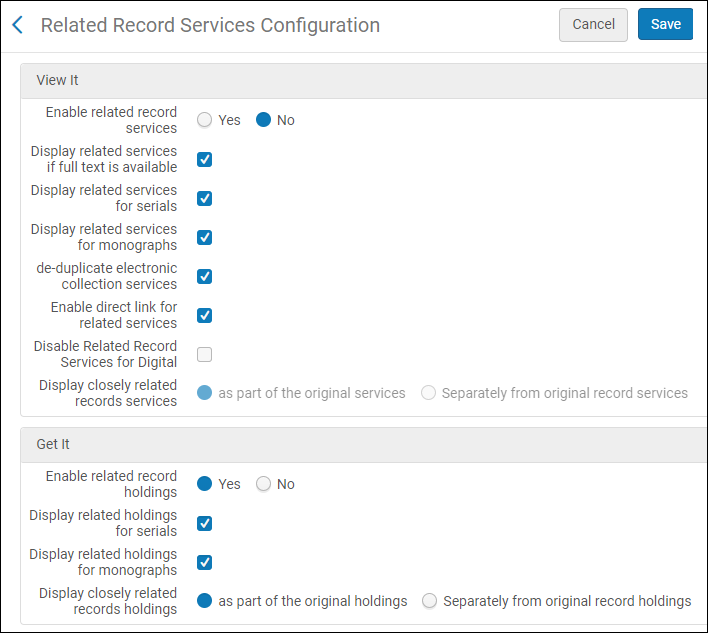
    1. Open the Related Record Services Configuration page (Configuration Menu > Fulfillment > Discovery Interface Display Logic > Related Records).

      Related_Record_Services_Configuration_04.png
      Related Record Services Configuration Page
    2. For electronic inventory, refer to the following table to configure how related records display in View It. For more information, see Configuring Related Records for Electronic Services and Modifying the Display Labels for Related Electronic Services.

      Related Record Services Configuration Options – View It Section
      Parameter Description

      Enable related record services

      Select Yes if you want to display a record's related titles in View It. If enabled, the remaining fields allow you to restrict or modify the display of related titles for specific types of records.

      Display related services if full text is available

      Display services for related records if full text is available. Services for related records are not shown if there is a full-text service for the original record in the OpenURL.

      Display related services for serials

      Display related services for serials (which have a Journal material type).

      Display related services for monographs

      Include related services for monographs (which have a Book material type).

      Deduplicate electronic collection services

      Use deduplication of electronic collection services for remote related services. This causes Primo to display only one service if related records are associated with the same electronic collection.

      Enable direct link for related services

      Turn on the direct-linking feature.

      Disable Related Record Services for Digital

      Disable the display of related records for digital records.

      Display closely related record services

      How closely related services (defined with MARC 773 or 774 fields in the bibliographic record) should appear in View It:

      • As part of the original services – Closely related services are placed in the list of regular services in View It with no indication that these services are for related titles.

      • Separately from the original record services – Closely related services are placed under the Services for Related Titles section in View It.

    3. For physical inventory, refer to the following table to configure how related records display in Get It. For additional information, see Configuring Related Records for Physical Inventory.

      Related Record Services Configuration Options – Get It Section
      Parameter Description

      Enable related record services

      Select Yes if you want to display a record's related titles in Get It. If enabled, the remaining fields allow you to restrict or modify the display of related titles for specific types of records.

      Display related holdings for serials

      Select this option to display the related holdings records for serials.

      Display related holdings for monographs

      Select this option to display the related holdings records for monographs.

      Note that for monographs, related inventory appearing in Get It is considered when fulfilling title-level requests placed by the patron. If you disable the display of related records for monographs, the related records’ inventory that isn’t displayed is not considered when fulfilling title-level requests.

      Display closely related records holdings

      Select one of the following options to indicate how you want the closely related records (which are defined with MARC 773 or 774 fields in the bibliographic record) to appear in Get It:

      • As part of the original holdings – Closely related records are placed in the list with the original holdings in Get It with an indication that these are related holdings, including title and relation type.

      • Separately from the original record holdings – Closely related records are placed under the Locations for Related Titles section in Get It. See c.uresolver.getit2.display_related_holding_separately_from_original_record in the table above for more information.

      For Primo VE, related records are displayed separately, regardless of this setting.

    4. Select Save.

    Enabling Direct Linking

    To configure direct linking, you must have one of the following roles:
    • Fulfillment Administrator
    • General System Administrator

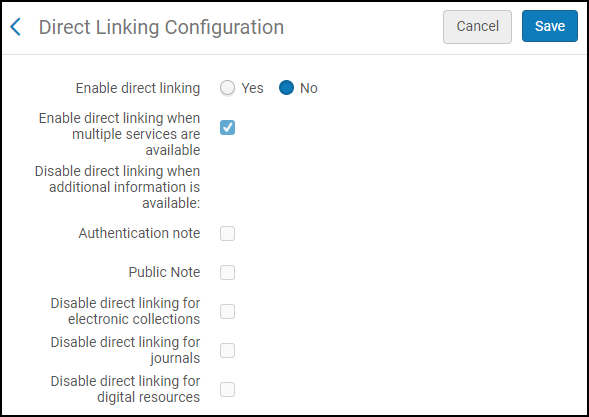
    Direct linking configuration enables Alma to skip the Services page and menu and link immediately to a digital or an electronic service (such as full text) when coming from an OpenURL-enabled source. If the OpenURL context object contains multiple digital or electronic services, the OpenURL link resolver displays the first service in the list (if the Enable direct linking and Enable direct linking when multiple services are available options are enabled). You can configure the order of the services in the Online Services Order page (see Configuring Online Services Order).

    You configure direct linking on the Direct Linking Configuration page (Configuration Menu > Fulfillment > Discovery Interface Display Logic > Direct Linking). On this page you can enable direct linking and specify situations in which direct linking is overridden.

    PVE_DirectLinkingConfiguration2.png

    Direct Linking Configuration Page
    • You can only configure direct linking at the institution level. Select the required institution from the Configuring filter on the Fulfillment Configuration page.

    •  When direct linking is enabled, there is a known issue when testing access from Alma. For more details, see Test Access for a portfolio in Alma opens a blank tab.
    To configure direct linking:
    1. On the Direct Linking Configuration page (Configuration Menu > Fulfillment > Discovery Interface Display Logic > Direct Linking), select Yes from the Enable direct linking parameter to enable direct linking.

      Selecting No indicates that the electronic service is not accessed directly from the search results in Primo, and users must select the service from a list provided by your link resolver (SFX or Alma).

      Selecting Yes enables direct linking and the other configuration parameters.

    2. Configure the other parameters which allow you to control direct linking based on the record. Refer to the table below for an explanation of your options.

      Direct Linking Configuration Options
      Parameter Description

      Enable direct linking when multiple services are available

      Enable direct linking even when more than one digital or electronic service is available for the record.

      Disable direct linking when Open Access service is available

      Select this option to disable direct linking when an Open Access Service is available. See Open Access for more information.

      Disable direct link when additional information is available:

      • Authentication note

      • Public Note

      Disable direct linking even when additional information is available for the record.

      Authentication note
      Disable direct linking when a record's services contain an authentication note.
      Public note
      Disable direct linking when a record's services contain a public note.

      Disable direct linking for electronic collections

      Select this option to disable direct linking when the first service (result) in the View It service list is a match between the search in the discovery system and the electronic collection's bib record. The electronic collection’s level URL will appear first in the View It service list in two cases:

      • It is the only service available in the View It service list (single result in the View It).
      • The electronic collection service result is configured to appear first in the View It service results list via the Online Services Order and Display Logic Rules configurations. See Configuring Online Services Order and Configuring Display Logic Rules for more information.

      Disable direct linking for journals

      When Yes is selected for Enable direct linking and Disable direct linking for journals is selected, direct linking is disabled under the following conditions:

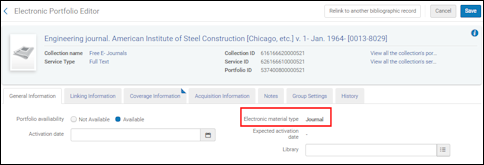
      • When the Electronic material type for a portfolio is set to Journal.

        Electronic_Material_Type_Journal_04_TC.png

        Electronic Material Type Set to Journal
        Any other electronic material type setting will not be considered and treated like a journal.
      • When Alma determines from the OpenURL that there is no indication of article-level attributes like the following:

        • Page(s) indication (rft.spage, rft.epage, rft.pages)

        • Doi (rft_id" source1="(info:doi/.*)|(doi:.*))

        • Pmid (rft_id" source1="(info:pmid/.*)|(pmid:.*)

          For example:
          …&rft_id=pmid:28274348&…)
        • Oaid (rft_id" source1="(info:oai/.*)|(oai:arXiv:.*))

      The setting for the Linking level parameter in the Electronic Service Editor is ignored, even when it is set to Journal.

      Related to disabling direct linking to journals, the following OpenURL attributes are supported:

      • Force_direct=true – This overrides any Alma configuration regarding direct linking and forces using direct linking.

      • Force_direct=false – This overrides any Alma configuration regarding direct linking and does not force using direct linking.

      • sfx.directlink=force – This is treated like Force_direct=true.

      • “disable_directlink=true&sfx.directlink=off” – This is treated like Force_direct=false.

      If both an enable direct linking and a disable direct linking attribute are stated in an OpenURL, the attribute related to disabling direct linking takes priority.

      Disable direct linking for digital resources

      Permits institutions to enable direct linking for electronic resources, while disabling only for digital resources.


    3. Select Save.

    Configuring General Electronic Services for Alma-Summon

    In addition to services found in your own collection (such as full text, requests, and so forth), Alma enables you to define general HTTP services (such as searches in ProQuest dissertations and Amazon.com, Ask a Librarian, and so forth) to present to patrons in the View It, Get It, and How to Get It sections on the record's full display page. Services that allow users to access or purchase the materials are considered delivery-related and will appear in the View It, Get It, and How to Get It sections on the record's full display page.

    Services that are not related to delivery appear as links under the Links section on the record's full display page.

    To configure a general electronic service for Alma-Summon:
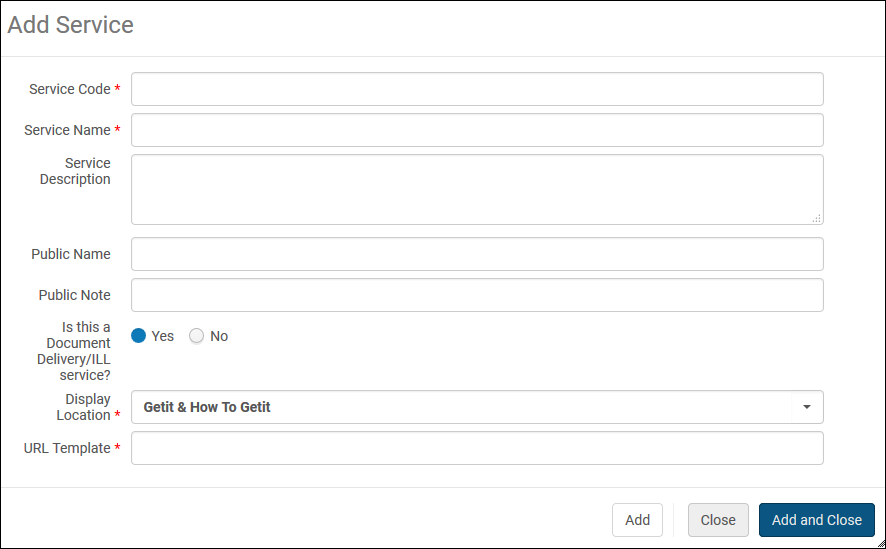
    1. On the General Electronic Services page (Configuration Menu > Fulfillment > Discovery Interface Display Logic > General Electronic Services), select Add Service. The Add Service dialog box opens.
      GES_AddService_NewUI.png

      Add Service Dialog Box
    2. Enter the following service information:

      • Service Code – The internal code for this service.

      • Service Name – If no Public Name is specified for this service, this name appears for the link's label on the Services Page. Otherwise, this field is used internally by the system only.

      • Service Description – The internal description of the service.

      • Public Name – The label for the link that displays on the Services Page.

      • Public Note – The note or description of the service that displays below the link on the Services Page.

      • Is this a Document Delivery/ILL Service – Choose one of the following options: Yes indicates that this service provides access to the resource and will appear in the specified display location. No indicates that the links to the general electronic service will display in the Links section.

      • Display Location – If this is a display or ILL service, specify the areas in which the link displays in Primo VE. The following options are valid: None, Getit & How To Getit, Viewit & How To Getit, Getit, viewit & How To Getit, and How To Getit only.

        • For Get It, display of the service depends on the settings of the display logic rules.

        • For View It, the display of the service depends on the settings of the display logic rules.

        • The How to Get It section displays only when a record has no inventory. Typically, the How to Get It section is used for resource sharing and relevant ILL service links.

      • URL Template – The URL to which the patron is redirected after the external service link is selected on the Services Page.

        The URL substitutes OpenURL fields that are enclosed in brackets ( "{" and "}") with the relevant values. For example, the referring URL’s ISBN is substituted into a URL containing: ...&isbn={rft.isbn}&...

        For example, the URL for an Amazon search for a specific ISBN:

        http://www.amazon.com/s/ref=nb_sb_ss_c_0_12?url=search-alias%3Dstripbooks&field-keywords={rft.isbn}

        When connecting to a resource sharing broker, ensure that this field contains an attribute corresponding to the broker in use. For example, when using the OCLC broker:

        http://xxx.worldcat.org/oclc/{rft.oclcnum}

        ILLiad - Books/Book Items (based on your institution’s base URL). For example:

        http://libill.XXX.edu/illiad/illiad.dll?Action=10&Form=30&rft.genre={rft.genre}&rft.title={rft.btitle}&rft.stitle={rft.stitle}&rft.atitle={rft.atitle}&rft.date={rft.pubdate}&rft.month={rft.month}&rft.volume={rft.volume}&rft.issue={rft.issue}&rft.number={rft.number}&rft.epage={rft.epage}&rft.spage={rft.spage}&rft.edition={rft.edition}&rft.isbn={rft.isbn}&rft.eisbn={rft.eisbn}&rft.au={rft.aulast},{rft.aufirst}&rft.auinit={rft.auinit}&rft.pub={rft.pub}&rft.publisher={rft.publisher}&rft.place={rft.place}&rft.doi={rft.doi}&rfe_dat={rft.oclcnum}&rfr_id={rfr_id}

        ILLiad - Articles/Journals (based on your institution’s base URL). For example:

        http://libill.XXX.edu/illiad/illiad.dll?Action=10&Form=30&rft.genre={rft.genre}&rft.title={rft.title}&rft.stitle={rft.stitle}&rft.atitle={rft.atitle}&rft.jtitle={rft.jtitle}&rft.au={rft.au}&rft.date={rft.year}&rft.month={rft.month}&rft.volume={rft.volume}&rft.issue={rft.issue}&rft.number={rft.number}&rft.spage={rft.spage}&rft.epage={rft.epage}&rft.edition={rft.edition}&rft.issn={rft.issn}&rft.eissn={rft.eissn}&rft.aulast={rft.aulast}&rft.aufirst={rft.aufirst}&rft.auinit={rft.auinit}&rft.pub={rft.pub}&rft.pubdate={rft.pubdate}&rft.pubyear={rft.pubyear}&rft.publisher={rft.publisher}&rft.place={rft.place}&rft.doi={rft.doi}&rfe_dat={rft.oclcnum}&rfr_id={rfr_id}

        ProQuest - Dissertation Service. For example:

        http://gateway.proquest.com/openurl?res_dat=xri%3Apqm&title={rft.btitle}&rft_val_fmt=info%3Aofi%2Ffmt%3Akev%3Amtx%3Adissertation&url_ver=Z39.88-2004&genre=dissertation

        The following values can be specified in the URL Template parameter between the curly brackets used for normalizing the ISBN, ISSN, eISBN, or eISSN:

        • rft.normalized_isbn

          This normalization removes the text after digits and the hyphen (-) and converts ISBN 10 to ISBN 13

        • rft.normalized_issn

          This normalization removes the text after digits and changes text to lowercase.

        • rft.normalized_Eisbn

          This normalization removes the text after digits and the hyphen (-) and converts ISBN 10 to ISBN 13.

        • rft.normalized_Eissn

          This normalization removes the text after digits and changes text to lowercase.

        For more information regarding OpenURL, refer to the following:

    3. Select Add and Close.

    4. Edit your new service to configure additional details on the following tabs:

      • Service Details tab – Specify the following fields as needed:

        • Enable without login – To display this service to signed-in users only, select No.

        • Item Level – Indicates whether this service displays for physical items at the item level in the Get It section. Otherwise, this service will display at the title level.

        • Disable service – To display this service based on the availability of the physical resource in the institutional repository, select one of the following options:

          • Never – The service is never disabled.

          • When resource is owned by the campus – The service is disabled when physical items for the resource are owned by the campus.

          • When resource is owned by the campus and available – The service is disabled when physical items for the resource are owned by the campus and are available (that is, they are not involved in a process).

          • When resource is owned by the institution – The service is disabled when there are physical items for the resource that are owned by the institution.

          • When resource is owned by the institution and available – The service is disabled when there are physical items for the resource that are owned by the institution, are in place, and are in an open location. Note that if a physical location is set to Unavailable (see Adding a Physical Location) and this option is selected, the service is enabled. You may want to use this option when items in a certain location (such as a reading room) cannot be requested. Setting this location to Unavailable will enable the display of the service.

      • Service Availability Rules tab – For details, see Configuring the Service Availability Rules Tab.

    5. Select Save.

    Configuring the Order of General Electronic Services

    Configuring the Order of Online Services

    To configure the order of online services, you must have one of the following roles:
    • General System Administrator
    • Fulfillment Administrator

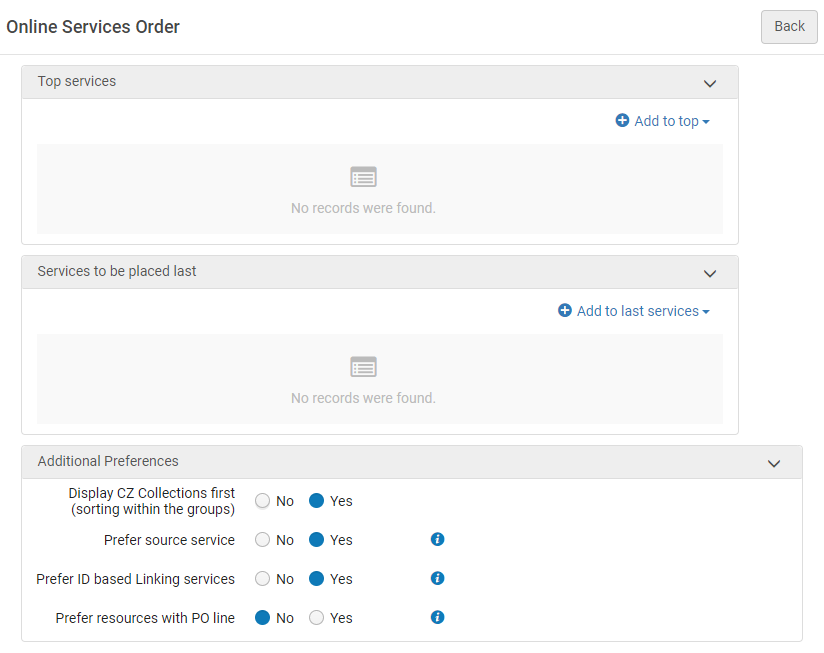
    With the Online Services Order page (Configuration Menu > Fulfillment > Discovery Interface Display Logic > Online Services Order), you can configure the order of the services that appear in the services results list in View It.

    By default (when no services were added to the top or bottom group), all services are displayed alphabetically on the services result list in the Primo view. If services are added to the top group, they will always display at the top of the Primo view (before other services). Services added to the bottom group will always display at the bottom of the Primo view (after the other services). Within the top group and bottom groups, services display in the order in which they are configured in the Online Services Order page. 

    Services that are not configured to display in the top or bottom group will display in the Primo view, after the top group and before the bottom group. Within these services (that are not part of the top or bottom group), the display order is alphabetical. 

    The Display CZ Collections first, Prefer source service, and Prefer ID based Linking services (see Configuring Direct Linking and Direct Links) options also override both the default alphabetic sort order (for services that are not part of the of top or bottom group) and override the order for the list of services in the Top services section. The top service defined can be used by Primo’s direct linking option, from the search result record.

    Alternatively, you can order the services in a specific sequence, using the Prefer resources with PO line option. 

    If all additional preferences are selected (set to Yes), then the services are displayed in View It in the order below:

    1. Services of collections/portfolios that have a linked PO Line (i.e., subscribed services or owned). 
    2. ID-based linked services. 
    3. Source services
    4. Community Zone collections.
    5. Top services. 
    6. Bottom services. 

    Unspecified levels are ordered alphabetically. For example if the first four options above were all set to No, and no items were added to the top or bottom list, then the sorting would be alphabetical. 

    AP_OnlineServicesOrder.png


    • This page does not have a Save button. Every selection made here is saved in Alma automatically. 

    • Changes to electronic collection Public Name (override) requires that the online service order configuration for the specific electronic collection is re-configured.

    • You can only configure the online services order at the institution level. Select the required institution from the Configuring filter on the Fulfillment Configuration page.

    To configure the display order of services:
    1. Open the Online Services Order page (Configuration Menu > Fulfillment > Discovery Interface Display Logic > Online Services Order).

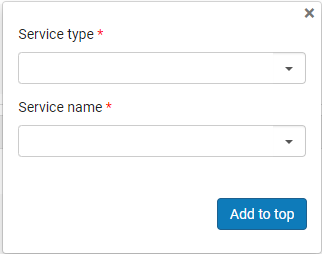
    2. Select Add To Top to assign high priority to a service or select Add to Last Services to assign low priority to a service. Services that are left unassigned will appear in the middle of the list. The Add Service dialog box opens:

      Selections made in the Additional Preferences section take precedence over the services selected as top services.  

      add service.png

    3. In the Service type field, select one of the following service types:

      The Service type "DB Service" is obsolete. Do not select it.
      • Full Text

      • Selected Full Text

    4. In the Service name field, select the name for the selected service type. The Service value field appears. Browse and select a service value.

    5. Depending on the type of priority you are assigning to the service, select Add to top or Add to last services to save the service to the selected priority list.

    6. Select the arrows in the Move Up and Move Down columns to order the services in the Top Services and Services to be placed last lists.

    7. In the Display CZ collections first field, select one of the following options:

      You can also set this priority with the uresolver_display_cz_records_first parameter in the Customer Parameters mapping table. For more information, see Configuring Other Settings.
      • Yes – The unspecified online resources that are not assigned to the top or bottom group, are sorted alphabetically. In addition, Community Zone resources are alphabetized and listed first in each level.

      • No – The unspecified online resources that are not assigned to the top or bottom group, are sorted alphabetically. Priority is not given to Community Zone resources.

    8. Set Prefer source service to Yes to improve the sorting relevance of online resources offered by the Services Page for OpenURLs coming from CDI. This option places the highest priority on services that match the source of the OpenURL. For example, if a user searching CDI discovers an article from Gale, and the Alma Link Resolver can offer services from Gale and EBSCO, Alma will place the service from Gale at the top of the results, followed by the remaining electronic services, as defined in the sort settings for this page. This is the recommended option.

    9. In the Prefer ID based Linking Services field, select one of the following options:

      You can also set this priority with the uresolver_use_source_to_target_ordering parameter in the Customer Parameters mapping table. For more information, see Configuring Other Settings. If static URL is used, none of the options will apply!

      If a service was hidden using the display logic rules, it will not appear, regardless of the value selected for this option.
      • Yes – If a collection with a preferred ID is defined, it always appears first, regardless of other sort criteria. If more than one preferred collection is defined, the display preference for those collections is then based on the sort configuration as defined on the Online Services Order page. Currently, the following vendors use a preferred ID for linking: Cambridge University Press, Elsevier ScienceDirect, Erudit, Gale, Ingenta, Institute of Physics, JSTOR, Nurimedia, Proquest, Sage, Springer, Taylor&Francis, Thieme.

      • No – No priority is given to vendors with a preferred ID.

    10. To prefer services of collections/portfolios that have a linked PO Line (i.e., subscribed services or owned), select Yes in the Prefer Resources with PO Line. Once enabled, services for portfolios that have a PO Line, either at the level of the collection or at the level of the portfolio itself, are displayed above all the other services. This preference overrides both the default alphabetic sorting order and the list of services listed in the Top Services section. 

    Configuring the Order of Locations in Search Results

    Configuring Miscellaneous Display Options

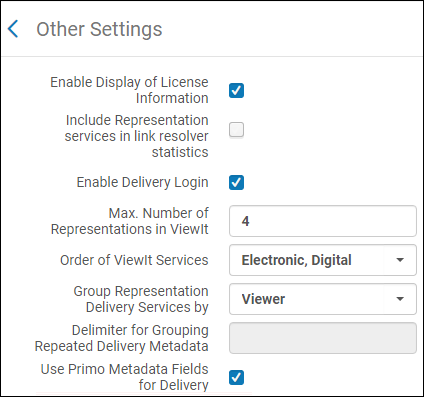
    On the Other Settings page (Configuration Menu > Fulfillment > Discovery Interface Display Logic > Other Settings), additional settings are available to configure how Alma information appears on the Services Page.

    Include Representation Services Statistics in Analytics

    The Include Representation services in link resolver statistics parameter allows you to include representation services usage in analytics link resolver statistics.

    Configure Maximum Number of Representations in Alma-Summon

    The Max. Number of Representations in View It parameter allows you to define the maximum number of digital representations that appears in View It. If there are more representations to display than the number configured here, a More... link appears. The patron can click More... to display the full list of representations available in a new browser tab.

    Displaying License Information

    Alma allows you to display an electronic resource's license information in View It. The displayed terms of the license can be configured in Alma, as well as the license-related labels that display in View It.
    ShowLicenseExample_PrimoVE.png
    Show License Link in View It
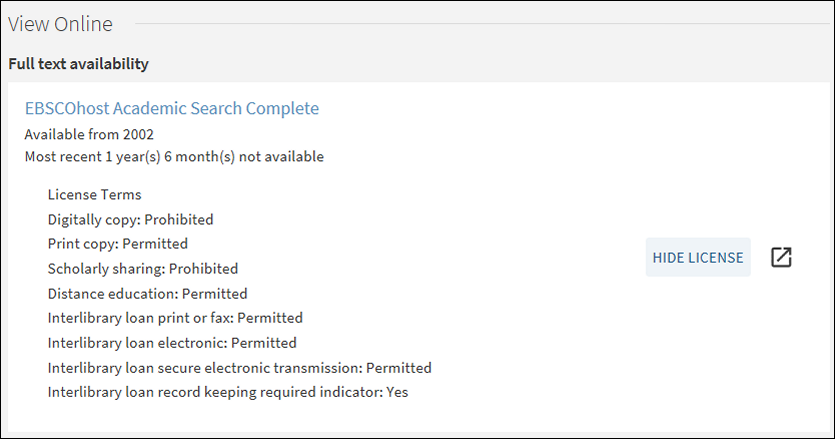
    After the user clicks the Show license link, the name of the link changes to Hide license, and the license information appears as configured in Alma:
    HideLicenseExample_PrimoVE.png
    License Terms Displayed in View It
    To configure the display of license-related information, the following roles are necessary:
    • Acquisitions Administrator
    • Fulfillment Administrator
    • General System Administrator
    To display license information in View It:
    1. Specify which license terms to display in View It. For information on the Display to Public field, see Adding a license term.
    2. If needed, modify the license-related labels, which are defined by the codes that contain a c.uresolver.viewit.license prefix in the ViewIt Labels code table. For more information, see Configuring Labels.
    3. Open the Other Settings page (Configuration Menu > Fulfillment > Discovery Interface Display Logic > Other Settings).
      FulfillmentOtherSettings_NewUI.png
      Other Settings Page under Fulfillment Configuration
    4. Select Enable Display of License Information.
    5. Click Save.
    For more information on configuring the license terms in Alma, see Managing License Terms.
    • Was this article helpful?