
Reviewing and Managing PO Lines
This page describes how to review and manage PO lines, including the PO review workflow, editing PO lines in review or in the PO lines task list, bulk actions for PO lines, etc. For a list of links to pages with instructions for purchasing in Alma including creating PO lines, renewals, working with vendors, etc., see Purchasing. For information on the overall purchasing workflow see Purchasing Workflow. For an overview of working with acquisitions in Alma, including links to relevant sections such as Infrastructure, Invoicing, Configuration, etc., see Introduction to Acquisitions.
- Purchasing Operator
- Purchasing Manager
- Purchase Operator Extended
PO Line Review Workflow
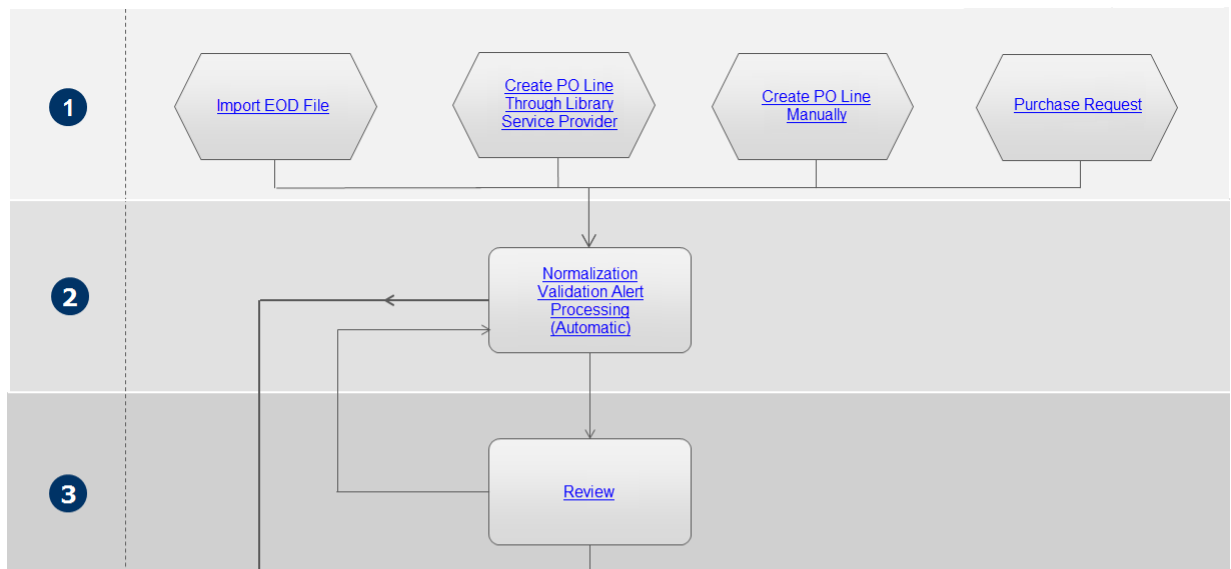
Viewing the PO Lines that Require Review
- In the Purchase Order Lines page (Acquisitions > Purchase Order Lines > All PO Lines), in the Facets panel, under Workflow Step, select In Review.
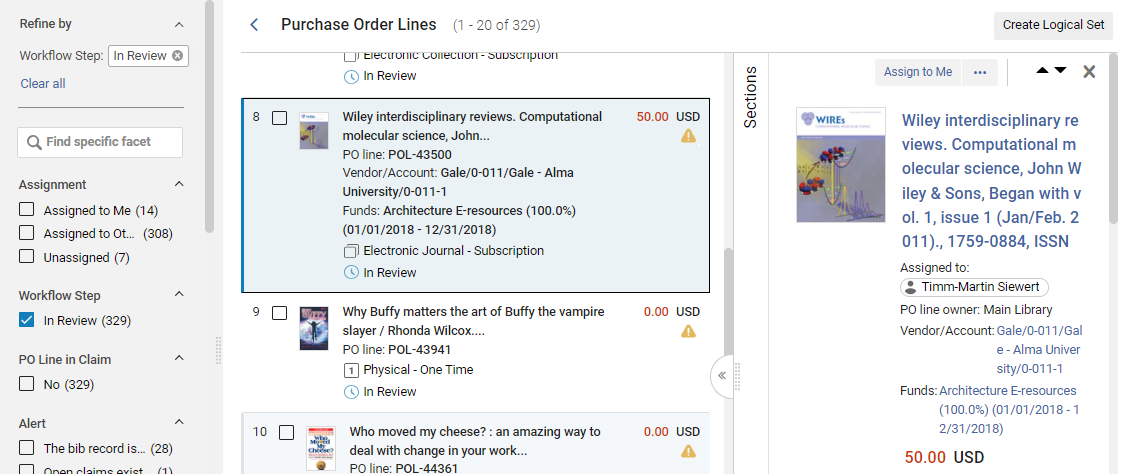
You can use the facets to filter the list so that you can find specific PO lines. In particular, you may want to use the Assignment and Assigned User facets to filter the list based on the users to which the PO lines are assigned (see Using Facets to Refine Search Results).
You can also use the following shortcut to set the facets up so that you only see the PO lines that require review and are assigned to you:
- In the main menu, select Acquisitions > Purchase Order Lines > Review (PO Line).
Once this page appears, you can still refine the results further with the facets (see Using Facets to Refine Search Results).
Editing a PO Line In Review
PO lines in review can be edited to correct incorrect information, or to add missing information, in the Details pane. For editing PO lines in the task list see Editing PO Line Information. For information about the fields of a PO line, see Manually Creating a PO Line. For information about working with the Details pane, see New Layout 2022.
You can edit any PO line that is assigned to you. If a PO line is assigned to another user, you can view it but you cannot edit it. Purchasing Operators and Managers can edit unassigned PO lines, but users without either of these roles cannot. For information about changing the user assignment of a PO line, see Other Available Actions, below. Below are instructions for editing a PO line in review. For editing a PO line in general see see Editing PO Line Information.
- Do one of the following to enter Edit mode:
- In the task list, select the Edit button (
 ).
). - If the Details pane is opened, select the Edit button (
 ) that appears at the top of the pane.
- In the task list, select the Edit button (
- In the Details pane, edit the fields as required.
- When you have finished editing the PO line, select Save and Continue in its row actions. The PO line returns to step 2 in the workflow, where it is revalidated (it is not normalized at this time). If the PO line is still invalid, it is once again sent for review. If all data issues have been resolved, the PO line proceeds to the Packaging step in the workflow (see step 4 in the workflow).
Other Available Actions When Reviewing PO Lines
- Assign to Me, Assign to, or Release assignment – A PO line that is unassigned can be assigned to yourself or to another user. A PO line that is currently assigned to a user can be reassigned to a different user, or it can have its assignment released, meaning that the PO line is no longer assigned to any specific user (see Assigned to Me, Unassigned, Assigned to Others). A PO line that is reassigned while it is in review remains in review until its issues are rectified.
- Change Bib Reference – Enables you to link the PO line to a different bibliographic record (see Closing, Reopening, and Relinking PO Lines - New Layout).
- Cancel Line – When a PO line in review is canceled, its Workflow Step changes from In Review to Cancelled, but its is not removed from Alma. Cancelled PO lines can be found by using the persistent search box or selecting the Cancelled facet under Workflow Step. For more information on canceling PO lines, see Closing, Reopening, and Relinking PO Lines - New Layout.
- Order Now – Move the PO line to the normalization and validation stage (see step 2) of the purchasing workflow in preparation for its being packaged (see step 4) and sent. For more information on packaging PO lines, see Packaging PO Lines into a PO.
If you select Order Now, you receive an Order Now message after the order is sent for processing. The vendor receives the order in the form of the Order List Letter. For information on these letters, see Configuring Alma Letters. - Defer – PO lines in review can be deferred for any reason. PO lines that are deferred are frozen in their current states until they are either reactivated (moved back to step 2 of the regular purchasing workflow), ordered (using the Order Now option), or canceled. For more information, see Deferring PO Lines - New Layout.
- Save and Start a Trial or Save and Request Evaluation – When a trial is requested or started for a PO line, it is automatically sent to the review task list. The PO line must be assigned to you in order for you to be able to execute either action. If you have the Trial Operator/Manager role, you can start the trial (Save and Start a Trial). Otherwise, you can request that a trial be started (Save and Request Evaluation). For more information on trials, see Evaluations and Trials.
- Delete – Deletes the PO line, as well as any transactions and inventory resources related to the PO line (see Closing, Reopening, and Relinking PO Lines - New Layout). To delete a PO line, you must have the Purchasing Operator Extended role.
- Save as Template – Saves some of the PO line's settings as a template that can be applied when new PO lines are created. For additional information, see Creating and Managing PO Line Templates.
- (New for October) Change Currency - Changes the currency of PO lines that were packaged. For more information see Change Currency in PO Lines.
Opening the PO Line Task List
The PO line task list can be accessed in a number of ways:
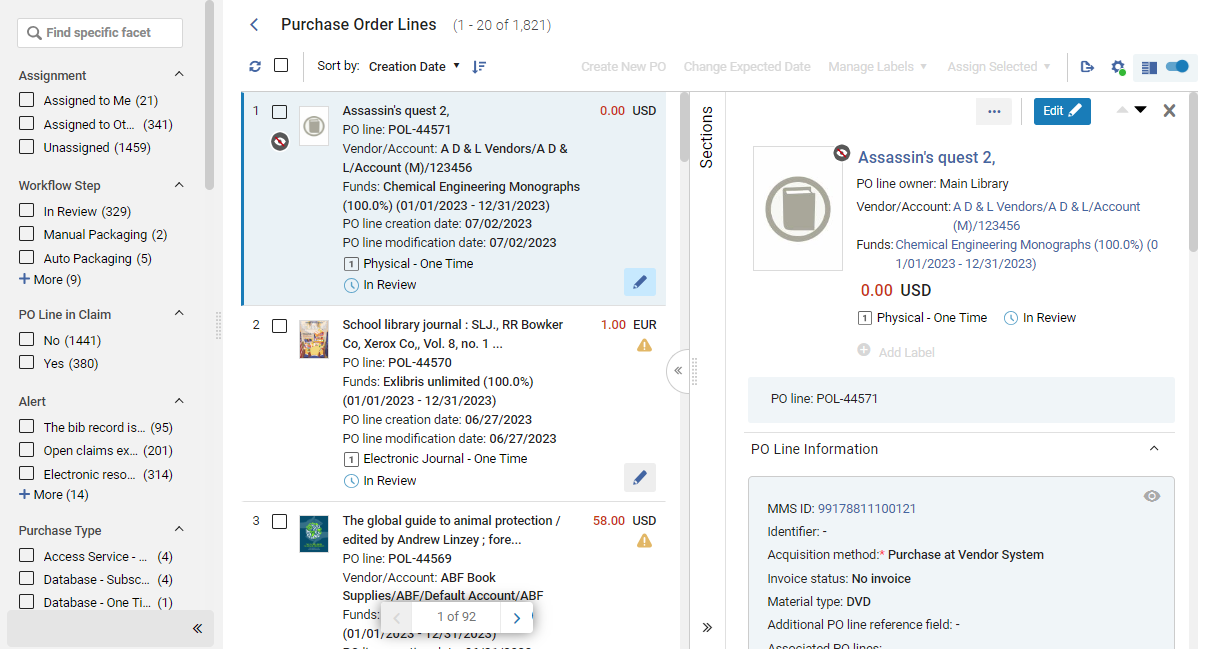
- Navigate to Acquisitions > Purchase Order Lines > All PO Lines to open the task list with all the PO lines that exist included in it. You can then filter the list using the facets to locate the PO lines you want to work with; see Searching for PO Lines.
- In the persistent search bar, search for Order lines that meet certain conditions; see Searching for PO Lines.
- Select one of the pre-filtered options under Acquisitions > Purchase Order Lines:
- Review (PO Line) – Open the PO line task list with the Assigned to Me and In Review facets pre-selected.
- Package – Open the PO line task list with the Manual Packaging facet pre-selected.
- Claim – Open the PO line task list with the PO Line in Claim facet category set to Yes.
- Renew – Open the PO line task list with the Waiting for Manual Renewal facet pre-selected.
- Review Deferred – Open the PO line task list with the Assigned to Me and Deferred facets pre-selected.
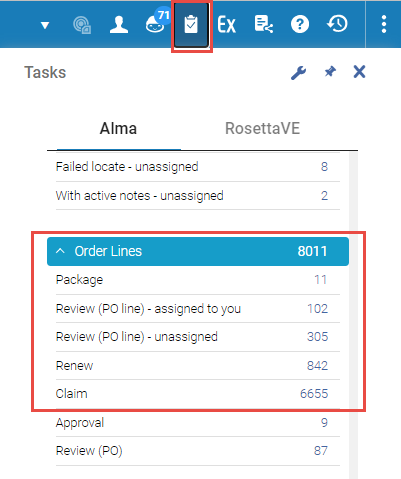
- In the persistent menu bar, select the Tasks icon (
), and then, in the Tasks list, select one of the following pre-filtered options:
- Package – Open the PO line task list with the Manual Packaging facet pre-selected.
- Review (PO line) - assigned to you – Open the PO line task list with the Assigned to Me and In Review facets pre-selected.
- Review (PO line) - unassigned – Open the PO line task list with the Unassigned and In Review facets pre-selected.
- Renew – Open the PO line task list with the Waiting for Manual Renewal facet pre-selected.
- Claim – Open the PO line task list with the PO Line in Claim facet category set to Yes.
Regardless of how you open it, once the PO line task list is open, you can further sort it and change the facet settings as necessary to find the PO lines that you are looking for; see Searching for PO Lines.
Searching For PO Lines
For information about searching for PO lines and refining the search results using the facets, see Searching for PO Lines.
Editing PO Line Information
-
Acquisition method is editable only when the PO line is in the In Review status.
-
Currency, Location, and Material supplier are editable only if the PO line has not yet been packaged.
- Locate the PO line in the PO line task list, as explained under Opening the PO Line Task List, above.
- Ensure the PO line is not currently assigned to someone else.
- Select Edit (
 in the task list or the Edit button
 at the top of the Details pane) to switch to Edit mode. The information in the Details pane becomes editable.
- Edit the information as required.
- Select Save. The changes are saved.
For PO lines in review the process is quite similar apart from how to save and continue the process. For details see Editing a PO Line in Review.
Updates in the PO line are reflected in the related inventory, for example in material type.
Replacing the Resource Associated with an Electronic PO Line
When you are editing an electronic PO line (Collection or Portfolio), you can detach the existing resource from the PO line and replace it with another electronic resource. This enables you to avoid having to delete a PO line if it was associated with the wrong electronic resource.
This operation is available for any type of electronic resource, but the replacement resource must be of the same type as the original resource. For example, if the currently selected resource is Electronic Portfolio, only another Electronic Portfolio can be selected as the new resource.
A replacement resource can belong to the Institution Zone, Community Zone, or Network Zone. An indication of the zone with which the resource is associated appears in the Ordered Portfolios section of the electronic PO line's Details pane, with color coding indicating whether the resource is available or not (see Manually Creating a PO Line).
The Replace Resource function can be used to handle purchasing and activation of electronic resources that are handled by a Network Zone (see Handling Electronic Resources that Are Managed in a Network Zone, below).
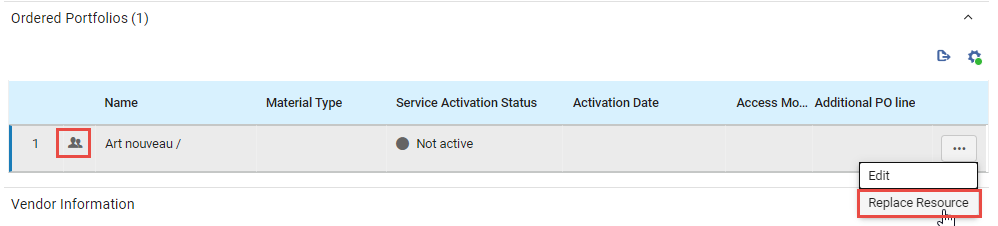
Replacing a Resource
You can change the resource associated with an electronic PO line. If the resource being replaced is associated with a different bibliographic record from the new resource, the PO line will be associated with the new bibliographic record.
- Select Edit to switch to Edit mode.
- In the Ordered Portfolios section, in the row actions of the portfolio, select Replace Resource. The Electronic Portfolios page opens in a sliding panel, with the persistent search bar at the top.
If the resource being replaced is associated with a different bibliographic record, you may be prompted about whether to keep the bibliographic record in the repository or delete it. If this occurs, choose one of the options, and then select Save.
If you choose to delete the resource, when Alma performs the resource replacement for the PO line, it also checks whether the bibliographic record of the original resource has any other inventory associated with it. If it does not have any other inventory, it is deleted. You will only see this prompt if the pol_handle_bib_record_without_inventory customer parameter is set to MANUAL. For additional information about this parameter, see Configuring Other Settings (Acquisitions).
- In the persistent search bar, search for the portfolio you want to order instead of the current portfolio.
- When you have located the resource, select the button beside its number in the list of search results.
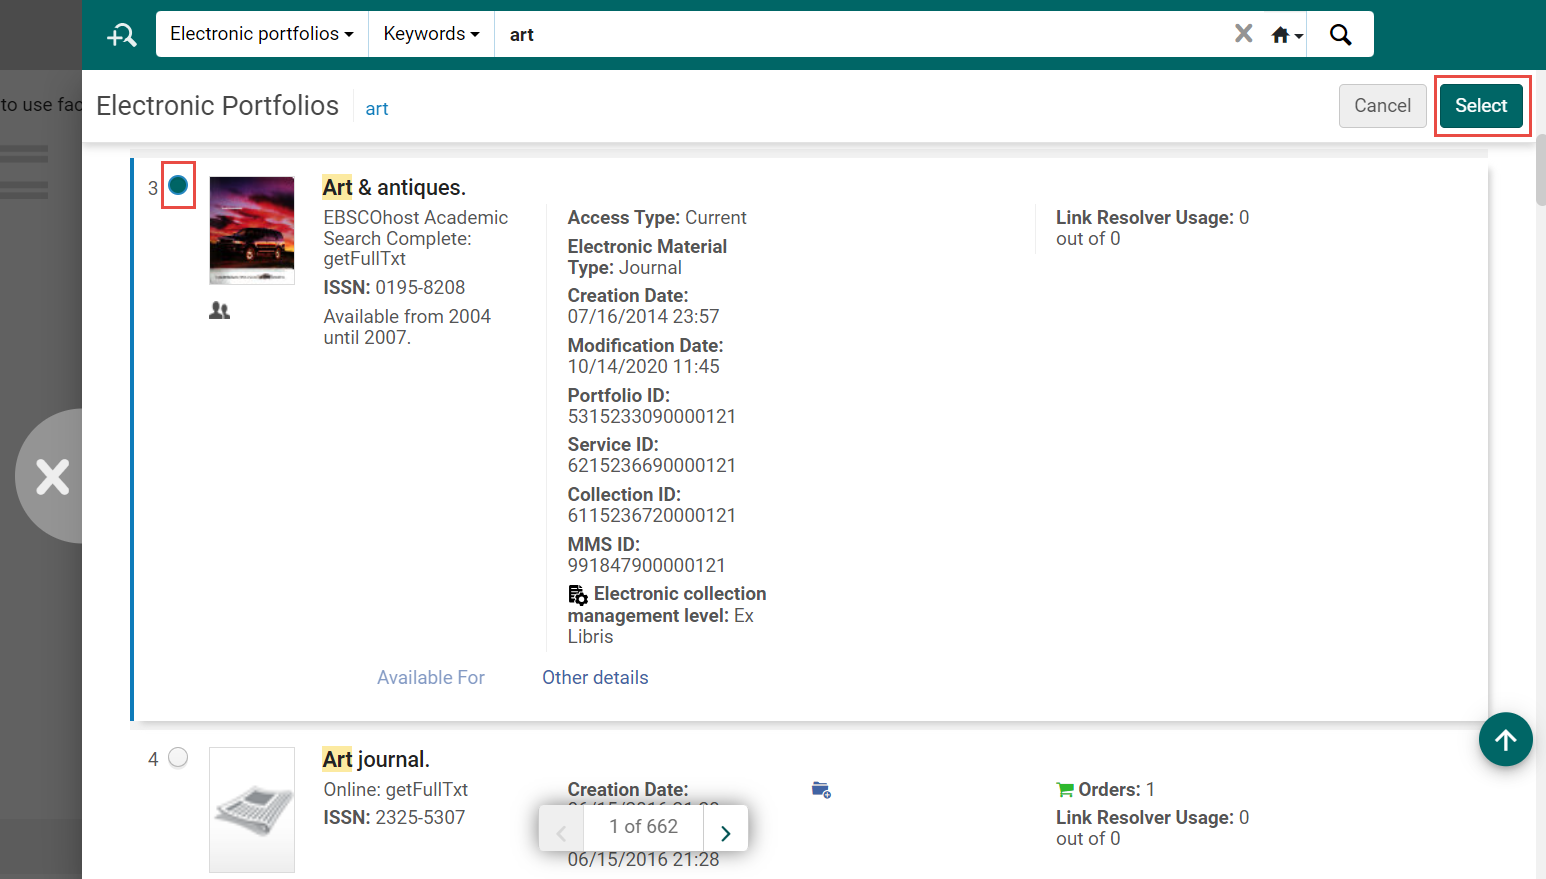
- Select the Select button. The sliding panel closes, and the portfolio you selected replaces the previous one in the PO line.
- Select Save to save the change in the PO line.
Handling Electronic Resources that Are Managed in a Network Zone
Institutions that are part of a Network Zone whose electronic resources are managed by the Network Zone (although the institution's purchases are handled locally) can perform the following steps to purchase and activate an electronic resource:
- Create a local PO line associated with an electronic resource.
- Send the order to the vendor.
- Once the resource is available, ask the network institution to enable the electronic resource in the Network Zone and make it Available for them.
- Use the Replace Resource function to replace the resource currently associated with the PO line with the Network Zone resource that was made available.
If the PO line doesn't have a license and the Network Zone resource has a license - the Network Zone license will be associated with the PO line. If the PO line has a license and the Network Zone resource has a license as well - the Network Zone license will not be associated with the PO line.
Performing Global Changes on Selected PO Lines
You can perform certain actions in bulk on selected PO lines that appear in the PO line task list at the same time. These actions can be selected in the Actions menu (see New Layout 2022), which becomes available when one or more PO lines are selected in the task list.
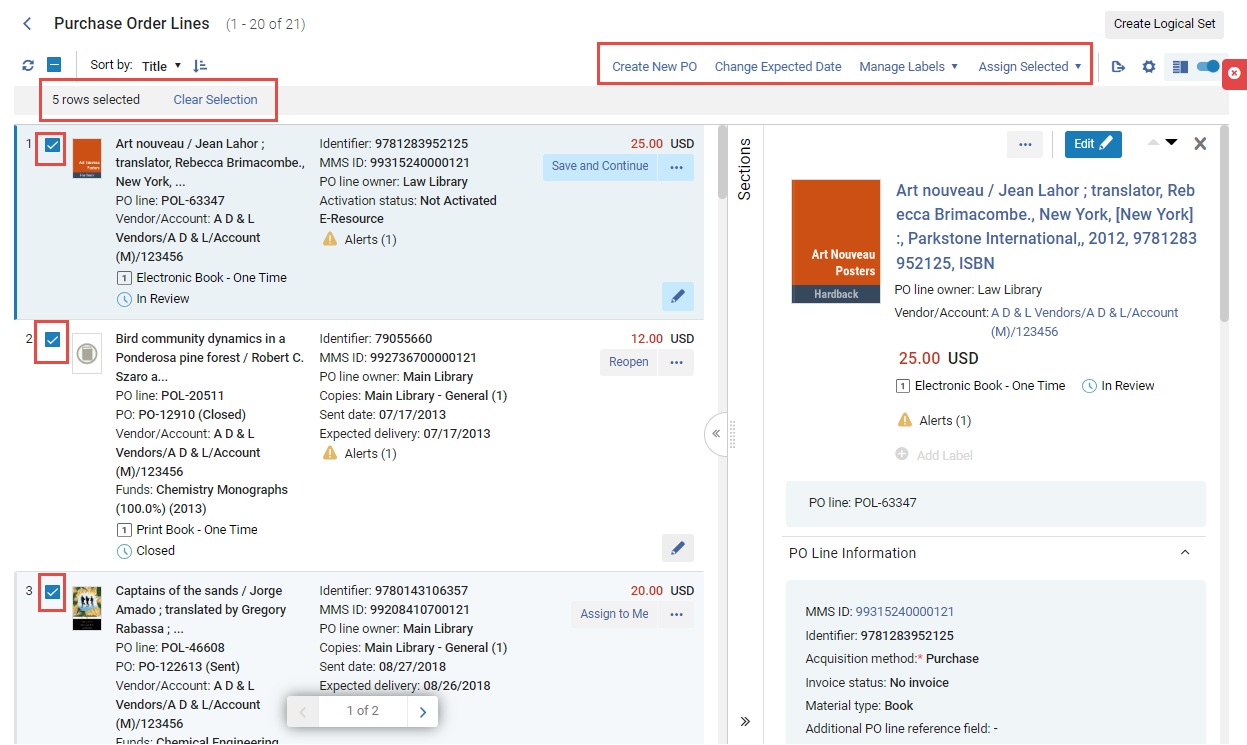
- Select its checkbox.
If the task list that is currently open has more than one page, you can select PO lines from multiple pages.
The available actions are:
- Create New PO – Package the selected PO lines into a purchase order; see Packaging PO Lines into a PO.
- Change Expected Date – Update the expected dates of PO lines that are in claim; see Processing Claims.
- Manage Labels – Add labels to or remove labels from the selected PO lines; see New Layout 2022.
- Assign Selected – Assign the selected PO lines to yourself or to another user, or release the assignment of the selected PO lines that are currently assigned to you: In the dialog box, select the required option, and then select Assign to selected.
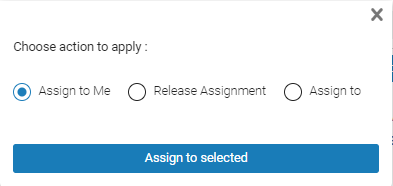 Choosing the Assignment Action for the Selected PO Lines
Performing Global Changes on PO Line Sets
- Purchase Operator
- Purchase Manager
- Acquisitions Administrator
- General System Administrator
- Update PO Lines Workflow – Move PO lines to a specific stage in the workflow
- Update PO Lines Transactions – Modify PO line allocation between funds
- Update PO Lines Information – Update PO line information according to specified conditions
- Update PO Lines Information - Advanced – Modify PO line attributes after an order is created and sent to the vendor
- Change PO Lines Status – Choose a status (Cancel, Close, or Delete) to which to change a set of PO lines
- Update PO Lines Interested Users – Update the list of interested users defined for a set of PO lines
Communicating with Vendors
- Purchasing Operator
- Purchasing Manager
- Vendor Manager
- Sending a new email to the vendor
- Manually entering a response from the vendor (even if it was received by email)
- Sending a reply email to the vendor
- Search for a PO line (see Searching for PO Lines - New Layout). When it is displayed in the task list, select it. The PO line opens in the Details pane.
- In the Sections menu of the PO line, select Communications. The Communications page opens in a sliding panel, and displays a list of communications that have already taken place with the vendor regarding this PO line. Each item in the list is a conversation that consists of one or more emails.
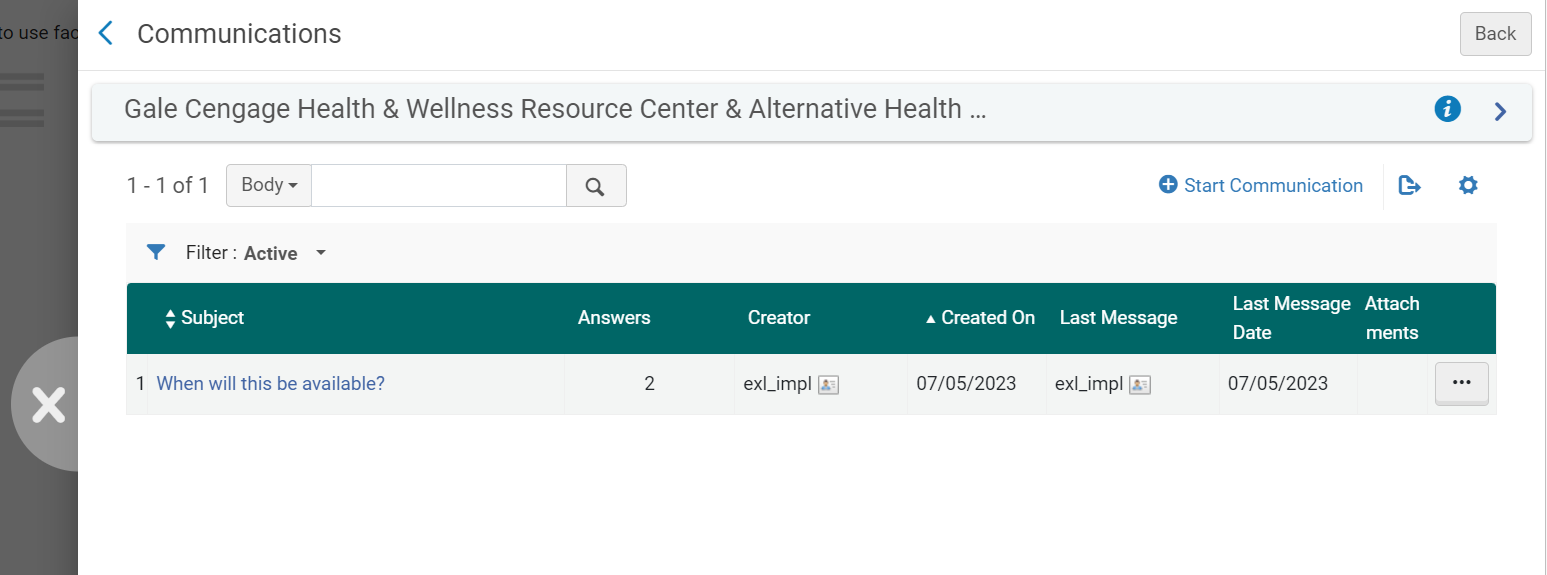
Initiating a New Communication with a Vendor
A new communication with a vendor is an email letter based on the Conversation Letter that is sent to the vendor. The letter is sent to the preferred email of the vendor (unless it is a claim letter – see Claim Communication, below). If no preferred email is available, the order email is used. To customize this letter, see Configuring Alma Letters.
The body of the email is automatically populated with the following information concerning the PO line, when it is available:
- Order Line Reference Number
- Library Code
- Library Name
- Title
- Author
- Publication Date
- Publication Place
- Publisher
- Identifier
- Order Date
- Total Price
- Unit Price
- Number of Units Arrived
- Number of Units Ordered
You can manually edit this information and add additional text to the body of the letter, as required.
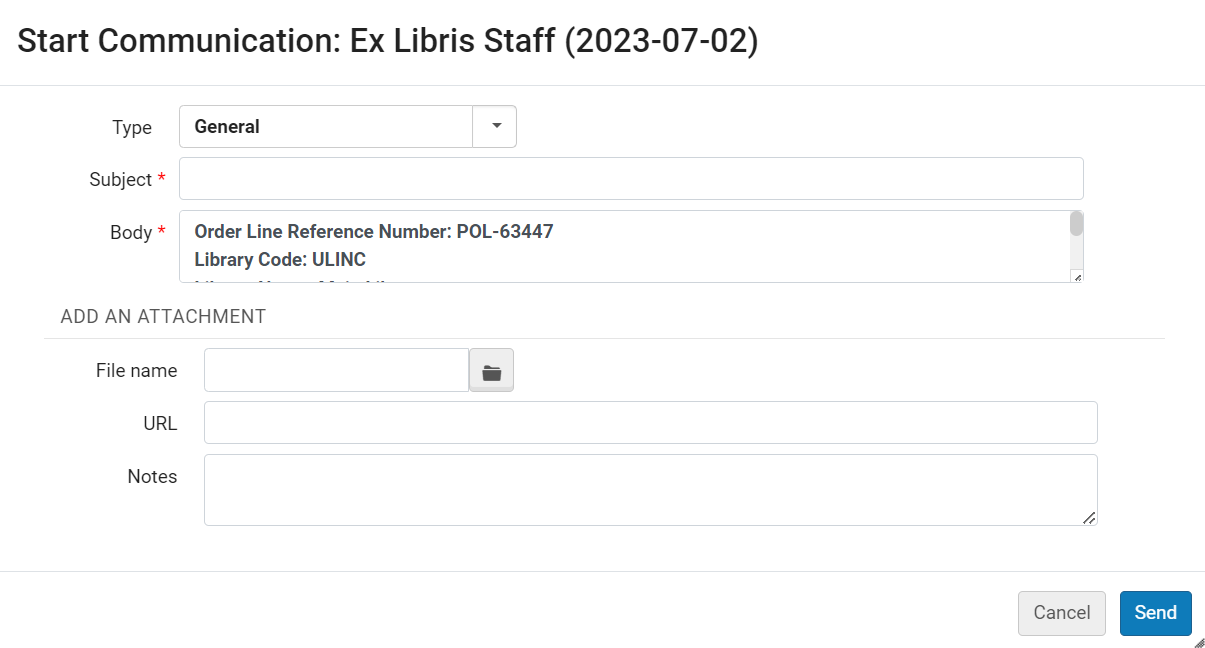
- In the Communications page, select Start Communication. The Start Communication dialog box opens. The Body of the letter is automatically populated with information concerning the PO line.
 Start Communication Dialog Box
 - Under Type, select one of the following:
- General – A general message, which is sent to the vendor's preferred email address.
- Claim – A manual claim letter. When this is selected, details about the last item received are added to the Body of the letter, and the letter is sent to the vendor's claim address rather than their preferred address, if one is available.
- Incident – A message used to report an issue with the order from the vendor.
- In the Subject field, enter a subject for the email. It is recommended to enter the PO number and/or PO line number. While any text can be entered, a subject that includes the PO number and/or the PO line number makes communication with the vendor clearer. This subject line will identify this conversation in the list in the Communications page (even if it is modified in later messages in the conversation).
- In the Body field, enter the text of the email, and modify the PO-line information that was inserted automatically, as required.
- If you are sending an attachment with the email, under File name, select the file.
- Optionally add a relevant URL and any notes (to be included in the attachment, not in the letter XML).
- Select Send. The email is sent to the vendor and appears in the list of communications.
Entering Vendor Responses to Emails
- In the Communications page, select one of the following options:
- Select the conversation to which you want to enter a response. The history of the conversation appears in the Communication Messages page. Select Add a Response.
- Select Add a Response in the row actions list.
The Add a Response dialog box opens.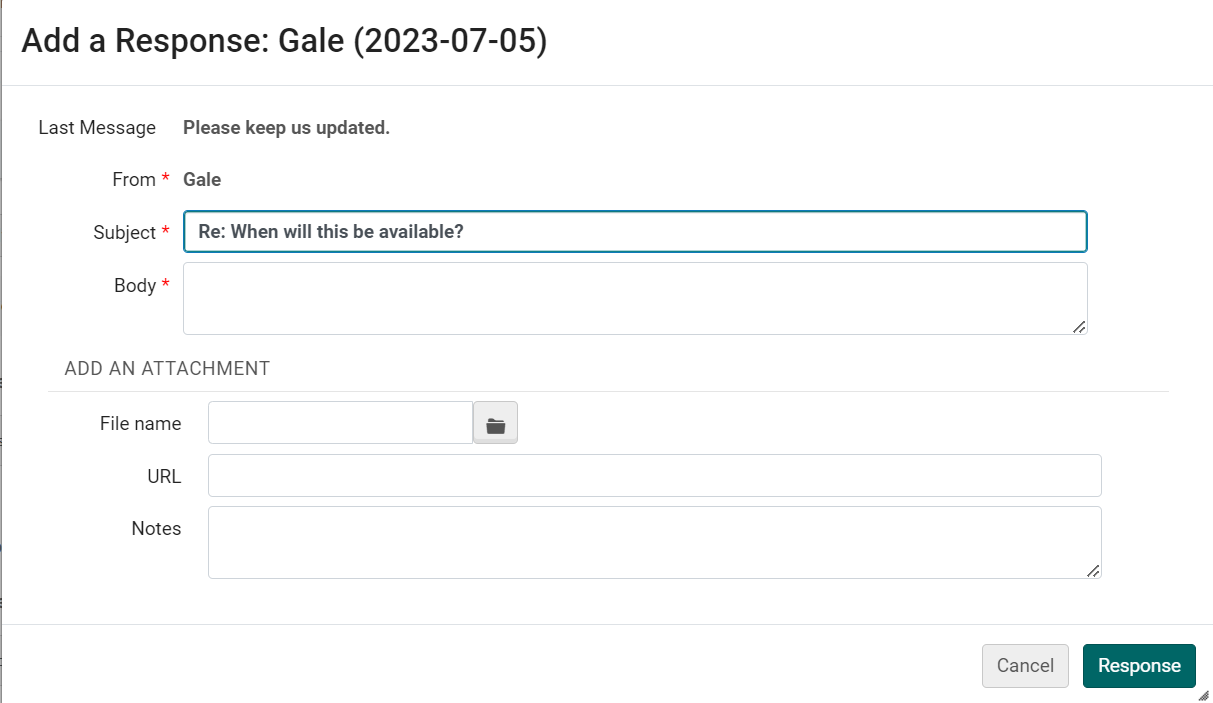 Add a Response Dialog Box
 - In the Body text box, enter the response from the vendor.
- If you received an attachment with the email, save it in your file system. Then, upload it by selecting it under File name.
- Optionally add any relevant URLs and notes.
- Select Response. The email response from the vendor is saved to Alma.
Replying to a Vendor's Email
You can continue a conversation with a vendor by sending additional emails, such as replies to their emails. The bodies of these emails include the text from previous messages, and carry the Subject line over from the first message.
- In either the row actions of the conversation in the Communications page, or the Messages tab of the Communication Messages page, select Reply. The Reply dialog box opens.
- Under Body, enter the text of the message.
- Optionally, attach a file, and/or add a URL or notes.
- Select Send. The email is sent to the vendor and added to the messages in the Messages tab of the Communication Messages page.
Managing Attachments to Communications
- Select Add Attachment.
- From the row actions of the attachment, select the relevant option: Edit, Download, or Delete.
Deleting Communications
- In the Communications page, in the row actions of the conversation, select Close.
Claim Communication
- The auto_claim parameter (for one-time physical PO lines) or the auto_claim_co parameter (for continuous physical PO lines) is set to Y (see Configuring Other Settings).
- The email PO Line Claims letter is enabled (see Enabling/Disabling Letters).
- The vendor's email address is configured.
- One day has elapsed since the Expected Receipt Date + Claiming grace period of a PO line (see Processing Claims) and the material has not been delivered by the vendor.
As long as the above conditions are met, a message is automatically sent to the vendor for physical PO lines. Messages may be sent to a vendor multiple times for a single item. For more information, see Processing Claims. All messages that are sent appear in the list in the Communications page as separate conversations.
If the customer parameter is not set to Automatic, you can, if required, manually send an email to the vendor; see Initiating a New Communication with a Vendor, above.
- If the vendor is configured for EDI claims (see Electronic Data Interchange (EDI)) and the EDI PO Line Claims letter is enabled, automatic claims are sent using EDI for all PO line types (see Processing Claims) as long as the above conditions are met. Claims sent using EDI do not appear in this tab. Responses to claims that are received from vendors using EDI appear in the Notes tab.
- When manually sending a claim, the claim is sent by email regardless of whether the vendor is configured for EDI claims.
- When a claim notification is sent to the vendor by email, if the organizational unit (owning library) has a Claim response email address defined, this address is used in the claim notification email's From address. To use the From address in the PO Line Claim Letter, and not the library's email address, remove the Claim response email address from the organization's email addresses (see Configuring Institution/Library Contact Information) and edit the email address settings under Contact Information, clearing the Claim response option). For information on configuring the letter, see Configuring Alma Letters.
- When a purchase order is sent to the vendor by email, if the organizational unit (owning library) has an Order Response email address defined, this email is used in the email's From address.
Creating and Managing PO Line Templates
Fields that Are Saved in a PO Line Template
- PO Line Information section:
- Acquisition method
- Material type (physical items)
- Manual packaging (Physical and Electronic items)
- Cancelation restriction note
- Labels
- Ordered Items or Holdings for Ordered Items section (physical items):
- Number of items
- Library
- Location
- Item policy
- Vendor Information section:
- Material supplier
- Expected activation - Days after ordering or Date (electronic items)
- Note to vendor
- Pricing and Funding section:
- Quantity for pricing (physical items)
- Update Net Price according to item quantity (physical items)
- Fund (physical and electronic items)
When saving a fund as part of a template, Alma saves the fund code. When loading from a template, Alma always loads the fund from the current fiscal period.
- Receiving Information section (physical items):
- Rush
- Receiving note
- Binding during receiving
- Routing during receiving
- Activation Information section (electronic items):
- Rush
- Activation note
- License
- Renewal Information section (continuous items):
- Renewal date
- Renewal reminder period (days)
- Reporting Codes:
- All the reporting codes from 1st reporting code through to 5th reporting code.
Adding or Updating a PO Line Template
You can save any PO line as a template. Only the template owner or an Acquisitions Administrator can update a PO line template.
- If the PO line is not currently visible, locate the PO line in the PO Line Task List (see Searching for PO Lines - New Layout).
- In the row actions of the PO line (in either its row in the task list, or in the Details pane, if the PO line is open there), select Save as template. The Save as Template dialog box opens.
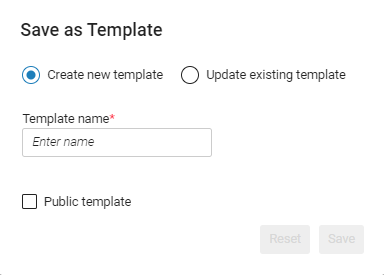 Save as Template dialog box
 - Do one of the following:
- To save a new template based on the settings of the current PO line: Select Create new template, and then, under Template name, enter a name for a template.
- To replace an existing template with the settings from the current PO line: Select Update existing template, and then, under Choose a template, search for and select the template.
- Template names cannot include semicolons (;), commas (,), slashes (/), or other special characters, such as: ! or $
- To remove any selections you have made in the dialog box, and revert it to its initial state when you first selected Save as template, select Reset.
- If you are creating a new template and you want to share the template with other users in your institution, select Public template. A public template can be used by everyone, but only the template owner or an Acquisitions Administrator can edit or delete it.
- Select Save.
Deleting a PO Line Template
The template owner or an Acquisitions Administrator can delete a PO line template.
To delete a PO line template, the PO line must be in View mode - the Delete button does not appear in Edit mode.
- In the row actions of any PO line in a list, select Save as template. The Save as Template dialog box opens.
- Select Update existing template.
- Under Choose a template, search for and select the template.
- Select Delete, and then confirm your selection. The template is deleted.