
Searching for PO Lines and Using Facets to Refine Results
This page describes how to search for PO lines. For a list of links to pages with instructions for purchasing in Alma including creating PO lines, renewals, working with vendors, etc., see Purchasing. For the overall purchasing workflow including the steps required for creating orders (whether using EOD, ordering manually, etc.), see Purchasing Workflow. For an overview of working with acquisitions in Alma, including links to relevant sections such as Invoicing, Renewals, Configuration, etc., see Introduction to Acquisitions.
- Invoice Manager
- Invoice Operator
- Invoice Operator Extended
- Purchasing Manager
- Purchasing Operator
- Selector
- Trial Manager
- Trial Operator
You can save a search query after you run the search, so that you can run it again in the future. When you save the query, it is saved as a logical set. You can then run the query again from the Manage Sets page (Admin > Manage Jobs and Sets > Manage Sets), by selecting Content in its row actions. For additional information about saving queries, see Saving and Reusing Search Queries.
Simple Searches
Simple searches are performed directly in the persistent search box.
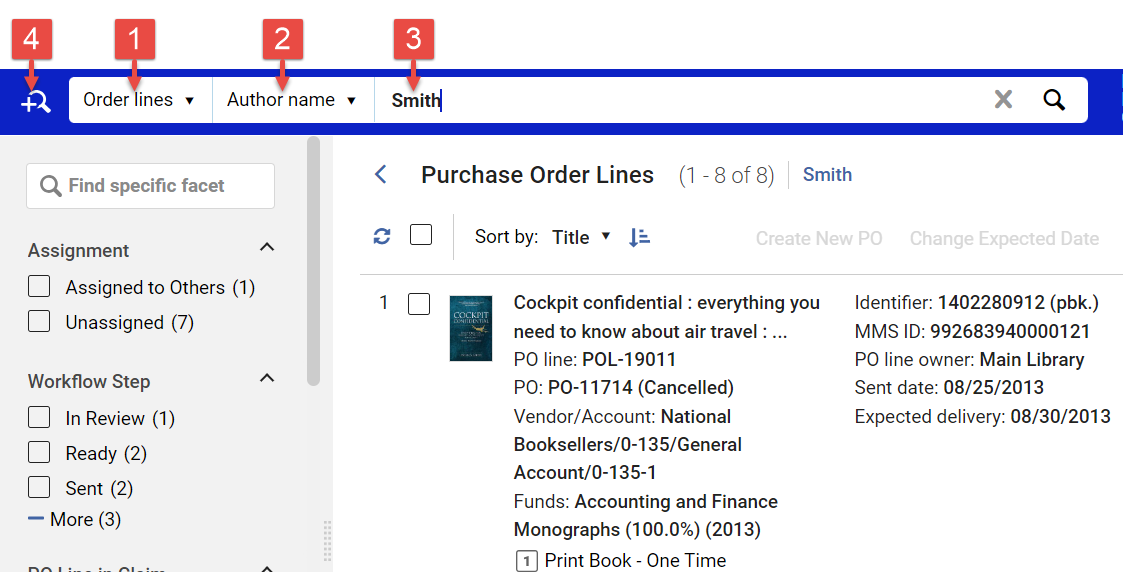
- In the category dropdown list (#1 in the illustration below), select Order lines.
- In the search-field selector (#2), select the field by which you want to search. For information about these fields, see PO Line Search Fields.
- In the text field (#3), enter the text for which you want to search in the selected field (#2), and then press Enter or select
 . (Alternatively, select the text field - #3. The last ten searches that you performed in the Order lines category are displayed. Select one of these to repeat that search.) The search results open as a PO-line task list.
Advanced Searches
Advanced searches are performed in the advanced-search panel.
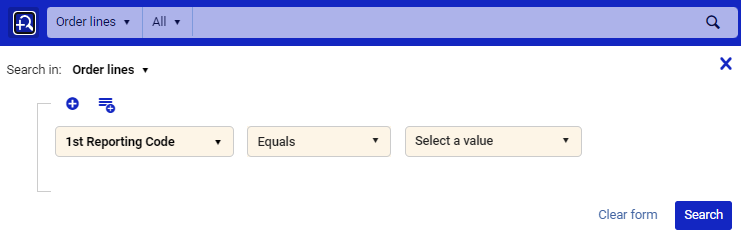
- In the category dropdown list (#1), select Order lines.
- Select
 (#4). The advanced-search panel opens, with the Order lines category selected, and one rule (condition) ready to be configured.
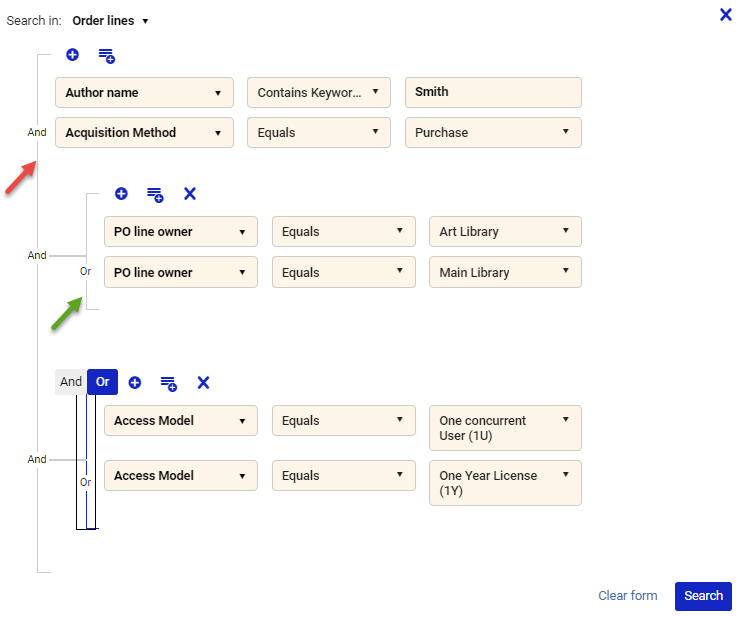
- Add rules as required to configure your search, as explained in the table below. Multiple rules can be grouped and nested, and the relationships between the rules and between the groups of rules can be defined as either AND or OR.
For each rule you add, select the search field (for example, Acquisition Method in the illustration below) and the operator (Equals below), and then either select or enter the search value or values (depending on the type of search field). For information about the available search fields, see PO Line Search Fields.
Option Description To add an additional search rule - Select
 above the rules to add another rule below all the existing rules. If all the existing rules are in one group, the new rule is added to that group. If there are multiple groups, the new rule is added as a new group.
 - Select beside a rule to add another rule below that rule, in the same group. (This option is only visible when you cursor is on the level of the rule.)
- Select
 beside a rule to add a duplicate of the rule below it. You can then edit the new rule as necessary. (This option is only visible when you cursor is on the level of the rule.)
To see an indication of where the new rule will be inserted if you select one of these icons, place your cursor on the icon.
To add a group of search rules Select  above an existing group of rules. The new group is nested below the existing group. You can have at most three nested levels of rules, so third-level groups do not provide the option of adding a new group.
To change the relationships between search rules in a group or between groups of search rules By default, the relationships between rules in a group, and between groups of rules, is AND, meaning that each rule in a group must be true for the group containing it to be true. You can change the relationship within a group, or between groups on the same level, to OR. In this case, the group will be true when any of its rules is true.
The line connecting the rules in a group, or the groups on a level, indicates the current relationship between the rules or groups. For example, in the search query below, the line with the AND operators (identified by the red arrow) links the three top-level elements of the query, two rules and two groups of rules, and the lines with the OR operators (identified by the green arrows) link the two rules in each of the second-level groups. A search implementing this query would find all PO lines for items whose author's name includes "Smith," whose acquisition method is "Purchase," whose owner is either "Art Library" or "Main Library," and whose access model is either "One Concurrent User" or "One Year License."
To change the relationship between connected elements, select the line connecting them. Flags for AND and OR appear at the top of the line (as for the last group in the illustration above). Select the flag of the required relationship.
To stop displaying these flags, select the line again.
While it is permissible to include multiple AND and OR operators in a search query, when many operators are selected, slower performance is likely to result. Thus, each search query should include no more than 200 Boolean operators.
To remove a search rule or group of rules Select the  beside the rule or the above the group.
 - Select
- Select Search. The search is performed, and the results open as a PO-line task list - see Search Results.
PO Line Search Fields
By default, searches by PO line and PO reference number seek exact matches to the numbers entered. Certain special characters, such as a forward slash /, cannot be included in the search text. If your institution uses PO-line numbers or PO numbers that contain any of these special characters, please contact the Alma support team. They will set a Customer Parameter to enable you to include these characters in search texts. Note, though, that thereafter all searches by these fields will employ the "contains" operator rather than the "equals" operator.
- 1st Reporting Code (advanced only; called Reporting Code in the simple search)
- 2nd Reporting Code (advanced only; called Second Reporting Code in the simple search)
- 3rd Reporting Code (advanced only; called Third Reporting Code in the simple search)
- 4th Reporting Code (advanced only)
- 5th Reporting Code (advanced only)
- Access Model - The code of the access model (of an electronic resource). In simple search, enter the code of the access model (see Managing Access Models, or switch to the advanced search); in advanced search, select the access model from the dropdown list.
- Access Provider (advanced only) - The name of the access provider (of an electronic resource)
- Acquisition Method (advanced only)
- Additional PO Line Reference - The contents of the Additional PO Line Reference field of the PO line. (This is an optional text field that can be used to store a reference code by which users in your institution can identify the PO line.)
- Alert (advanced only) – Select one or more PO-line alerts from the dropdown list.
- All - Searches all fields for the specified text (including label names). The search includes all the search fields, even if they are normally available only in the advanced search, or only in the simple search.
- Assigned User (advanced only) – Select one or more users from the dropdown list.
- Assignment (advanced only) – Assigned to Me, Assigned to Others, or Unassigned. Note: When Assigned to me is selected, and the query is then saved as a logical set (see Saving a Search Query, below), the user who saved the logical set is saved as the value for Assignment in the query. If a different user makes use of the logical set, the original user will still be used as the value for this field.
- Author Name
- Cancellation restriction (advanced only) - Whether the PO line can be canceled, Yes or No.
- Creation Date (advanced only) – Select a date and one of these operators: Equals, Not Equals, Before, After
- ERP Number - The number assigned by the institution's ERP system to the PO containing the PO line
- Fund Code - The code of a fund financing the purchase of the resource. (Fund codes are defined in the Funds and Ledgers page, Acquisitions > Acquisitions Infrastructure > Funds and Ledgers; see also Managing Funds and Ledgers.)
- Fund Name - The name of a fund financing the purchase of the resource. (Funds are defined in the Funds and Ledgers page, Acquisitions > Acquisitions Infrastructure > Funds and Ledgers; see also Managing Funds and Ledgers.)
- Import Job ID - This ID exists if the PO line was imported by a job.
- Interested Users (advanced only) - Whether the PO line has interested users, Yes or No
- Internal Notes (simple search only) - Internal notes that contain the text you enter
- Labels (advanced only) – Select one or more labels from the dropdown list.
- License Code (advanced only) - For electronic resources, the code of the license. (License codes are defined in the Licenses and Amendments page, Acquisitions > Acquisitions Infrastructure > Licenses; see also Managing Licenses and Amendments)
- MMS ID - The Alma ID of the resource
- Material Type - The material type of the PO line. In simple search, enter the code of the material type. (Material types and their codes are defined in the Physical Material Type code table, Configuration menu > Resources > General > Physical Material Type Descriptions.) In advanced search, select the material type from the dropdown list.
- PO Line - The PO line number
- PO Line Type - The PO-line type, also called the purchase type. In simple search, enter the code of the PO-line type (see Enabling/Disabling PO Line Types); in advanced search, select the PO-line type from the dropdown list.
- PO Line in Claim (advanced only) - Whether the PO line is in claim, Yes or No
- PO line owner (advanced only) - The library that created the PO line. In an institution with multiple libraries, you can use this field to search for PO lines from an individual library.
- PO reference number - The number of the purchase order (PO) in which the PO line is included.
- PO status (advanced only) - The status of the purchase order (PO) in which the PO line is included.
- Physical location name - Keywords from the name of the ordered item's current physical location, or, if it has not yet arrived at the library, its future location - the location where it will be
- Publication place
- Publication year
- Publisher
- Receiving/activation notes - Words that are in the receiving or activation notes of the PO line
- Renewal Date (advanced only) – Select a date and one of these operators: Equals, Not Equals, Before, After. Note: When Renewal Date is selected, and the query is then saved as a logical set (see Saving a Search Query), the value of this field at the time the logical set is saved is retained as the value for Renewal Date in the query. This is true even if the selected value was originally a relative value. For example, if the selected value was Earlier than today, PO lines whose renewal date is earlier than the date on which the query was saved will be found, regardless of when the query is run.
- Reporting Code (simple search; called 1st Reporting Code in advanced search)
- Rush (advanced only) - Whether the PO line was marked as a rush order, Yes or No
- Second Reporting Code (simple search; called 2nd Reporting Code in advanced search)
- Sent Date (advanced only) – Select a date and one of these operators: Equals, Not Equals, Before, After
- Sip ID - The ID number that was assigned to the the PO line if and when it was imported by a job (see Configuring Search Indexes)
- Standard number - The identification number of the resource (ISBN or ISSN)
- Third Reporting Code (simple search; called 3rd Reporting Code in advanced search)
- Title - Titles whose names include the search text
- Title - Starts with - Titles whose names start with the search text
- Vendor account code - The vendor-account code (a single vendor can have multiple accounts, each of which would have a different code; see Managing Vendors)
- Vendor code - Part or all of the vendor code (whole words). (Vendors and their codes are defined in the Search Vendors page, Acquisitions > Acquisitions Infrastructure > Vendors; see also Managing Vendors.)
- Vendor code - Equals - The exact vendor code. (Vendors and their codes are defined in the Search Vendors page, Acquisitions > Acquisitions Infrastructure > Vendors; see also Managing Vendors.)
- Vendor invoice number - The number of the vendor invoice in which this PO line is included. This number is sent to Alma from the vendor if the PO line is generated by EOD.
- Vendor name - Part or all of the name of the vendor (whole words). (Vendors and their codes are defined in the Search Vendors page, Acquisitions > Acquisitions Infrastructure > Vendors; see also Managing Vendors.)
- Vendor name - Equals - The exact vendor name. (Vendors and their codes are defined in the Search Vendors page, Acquisitions > Acquisitions Infrastructure > Vendors; see also Managing Vendors.)
- Workflow - The current workflow step of the PO line (for a list, see Workflow Steps)
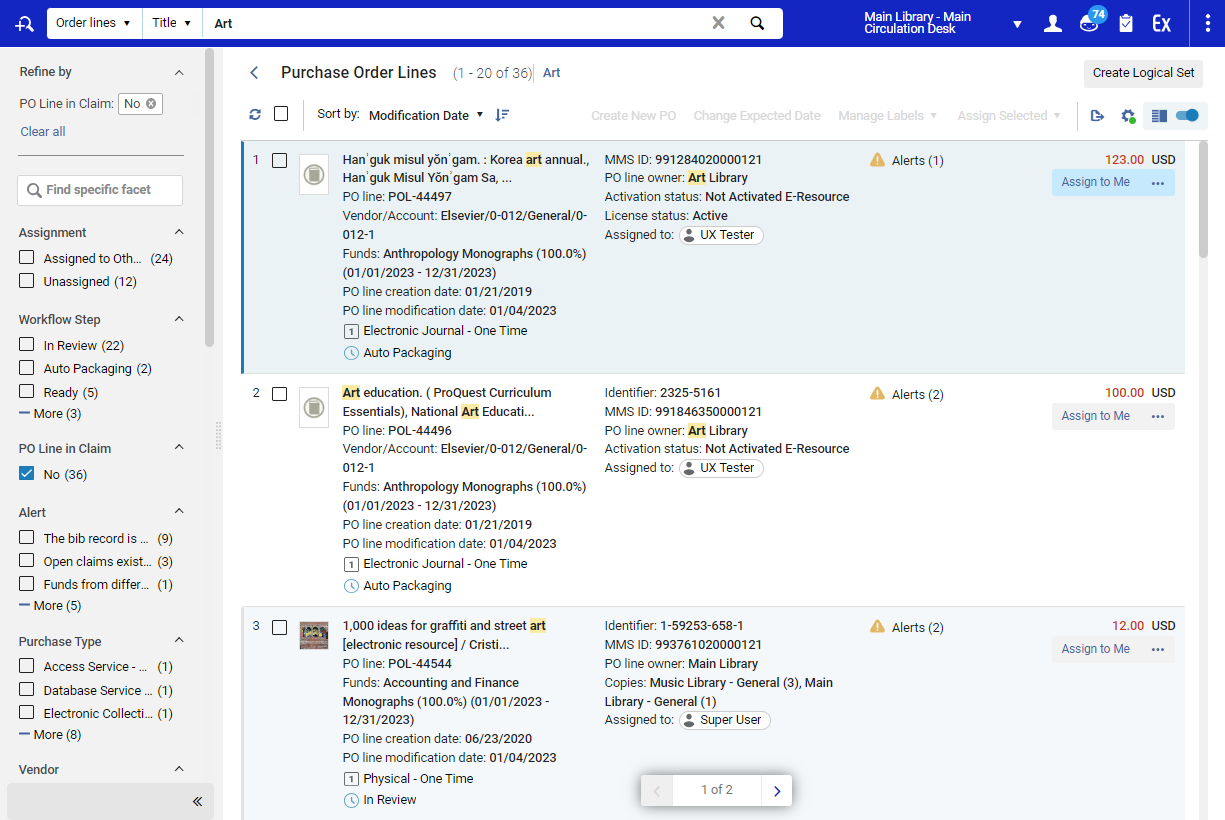
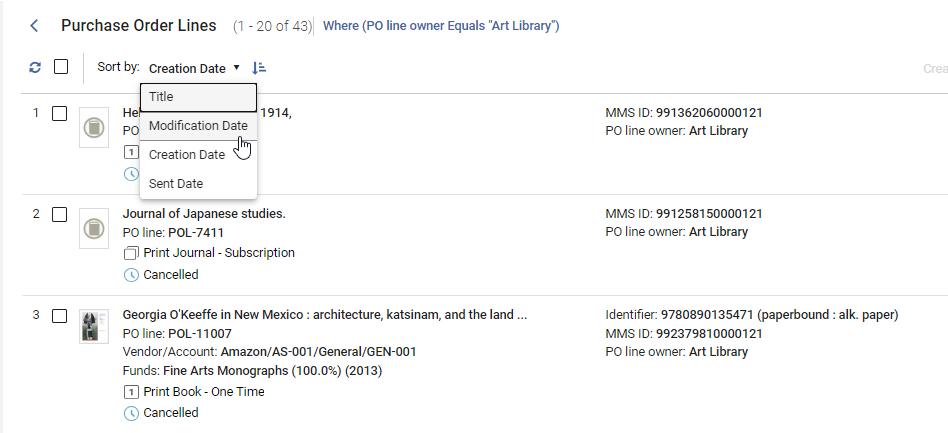
Sorting and Refining Search Results
Sorting Search Results
- Title – Alphabetical order by the titles of the items (the articles a, and, and the are factored into the sorting)
- Modification Date
- Creation Date
- Sent Date
You can also switch the sorting direction between ascending and descending by selecting the Sort Direction icon ( ).
).
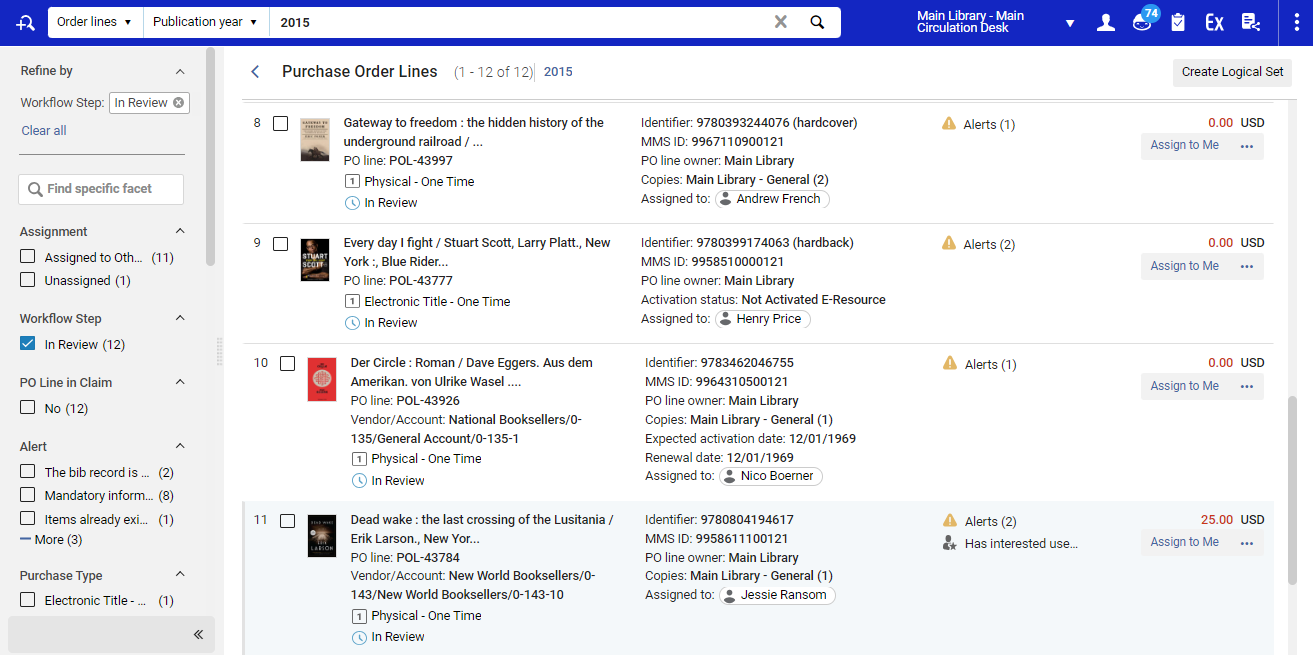
Using Facets to Refine Search Results
You can use the facets described below to refine your search results. For general information about working with facets, see New Layout 2022.
When viewing the PO lines in the Purchase Order Lines page as described in Reviewing PO Lines, the facets are automatically selected to show the PO lines Assigned to Me and with the In Review workflow step.
For a brief overview of the PO Lines task list, including the use of facets to filter the list, watch New PO Line Task List (4:56).
Available Order-Line Facets
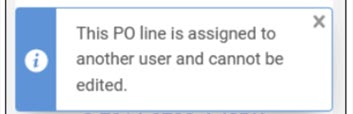
- Assignment – Whether the PO line is assigned to the current user (Assigned to Me), assigned to another user (Assigned to Others), or Unassigned; if none of the values is selected in this facet, or only Assigned to Others is selected, you can select specific users in the Assigned User facet (see below).
Assignment in this context indicates the user who is responsible for managing the PO line. This user is not necessarily the same as the user to whom the handling of the resource is assigned (for example, activating the PO line's associated electronic resource).
(New for May) When a user with the Purchasing Operator role enters a PO line that is assigned to another user, it will be shown in a view display only; no actions are available. In this case, the user is notified that this PO line is assigned to another user.
- Workflow Step – The current stage of processing of the PO line (see Workflow Steps)
- PO Line in Claim – Whether the receipt of the item is overdue. The possible values are Yes or No.
- Alert – The types of alerts that were generated for the PO line (for additional information about these alerts, see Managing Acquisitions Alerts)
- Purchase Type – The type of item the PO line represents. For additional information about purchase types – also known as PO line types – see Enabling/Disabling PO Line Types.
- Vendor – The vendor to which the PO was or will be sent
- Vendor Account – The vendor account to which the PO was or will be sent
- Rush – Indicates whether the PO line has a Rush label. The possible values are Yes or No.
- PO Line Owner – The library that ordered the item
- Creation Date – The date on which the PO line was created. The possible values are Undefined, Today, This week (the past 7 days for example last Monday until today), This month (the period between today and the same day last month for example 3.5 - 3.6), In the past 6 months or More than 6 months ago.
- Labels – Labels attached to the PO line (for additional information about labels, see Managing Labels)
- Assigned User – The user to which the PO line is assigned; not available if either Assigned to Me and/or Unassigned are selected in the Assignment facet
- Acquisition Method – The method by which the item will be purchased (for additional information about acquisition methods, see Acquisition Methods)
- Material Type – The material type of the item being ordered in the PO line (Article, Book, etc.)
- Reporting Code – The Reporting Code of the PO line
- Sent Date – The date on which the PO line was sent to the vendor (Not yet sent, This month (the period between today and the same day last month for example 3.5 - 3.6), In the past 6 months, More than 6 months ago)
- Renewal Date – The next date on which a PO line for a subscription needs to be renewed (Undefined, Earlier than today, In 2 Weeks, In a month, Over a month [from now])
Sorting Facets (New for May)
Facets for PO lines are ordered alphabetically, with the exception of the following:
-
Workflow step
-
Creation date
-
Sent date
-
Renewal date
-
Reporting code
Workflow Steps
- In Review – The initial status of a newly created PO line. It remains in this status in the following cases:
- The operator/manager does not select Order Now or Edit > Save and Continue for the PO line after it is created.
- Validation for the PO line fails.
- For automatically created PO lines (via API, Order It or EOD): The criteria defined in a purchasing review rule requiring that the PO line be sent for review have been met (see Configuring Purchasing Review Rules).
- Manual Packaging – The PO line passed normalization, validation, and alert processing, and is ready to be manually packaged into a PO (see Packaging PO Lines into a PO).
- Auto Packaging – The PO line passed normalization, validation, and alert processing, and is ready to be automatically packaged into a PO (see Packaging PO Lines into a PO).
- Ready – The PO line was packed into a PO and is ready to be sent. For a PO to be sent to a vendor, all of its PO lines must have a status of Ready.
- Sent – The PO in which the PO line is packed was approved and sent to the vendor (see Approving and Sending POs). This status is relevant for both electronic and physical one-time PO lines and for inactive continuous electronic PO lines. For more information, see Approving and Sending POs.
- Waiting for Manual Renewal – The manual PO line was fully processed and the item was received/activated, its renewal date is the same as the current date, and it is marked for manual renewal (see Renewals). PO lines with the status Recurring Renewal change to Waiting for Manual Renewal if they are marked for Manual Renewal and the time to notify operators about the renewal arrives. (This is configured as a certain number of days before the renewal date.)
- Recurring Renewal – The PO line was fully processed and received/activated, and will be renewed automatically. Continuous physical PO lines that are sent to the vendor have Recurring Renewal status even if the renewal is done manually but the renewal date has not yet arrived (see Renewals). Continuous electronic PO lines receive this status once they are activated and the user selects Done in the task list.
- Waiting for Invoice – All of the PO line's items were received or activated, and the PO line is ready to be associated with an invoice (see Invoicing). One-time PO lines that are not fully invoiced receive this status once the ordered item has been received or activated.
- Under Evaluation – Indicates that the PO line is under evaluation, meaning that a trial was requested or started (see Managing Trials). PO lines with this status can be edited only by a Trial Manager or Trial Operator.
- Under Evaluation (Renewal) – The PO-line renewal is being evaluated and has not yet been decided upon. PO lines with this status can be edited only by a Trial Manager or Trial Operator.
- Deferred – The PO line was set aside to be handled at a later date (see Deferrals).
- Canceled – The PO line was canceled (see Cancelling PO Lines).
- Deleted – The PO line was deleted from the system (see Deleting PO Lines).
- Closed – The PO line was closed (see Closing PO Lines).
Saving a Search Query
After you run a search and/or select facets to apply to the currently displayed list of PO lines, you can save the conditions of the search, including any facets that are selected, as a logical set. You can then run a search with the same settings again, as required.
- Set up the conditions of the search in one of the following ways:
- In the persistent search box, set up the search parameters for an Order lines search, and run the search. A list of PO lines that meet the requirements of the search is displayed.
- From the main menu, under Acquisitions > Purchase Order Lines, select an option (e.g., All PO Lines or Package). A list of PO lines that meet the requirements of the selection is displayed.
- Apply any facets you would like to use to further filter the results. The facet selections are also implemented in the settings of the logical set when you save it. (If you selected All PO Lines, you must select at least one facet in order to save the query.)
- Select the Create Logical Set button. A Logical Set Details dialog box opens.
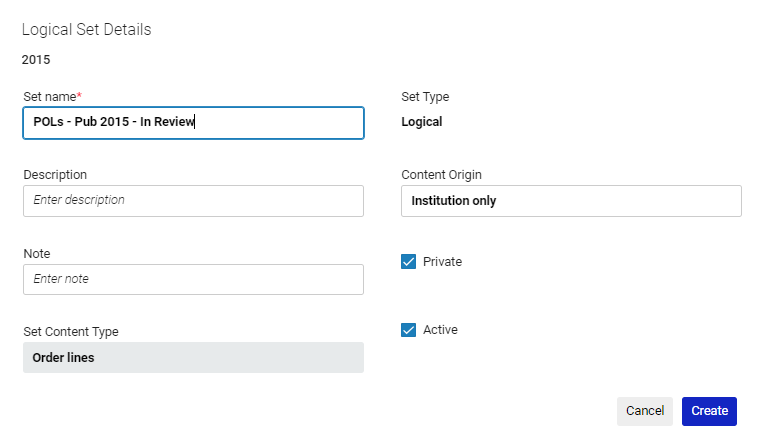
- Enter a Set name, and configure the other fields (see Managing Search Queries and Sets).
- Select Create. The logical set is saved.
Once you have saved a query as a logical set, you can run the query again from the Manage Sets page (Admin > Manage Jobs and Sets > Manage Sets), by selecting Content in its row actions. For additional information, see Saving and Reusing Search Queries.
Managing Labels
For working with labels see Managing Labels in Alma.