
ViewIt
This page describes the configuration of ViewIt including display logic rules, the order of online services, direct linking, etc.
For links to all the main fulfillment documentation pages see Fulfillment.
Configuring Display Logic Rules
- General System Administrator
- Fulfillment Administrator
For a concise "How To" format of the topics covered on this page, see Defining Link Resolver Library Preferences.
Display logic rules define when the following fulfillment services should not appear in Primo and Primo VE:
-
Booking request – Request to reserve an item at a specific time.
-
DB service – Link to the core interface of a third-party database.
-
Digitization – Request to have an item or part of an item scanned so that it can be viewed on a computer.
-
Full text – View the full text for an item online.
-
General electronic services – Links that can be created by an institution for any purpose. For information about general electronic services (GES), see General Electronic Services.
-
General hold request – Request to have an item held at a circulation desk when the holdings record is empty or request an issue for a journal regardless of whether any of its issues have been cataloged. For more information on general hold requests, see Creating a General Hold Request.
-
Hold request – Request to have an item held at a circulation desk.
-
Open Access – View open access full text (for example, hide open access if full text exists or hide full text if open access exists).
-
Purchase request – Request an item to be purchased. For more information, see Purchase Requests.
-
Representation Delivery Service – View a digital item.
-
Resource sharing request – Request to retrieve an item from another institution when the patron's institution does not have the item.
-
Selected full text – Links to full text (full text may not be available to all articles in the Journal).
-
For more information about requests, see Requests in Alma.
-
For information on how to customize the request forms, see the following pages: Customizing Primo Request Forms for Primo, Customizing Primo Resource Sharing Forms for Primo, Configuring Request Forms for Primo VE, and Configuring Resource Sharing Request Forms for Primo VE.
-
Display logic rules can be configured at the network, institution, and campus levels (if campuses are defined in the system). For configuring campus-level display logic rules, see Defining Display Logic Rules at the Campus Level.
-
If display logic rules are configured in the network, the behavior is affected by the network_display_logic_distribution_members_behavior and network_display_logic_rules_precedence customer parameters. See Configuring Other Settings (Fulfillment).
-
All relevant and applicable rules are applied. If a subsequent (lower) rule conflicts with a previous (higher) rule, Alma applies the first rule.
-
Add a display logic rule (see Adding Display Logic Rules)
-
Edit a display logic rule (select Edit from the row actions list)
-
Duplicate a display logic rule (select Duplicate from the row actions list)
-
Enable or disable a display logic rule. Each row can be enabled or disabled individually with the Active slider. Or select a group of rules and select Deactivate Selected or Activate Selected from the actions.
-
Delete a display logic rule (select Remove from the row actions list)
For examples of working with discovery display logic, see Display Logic Rules Examples.
The following display logic rules are available out-of-the-box. These rules are active, by default:
-
Hide service Representation Quick Access – hides the Quick Access section in Primo and Primo VE.
For Quick Access to be available, you must enable the New Digital Viewer. For more information, see To configure the Digital Viewer.
-
Hide service Representation Quick Access with Obtrusive Copyrights (Alma representations only) = true – hides representations with obtrusive copyrights from the Quick Access section in Primo and Primo VE.
-
Hide service Representation Delivery Service with Usage Type = Auxiliary – hides representations with the usage type of Auxiliary from the Quick Access section in Primo and Primo VE.
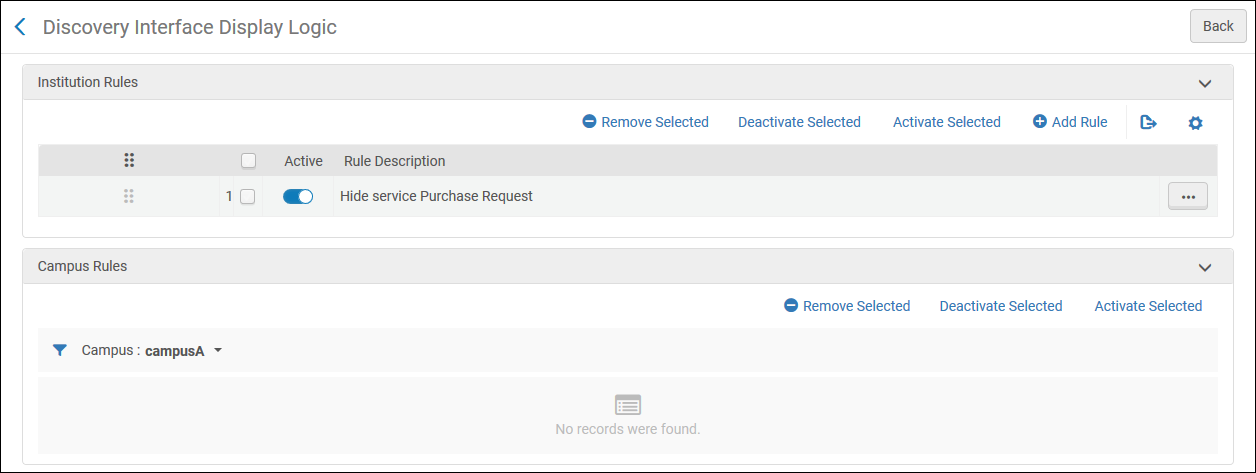
Adding Display Logic Rules
You can add new display logic rules. Rules apply for all libraries in the institution. By default, new rules are enabled.
Representation-related services (such as Representation Quick Access) are applicable to Alma-D records only.
-
On the Discovery Interface Display Logic page (Configuration Menu > Fulfillment > Discovery Interface Display Logic > Display Logic Rules), select Add Rule. The Add Rule dialog box appears.
-
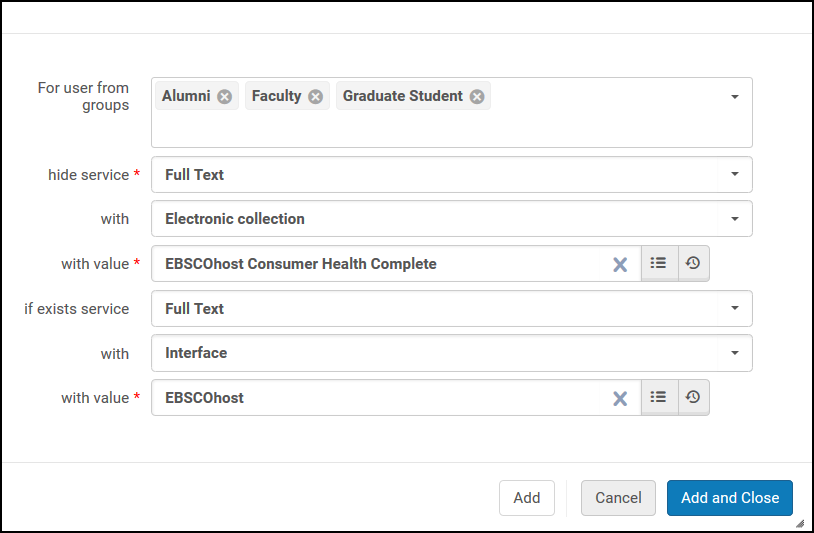
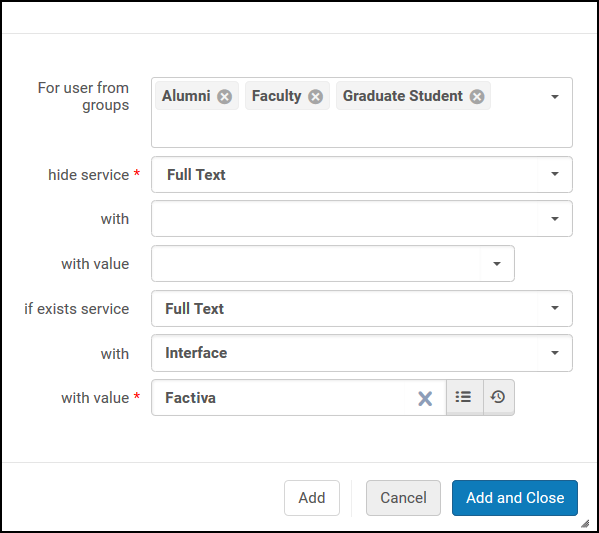
From the For user from groups drop-down list, select one or more groups to which to apply the rule. If you do not select a group, the rule applies to all user groups.
-
In the hide service drop-down list, select the service(s) that the rule should hide. For some services (for example Full Text), the with and with value fields appear, enabling you to select additional options for this service. The fields that appear depend on your selection. See the following table.
Add Rule Fields hide service with with value Booking, Digitization, General Hold Request, Hold Request N/A N/A DB Service Electronic Collection Select one or more electronic collection name(s). Full Text, Selected Full Text, General Digitization Request Interface Select one or more interface or electronic collection name(s). Both Community Zone and local interfaces are available.Electronic Collection General Electronic Service Service Select a general electronic service. Open Access
Note that this service appears when the enable_open_access_services_from_unpaywall_api customer parameter is set to true. See Open Access for more information.
N/A
N/A
Purchase Request Availability by the campus Select true to hide the service if the physical resource cannot be requested for availability on the campus. Otherwise, select false. Availability by the institution Select true to hide the service if the physical resource cannot be requested for availability on the institution. Otherwise, select false. Ownership by the campus Select true to hide the service if the resource cannot be requested due to physical ownership by the institution. Otherwise, select false.
To enable self-ownership checks to be performed for serial titles, make sure to set the parameter check_self_ownership_serial to true.
See also Configuring Other Settings (Fulfillment).To block requesting resources owned by the institution in a non-physical format, set the if exists service field as follows:- For digital resources – representation delivery service
- For electronic resources – full text
Ownership by the institution Select true to hide the service if the resource cannot be requested due to physical ownership by the institution. Otherwise, select false.
To enable self-ownership checks to be performed for serial titles, make sure to set the parameter check_self_ownership_serial to true.
See also Configuring Other Settings (Fulfillment).To block requesting resources owned by the institution in a non-physical format, set the if exists service field as follows:- For digital resources – representation delivery service
- For electronic resources – full text
Representation Delivery Service,
Representation Quick AccessAccess Rights Select true to hide the service if the resource has access rights configured. Otherwise, select false. Public Note Hide a representation in Primo, depending on the value of the Public Note field of the representation. The following are examples of regular expressions with which you can configure the Display Logic Rules to hide representations when the expressions are in the Public Note field. A flag can be used to determine if the expression is case sensitive or not:- /Restricted Access/ - Matches a public note containing the phrase Restricted Access, case sensitive.
- /Restricted Access/i - Matches a public note containing the phrase Restricted Access, case insensitive.
- /^(?!Open Access$)- Matches a public note that does not equal Open Access, case sensitive.
- /^((?!Open Access).)*$/i - Matches a public note that does not contain the phrase Open Access, case insensitive.
Usage Type Select primary (master) to hide the service for representations with the usage type of primary (master) and select derivative to hide the service for representations with the usage type of derivative. Representation Type Select remote to hide the service for remote representations and select non-remote to hide the service for remote representations. Viewer Select a viewer to hide the service if the resource is configured to be displayed by that viewer.
For Quick Access to be available, you must enable the New Digital Viewer. For more information, see To configure the Digital Viewer.
Obtrusive Copyrights (Representation Quick Access only) Hide the service if the resource is configured with obtrusive copyrights enabled. Resource Sharing Request Availability by the campus Select true to hide the service if the resource is available on campus. Otherwise, select false. Availability by the institution Select true to hide the service if the resource is available at the institution. Otherwise, select false. Ownership by the campus Select true to hide the service if the resource is owned by the campus. Otherwise, select false. Ownership by the institution Select true to hide the service if the resource is owned by the institution. Otherwise, select false. Resource Sharing System Select a resource sharing system. Resource typeSelect a resource type for which the resource sharing link will be hidden.The with value kit, is only supported for Primo VE customers, not Primo customers. -
If you want hide a service, only in the case when another service already exists, in the If exists service multiple select drop-down list, select the other service(s).
For some services (for example Full Text), the with and with value fields appear, enabling you to select additional options for this service. See the table above for information about the fields.
For resource sharing requests, if a resource has holdings without items, it is not considered self-owned. To hide resources that have holdings without items, hide the Resource Sharing Request service if the General Hold Request service exists.
-
Select one of the following:
-
Add – Add the rule but leave the dialog box open so that you can add additional rules.
-
Add and Close – Add the rule and close the dialog box.
-
-
If you define more than one rule, on the Discovery Interface Display Logic page, use the Move Up and Move Down arrows to set the order of the rules. Alma applies the enabled rules in the configured order.
Display Logic Rule Examples
EBSCOhost is identified as the interface in this example.
Configuring the Order of Online Services
- General System Administrator
- Fulfillment Administrator
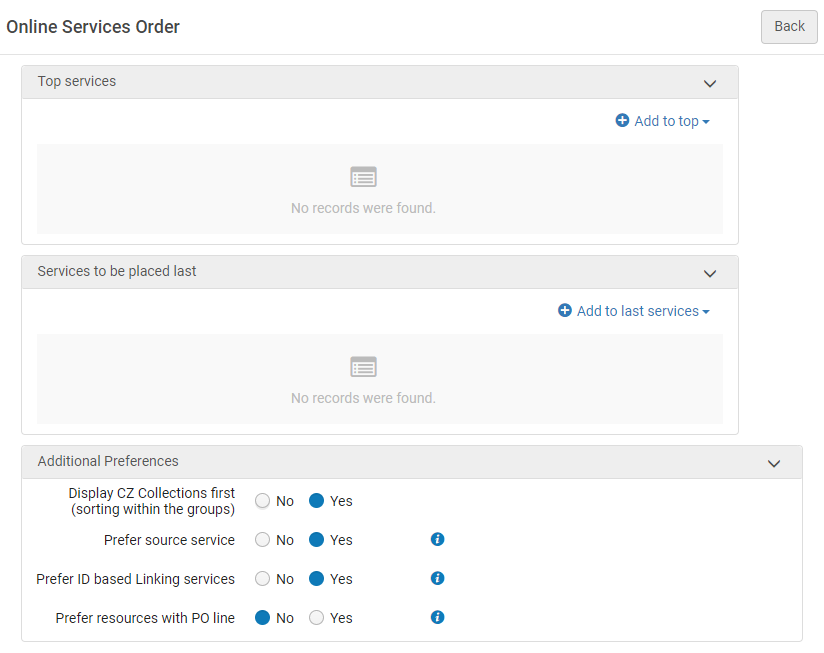
With the Online Services Order page (Configuration Menu > Fulfillment > Discovery Interface Display Logic > Online Services Order), you can configure the order of the services that appear in the services results list in View It.
By default (when no services were added to the top or bottom group), all services are displayed alphabetically on the services result list in the Primo view. If services are added to the top group, they will always display at the top of the Primo view (before other services). Services added to the bottom group will always display at the bottom of the Primo view (after the other services). Within the top group and bottom groups, services display in the order in which they are configured in the Online Services Order page.
Services that are not configured to display in the top or bottom group will display in the Primo view, after the top group and before the bottom group. Within these services (that are not part of the top or bottom group), the display order is alphabetical.
The Display CZ Collections first, Prefer source service, and Prefer ID based Linking services (see Configuring Direct Linking and Direct Links) options also override both the default alphabetic sort order (for services that are not part of the of top or bottom group) and override the order for the list of services in the Top services section. The top service defined can be used by Primo’s direct linking option, from the search result record.
Alternatively, you can order the services in a specific sequence, using the Prefer resources with PO line option.
If all additional preferences are selected (set to Yes), then the services are displayed in View It in the order below:
- Services of collections/portfolios that have a linked PO Line (i.e., subscribed services or owned).
- ID-based linked services.
- Source services
- Community Zone collections.
- Top services.
- Bottom services.
Unspecified levels are ordered alphabetically. For example if the first four options above were all set to No, and no items were added to the top or bottom list, then the sorting would be alphabetical.
-
This page does not have a Save button. Every selection made here is saved in Alma automatically.
-
Changes to electronic collection Public Name (override) requires that the online service order configuration for the specific electronic collection is re-configured.
-
You can only configure the online services order at the institution level. Select the required institution from the Configuring filter on the Fulfillment Configuration page.
-
Open the Online Services Order page (Configuration Menu > Fulfillment > Discovery Interface Display Logic > Online Services Order).
-
Select Add To Top to assign high priority to a service or select Add to Last Services to assign low priority to a service. Services that are left unassigned will appear in the middle of the list. The Add Service dialog box opens:
Selections made in the Additional Preferences section take precedence over the services selected as top services.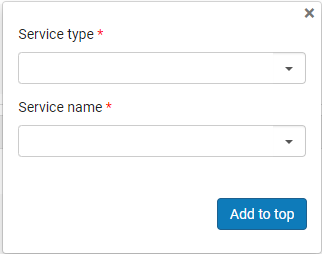
-
In the Service type field, select one of the following service types:
The Service type "DB Service" is obsolete. Do not select it.-
Full Text
-
Selected Full Text
-
-
In the Service name field, select the name for the selected service type. The Service value field appears. Browse and select a service value.
-
Depending on the type of priority you are assigning to the service, select Add to top or Add to last services to save the service to the selected priority list.
-
Select the arrows in the Move Up and Move Down columns to order the services in the Top Services and Services to be placed last lists.
-
In the Display CZ collections first field, select one of the following options:
You can also set this priority with the uresolver_display_cz_records_first parameter in the Customer Parameters mapping table. For more information, see Configuring Other Settings.-
Yes – The unspecified online resources that are not assigned to the top or bottom group, are sorted alphabetically. In addition, Community Zone resources are alphabetized and listed first in each level.
-
No – The unspecified online resources that are not assigned to the top or bottom group, are sorted alphabetically. Priority is not given to Community Zone resources.
-
-
Set Prefer source service to Yes to improve the sorting relevance of online resources offered by the Services Page for OpenURLs coming from CDI. This option places the highest priority on services that match the source of the OpenURL. For example, if a user searching CDI discovers an article from Gale, and the Alma Link Resolver can offer services from Gale and EBSCO, Alma will place the service from Gale at the top of the results, followed by the remaining electronic services, as defined in the sort settings for this page. This is the recommended option.
-
In the Prefer ID based Linking Services field, select one of the following options:
You can also set this priority with the uresolver_use_source_to_target_ordering parameter in the Customer Parameters mapping table. For more information, see Configuring Other Settings. If static URL is used, none of the options will apply!
If a service was hidden using the display logic rules, it will not appear, regardless of the value selected for this option.-
Yes – If a collection with a preferred ID is defined, it always appears first, regardless of other sort criteria. If more than one preferred collection is defined, the display preference for those collections is then based on the sort configuration as defined on the Online Services Order page. Currently, the following vendors use a preferred ID for linking: Cambridge University Press, Elsevier ScienceDirect, Erudit, Gale, Ingenta, Institute of Physics, JSTOR, Nurimedia, Proquest, Sage, Springer, Taylor&Francis, Thieme.
-
No – No priority is given to vendors with a preferred ID.
-
-
To prefer services of collections/portfolios that have a linked PO Line (i.e., subscribed services or owned), select Yes in the Prefer Resources with PO Line. Once enabled, services for portfolios that have a PO Line, either at the level of the collection or at the level of the portfolio itself, are displayed above all the other services. This preference overrides both the default alphabetic sorting order and the list of services listed in the Top Services section.
Configuring Direct Linking
- Fulfillment Administrator
- General System Administrator
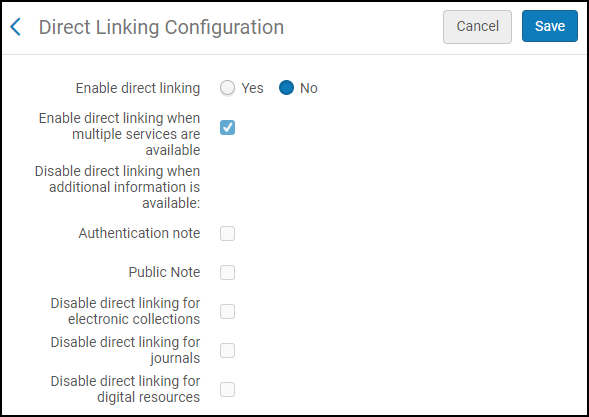
Direct linking configuration enables Alma to skip the Services page and menu and link immediately to a digital or an electronic service (such as full text) when coming from an OpenURL-enabled source. If the OpenURL context object contains multiple digital or electronic services, the OpenURL link resolver displays the first service in the list (if the Enable direct linking and Enable direct linking when multiple services are available options are enabled). You can configure the order of the services in the Online Services Order page (see Configuring Online Services Order).
You configure direct linking on the Direct Linking Configuration page (Configuration Menu > Fulfillment > Discovery Interface Display Logic > Direct Linking). On this page you can enable direct linking and specify situations in which direct linking is overridden.
-
You can only configure direct linking at the institution level. Select the required institution from the Configuring filter on the Fulfillment Configuration page.
- When direct linking is enabled, there is a known issue when testing access from Alma. For more details, see Test Access for a portfolio in Alma opens a blank tab.
-
On the Direct Linking Configuration page (Configuration Menu > Fulfillment > Discovery Interface Display Logic > Direct Linking), select Yes from the Enable direct linking parameter to enable direct linking.
Selecting No indicates that the electronic service is not accessed directly from the search results in Primo, and users must select the service from a list provided by your link resolver (SFX or Alma).
Selecting Yes enables direct linking and the other configuration parameters.
-
Configure the other parameters which allow you to control direct linking based on the record. Refer to the table below for an explanation of your options.
Direct Linking Configuration Options Parameter Description Enable direct linking when multiple services are available
Enable direct linking even when more than one digital or electronic service is available for the record.
Disable direct linking when Open Access service is available
Select this option to disable direct linking when an Open Access Service is available. See Open Access for more information.
Disable direct link when additional information is available:
-
Authentication note
-
Public Note
Disable direct linking even when additional information is available for the record.
Authentication noteDisable direct linking when a record's services contain an authentication note.Public noteDisable direct linking when a record's services contain a public note.Disable direct linking for electronic collections
Select this option to disable direct linking when the first service (result) in the View It service list is a match between the search in the discovery system and the electronic collection's bib record. The electronic collection’s level URL will appear first in the View It service list in two cases:
-
It is the only service available in the View It service list (single result in the View It).
-
The electronic collection service result is configured to appear first in the View It service results list via the Online Services Order and Display Logic Rules configurations. See Configuring Online Services Order and Configuring Display Logic Rules for more information.
Disable direct linking for journals
When Yes is selected for Enable direct linking and Disable direct linking for journals is selected, direct linking is disabled under the following conditions:
-
When the Electronic material type for a portfolio is set to Journal.
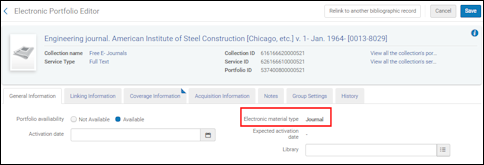 Electronic Material Type Set to JournalAny other electronic material type setting will not be considered and treated like a journal.
 -
When Alma determines from the OpenURL that there is no indication of article-level attributes like the following:
-
Page(s) indication (rft.spage, rft.epage, rft.pages)
-
Doi (rft_id" source1="(info:doi/.*)|(doi:.*))
-
Pmid (rft_id" source1="(info:pmid/.*)|(pmid:.*)
For example:…&rft_id=pmid:28274348&…) -
Oaid (rft_id" source1="(info:oai/.*)|(oai:arXiv:.*))
-
The setting for the Linking level parameter in the Electronic Service Editor is ignored, even when it is set to Journal.Related to disabling direct linking to journals, the following OpenURL attributes are supported:
-
Force_direct=true – This overrides any Alma configuration regarding direct linking and forces using direct linking.
-
Force_direct=false – This overrides any Alma configuration regarding direct linking and does not force using direct linking.
-
sfx.directlink=force – This is treated like Force_direct=true.
-
“disable_directlink=true&sfx.directlink=off” – This is treated like Force_direct=false.
If both an enable direct linking and a disable direct linking attribute are stated in an OpenURL, the attribute related to disabling direct linking takes priority.Disable direct linking for digital resources
Permits institutions to enable direct linking for electronic resources, while disabling only for digital resources.
-
-
Select Save.
Configuring Service Labels in the Discovery Interface
- General System Administrator
- Fulfillment Administrator
This section applies only to Primo. For information regarding Primo VE and Alma-Summon environments, see the following pages:
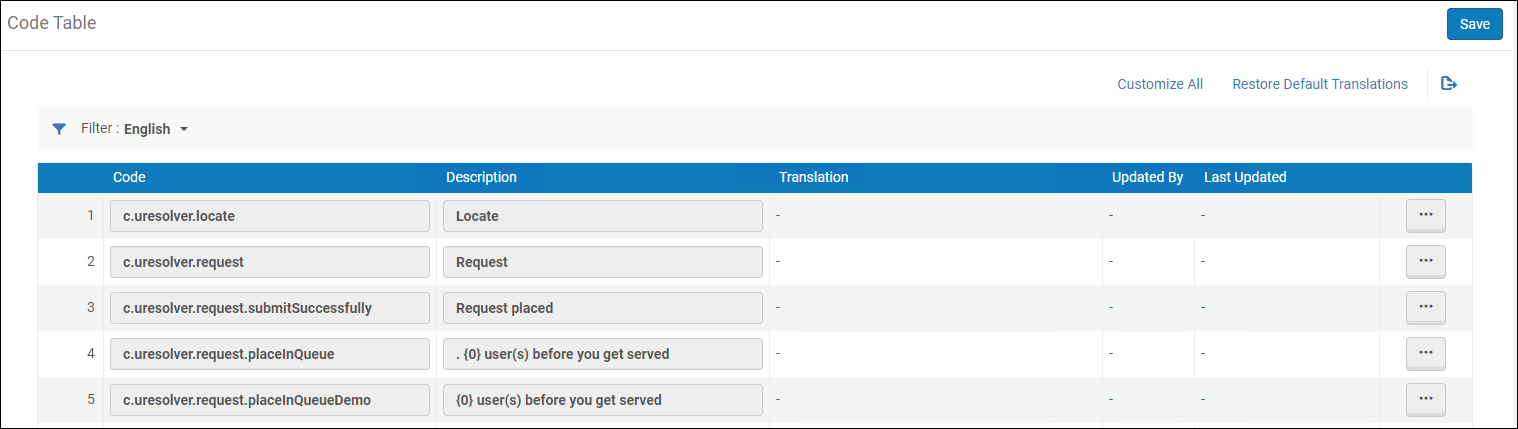
The Discovery Interface Labels Code Table page (Configuration Menu > Fulfillment > Discovery Interface Display Logic > Labels) contains predefined labels that appear in Primo. You cannot add or remove these labels, but you can edit the label’s text to meet your requirements. For more information about code tables, see Code Tables.
Labels for Booking are performed in Alma!
-
Labels can be configured at the institution level only. Select the required institution from the Configuring filter on the Fulfillment Configuration page.
-
For user-created license terms that appear in Primo, see Viewing User-Created License Terms that Appear in Primo.
-
In addition to configuring labels, you can hide certain services, such as Request a different issue and Don't see what you need? Request anyway by configuring a display logic rule to hide a General Hold Request service. See Adding Display Logic Rules above.
In addition, you can add HTML code to these fields to change the display of labels. For example, if you modify the following field as indicated, the output appears as displayed in the figure below.
-
c.uresolver.request.request_type = Request Type: <font color=red>ALL FIELDS REQUIRED!</font>
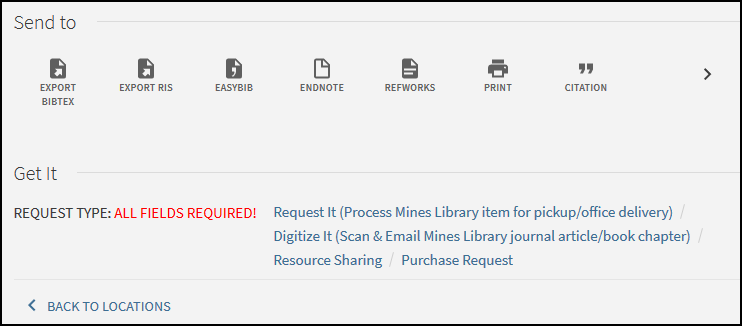
List of Commonly Used Labels
| Label Code | Default Value | Location in Interface |
|---|---|---|
| c.search.htmlCreator.unifiedDisplay |
{0} copy, {0} available, {0} requests Formatted as: {{copies_labels}}, {{available_labels}}, {{requests_labels}}. All content in curly brackets cannot be changed or translated because it represents other labels. Text can be added before, after or between each pair of curly brackets. Or one of the labels can be removed. |
The following variables display the count in the items list:
|
| c.uresolver.locate | Locate | Link to locate location in library (location map). Appears both in items list (when only one holding) and holdings list (when more than one holding). |
| c.uresolver.request | Request | |
| c.uresolver.request.submitSuccessfully | Request Placed | This label displays in Get It after a request has been submitted. |
| c.uresolver.request.placeInQueue |
For customers that went live before the August 2019 release, the default value is: Place in queue is {0}. For customers going live in August 2019 or later, the default value is: {0} user(s) before you get served. |
This label displays in Get It after a request has been submitted. |
| c.uresolver.request.placeInQueueDemo | Place in queue: {0} | This label displays the tentative place in the queue of a hold request, before the request is placed. It is displayed in Get It when the user selects the Calculate Queue button in the request form before placing the request. |
| c.uresolver.request.submitFailed | Failed to place a request on the resource. Please contact the library. | This label displays in Get It when a request submission fails. |
| c.uresolver.request.title | Details of title you requested: | This label displays on the top of a digitization or hold request form. |
| c.uresolver.request.notNeededAfter | Not Needed After: | This label displays on the Hold Request form. |
| c.uresolver.request.Partial.madatoty_comment | Please add the part to digitize | Partial digitization confirmation message |
| c.uresolver.request.institution_dropdown_my_institution | My Institution | In fulfillment network configuration, the pickup location selection in the request form displays a My Institution option. |
| c.uresolver.request.institution_dropdown_other_institutions | Other Institutions | In fulfillment network configuration, the pickup location selection in the request form displays a label, Other Institution, above the additional options. |
| c.uresolver.request.comment | Comment: | This label displays on the Request form. |
| c.uresolver.request.manualDescription | Manual Description: | The Request a different issue link appears in Get It if the item has a description or the resource holding has a summary holdings field. This allows users to request items that may have not been cataloged.
After selecting the Request a different issue link, this label appears on the request form.
|
| c.uresolver.request.submitRequest | Request | This label displays for the Request button at the bottom of the Request form. |
| c.uresolver.request.refresh | Refresh Services List | After submitting a request, the Refresh Services List link appears in Get It. |
| c.search.htmlCreator.copy | copy | Displays the count of total copies and copies available (X copy, Y available) in the items list. |
| c.search.htmlCreator.copies | copies | Availability display |
| c.search.htmlCreator.request | request | Availability display |
| c.uresolver.ServicesForThisTitle | Services For This Title | |
| c.uresolver.GeneralElectronicServices | Additional services | This label appears in View It when there are General Electronic services available. |
| c.uresolver.ServicesForRelatedTitles | Services For Related Titles | This label appears in View It when there are related records. |
| c.uresolver.availableOnline.full_text_prefix | Full text available at: | The label appears in View It when there is full text services available. |
| c.uresolver.availableOnline.selected_full_text_prefix | Selected full text available at: | The prefix for a full text link in View It. |
| c.uresolver.emptyList | No full text available | This label appears in View It when there is no full text services available. |
| c.uresolver.error | We're sorry. An error occurred while retrieving services for this title. | This label appears in Get It and View It if there was a processing error. |
| c.uresolver.request.ill | Resource Sharing Request: | This label appears at the top of the Resource Sharing Request form. |
| c.uresolver.request.ill.citationType.book | Book | This label appears as an option for the Citation Type field on the Resource Sharing Request form. |
| c.uresolver.request.ill.citationType.article | Article | This label appears as an option for the Citation Type field on the Resource Sharing Request form. |
| c.uresolver.request.ill.format.physical | Physical | This label is found on the Resource Sharing Request tab > Delivery Information > Format > Physical. |
| c.uresolver.request.ill.format.digital | Digital | This label is found on the Resource Sharing Request tab > Delivery Information > Format > Digital. |
| c.uresolver.request.ill.format.physicalNonReturnable | Physical non-returnable | This label is found on the Resource Sharing Request tab > Delivery Information > Format > Physical non returnable. |
| c.uresolver.request.ill.delivery.library | Deliver to library | This label is found on the Resource Sharing Request tab > Delivery Location > Delivery to Library. |
| c.uresolver.request.ill.delivery.alternative | Alternative address | This label is found on the Resource Sharing Request tab > Delivery Location > Alternative address. |
| c.uresolver.request.ill.volume | Volume: | This label displays on the Resource Sharing Request form for both articles and books. |
| c.uresolver.request.ill.issue | Issue: |
This label displays on the Resource Sharing Request form for articles. |
| c.uresolver.availableOnline.service_is_temporary_unavailable_due_to | Service temporarily unavailable due to | This label appears in View It when the service is temporarily unavailable and a Service unavailability reason has been defined in the Electronic Service Editor (see Service Unavailability Reason). |
|
c.uresolver.availableOnline.service_is_temporary_unavailable |
Service temporarily unavailable |
This label appears in View It when the service is temporarily unavailable and there is no Service unavailability reason defined in the Electronic Service Editor (see Service Unavailability Reason). |
| c.uresolver.getit2.request.request_options |
Request Options: |
This label appears appears next to the list of request options in Get It. |
| c.uresolver.getit2.request.monograph | Request | This labels appears for the Request link in Get It. If all items are monographs, the link will be at the title level. |
| c.uresolver.getit2.request.serial | Request |
This labels appears for the Request link in Get It. If there are serial items, the link will be at the item level. |
| c.uresolver.getit2.request.noItems | Don't see what you need? Request Anyway |
This request option appears when the item is not available at this location. Select the link to create a request. The request that will be created is a General Request, see Creating a General Hold Request |
| c.uresolver.getit.related_title_display | Inventory of related "{0}" is listed below | |
| c.uresolver.getit2.holding_list.location_map | Location Map | This is the column title for the Locate links in the holdings list. |
|
c.uresolver.getit2.holding_list.related_holdings |
Related holdings |
This is the label that appears with related holdings. See the Enabling the Display of Related Records in Primo section for more information. |
| c.uresolver.getit2.ill_request.monograph | Resource sharing request | The Resource Sharing Request link displays in the request options at the title level when all items are monographs (without description) or there are no holdings. |
| c.uresolver.getit2.ill_request.serial | Resource sharing request | The Resource Sharing Request link displays in the request options at the title level when at least one of the items is serial (with description) or no items exist. |
| c.uresolver.getit2.digitization_request.monograph | Digitization | The Digitization Request link displays in the request options at the title level when all items are monographs (without description) or there are no holdings. |
| c.uresolver.getit2.digitization_request.serial | Digitization | The label displays in the holding item digitization service in Primo Get It. |
|
c.uresolver.getit2.display_related_holding_separately_from_original_record |
LOCATIONS FOR RELATED TITLES |
The label that appears above the list of related holdings if the Separately from the original record holdings option is selected. See the Enabling the Display of Related Records in Primo section for more information. |
|
c.uresolver.getit2.display_related_holding |
Alma-Primo: Related title:{0} ({1}) Primo VE: Related title:{0} |
Appears in Get It to indicate that the physical title is related to the record. For Alma-Primo environments only, the type of relation is appended to the end of the title. For example: Related title:Art / (Contains)
|
| c.uresolver.getit2.item_list.pagination.records | Records | |
| c.uresolver.getit2.item_list.type | Type | The Type column is in the holding item in Primo Get It. |
| c.uresolver.getit2.item_list.policy | Policy | The Policy column is in the item list in Primo Get It. |
| c.uresolver.getit2.item_list.status | Status | The Status column is in the holding item in Primo Get It. |
| c.uresolver.getit2.item_list.empty | No items exist. Please refer to the request options above | The label is in the items list when there is a holding without items. |
| c.uresolver.getit2.request_different | Request a different issue | The Request a different issue link will appear in Primo Get It if the item has a description or the resource holding has a summary holdings field. This will enable requesting items that may have not been cataloged. |
| c.uresolver.getit2.digitize_different | Digitize a different issue | The Digitize a different issue column is in the holding item in Primo Get It. |
| dlf.block.expiry | Configure with {0} to display the user's block expiry on the My Account page. For example, entering Expired on {0} in the label description will be displayed as Expired on 07/07/2017. | |
| dlf.onHoldShelf.until | until {0} | This label appears in the List of Requests in Primo's My Account. The first part of the status is based on the status and therefore may not be configured. Only the text of until {0} is configurable. |
| c.uresolver.request.part_to_digitize | Part to Digitize: | The label is in the digitization request in Primo Get It. |
| c.uresolver.getit2.holding_list.empty.top | Your search did not match any physical resource in the library | When there are no holdings, this is the first row in Primo Get It (if the user is signed in). |
| c.uresolver.getit2.holding_list.empty.signed_in_user | Use the link/s below in order to request the resource from other libraries | When there are no holdings, this is the second row in Primo Get It (if the user is signed in). |
| c.uresolver.getit2.holding_list.empty.signed_in_user.no_services | There are no services available | When there are no holdings and no services, this is the message shown in Primo Get It (if the user is signed in). |
| c.uresolver.getit2.holding_list.empty.bottom | Having problems? Please contact the ExLibris staff | When there are no holdings, this description is shown at the bottom in Primo Get It (if the user is signed in). |
| c.uresolver.getit2.holding_list.empty.guest_user | In order to receive options to request the resource from other libraries, please sign in. | When there are no holdings and user is not signed in, this is shown in Primo Get It. |
| c.uresolver.getit2.item_list.non_circulating | Not loanable | When item is not loanable (according to policy), the Policy under the item list will be Not loanable. |
| c.uresolver.getit2.item_list.circulating | Loanable | When the item is loanable (according to policy), the Policy under the item list will be Loanable. |
| c.uresolver.getit2.item_list.alt_call_number_prefix | Additional location information: | A prefix for the alternative call number appears next to an item description in the Get It items page, |
| c.uresolver.getit2.item_list.status.ITEM_NOT_IN_PLACE | Item not in place | This is a status in the item list. |
| c.uresolver.getit2.item_list.status.ITEM_IN_PLACE | Item in place | This is a status in the item list. |
| c.uresolver.getit2.item_list.status.ACQ.with_expected_date | On order until {0} | This is a status in the item list (expiration date is included). |
| c.uresolver.getit2.item_list.status.TRANSIT.with_expected_date | In transit until {0} | This is a status in the item list (expected arrival time is included). |
| c.uresolver.getit2.item_list.status.NOPROCESS.with_no_expected_date | On Shelf | This is a status in the item list. |
| c.uresolver.getit2.item_list.status.WORK_ORDER_DEPARTMENT. with_expected_date |
In process of {0} until {1} | This is a status in the item list (expiration date is included). |
| c.uresolver.getit2.item_list.status.LOST_LOAN.with_expected_date | Lost since {0} | This is a status in the item list. |
| c.uresolver.getit2.item_list.status.CLAIM_RETURNED_LOAN. with_expected_date |
Claimed returned. Due on {0} | This is a status in the item list (due date is included). |
| c.uresolver.getit2.item_list.status.LOAN.with_expected_date | On loan until {0} | This is a status in the item list. |
| c.uresolver.getit2.item_list.status.OVERDUE.with_expected_date | On loan - overdue since {0} | This is a status in the item list. |
| c.uresolver.getit2.item_list.status.WORK_ORDER_DEPARTMENT. with_no_expected_date |
In process of {0} | This is a status in the item list. |
| c.uresolver.getit2.item_list.status.ILL.with_expected_date | On ILL process until {0} | This is a status in the item list (when the Resource Sharing request has a due date.) |
| c.uresolver.getit2.item_list.status.ILL.with_no_expected_date | On ILL process | This is a status in the item list (when the Resource Sharing request doesn't have due date). |
| c.uresolver.getit2.item_list.status.TECHNICAL.with_no_expected_date | Technical | This is a status in the item list. |
|
Related Records |
This is the label for the relation type Contains. This label appears with View It related records. See the Enabling the Display of Related Records in Primo section for more information. |
|
| c.uresolver.viewit.relatedTemplate | @TITLE (@RelationType) | This is shown in View It. |
| c.uresolver.missingProvider | view full text | This is the link to the full text in View It. |
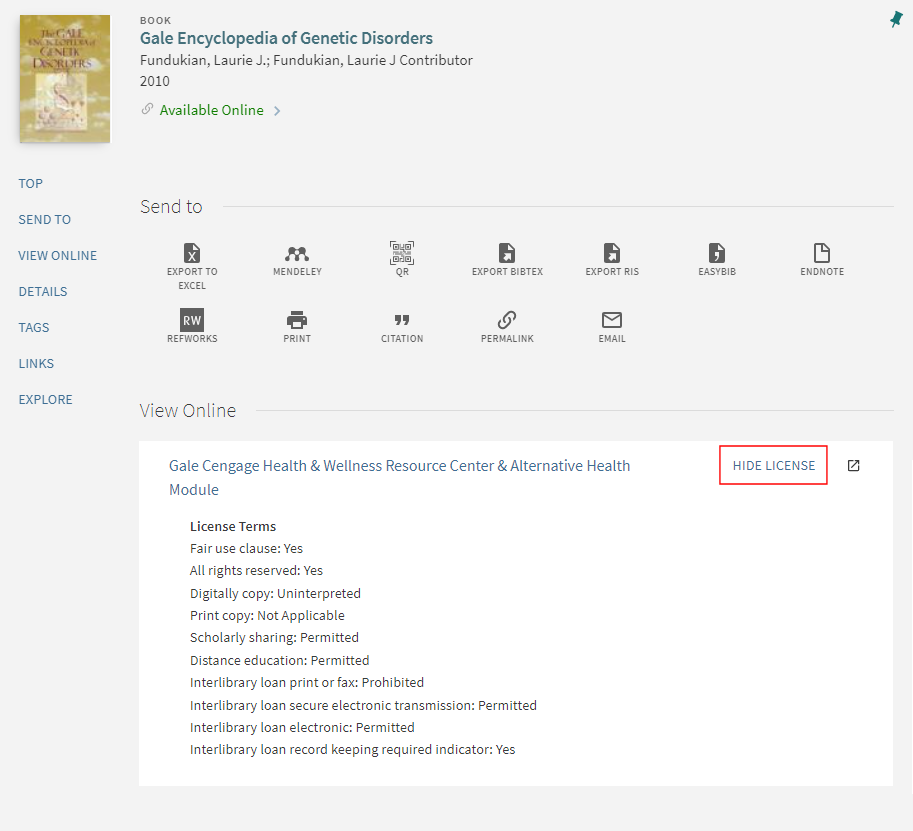
Displaying License Information
Alma enables you to display electronic resource license information in View It. The displayed terms of the license can be configured in Alma, as well as the license-related labels that display in View It.
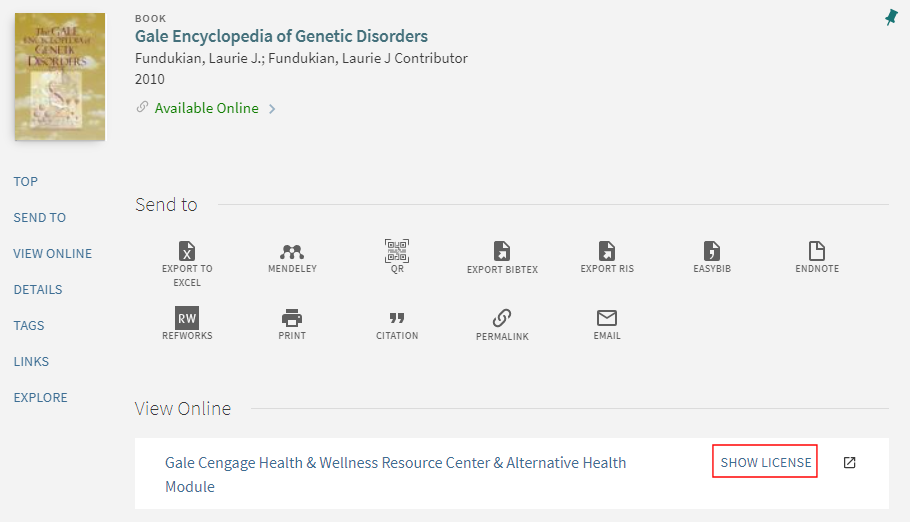
After the user selects the Show license link, the name of the link changes to Hide license, and the license information appears as configured in Alma:
- Acquisitions Administrator
- Fulfillment Administrator
- General System Administrator
-
Specify which license terms to display in View It. For information on the Display to Public field, see Adding a License Term.
-
If needed, modify the license-related labels, which are defined by the codes that contain a c.uresolver.viewit.license prefix. For more information, see Configuring Labels for Primo or Configuring Labels for Primo VE.
-
Open the Other Settings page (Configuration Menu > Fulfillment > Discovery Interface Display Logic > Other Settings).
-
Select the Enable Display of License Information check box.
-
Select Save.
For more information on configuring the license terms in Alma, see Managing License Terms.
Displaying Access Model
To control the presentation of the access model to patrons in Primo, select the Enable Display of Access Model parameter (Configuration Menu > Fulfillment > Discovery Interface Display Logic > Other Settings). This displays the access model information in Primo, based on the access model indicated in the electronic portfolio (see Real-Time Ordering).
This option is disabled by default.
Configuring Provider Preferences for CDI Linking
This section applies only to Primo. For related information regarding Primo VE, see Configuring Central Index and Proxy Settings for Primo VE.
To configure provider preferences, you must have one of the following roles:
-
General System Administrator
-
Fulfillment Administrator
The Central Index page allows you to configure which providers are given preference when displaying links from CDI in Primo's View It.
These preferences are used in the following situations:
-
When only a single link is returned from CDI, regardless of the setting of the Display All Links from CDI option.
-
When the Display All Links from CDI option is enabled and multiple links are returned from CDI.
-
When Quicklinks are returned from CDI.
The linking preferences apply to both general Link in Record links and Quicklinks and All links. This configuration takes effect immediately and is used when returning search results from CDI. For more information regarding link priority, see CDI and Linking to Electronic Full Text.
You do not need to add precedence for all providers, but the providers in this list have precedence over providers that are not included in this list.
-
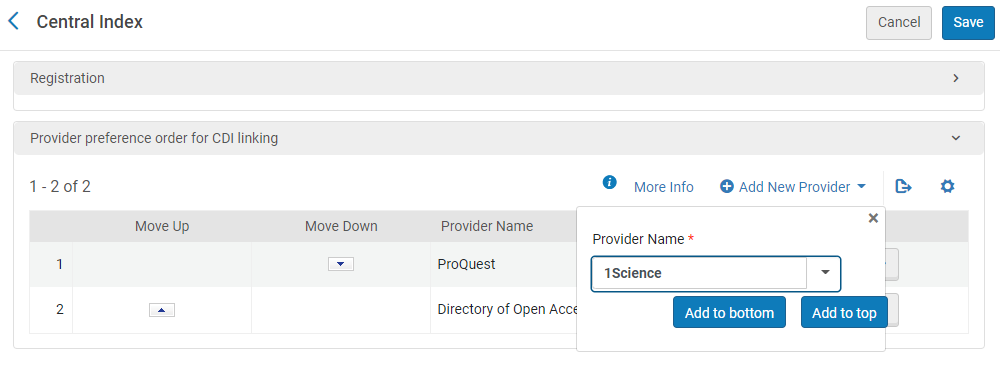
Open the Central Index page (Configuration Menu > Fulfillment > Discovery Interface Display Logic > Central Index).
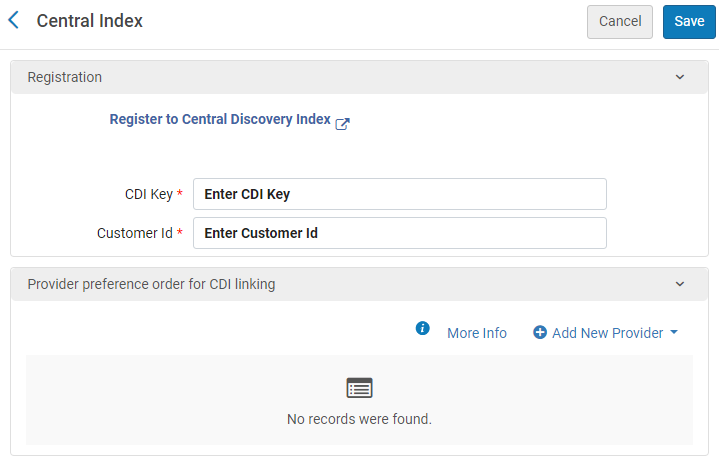 Central Index Page
If instead you see a list of profiles from which to choose, see Configuring Provider Preferences for Multicampus Environments.
-
If you have not already done so, fill out the Registration section by entering the same CDI Key and Customer ID fields that you are using in Primo, which you can find in the PC Key and Customer ID fields in Primo's Institution Wizard (Primo Home > Ongoing Configuration Wizards > Institution Wizard).
After you save your CDI Key and Customer ID, the View my Profile link replaces the Registration link, enabling you to modify your customer and contact details, unsubscribe institutions, and configure your client applications. For more information, see My Profile for CDI.
-
In the Provider preference order for CDI linking section, perform the following steps to give preference to providers' links returned from CDI searches.
-
Select Add New Provider to open the Provider dialog box.
-
In the Provider Name field, select the provider to which you want to give precedence. This drop-down includes all CDI providers that have Provider Coverage set to Yes in the CDI Collection List.
-
Select either Add to bottom or Add to top to indicate whether the selected provider has more or less precedence than other providers that you have added to the list.
-
Select the arrow in the Move Up/Move Down columns to adjust the new provider's precedence.
-
Repeat the above steps for additional providers.
-
-
Select Save.
-
Open the List of Electronic Profiles page (Configuration Menu > Fulfillment > Discovery Interface Display Logic > Central Index).
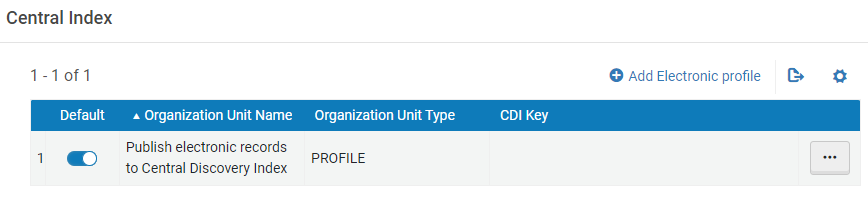 List of Electronic Profiles Page
 -
Edit the profile for each campus/library that is configured as an institution in Primo. Initially, you must create a profile for each campus/library by selecting the Add Electronic profile option.
-
In the Registration section, enter the same CDI Key and Customer ID fields that you are using in Primo, which you can find in the PC Key and Customer ID fields in Primo's Institution Wizard (Primo Home > Ongoing Configuration Wizards > Institution Wizard).
Central Index PageAfter you save your CDI Key and Customer ID, the View my Profile link replaces the Registration link, enabling you to modify your customer and contact details, unsubscribe institutions, and configure your client applications. For more information, see My Profile for CDI.
-
In the Provider preference order for CDI linking section, perform the following steps to give preference to providers' links returned from CDI searches.
-
Select Add New Provider to open the Provider dialog box.
-
In the Provider Name field, select the provider to which you want to give precedence. This drop-down includes all CDI providers that have Provider Coverage set to Yes in the CDI Collection List.
-
Select either Add to bottom or Add to top to indicate whether the selected provider has more or less precedence than other providers that you have added to the list.
-
Select the arrow in the Move Up/Move Down columns to adjust the new provider's precedence.
-
Repeat the above steps for additional providers.
-
-
-
Select Save.