Submitting Cart to Approval
- To submit the cart for approval: Super Selector, Selector, Selector-Limited
- To approve the cart: Rialto Manager
- To check out the cart: Rialto Manager, Rialto Purchaser
- If you have the Selector role, you submit individual offers within the cart for approval to the Purchasing Manager. The Purchasing Manager will review the order, and can approve or reject individual offers. When the order is approved, Rialto generates a Purchase Order and sends it to the vendor. At any time, you can monitor the order’s real-time progress via the Order History page.
- If you have the Purchasing Operator role, you can check out individual offers within the cart yourself. In this case as well, Rialto generates a Purchase Order and sends it to the vendor.
- If you are the Rialto Manager, you review and check out the orders made by the selection staff.
For information on submitting the cart for approval, watch Ordering (3:00 min.).
For information on approving a cart, watch Order Approval (3:44 min.)
These activities are managed from the Shopping Cart page. Select the Cart icon (![]() ) to open the page.
) to open the page.
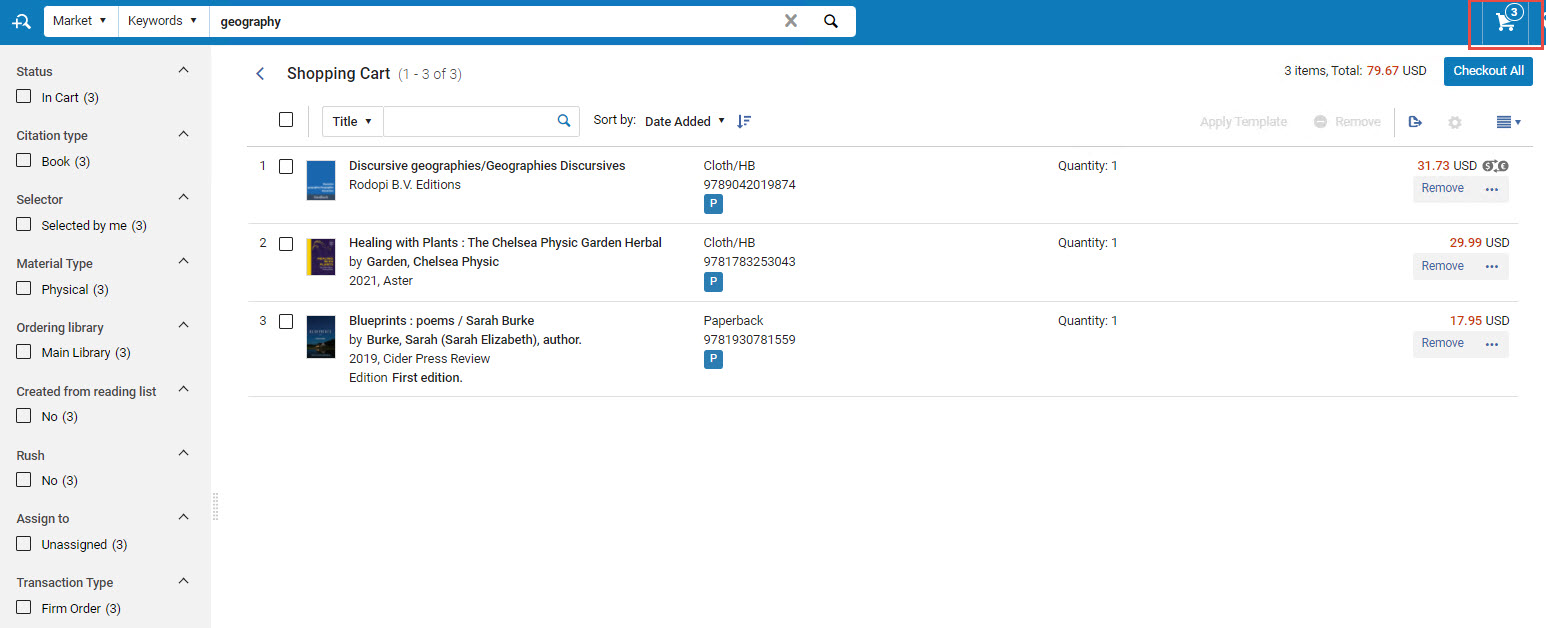
The information you enter on this page is saved automatically.
Ordering Library Management
The cart is disabled for purchase until you select the Ordering library: the library on behalf of which the order is made. Ordering libraries are tied to specific shelving locations in the system; in turn, shelving locations are tied to specific funds. The available locations and funds are configured to the ordering library in Alma (for details, see Configuring Physical Locations).
You can submit one order with multiple ordering libraries. Carts are not tied to specific ordering libraries, so you can submit offers from any ordering library you have access to, in one cart submission.
The ordering library must have a valid shipping and billing address in the system. If the system cannot find it, the ordering library is disabled in the cart. To indicate valid addresses, see Configuring the Institution and Its Libraries.
Cart Template Management
Instead of filling in all cart options manually, you can apply a customized template to your shopping cart. Cart templates hold a set of predefined values of the cart fields, so that you can apply a single template instead of applying values for every field, thus saving you time and effort. For information on creating and managing cart templates, see Cart Template Management. Once the template is applied, if needed, you can change individual cart field values to fit your needs.
Each template is created for a single ordering library. You can only apply a template to an order made for that ordering library.
Applying a template is not mandatory - if desired, you can fill in the cart options manually.
Filling in the Cart
- Super Selector, Selector, Selector-Limited
The following roles are required to check out the cart:
- Rialto Manager, Purchasing Operator
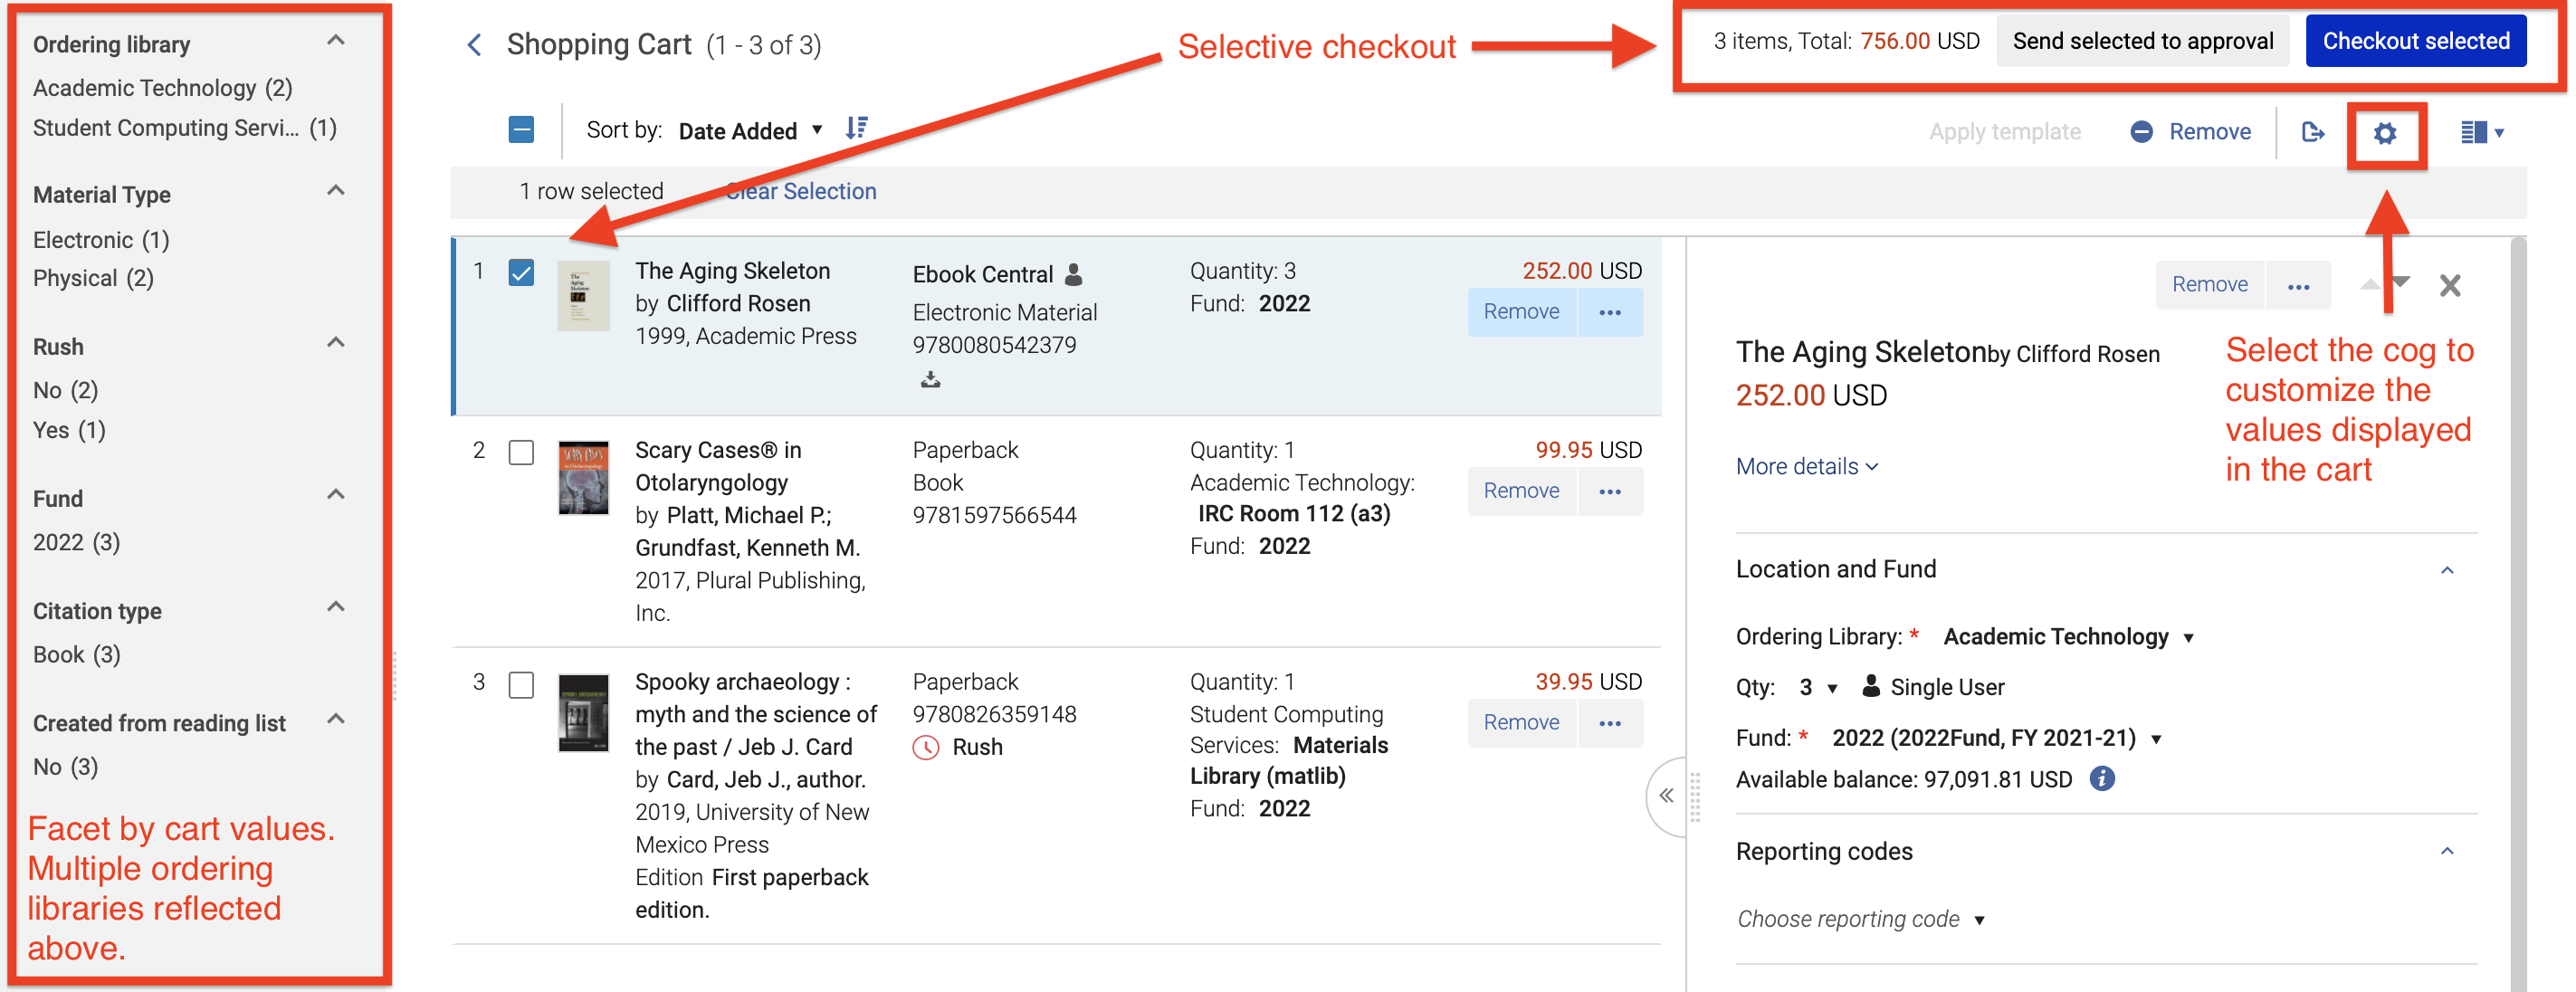
You can add as many offers to the shopping cart as you'd like; however, when you submit for approval / check out the cart, this is selective - you submit to checkout individual offers, and not the entire cart.
Indicating the ordering library, the shelving location, and the funds is mandatory. However, if you are part of the selection staff, your institution policy might be that selectors do not allocate fund or location. In this case, you can send the order directly to approval, and the purchaser will complete the information. If you did indicate this information, the purchaser may change your selections, if necessary.
In addition, within the shopping cart you may need to provide more information about the order. If you are part of the purchasing staff, this may be mandatory. If you are part of the selection staff, this is optional. If you do not provide this information, the Rialto Manager will provide it as part of the order approval.
Filling in the Cart Options
There are two ways to fill in the cart options:
- By applying a cart template to the options. This is the quickest option if you need to order many offers with the same or similar options. See Applying Template to the Cart Options.
- By filling in the options manually. Do this when the offers you are ordering are all different from one another.
-
In the right pane of the cart, select the ordering library.
-
In the field below, select the desired template or select Use a Template in the row actions list. Only the templates created for the selected ordering library are available in the dropdown.
- Select the template you wish to apply. To check the template values before applying it, click Manage Template. This takes you to the Manage Templates page. From here you can view all the templates available to you, and modify any that you have created. However, if modifying, make your changes before you apply the template to any offers: once the template was applied to the cart, the changes made to the template do not affect the cart.
Note that templates that are disabled on the Manage Templates page do not appear in the dropdown. - In the dropdown you see your private templates separately from the institution-level templates shared with you. Note that you can only make change to your private templates. However, you can hide from view the shared templates that you don't use: click Manage Template, and on the Manage Templates page, toggle the shared template Off. This disables the template only for you; other users will still have this template active.

- When selecting the template, some templates may be marked with
 in the dropdown. This means that the blank values in the template overwrite the existing cart values. In templates without this icon, in case of blank values in the template, the pre-existing values in the cart are left as is. This helps you make sure that information specified by the Selection staff is not lost after applying a template.
- Select the template you wish to apply. To check the template values before applying it, click Manage Template. This takes you to the Manage Templates page. From here you can view all the templates available to you, and modify any that you have created. However, if modifying, make your changes before you apply the template to any offers: once the template was applied to the cart, the changes made to the template do not affect the cart.
-
If you want to apply this template to all the offers in your cart, select Apply to All. If you wish to apply it to specific offers, select the checkbox to the far left of the offer line and then select Apply to selected to apply it.
When the template has been applied to the cart, the name of the template appears in the right-hand panel, and all the fields where values were inherited from the template receive yellow background. If you modify the value, the yellow background disappears. -
If some of the cart options were left blank in the template, make your selections in the offer manually (and in the other offers in the cart, if applicable. In this case, you'll have to open the offers one-by-one).
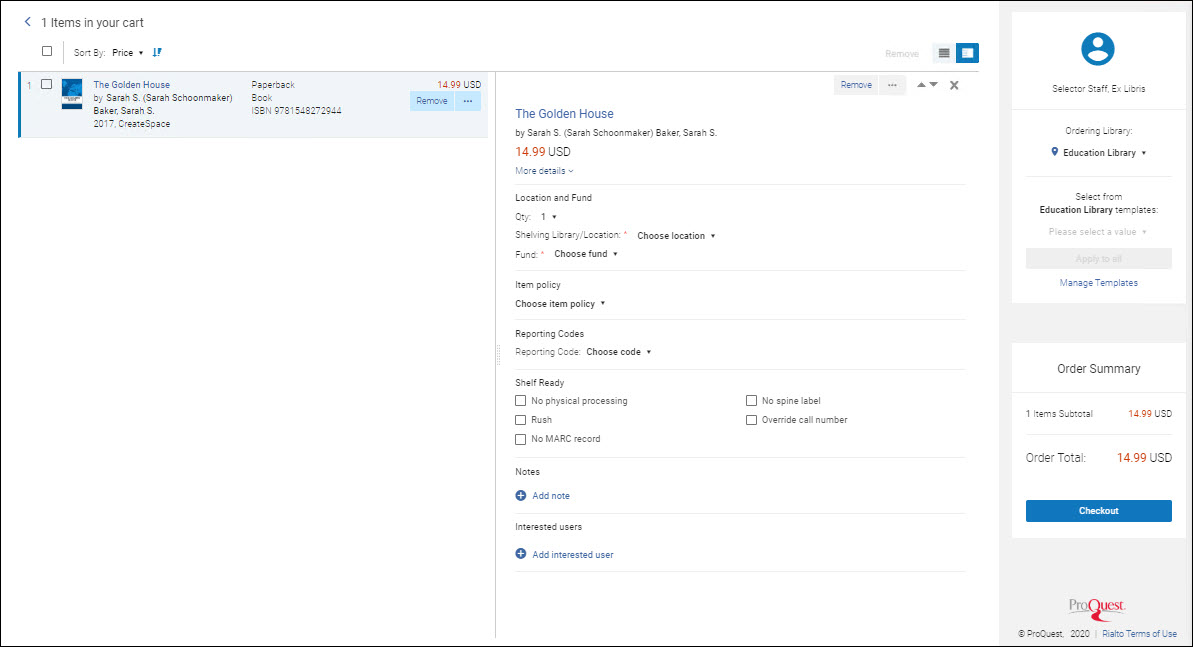
To fill in the cart options manually:
-
In the list of offers, click anywhere on the offer row, except the offer name. The Details pane opens for that offer.
-
In the right pane, select the Ordering Library. The cart is now enabled.
-
Fill in the cart options as per the below:
| Cart Option | Description |
|---|---|
| Allow Duplicate |
An optional Allow Duplicate checkbox can be enabled for use in the Cart and Order's Awaiting Approval. When enabled, a checkbox is displayed at the top of all cart values and when checked "allows" items with holdings to be submitted in the order. If a cart item has a holding attached to it and the user did not select the checkbox, a message appears to let the user know the order may not go through after a final holdings check. If you are part of a consortia, Network Zone holdings will also be included in the check. On cart confirmation, after all holdings have been identified, you are prompted to check the box to allow the order to proceed or remove the item from the cart. This feature can be enabled or disabled by system administrators from Other Settings table on the Rialto Configuration page. |
| Shelving Library / Location | Select the shelving location (for print offers only). Within the dropdown you can type in the location name, or expand the directory to find the correct one.
To apply shelving location and funds to multiple offers in bulk, see Applying Library and Funds to Multiple Offers in Bulk. |
| Quantity |
Indicate the number of copies you are ordering.
For eBooks, ordering multiple copies is enabled for EBC and EBSCO , only if the offer's license is 'single user' or 'three users' or 'non-linear/concurrent' (i.e., not 'unlimited'). If you want to increase the number of copies, you can easily select another copy of the title, see Navigating to Work from Cart.
To order copies for several different libraries, see Ordering Copies for Different Shelving Locations.
For Alibris orders, the quantity is fixed at "1" and cannot be modified; see Working with Alibris.
|
| Fund Assigned |
Select the fund that will be encumbered. Within the dropdown you can type in the fund name or the fund code, or expand the directory to find the correct one. Only one fund may be associated with any given cart item. (This is different from the Alma PO line, to which multiple funds can be added). After choosing the fund, its current available balance is displayed below. (for details, see Managing Funds and Ledgers).
Only active funds with an available balance or overencumbrance allowed will appear as options in the dropdown.
The right-hand pane shows the applied fund’s usage and the available balance. Note that this summary does not reflect the current amount being encumbered. If multiple funds are used within the cart, you can view them by selecting the toggle next to the fund name.
To apply shelving location and funds to multiple offers in bulk, see Applying Library and Funds to Multiple Offers in Bulk. |
| Interested users |
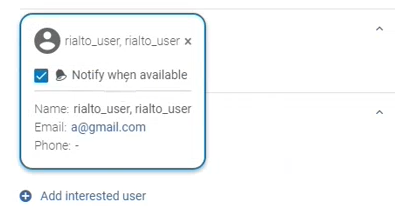
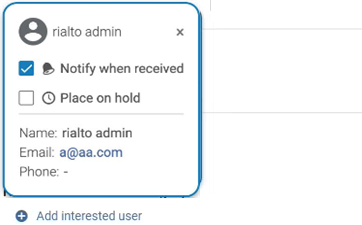
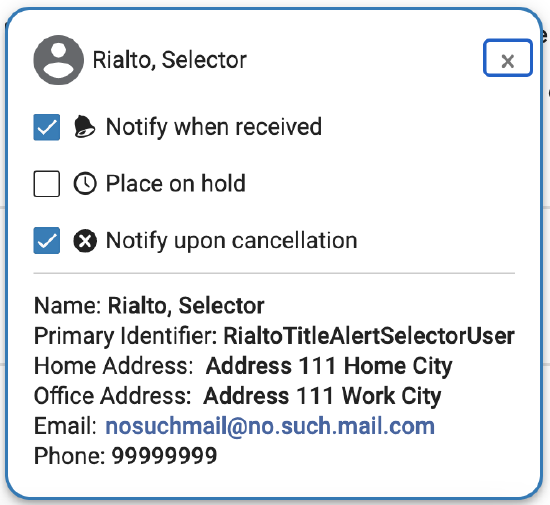
Optionally, indicate the name(s) of the patron (institution staff or students) who requested this offer. If you have permissions to access the "Users" menu within Alma, you may also search the interested users field by email address (full address must be entered). Interested users have a limit of 5 persons on templates, there is no limit in the cart. By default, Rialto will respect your Alma configurations for interested user notification preferences. The default selection of interested user notification options can be defined by the institution in the configuration menu (Configuration Menu > Acquisitions > General > Other Settings). If the cart offer was added due to a purchase request or borrowing request, the interested users are automatically carried over from the requests. In this case, Rialto will reflect the notification method entered there. However, once in the cart you can make any modification to the interested user notification types, or add additional interested users. When selecting the interested user, the notification actions can be assigned as follows:
See When is a notification sent to interested users for more information on Alma notifications for interested users.
The notification actions are displayed only when an email address is available for the interested user. Note that in the collapsed view in the Details pane, the icons for the selected notification types appear only when they are selected. When the notification type is not selected, the icon does not appear. For information on interested users in PO lines, see Interested Users Section. |
| Notes | Optionally, click Add Note to add a note. You can select between these types of notes:
|
| No Physical Processing | (Only print offers) Select to instruct the vendor to skip all physical processing steps, such as protective films, spine labeling, etc. that are part of your contractual agreement. Select this option to complete your own processing, or to speed up order shipping.
When selecting this option, it will not have an impact on the MARC delivery. |
| Rush |
This option is configured by Alma administrator. (Only print offers) Select to instruct the vendor that rush handling applies. This means the following:
|
| No MARC record | (Only print offers) Select to instruct the vendor that no MARC record should be created, for example, when ordering another copy of a offer already owned by your institution. The vendor will still apply the other processing steps that are part of your agreement.
If you do not select this option, the MARC records are sent nightly via an FTP transfer.
|
| No Spine Label | (Only print offers) Select to instruct the vendor to skip the spine label. The vendor will still apply the other physical processing steps. |
| Override Call Number | (Only print offers) Select to instruct the vendor to replace the existing call number. Enter your own call number in the field that opens. |
| Item Policy | If your institution requires, select the item fulfillment policy. For more information, see Adding Fulfillment Policies. |
| Reporting Code | Select up to five reporting codes. Reporting codes can be used for analyzing acquisitions in subsequent reporting. For more information, see Configuring Reporting Codes. These reporting codes will be assigned to the PO line. The order of Report Code values is inherited from the Reporting Codes table, and can be set from there. Note that if the values were changed in the Reporting Codes table, you need to refresh the Cart for the list of Report Codes to display the new order. |
| Route cart item into category |
The values in this field are configured by the institution. If the values were not configured by the institution, this field does not appear in the cart. Your Alma administrator can configure the values for your institution from the Cart Routing section of the Rialto Configuration page. Selecting an option from this category allows the selection staff to assign a unique value for acquisitions to filter by on the Orders Awaiting Approval Task List. For more information, please watch the cart routing training. |
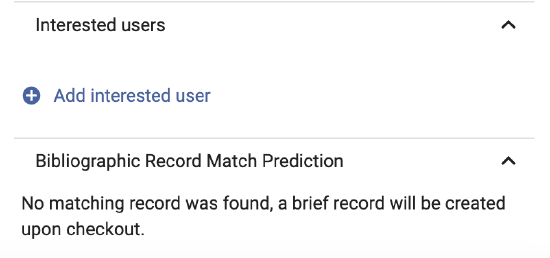
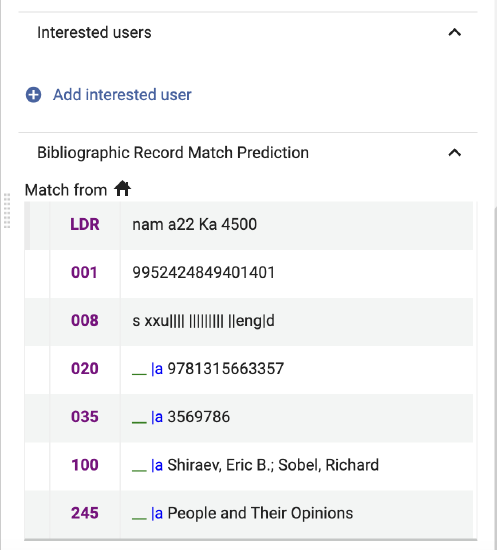
| Bibliographic Record Match Prediction | When record matching is enabled purchasers will be able to proactively review matched records in the cart to ensure collection accuracy prior to checking out. "Bibliographic Record Match Prediction" appears as an expandable field and will display either:
or
Rialto will search for records based on title, author, and ISBN from the record as a whole. When a community zone match is found, we will use provider identifiers (when present) to match against the correct collection. The match retrieval also depends on the format of the item in the cart and the record. Rialto will respect matching electronic and print records respectively. When this feature is enabled, Rialto also prevents brief record creation at the time an offer is added to the cart. Enabling or disabling this feature is handled through the customer parameter: "rialto_enable_create_or_match_mms_on_checkout" in Configuration > Collection Development > General > Other Settings. By default, the parameter is set to true.
|
| Relinking Cart Item Record Matching | When an offer in the cart has matched to the Institution or Network Zones, a "Relink" option will be present. If no match has been found a "Manual Link" option is present. When either link is selected, a large sliding panel will open allowing for a repository search. If a match was found in the cart, the panel will display all other record options found within the corresponding zone, so that the approver can quickly locate other options. If no match was found in the cart, then the approver can search the repository for a matching record.
Users will not have the option to relink Community Zone records, or Ebook Central upgrades, as unique workflows and configurations are in place for both of these scenarios. For example:
Relink button
Repository Search - Select Title to Relink to MMS ID
Manual link
After an item has been relinked, the Cart, Task List, and Order History pages display a notification detailing the action. The notification includes a message confirming the relink/manual link, the user's name who performed the action, and the date it was completed.
Relink User Indication
|
| Restore Original MMS ID after Relinking | A Restore button appears after a user performs a relink, enabling retrieval of the original MMS ID that was matched. The restore action reverts to the original bibliographic record (BIB) and includes a confirmation popup to ensure user intent. Upon completion, a success or failure message is displayed to indicate the outcome of the action.
Restore button workflow
|
Refining Large Carts
To help refine large shopping carts, use the facets.
Ordering Copies for Multiple Shelving Locations
- Rialto Manager, Purchasing Operator
You may want to order several copies of a single offer, where each copy is destined for another shelving location in your institution. You can do this from the Shopping Cart page. Each copy generates a separate PO line in the Purchase Order.
- On the Shopping Cart page (
 ), in the row actions list of the offer, select Duplicate. The offer is duplicated.
When you duplicate an offer, all its cart information is copied over to the new offer, including information that might not be relevant for the new offer, such as shelving location. Make sure to review the new offer and substitute all the unnecessary information with the correct information.
- Open the new offer and edit its information as necessary. Then proceed as described in Checking Out the Cart above.
Navigating to a Work from the Cart
You can navigate to a list of other offers for a work from the cart, in order to confirm that this is the best offer or to choose an alternate/additional offer in the same work. If you are an Approver, you can do this from your own cart, or from a cart that you are currently approving.
- Click on the title of the item in the cart or select Display Title in Market in the row actions list.
The list of offers for the work opens. The item currently in the cart is marked with an In your cart badge. - For all users, to replace the item with another item, click Replace Title on the desired item. The In your cart badge moves to the selected title.
To add an additional item (if you increased the number of copies in the cart), click Add to Cart on the desired item.

- If you are an Approver, to replace the existing offer with a related offer of the work, in the row actions list in the selector's cart that you are actively working on approving, select Add to Selector's Cart.
- To return to the cart, at the top of the page, select
 beside the name of the work.
All the information selected in the cart remains unchanged.
Submitting the Cart to Approval or Checking Out
-
Once all the required cart options are filled in, select the button that appears:
-
If you are part of the selection staff, select Submit to Approval to sent the order to review by the Purchase Manager. Once the order is approved, Rialto generates the Purchase Order and submits it to the vendor. To monitor the progression of your order across the approval workflow, use Order History page.
-
If you are part of the purchasing staff, select Check Out Selected to submit the Rialto order to the vendor.
-
In some cases, certain users might see both buttons Submit to Approval and Checkout Selected, as institutions may want to allow Purchasing Operator roles to submit an order for secondary approval, instead of submitting to the vendor directly. In these cases, proceed as instructed by your institution, or work with your Approvers to determine in which cases you can check out the cart and when you need to request approval.
When both buttons appear, the Submit to Approval button is displayed as grayed-out (because it is secondary to the Checkout Selected button). But you can still select it.
-
- If there are errors in the cart prior to submitting to vendor, they are caught on the errors page:
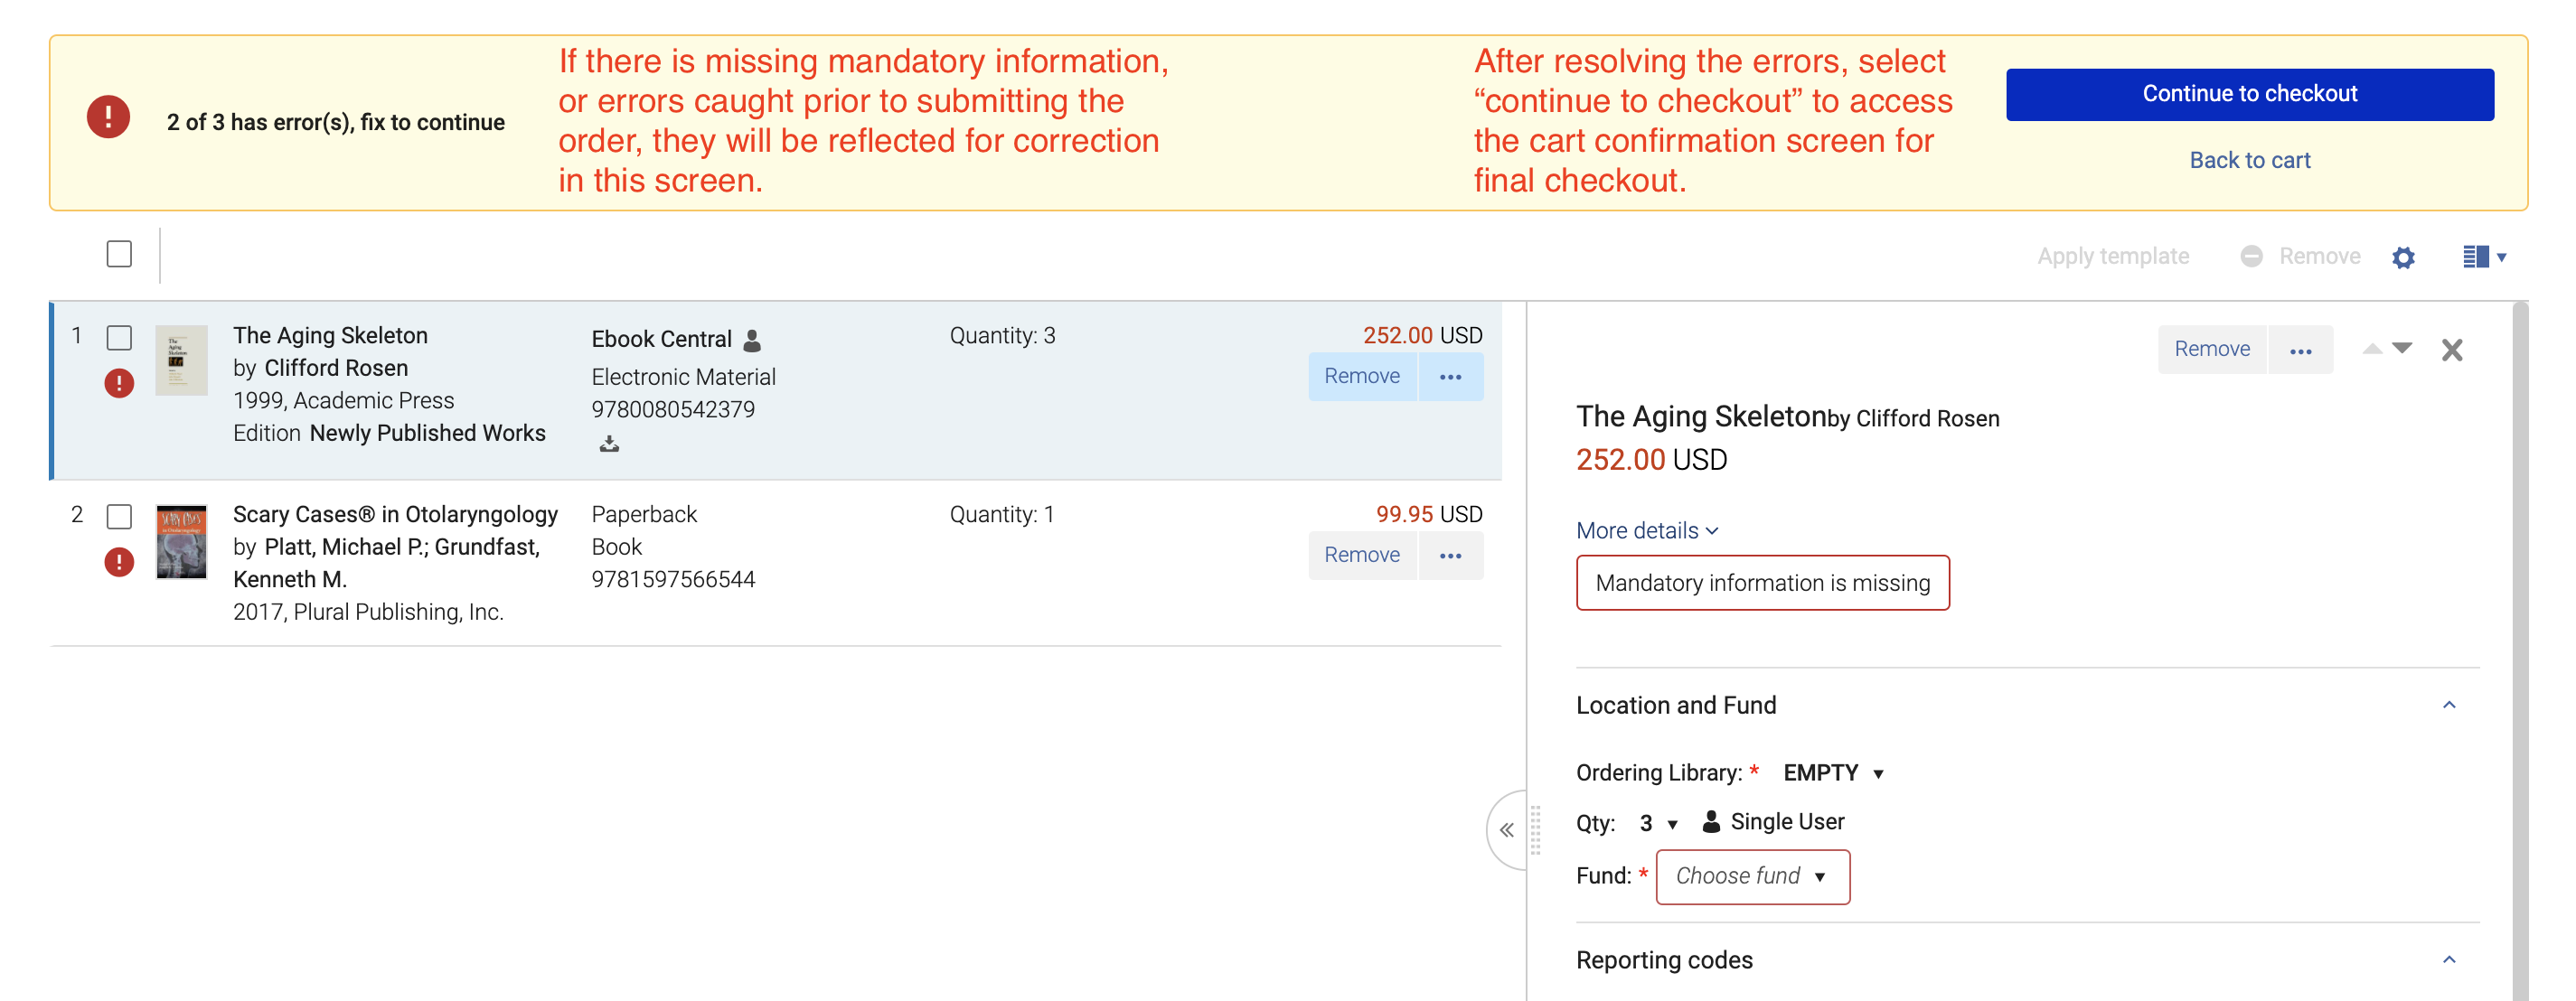 The
The Alert icon indicates that information is missing or is incorrect. The icon appears in the following cases:
- When the order does not have a location or fund selected and they need to be selected,
- When the selected fund is out of budget, and needs to be replaced with an alternate,
- When the offer is no longer available in the market and needs to be replaced or removed,
- When you do not have access to the platform for the offer and the offer needs to be removed or replaced,
- When the MMS ID is invalid. This occurs when an item was added to the cart, but then its brief record has been deleted in Alma. The offer needs to be removed or replaced.
- If you have submitted an order for approval in error, you can reject or move the offer back to your cart to continue editing from the Order History page. See Monitoring the Order Status for more details.
- Select Continue to checkout in the prompt message to continue to cart submission.
-
In the Shopping Cart page, select the offer(s) you want to delete. Then, at the top right, select Remove.
Personalized and Institution-level Cart Customization
The following customizations can be implemented on the Cart page:
- Any user can configure the display of detailed information that appears in the Details pane about the selected item in the cart. They can choose to hide sections of information that are redundant for their work, and/or change the order in which the sections appear. Users with the role of Rialto Administrator can also configure the default settings for the entire institution.

- Any user can configure the facet display. They can choose to hide facets that are redundant for their work, and/or change the order in which the facets appear in the Facets pane. Users with the role of Rialto Administrator can also configure the default facet settings for the entire institution.
- Users with the role of Rialto Administrator can configure which of the Cart fields are mandatory. This is configured for the entire institution.
These settings can be accessed by selecting ![]() . For additional information, see Institution-level Customizations. For general information about customization settings, see New Layout in the Alma documentation.
. For additional information, see Institution-level Customizations. For general information about customization settings, see New Layout in the Alma documentation.


