
Configuring Discovery Interface Display Logic for Primo VE
Configuring Display Logic Rules
- General System Administrator
- Fulfillment Administrator
For a concise "How To" format of the topics covered on this page, see Defining Link Resolver Library Preferences.
Display logic rules define when the following fulfillment services should not appear in Primo and Primo VE:
-
Booking request – Request to reserve an item at a specific time.
-
DB service – Link to the core interface of a third-party database.
-
Digitization – Request to have an item or part of an item scanned so that it can be viewed on a computer.
-
Full text – View the full text for an item online.
-
General electronic services – Links that can be created by an institution for any purpose. For information about general electronic services (GES), see General Electronic Services.
-
General hold request – Request to have an item held at a circulation desk when the holdings record is empty or request an issue for a journal regardless of whether any of its issues have been cataloged. For more information on general hold requests, see Creating a General Hold Request.
-
Hold request – Request to have an item held at a circulation desk.
-
Open Access – View open access full text (for example, hide open access if full text exists or hide full text if open access exists).
-
Purchase request – Request an item to be purchased. For more information, see Purchase Requests.
-
Representation Delivery Service – View a digital item.
-
Resource sharing request – Request to retrieve an item from another institution when the patron's institution does not have the item.
-
Selected full text – Links to full text (full text may not be available to all articles in the Journal).
-
For more information about requests, see Requests in Alma.
-
For information on how to customize the request forms, see the following pages: Customizing Primo Request Forms for Primo, Customizing Primo Resource Sharing Forms for Primo, Configuring Request Forms for Primo VE, and Configuring Resource Sharing Request Forms for Primo VE.
-
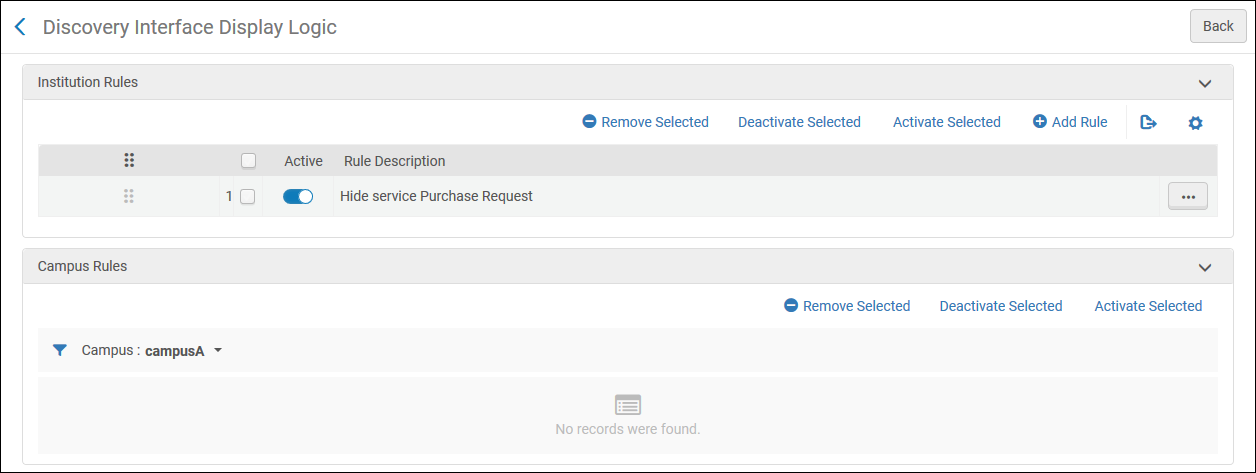
Display logic rules can be configured at the network, institution, and campus levels (if campuses are defined in the system). For configuring campus-level display logic rules, see Defining Display Logic Rules at the Campus Level.
-
If display logic rules are configured in the network, the behavior is affected by the network_display_logic_distribution_members_behavior and network_display_logic_rules_precedence customer parameters. See Configuring Other Settings (Fulfillment).
-
All relevant and applicable rules are applied. If a subsequent (lower) rule conflicts with a previous (higher) rule, Alma applies the first rule.
-
Add a display logic rule (see Adding Display Logic Rules)
-
Edit a display logic rule (select Edit from the row actions list)
-
Duplicate a display logic rule (select Duplicate from the row actions list)
-
Enable or disable a display logic rule. Each row can be enabled or disabled individually with the Active slider. Or select a group of rules and select Deactivate Selected or Activate Selected from the actions.
-
Delete a display logic rule (select Remove from the row actions list)
For examples of working with discovery display logic, see Display Logic Rules Examples.
The following display logic rules are available out-of-the-box. These rules are active, by default:
-
Hide service Representation Quick Access – hides the Quick Access section in Primo and Primo VE.
For Quick Access to be available, you must enable the New Digital Viewer. For more information, see To configure the Digital Viewer.
-
Hide service Representation Quick Access with Obtrusive Copyrights (Alma representations only) = true – hides representations with obtrusive copyrights from the Quick Access section in Primo and Primo VE.
-
Hide service Representation Delivery Service with Usage Type = Auxiliary – hides representations with the usage type of Auxiliary from the Quick Access section in Primo and Primo VE.
Adding Display Logic Rules
You can add new display logic rules. Rules apply for all libraries in the institution. By default, new rules are enabled.
Representation-related services (such as Representation Quick Access) are applicable to Alma-D records only.
-
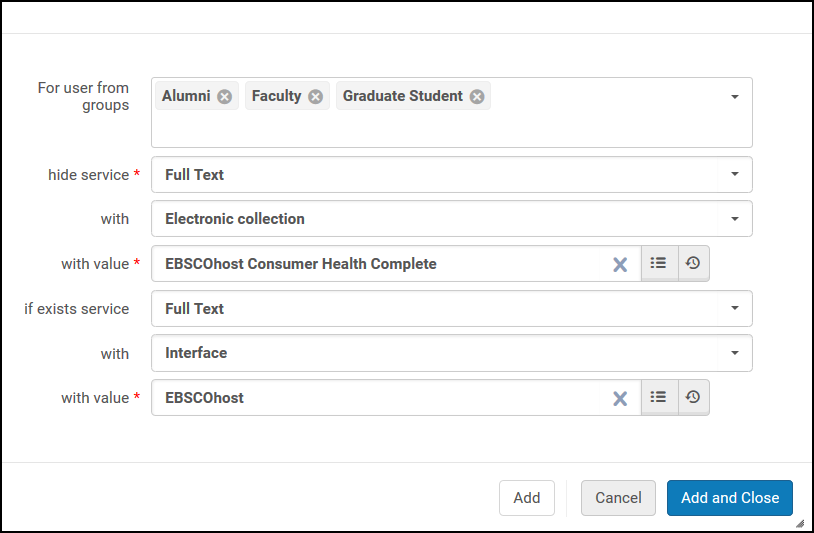
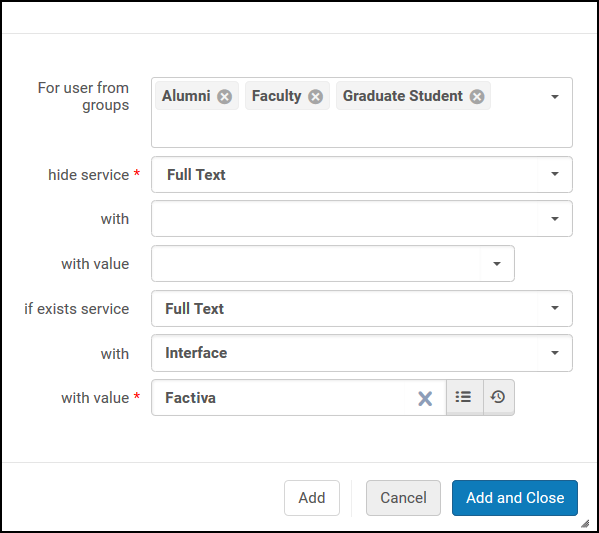
On the Discovery Interface Display Logic page (Configuration Menu > Fulfillment > Discovery Interface Display Logic > Display Logic Rules), select Add Rule. The Add Rule dialog box appears.
-
From the For user from groups drop-down list, select one or more groups to which to apply the rule. If you do not select a group, the rule applies to all user groups.
-
In the hide service drop-down list, select the service(s) that the rule should hide. For some services (for example Full Text), the with and with value fields appear, enabling you to select additional options for this service. The fields that appear depend on your selection. See the following table.
Add Rule Fields hide service with with value Booking, Digitization, General Hold Request, Hold Request N/A N/A DB Service Electronic Collection Select one or more electronic collection name(s). Full Text, Selected Full Text, General Digitization Request Interface Select one or more interface or electronic collection name(s). Both Community Zone and local interfaces are available.Electronic Collection General Electronic Service Service Select a general electronic service. Open Access
Note that this service appears when the enable_open_access_services_from_unpaywall_api customer parameter is set to true. See Open Access for more information.
N/A
N/A
Purchase Request Availability by the campus Select true to hide the service if the physical resource cannot be requested for availability on the campus. Otherwise, select false. Availability by the institution Select true to hide the service if the physical resource cannot be requested for availability on the institution. Otherwise, select false. Ownership by the campus Select true to hide the service if the resource cannot be requested due to physical ownership by the institution. Otherwise, select false.
To enable self-ownership checks to be performed for serial titles, make sure to set the parameter check_self_ownership_serial to true.
See also Configuring Other Settings (Fulfillment).To block requesting resources owned by the institution in a non-physical format, set the if exists service field as follows:- For digital resources – representation delivery service
- For electronic resources – full text
Ownership by the institution Select true to hide the service if the resource cannot be requested due to physical ownership by the institution. Otherwise, select false.
To enable self-ownership checks to be performed for serial titles, make sure to set the parameter check_self_ownership_serial to true.
See also Configuring Other Settings (Fulfillment).To block requesting resources owned by the institution in a non-physical format, set the if exists service field as follows:- For digital resources – representation delivery service
- For electronic resources – full text
Representation Delivery Service,
Representation Quick AccessAccess Rights Select true to hide the service if the resource has access rights configured. Otherwise, select false. Public Note Hide a representation in Primo, depending on the value of the Public Note field of the representation. The following are examples of regular expressions with which you can configure the Display Logic Rules to hide representations when the expressions are in the Public Note field. A flag can be used to determine if the expression is case sensitive or not:- /Restricted Access/ - Matches a public note containing the phrase Restricted Access, case sensitive.
- /Restricted Access/i - Matches a public note containing the phrase Restricted Access, case insensitive.
- /^(?!Open Access$)- Matches a public note that does not equal Open Access, case sensitive.
- /^((?!Open Access).)*$/i - Matches a public note that does not contain the phrase Open Access, case insensitive.
Usage Type Select primary (master) to hide the service for representations with the usage type of primary (master) and select derivative to hide the service for representations with the usage type of derivative. Representation Type Select remote to hide the service for remote representations and select non-remote to hide the service for remote representations. Viewer Select a viewer to hide the service if the resource is configured to be displayed by that viewer.
For Quick Access to be available, you must enable the New Digital Viewer. For more information, see To configure the Digital Viewer.
Obtrusive Copyrights (Representation Quick Access only) Hide the service if the resource is configured with obtrusive copyrights enabled. Resource Sharing Request Availability by the campus Select true to hide the service if the resource is available on campus. Otherwise, select false. Availability by the institution Select true to hide the service if the resource is available at the institution. Otherwise, select false. Ownership by the campus Select true to hide the service if the resource is owned by the campus. Otherwise, select false. Ownership by the institution Select true to hide the service if the resource is owned by the institution. Otherwise, select false. Resource Sharing System Select a resource sharing system. Resource typeSelect a resource type for which the resource sharing link will be hidden.The with value kit, is only supported for Primo VE customers, not Primo customers. -
If you want hide a service, only in the case when another service already exists, in the If exists service multiple select drop-down list, select the other service(s).
For some services (for example Full Text), the with and with value fields appear, enabling you to select additional options for this service. See the table above for information about the fields.
For resource sharing requests, if a resource has holdings without items, it is not considered self-owned. To hide resources that have holdings without items, hide the Resource Sharing Request service if the General Hold Request service exists.
-
Select one of the following:
-
Add – Add the rule but leave the dialog box open so that you can add additional rules.
-
Add and Close – Add the rule and close the dialog box.
-
-
If you define more than one rule, on the Discovery Interface Display Logic page, use the Move Up and Move Down arrows to set the order of the rules. Alma applies the enabled rules in the configured order.
Display Logic Rule Examples
EBSCOhost is identified as the interface in this example.
Configuring Related Record Services
-
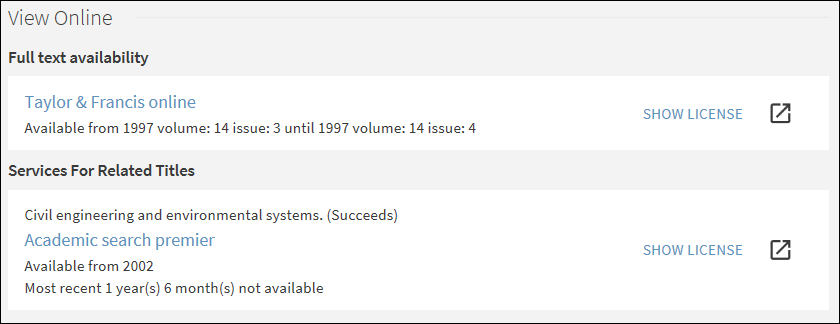
Articles sought by users may be available only in related versions of the journal.
-
Metadata in the OpenURL can be for one publication, but in fact, a related journal by another name is what the end user sought.
-
Vendors may list previous or newer versions in their holdings causing inconsistencies in the Community Zone. For example, the journal Civil Engineering Systems is now named Civil Engineering and Environmental Systems.
-
To configure close relations to appear in the same section as the related titles in View It, see the Display closely related record services option in Enabling the Display of Related Records in Primo VE.
-
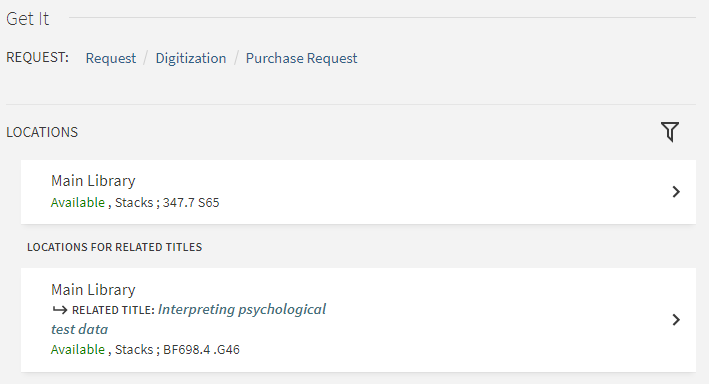
For Get It, the related records appear under the Locations for Related Titles section, regardless of this configuration.
In cases where a series linking field (such as 830.w) does not have a matching record with the specified record number (such as in the 035 field), Primo VE provides a link that performs an exact search by title (instead of a direct link to the missing referenced record). For cases in which an IZ record links to a record in the NZ, the NZ record should be localized to allow the system to create a direct link from the IZ record to the referenced record.
The following table presents the correlation between the MARC fields defined in the bibliographic record and the out-of-the-box labels that appear for each type of relation in View It / Get It.
Enabling the Display of Related Records in Primo VE
- General System Administrator
- Fulfillment Administrator
-
Open the Related Record Services Configuration page (Configuration Menu > Fulfillment > Discovery Interface Display Logic > Related Records).
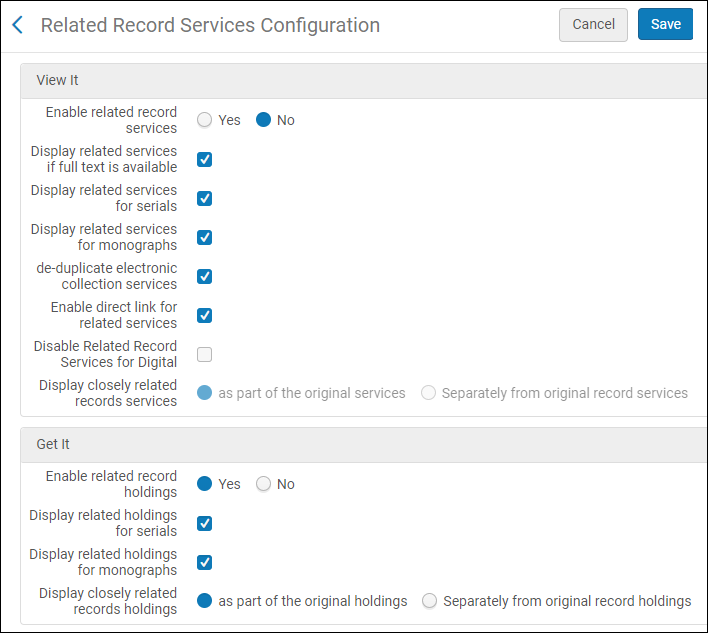 Related Record Services Configuration Page
 -
For electronic inventory, refer to the following table to configure how related records display in View It. For more information, see Configuring Related Records for Electronic Services and Modifying the Display Labels for Related Electronic Services.
Related Record Services Configuration Options – View It Section Parameter Description Enable related record services
Select Yes if you want to display a record's related titles in View It. If enabled, the remaining fields allow you to restrict or modify the display of related titles for specific types of records.
Display related services if full text is available
Display services for related records if full text is available. Services for related records are not shown if there is a full-text service for the original record in the OpenURL.
Display related services for serials
Display related services for serials (which have a Journal material type).
Display related services for monographs
Include related services for monographs (which have a Book material type).
Deduplicate electronic collection services
Use deduplication of electronic collection services for remote related services. This causes Primo to display only one service if related records are associated with the same electronic collection.
Enable direct link for related services
Turn on the direct-linking feature.
Disable Related Record Services for Digital
Disable the display of related records for digital records.
Display closely related record services
How closely related services (defined with MARC 773 or 774 fields in the bibliographic record) should appear in View It:
-
As part of the original services – Closely related services are placed in the list of regular services in View It with no indication that these services are for related titles.
-
Separately from the original record services – Closely related services are placed under the Services for Related Titles section in View It.
-
-
For physical inventory, refer to the following table to configure how related records display in Get It. For additional information, see Configuring Related Records for Physical Inventory.
Related Record Services Configuration Options – Get It Section Parameter Description Enable related record services
Select Yes if you want to display a record's related titles in Get It. If enabled, the remaining fields allow you to restrict or modify the display of related titles for specific types of records.
Display related holdings for serials
Select this option to display the related holdings records for serials.
Display related holdings for monographs
Select this option to display the related holdings records for monographs.
Note that for monographs, related inventory appearing in Get It is considered when fulfilling title-level requests placed by the patron. If you disable the display of related records for monographs, the related records’ inventory that isn’t displayed is not considered when fulfilling title-level requests.
Display closely related records holdings
Select one of the following options to indicate how you want the closely related records (which are defined with MARC 773 or 774 fields in the bibliographic record) to appear in Get It:
-
As part of the original holdings – Closely related records are placed in the list with the original holdings in Get It with an indication that these are related holdings, including title and relation type.
-
Separately from the original record holdings – Closely related records are placed under the Locations for Related Titles section in Get It. See c.uresolver.getit2.display_related_holding_separately_from_original_record in the table above for more information.
- For Primo VE, related records are displayed separately, regardless of this setting.
- A maximum of 10 Locations for Related Titles display by default. To increase the maximum number of locations, edit the max_holding_per_record parameter in the Discovery Customer Settings mapping table (Configuration Menu > Discovery > Other > Customer Settings).
-
-
Select Save.
Enabling Direct Linking
- Fulfillment Administrator
- General System Administrator
Direct linking configuration enables Alma to skip the Services page and menu and link immediately to a digital or an electronic service (such as full text) when coming from an OpenURL-enabled source. If the OpenURL context object contains multiple digital or electronic services, the OpenURL link resolver displays the first service in the list (if the Enable direct linking and Enable direct linking when multiple services are available options are enabled). You can configure the order of the services in the Online Services Order page (see Configuring Online Services Order).
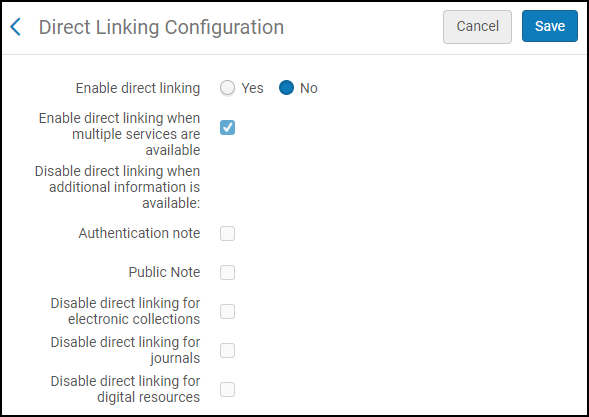
You configure direct linking on the Direct Linking Configuration page (Configuration Menu > Fulfillment > Discovery Interface Display Logic > Direct Linking). On this page you can enable direct linking and specify situations in which direct linking is overridden.
-
You can only configure direct linking at the institution level. Select the required institution from the Configuring filter on the Fulfillment Configuration page.
- When direct linking is enabled, there is a known issue when testing access from Alma. For more details, see Test Access for a portfolio in Alma opens a blank tab.
-
On the Direct Linking Configuration page (Configuration Menu > Fulfillment > Discovery Interface Display Logic > Direct Linking), select Yes from the Enable direct linking parameter to enable direct linking.
Selecting No indicates that the electronic service is not accessed directly from the search results in Primo, and users must select the service from a list provided by your link resolver (SFX or Alma).
Selecting Yes enables direct linking and the other configuration parameters.
-
Configure the other parameters which allow you to control direct linking based on the record. Refer to the table below for an explanation of your options.
Direct Linking Configuration Options Parameter Description Enable direct linking when multiple services are available
Enable direct linking even when more than one digital or electronic service is available for the record.
Disable direct linking when Open Access service is available
Select this option to disable direct linking when an Open Access Service is available. See Open Access for more information.
Disable direct link when additional information is available:
-
Authentication note
-
Public Note
Disable direct linking even when additional information is available for the record.
Authentication noteDisable direct linking when a record's services contain an authentication note.Public noteDisable direct linking when a record's services contain a public note.Disable direct linking for electronic collections
Select this option to disable direct linking when the first service (result) in the View It service list is a match between the search in the discovery system and the electronic collection's bib record. The electronic collection’s level URL will appear first in the View It service list in two cases:
-
It is the only service available in the View It service list (single result in the View It).
-
The electronic collection service result is configured to appear first in the View It service results list via the Online Services Order and Display Logic Rules configurations. See Configuring Online Services Order and Configuring Display Logic Rules for more information.
Disable direct linking for journals
When Yes is selected for Enable direct linking and Disable direct linking for journals is selected, direct linking is disabled under the following conditions:
-
When the Electronic material type for a portfolio is set to Journal.
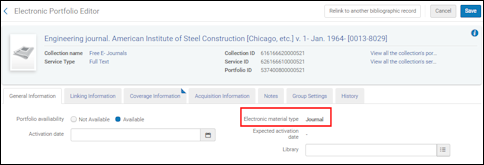 Electronic Material Type Set to JournalAny other electronic material type setting will not be considered and treated like a journal.
 -
When Alma determines from the OpenURL that there is no indication of article-level attributes like the following:
-
Page(s) indication (rft.spage, rft.epage, rft.pages)
-
Doi (rft_id" source1="(info:doi/.*)|(doi:.*))
-
Pmid (rft_id" source1="(info:pmid/.*)|(pmid:.*)
For example:…&rft_id=pmid:28274348&…) -
Oaid (rft_id" source1="(info:oai/.*)|(oai:arXiv:.*))
-
The setting for the Linking level parameter in the Electronic Service Editor is ignored, even when it is set to Journal.Related to disabling direct linking to journals, the following OpenURL attributes are supported:
-
Force_direct=true – This overrides any Alma configuration regarding direct linking and forces using direct linking.
-
Force_direct=false – This overrides any Alma configuration regarding direct linking and does not force using direct linking.
-
sfx.directlink=force – This is treated like Force_direct=true.
-
“disable_directlink=true&sfx.directlink=off” – This is treated like Force_direct=false.
If both an enable direct linking and a disable direct linking attribute are stated in an OpenURL, the attribute related to disabling direct linking takes priority.Disable direct linking for digital resources
Permits institutions to enable direct linking for electronic resources, while disabling only for digital resources.
-
-
Select Save.
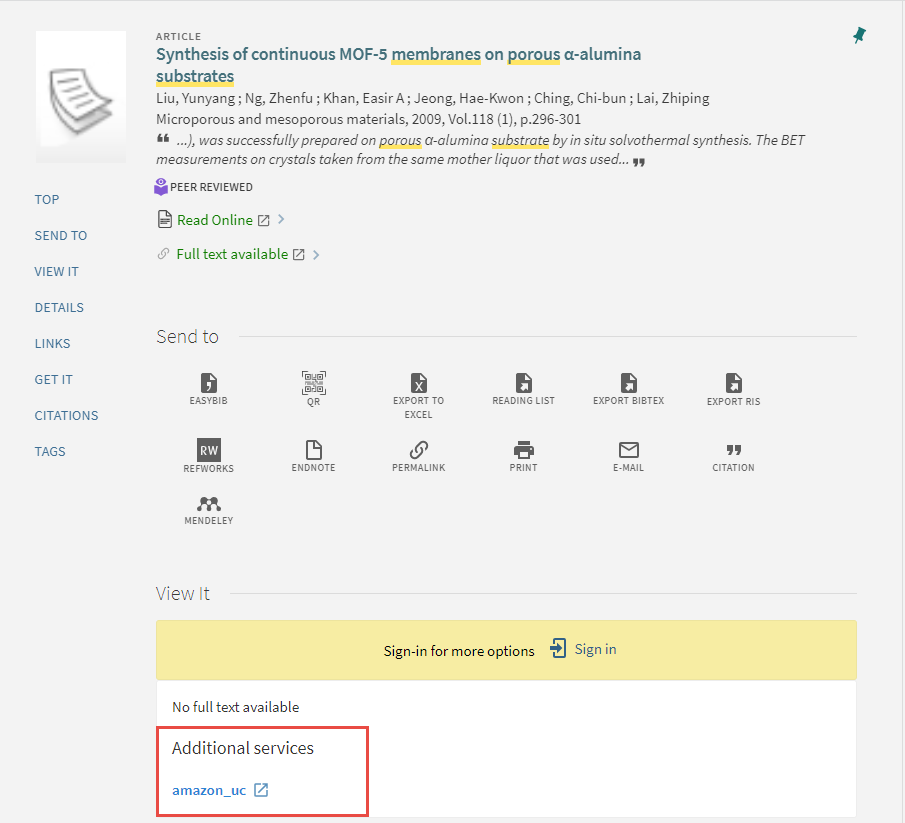
Configuring General Electronic Services
To configure general electronic services, you must have one of the following roles:
-
General System Administrator
-
Fulfillment Administrator
In addition to services found in your own collection (such as full text, requests, and so forth), Alma enables you to define general HTTP services (such as searches in ProQuest dissertations and Amazon.com, Ask a Librarian, and so forth) to present to patrons in the View It, Get It, and How to Get It sections on the record's full display page. Services that allow users to access or purchase the materials are considered delivery-related and will appear in the View It, Get It, and How to Get It sections on the record's full display page.
To have these services appear in Leganto, see Enabling General Electronic Services in Leganto.
In order to create a general electronic service, you must be familiar with the syntax of the service’s URL, which includes any parameters that are required to query or access specific information from the service. The service’s URL along with OpenURL context object attributes returned from Alma’s link resolver are used to define the URL template, which Alma uses to create the service link that appears in View It and/or Get It.
In addition, you can configure the following display settings for general electronic services:
-
Specify service order – see Configuring General Electronic Services Order
-
Define display logic rules – see Configuring Display Logic Rules
You can also share your general electronic services in the Community Zone, and use general electronic services defined by other institutions. See Sharing General Electronic Services in the Community Zone.
It is recommended to use ExLibris' Unpaywall service in View It and not an externally used customer Unpaywall GES. This is because the open access in ExLibris' Unpaywall service is 100% available.
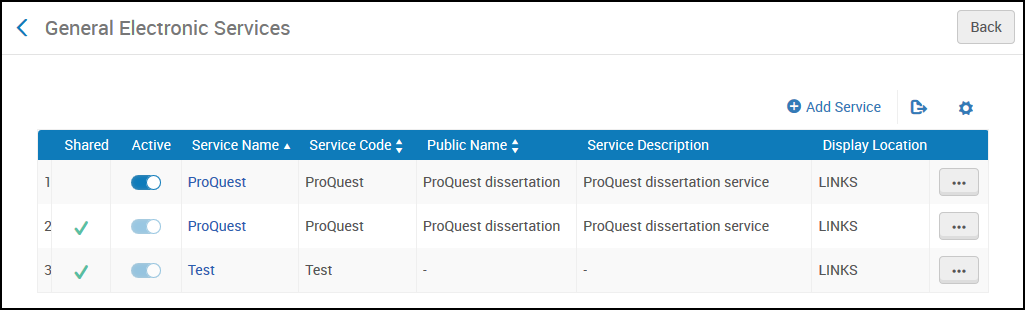
- Open the General Electronic Services Configuration page (Configuration Menu > Fulfillment > Discovery Interface Display Logic > General Electronic Services).
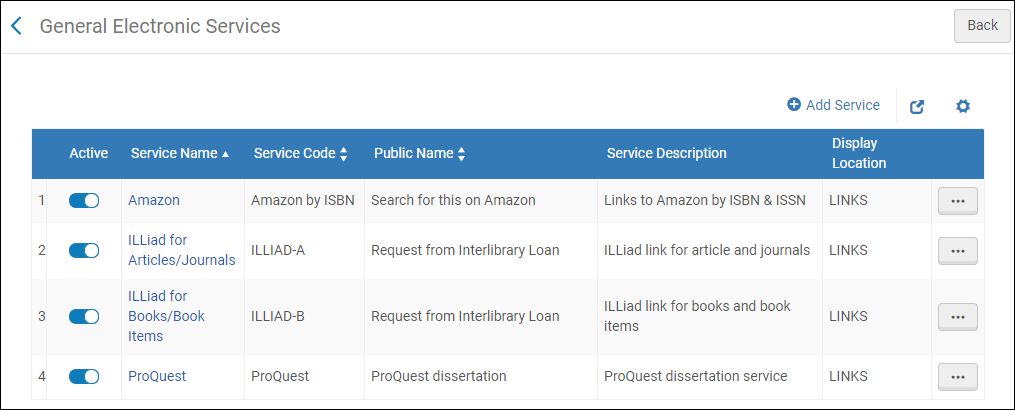 General Electronic Services List (Alma-Primo)
-
The Item Level column is hidden by default; you can add it to the table by selecting the Manage Column Display icon above the table.
-
The Is this a Document Delivery/ILL Service column is available only with Primo VE and Alma-Summon environments.
-
-
Select Add Service. The Add Service dialog box opens.
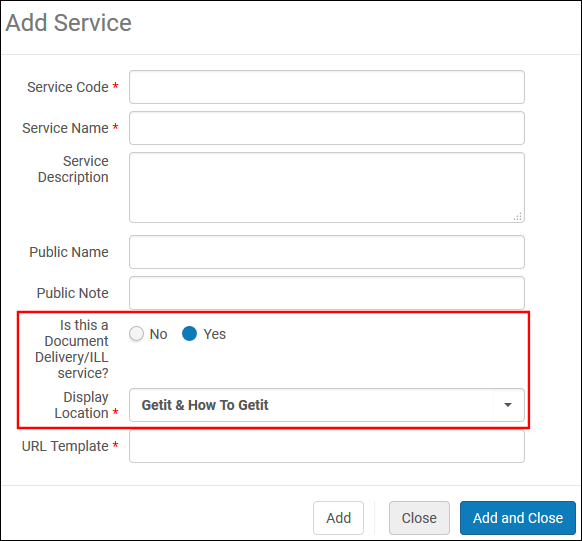 Add Service Dialog Box
Unless otherwise noted, all fields are supported in the following environments: Alma-Primo, Primo VE, and Alma-Summon.
-
Enter the following service information:
-
Service Code – The internal code for the service.
-
Service Name – The internal name used for the service.
-
Service Description – The description of the service.
-
Public Name – The label for the link that displays in View It and/or Get It.
-
Public Note – The note or description of the service that displays below the link in View It and/or How To GetIt.
-
Is this a Document Delivery/ILL service – Select Yes to indicate that this service is delivery-related and provides access to the resource. Select No to indicate that this service is not delivery-related and will appear under the Links section.
This field is not available with Alma-Primo environments.
-
Display Location – Specify the section on a record's full display to which you want to display the GES link. The following table lists the available options per customer environment:
The Display Location is only displayed if Is this a Document Delivery/ILL service is selected Yes.
The Display Location is not displayed if Is this a Document Delivery/ILL service is selected No.Alma-Primo Primo VE and Alma-Summon - Getit
- Viewit
- Getit & Viewit
- None – Services appear under the Links section in the record's full display.
- Getit & How to Getit
- Viewit & How to Getit
- Getit, viewit, and How to Getit
- None – Services appear under the Links section in the record's full display.
The How to Get It section displays only when a record has no inventory. Typically, the How to Get It section is used for resource sharing and relevant ILL service links.
-
For Primo VE and Alma-Summon only, this field appears only when the Is this a Document Delivery/ILL Service field is set to Yes.
-
The display of general electronic services is based on the service's availability rules that are defined with the Service Availability Rules tab, which appears while editing a general electronic service. For more details, see step 5. See Configuring Display Logic Rules if you want to hide the general electronic service based on additional criteria (such as the existence of another type of service or the type of user).
-
URL Template – The URL where the patron is redirected when the external service link is selected. The external service link is comprised of the base URL of the service, and any parameters that are required to query or access specific information from the service. It is formatted according to the syntax of the URL of the service. For more information, see URL Template.
-
Item Level – Select Yes to show the link next to each item that matches the input rules. Select No to show the link at the holding level.
- This option displays only when the value of the Display Location field includes GetIt.
- To prevent potential performance issues, Item-level General Electronic Services cannot be used for the If Exists portion of Display Logic Rules.
For more information, see Item-Level General Electronic Service.
-
-
Select Add and Close. The new service appears on the General Electronic Service page with the following row actions: Remove and Edit.
-
Edit the new row to configure additional service details.
The Service Details page appears.
 Service Details Page (Service Details Tab)
 -
To display this service to signed-in users only, select No in the Enable without login field.
-
To hide this service based on the availability of the physical resource in the institutional repository, select one of the following options for Disable Service:
When a guest user or a user without a configured campus performs any of the campus-level disabling activities, Alma disables/hides the service based on a self-ownership check done at the institution level.
-
Never – The service is never disabled.
-
When resource is owned by the campus – The service is disabled when physical items for the resource are owned by the campus.
-
When resource is owned by the campus and available – The service is disabled when physical items for the resource are owned by the campus and are available (that is, they are not involved in a process).
-
When resource is owned by the institution – The service is disabled when there are physical items for the resource that are owned by the institution.
-
When resource is owned by the institution and available – The service is disabled when there are physical items for the resource that are owned by the institution, are in place, and are in an open location. Note that if a physical location is set to Unavailable (see Adding a Physical Location) and this option is selected, the service is enabled. You may want to use this option when items in a certain location (such as a reading room) cannot be requested. Setting this location to Unavailable will enable the display of the service.
-
-
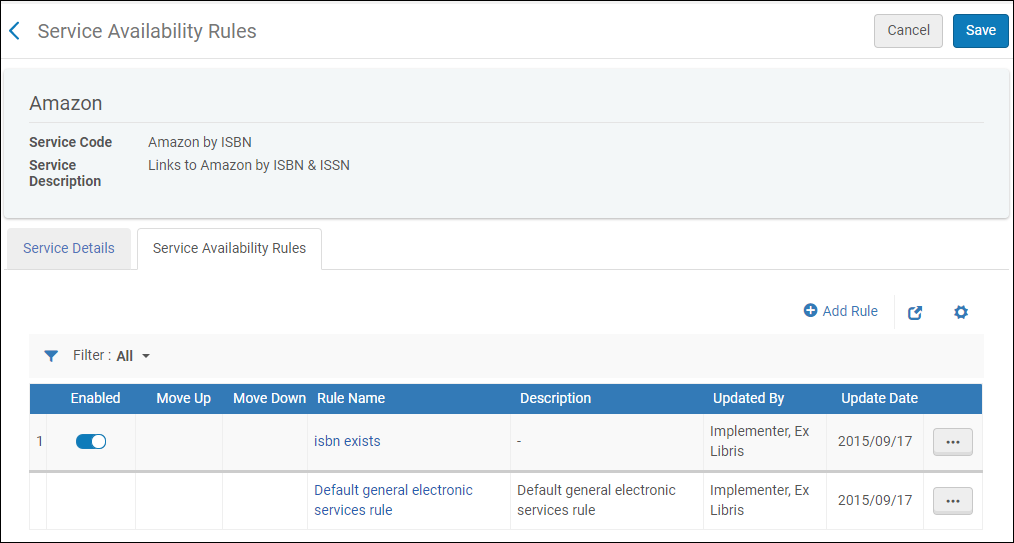
Select the Service Availability Rules tab.
The Service Availability Rules tab displays the rules that the system uses to determine whether a service should be hidden from the user. Each service has a default rule that is applied when none of the other rules apply. The Default general electronic service rule hides the service by default (IsDisplay=False). You can edit the default rule and add rules as needed.
 Service Availability Rules Tab
 -
Add rules regarding the OpenURL context object attributes (which may be returned by Alma’s link resolver during the user’s search) to ensure that Alma has the necessary information to display the service.
-
The available attributes are standard OpenURL attributes. For more information, see Commonly Used OpenURL Attributes for the URL Template.
-
The following item level attributes may be used when item level services are configured:
-
material_type
-
item_policy - values are populated from the institution's Item Policy table. See Configuring Item Policies.
-
process_type
-
base_status - values are Item not in place and Item in place.
-
storage_location_id
-
item_call_number
-
-
Adding parameters within a rule will cause the parameters to have an AND relationship with each other, meaning that all values must be true before the rule is considered true. For OR conditions, where only one value must be true, parameters should be entered separately in a new rule.
-
If multiple rules evaluate to true, the output parameter will be applied based on the first rule that is true.
-
To add a new rule, select Add Rule. The Edit Rule page opens.
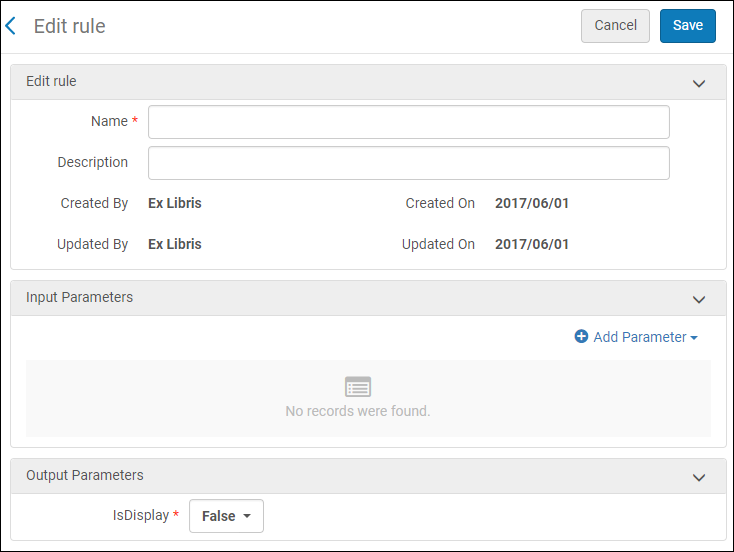 Edit Rule Page
 -
In the Edit Rule section, enter the rule name (required) and description (optional).
-
In the Input Parameters section, select Add Parameter. The Add Parameter dialog box opens.
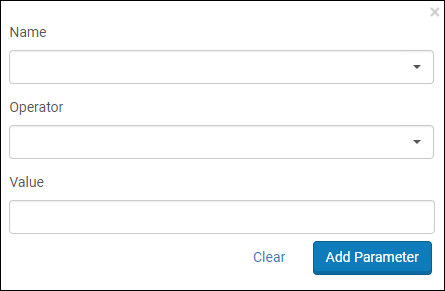 Edit Rule Page
 -
Enter the following fields:
-
Name – The name of the attribute in the OpenURL context object. For more information about these attributes, see Commonly Used OpenURL Attributes for the URL Template.
-
Operator – The comparison operator to use with this context object attribute.
-
Value – An accepted value for this parameter. To match multiple values, create a separate rule for each value. Note that not all operators require a value.
-
-
Select Add Parameter. The parameter is added to the input parameter list.
-
In the Output Parameters section, set IsDisplay to true.
-
Select Save. The Service Availability Rules page displays the new rule.
-
-
Select Save. The General Electronic Services page displays the new service.
In a collaborative network, you can create general electronic services in the Network Zone and then distribute them to member institutions. The member institutions have view permission to the distributed records but are not able to edit or delete them. When the Network Zone general electronic service has been distributed, the local list will show either the distributed records only or both the distributed records and the previous local general electronic service records, depending on the configuration in the customer parameter, network_ges_distribution_members_behavior.
For more information, see Configuring Fulfillment Information in the Network Zone.
URL Template
The URL substitutes OpenURL fields that are enclosed in brackets ( "{" and "}") with the relevant values. For example, the referring URL’s ISBN is substituted into a URL containing: ...&isbn={rft.isbn}&...
For example, the URL for an Amazon search for a specific ISBN:
When connecting to a resource sharing broker, ensure that this field contains an attribute corresponding to the broker in use. For example, when using the OCLC broker:
ILLiad - Books/Book Items (based on your institution’s base URL). For example:
ILLiad - Articles/Journals (based on your institution’s base URL). For example:
ProQuest - Dissertation Service. For example:
The following values can be specified in the URL Template parameter between the curly brackets used for normalizing the ISBN, ISSN, eISBN, or eISSN:
-
rft.normalized_isbn
This normalization removes the text after digits and the hyphen (-) and converts ISBN 10 to ISBN 13
-
rft.normalized_issn
This normalization removes the text after digits and changes text to lower case.
-
rft.normalized_Eisbn
This normalization removes the text after digits and the hyphen (-) and converts ISBN 10 to ISBN 13.
-
rft.normalized_Eissn
This normalization removes the text after digits and changes text to lower case.
For more information regarding OpenURL, refer to the following:
-
Specific vendor web sites for OpenURL details
Commonly Used OpenURL Attributes for the URL Template
The following table describes general categories by which the OpenURL attributes returned from Alma’s link resolver are grouped.
| Category | Prefix | Description |
|---|---|---|
| Requester | req. | Information about the requesting entity, that is, the patron. Not used when creating service availability rules for general electronic services. |
| ReferringEntity | rfe. | Information about the referring entity, i.e. Primo. Not used when creating service availability rules for general electronic services. |
| Referent | rft. | Information about the requested item. |
| ServiceType | svc. | Whether a particular format of the Referent is available: "yes" or "no". For example, whether the requested target is available as an abstract or as full text. Multiple service types may be available. |
| Other | various | Other returned values are unused, unless noted below. |
| Attribute | PNX Mapping | MARC 21 Fields | Description |
|---|---|---|---|
| req_id | The PDS handle (see Identify Patrons to Provide Relevant Services) | ||
| rft.advisor | Advisor, for a dissertation | ||
| rft.applcc | Application country code in ISO two-character format, for a patent. The country in which the patent application was main. | ||
| rft.appldate | Date of application for a patent | ||
| rft.applyear | Year of application for a patent | ||
| rft.artnum | addata/artnum | Article number. Assigned by the publisher. A URL may be the only usable ID for an online article. | |
| rft.assignee | Assignee, for a patent: "Smith, John J.", "IBM" | ||
| rft.atitle | addata/atitle | Article or chapter title | |
| rft.au | addata/au | 100 or 110 or 111 | One author's full name: "Smith, Fred James Jr." |
| rft.aucorp | addata/aucorp | Organization or corporation that created document: "Mellon Foundation" | |
| rft.aufirst | First author's given name: "Fred James" May have spaces and punctuation. | ||
| rft.auinit | addata/auinit | First author's first and middle initials | |
| rft.auinit1 | addata/auinit1 | First author's first initial | |
| rft.auinitm | addata/auinitm | First author's middle initial | |
| rft.aulast | addata/aulast | First author's last name: "Smith" May have spaces and punctuation. | |
| rft.ausuffix | addata/ausuffix | First author's name suffix: "Jr." etc. | |
| rft.bici | addata/bici | Book Item and Component Identifier (BICI code) | |
| rft.btitle | addata/btitle | For the LDR positions, see Fields that Identify the Bibliographic Material Type. | Book title, if the LDR material_type = BK. See rft.jtitle. |
| rft.cc | Publication country code, in ISO two-character format: "US". See co. | ||
| rft.chron | Enumeration or chronology not in standard format: "1st quarter". Where possible, use date. See ssn and quarter. | ||
| rft.co | Publication country: "United States". See cc. | ||
| rft.coden | addata/coden | 030 a | CODEN (alphanumeric code) |
| rft.date | addata/date | Publication date. For a patent, this is the date that the patent was issued. Format is YYYY, YYYY-MM, or YYYY-MM-DD. | |
| rft.day | Publication day | ||
| rft.dcContributor | Dublin Core contributor: person, organization, or service | ||
| rft.dcCreator | Dublin Core creator: person, organization, or service | ||
| rft.dcDescription | Dublin Core description: abstract, table of contents, graphical representation, or free text | ||
| rft.dcFormat | Dublin Core format: File format, physical medium, or dimensions, such as MIME type | ||
| rft.dcIdentifier | Dublin Core identifier: Unambiguous resource identifier | ||
| rft.dcLanguage | Dublin Core language: Resource language | ||
| rft.dcPublisher | Dublin Core publisher: person, organization, or service | ||
| rft.dcRelation | Dublin Core relation: A related resource | ||
| rft.dcRights | Dublin Core rights: Rights information | ||
| rft.dcSource | Dublin Core source: A related resource from which this resource was taken | ||
| rft.dcSubject | Dublin Core subject: keywords and classification codes | ||
| rft.dcTitle | Dublin Core title: Resource title | ||
| rft.dcType | Dublin Core type: nature and genre, such as described by DCMITYPE. For format, see dcFormat. | ||
| rft.degree | Degree issued, for a dissertation | ||
| rft.doi | addata/doi | DOI (digital object identifier) field | |
| rft.edition | display/edition | 250 a | Book edition, typically a phrase, with or without numbers: "First edition", "4th ed.". |
| rft.eisbn | addata/eisbn | 020 a if there is no 020 e and the record is not physical; otherwise, 020 e | International Standard Book Number for electronic version. May be multiple ISBN, separated by commas. May contain a hyphen. May or may not be distinct from rft.isbn. |
| rft.eissn | addata/eissn | 022 a if there is no 022 e and the record is not physical; otherwise, 022 e | International Standard Serial Number for electronic version. May be multiple ISSN, separated by commas. May contain a hyphen. May or may not be distinct from rft.issn. |
| rft.epage | addata/epage | End page of article/chapter within volume/issue. | |
| rft.format | addata/format | MIME type of the format | |
| rft.genre | addata/genre | One of:
|
|
| rft.inst | Issuing institution, for a dissertation | ||
| rft.inventor | Inventor’s full name: "Smith, John J.". For a patent. | ||
| rft.invfirst | Inventor’s given names: "John J.". For a patent. | ||
| rft.invlast | Inventor’s last name: "Smith". For a patent. | ||
| rft.isbn | addata/isbn | 020 a if there is an 020 e; otherwise, 776 z if the record is not physical or 020 a if there is no 020 e and the record is physical | International Standard Book Number. Nine digits plus a check digit. May contain hyphens. |
| rft.issn | addata/issn | 022 a if there is no 022 e and the record is physical; otherwise, 022 a if there is an 022 e or 776 x if the record is not physical | International Standard Serial Number. May contain a hyphen. ISSN for a book may be associated with the series. |
| rft.issue | addata/issue | Journal issue: "Spring 1998". Typically numeric. | |
| rft.jtitle | addata/jtitle | For the LDR positions, see Fields that Identify the Bibliographic Material Type. | Full journal title, if the LDR material_type = CR. See rft.btitle. For example, "Journal of the American Medical Association". For short title, use stitle. |
| rft.kind | Patent kind code, for a patent: "AU A1". Kind codes are meaningful within the country of origin. | ||
| rft.lccn | addata/lccn | 010 a,z | Library of Congress control number |
| rft.mms_id | MMS ID of the item | ||
| rft.month | Publication month | ||
| rft.number | Application number, for a patent | ||
| rft.object_type | For the LDR positions, see Fields that Identify the Bibliographic Material Type. | The LDR material_type. The default is BOOK. | |
| rft.oclcnum | addata/oclcid | 035 a,z | OCLC control number or journal level OCLC number. May be multiple OCLC control numbers, separated by commas. |
| rft.pages | addata/pages | Start and end pages of article/chapter within volume/issue: "53-58". Can also contain pages not in sequence, e.g. "12-6,64-67". See spage and epage. | |
| rft.part | addata/part | Either a subdivision of, or in place of, volume. Examples: "B", "Supplement". | |
| rft.place | addata/cop | 260 a or 264 a | Publication place: "New York". |
| rft.prioritydate | Priority date for a patent | ||
| rft.pub | addata/pub | 502 a,c or 260 b or 264 b | Publisher name: "Harper and Row". |
| rft.pubdate | 260 c or 260 g or 264 c or 362 a or 008(date1) | Publication date, for a patent | |
| rft.publisher | 502 a,c or 260 b or 264 b | Publisher name | |
| rft.pubyear | Year of publication | ||
| rft.quarter | addata/quarter | Chronology: "1", "2", "3", or "4". For non-standard chronology, use chron. | |
| rft.series | addata/seriestitle | Title of the series that contains this book. There may also be an ISSN associated with the series. | |
| rft.sici | addata/sici | Serial Item and Contribution Identifier (SICI code) | |
| rft.spage | addata/spage | Start page of article/chapter within volume/issue | |
| rft.ssn | addata/ssn | Season: "winter", "spring", "summer", or "fall". For non-standard season, use chron. | |
| rft.stitle | addata/stitle | 245 a | Short journal title: "J Am Med Assn". For full title, use jtitle. |
| rft.title | 245 a,b | Book title (deprecated: use btitle), journal title (deprecated: use jtitle), dissertation title, patent title | |
| rft.tpages | Total pages: "392". Typically only for monographs (books and printed reports). May not be numeric: "F96". | ||
| rft.volume | addata/volume | Journal volume: "124". Typically numeric, but may be roman numerals, etc. | |
| svc.abstract | Abstract | ||
| svc.any | Any format | ||
| svc.citation | Citation | ||
| svc.fulltext | Full text | ||
| svc.holdings | Holdings information. This field is not used to hide services based on whether the record has holdings. If it is included in the OpenURL, it will be saved in the Context Object for use in the GES. | ||
| svc.ill | Interlibrary loan |
Item-Level General Electronic Services
When the General Electronic Service is added as an item-level service, you can configure the URL template to include the following Holdings and item-level information:
| Holdings/Item Element | Name of Placeholder |
|---|---|
| Current Library (Code) | library |
| Current Location (Code) | location |
| Current Call Number | call_number |
| Barcode | barcode |
| Material Type (Code) | material_type |
| Current Item Policy (Code) | item_policy |
| MMS ID | mms_id |
| Process Type (Code) | process_type |
| Item description | description |
| Storage Location ID | storage_location_id |
| Item Call Number | item_call_number |
In addition, it is possible to add fields from the Holdings record to the URL template. The placeholder syntax is HOL_{field}_{indicators}_{subfields}. The use of indicators is optional. For example:
-
HOL_506_ab - Alma will extract subfields a and subfield b from 506 field. Each subfield will be delimited from the next one with a space. The indicators are not taken into account.
-
HOL_506_12_df - Alma will extract subfields d and subfield f from 506 field only when indicators 1 and 2 exists. Each subfield will be delimited from the next one with a space.
-
HOL_506_1#_g - In this scenario, Alma will extract subfields g from 506 field only when the first indicator value is 1 with no dependency on the second indicator.
A sample URL template may be : <baseURL>?LIB={library}&BARCODE={barcode}&FIELD1={HOL_506_ab}.
Allow any Field from the Bibliographic Record to be Used when Defining a General Electronic Service
The "General Electronic Services Bib Fields Enrichment" configuration screen (Configuration > Fulfillment > Discovery Interface Display Logic) enables institutions to define which field will be extracted from the record's metadata and be available for use when defining an "Availability Rule" or enhancing the "URL template" field upon definition of a "General Electronic Service" (Configuration > Fulfillment > Discovery Interface Display Logic > General Electronic Services).
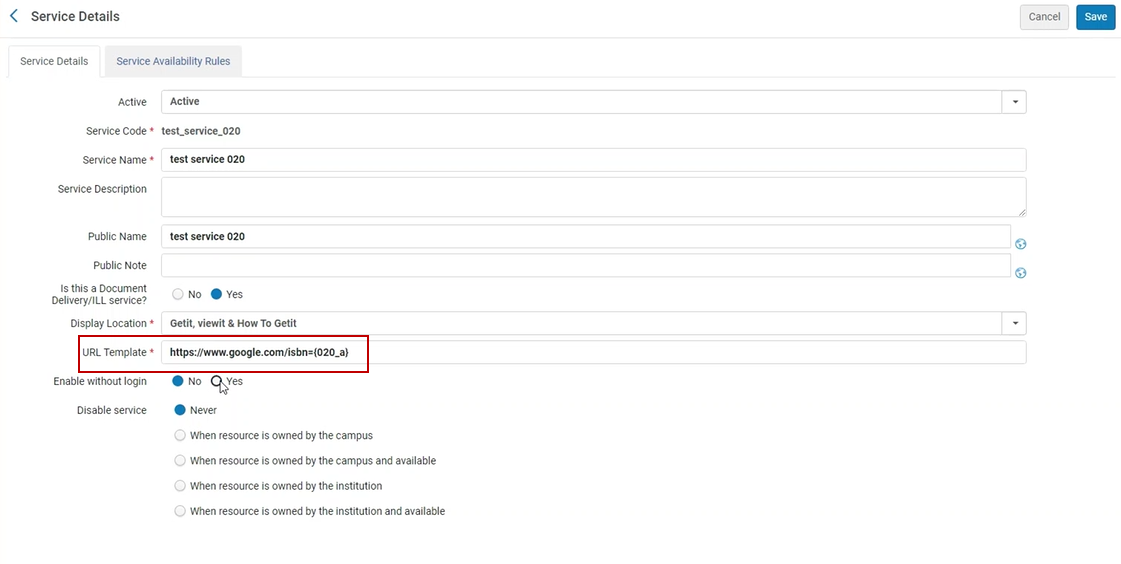
Below is an example workflow:
1. Access the new configuration screen and add a new row to point to the specific bibliographic field (020_a in the example).
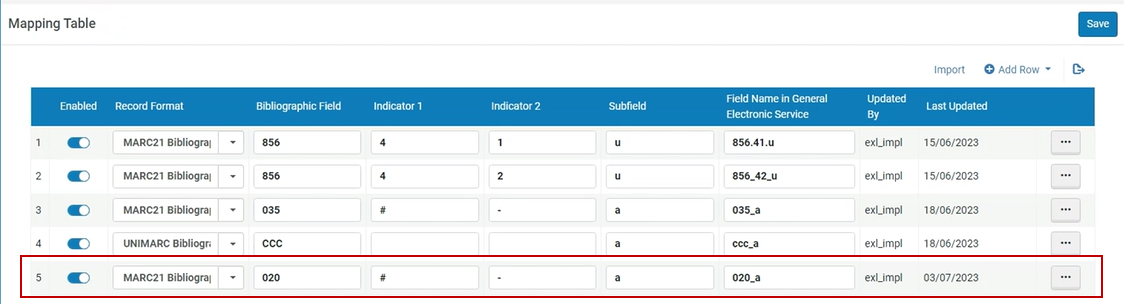
2. You can find the newly defined bibliographic field in the input parameters section of a rule.
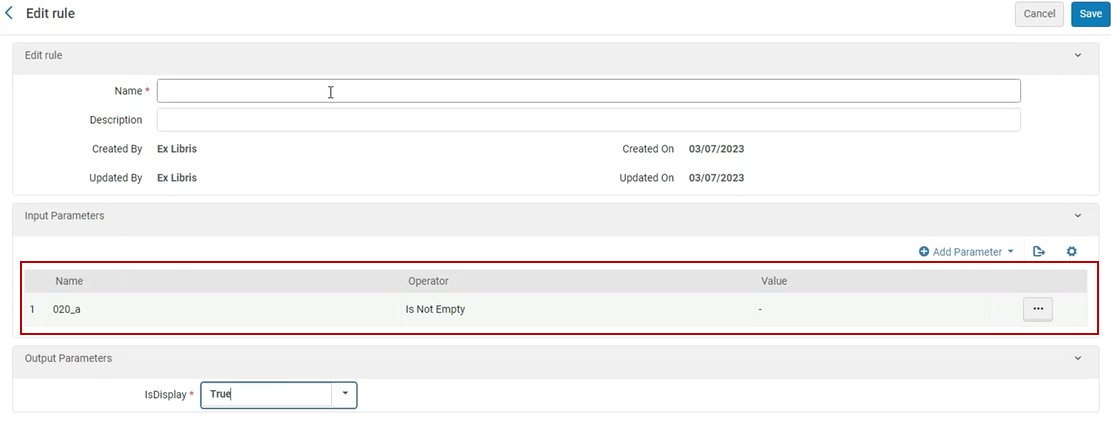
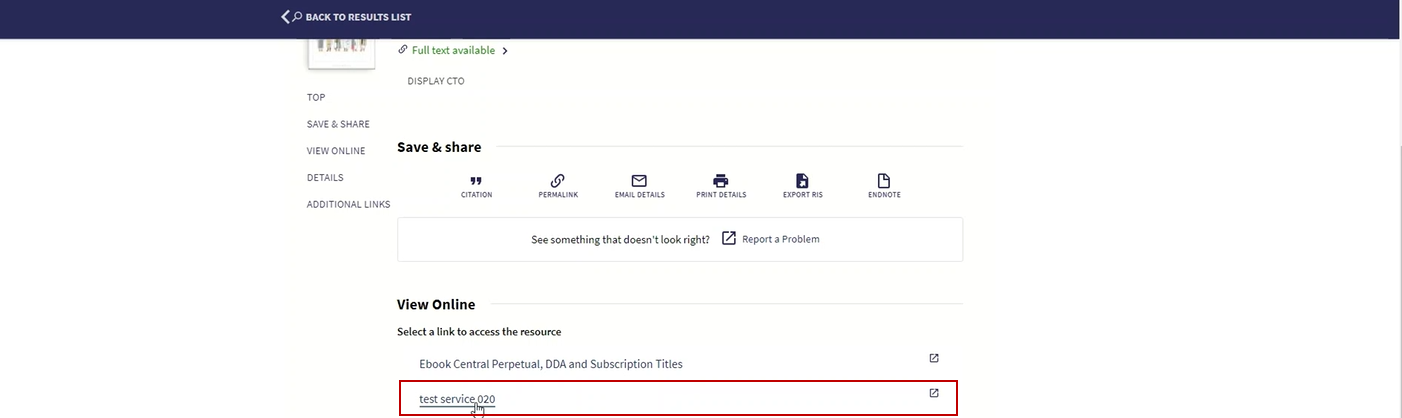
3. You can also utilize the newly defined field in the URL Template field of the general electronic service.
4. Below is an example of how this will appear to patrons in the Discovery (Primo) system, as well as how the actual URL will be constructed.
When adding a row to the "General Electronic Service Bib Fields Enrichment" configuration screen, you need to define the Record format, Bibliographic field and subfield. The defined value within the "Field Name in General Electronic Service" will be the one that appears when defining the General Electronic Rule/URL template.
1. When 2 bibliographic records are matched, the logic will only apply on the "Selected" bibliographic record.
2. In case the URL template field starts with a parameter place holder with no text or URL before it (and regardless of what comes after it), no decoding will be done
to the first parameter's information.
3. For Network Zone members, General Electronic Services that use values from the "General Electronic Service Bib Fields Enrichment" page, it is recommended to
use the same names as in the network zone. This is in order to display the General Electronic Service for institution or network zone resources.
For more information, see General Electronic Services.
Configuring the Order of General Electronic Services
- General System Administrator
- Fulfillment Administrator
With the General Electronic Services Order page, you can configure the order in which general electronic services appear in Primo. Like other services, you can also assign services to appear in the first or last group in the list.
You can only configure the order of general electronic services at the institution level. Select the required institution from the Configuring filter on the Fulfillment Configuration page.
This page does not have a Save button. Every selection made here is saved in Alma automatically.
-
Open the General Electronic Services Order page (Configuration Menu > Fulfillment > Discovery Interface Display Logic > General Electronic Services Order).
-
Select Add to top or Add to last services to configure the order of services at the top and bottom of the list of results, respectively.
-
In the Service type field, select General Electronic Service.
-
In the Service name field, select Service.
-
In the Service value field, select a service value.
-
Depending on which list you are defining, select either Add to top / Add to last services. The service appears in the list that you are defining.
-
For each list, select the arrows in the Move Up and Move Down columns to order the services.
Configuring the Order of Online Services
- General System Administrator
- Fulfillment Administrator
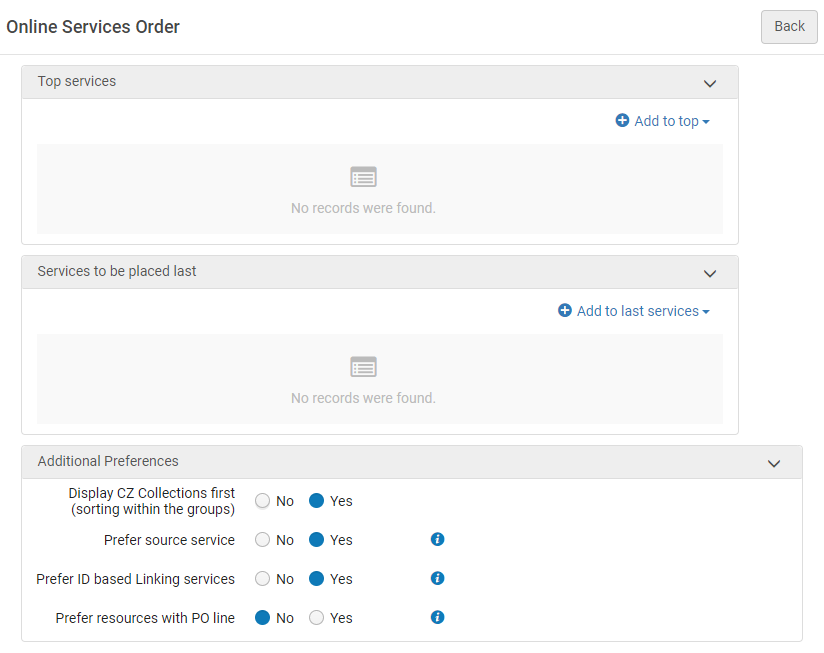
With the Online Services Order page (Configuration Menu > Fulfillment > Discovery Interface Display Logic > Online Services Order), you can configure the order of the services that appear in the services results list in View It.
By default (when no services were added to the top or bottom group), all services are displayed alphabetically on the services result list in the Primo view. If services are added to the top group, they will always display at the top of the Primo view (before other services). Services added to the bottom group will always display at the bottom of the Primo view (after the other services). Within the top group and bottom groups, services display in the order in which they are configured in the Online Services Order page.
Services that are not configured to display in the top or bottom group will display in the Primo view, after the top group and before the bottom group. Within these services (that are not part of the top or bottom group), the display order is alphabetical.
The Display CZ Collections first, Prefer source service, and Prefer ID based Linking services (see Configuring Direct Linking and Direct Links) options also override both the default alphabetic sort order (for services that are not part of the of top or bottom group) and override the order for the list of services in the Top services section. The top service defined can be used by Primo’s direct linking option, from the search result record.
Alternatively, you can order the services in a specific sequence, using the Prefer resources with PO line option.
If all additional preferences are selected (set to Yes), then the services are displayed in View It in the order below:
- Services of collections/portfolios that have a linked PO Line (i.e., subscribed services or owned).
- ID-based linked services.
- Source services
- Community Zone collections.
- Top services.
- Bottom services.
Unspecified levels are ordered alphabetically. For example if the first four options above were all set to No, and no items were added to the top or bottom list, then the sorting would be alphabetical.
-
This page does not have a Save button. Every selection made here is saved in Alma automatically.
-
Changes to electronic collection Public Name (override) requires that the online service order configuration for the specific electronic collection is re-configured.
-
You can only configure the online services order at the institution level. Select the required institution from the Configuring filter on the Fulfillment Configuration page.
-
Open the Online Services Order page (Configuration Menu > Fulfillment > Discovery Interface Display Logic > Online Services Order).
-
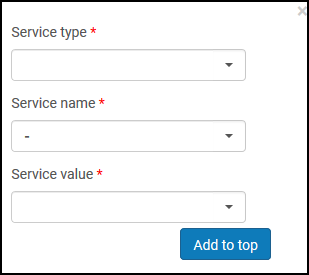
Select Add To Top to assign high priority to a service or select Add to Last Services to assign low priority to a service. Services that are left unassigned will appear in the middle of the list. The Add Service dialog box opens:
Selections made in the Additional Preferences section take precedence over the services selected as top services.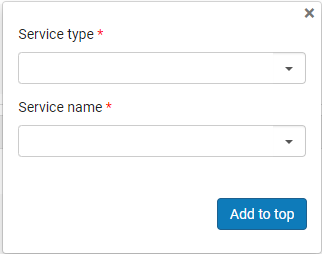
-
In the Service type field, select one of the following service types:
The Service type "DB Service" is obsolete. Do not select it.-
Full Text
-
Selected Full Text
-
-
In the Service name field, select the name for the selected service type. The Service value field appears. Browse and select a service value.
-
Depending on the type of priority you are assigning to the service, select Add to top or Add to last services to save the service to the selected priority list.
-
Select the arrows in the Move Up and Move Down columns to order the services in the Top Services and Services to be placed last lists.
-
In the Display CZ collections first field, select one of the following options:
You can also set this priority with the uresolver_display_cz_records_first parameter in the Customer Parameters mapping table. For more information, see Configuring Other Settings.-
Yes – The unspecified online resources that are not assigned to the top or bottom group, are sorted alphabetically. In addition, Community Zone resources are alphabetized and listed first in each level.
-
No – The unspecified online resources that are not assigned to the top or bottom group, are sorted alphabetically. Priority is not given to Community Zone resources.
-
-
Set Prefer source service to Yes to improve the sorting relevance of online resources offered by the Services Page for OpenURLs coming from CDI. This option places the highest priority on services that match the source of the OpenURL. For example, if a user searching CDI discovers an article from Gale, and the Alma Link Resolver can offer services from Gale and EBSCO, Alma will place the service from Gale at the top of the results, followed by the remaining electronic services, as defined in the sort settings for this page. This is the recommended option.
-
In the Prefer ID based Linking Services field, select one of the following options:
You can also set this priority with the uresolver_use_source_to_target_ordering parameter in the Customer Parameters mapping table. For more information, see Configuring Other Settings. If static URL is used, none of the options will apply!
If a service was hidden using the display logic rules, it will not appear, regardless of the value selected for this option.-
Yes – If a collection with a preferred ID is defined, it always appears first, regardless of other sort criteria. If more than one preferred collection is defined, the display preference for those collections is then based on the sort configuration as defined on the Online Services Order page. Currently, the following vendors use a preferred ID for linking: Cambridge University Press, Elsevier ScienceDirect, Erudit, Gale, Ingenta, Institute of Physics, JSTOR, Nurimedia, Proquest, Sage, Springer, Taylor&Francis, Thieme.
-
No – No priority is given to vendors with a preferred ID.
-
-
To prefer services of collections/portfolios that have a linked PO Line (i.e., subscribed services or owned), select Yes in the Prefer Resources with PO Line. Once enabled, services for portfolios that have a PO Line, either at the level of the collection or at the level of the portfolio itself, are displayed above all the other services. This preference overrides both the default alphabetic sorting order and the list of services listed in the Top Services section.
Configuring the Order of Locations in Search Results
To configure the order of Primo search results, you must have one of the following roles:
-
General System Administrator
-
Fulfillment Administrator
Alma determines the display priority of locations primarily by availability. Holdings with the greatest number of available items appear first. In addition, Alma enables you to give preference to locations that match the IP address of the patron’s IP address. These locations include the AVA $$P field. For more information, see the following topic: Discovery in Collaborative Networks.
The use of the AVA field is not necessary for Primo VE environments, but the configuration of sorting and priority in Alma is the same for both Primo and Primo VE. In addition, Primo VE can override Alma's custom sorting configuration. For more information, see Configuring the Get It Service for Primo VE.
Alternatively, you can configure your own display order of locations, based on the considerations of your institution. When displaying a list of locations in the GetIt tab, if the record has multiple holdings, they are listed in the order that has been defined by the institution. Where the institutional priorities are not defined or are not relevant, alphabetical sorting is used.
By default, holdings locations appear on the first page in Primo Get It based on one or more of the following criteria:
-
According to the holdings’ locations and their proximity to the patron, according to the library IP address. The locations in the libraries closest to the patron appear at the top of the holdings list. If these criteria are used, it takes priority over the holdings' availability.
-
According to the holdings’ availability, in the order (by default):
- In temporary locations
- In permanent locations
- In remote locations
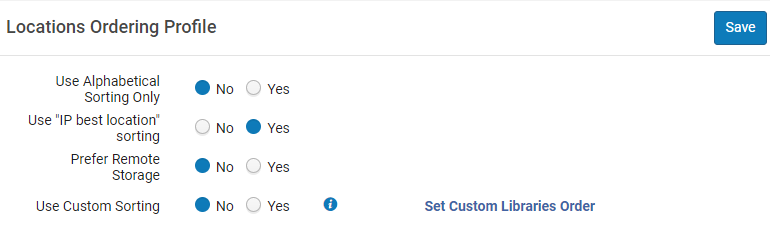
You can select a different order on the Locations Ordering Profile page (Configuration Menu > Fulfillment > Discovery Interface Display Logic > Locations Ordering Profile):
You can configure this ordering at the institution level only. Select the required institution from the Configuring filter on the Fulfillment Configuration page.
-
In the Use Alphabetical Sorting Only field, select Yes if you want to sort the holdings in Primo Get It alphabetically by the external name of the location, which is passed to Primo in the AVA $$c subfield during RTA. The alphabetical sorting logic is hard-coded.
When this field is set to Yes, all other ordering fields on this page are disabled.
-
In the Use "IP best location” sorting field, select Yes to configure the display of holdings by best location, which is determined by the location's priority in the AVA $$p subfield during RTA. IP addresses must be defined for the libraries. No indicates that holdings are displayed by availability and that for the display of holdings locations, IP addresses do not need to be defined.
IP addresses can be configured:
- On the library level (see Managing IP Definitions for a Library)
- On the campus level (see Editing a Campus)
-
In the Prefer remote storage field, select Yes to increase the priority of remote storage items when viewing results in Primo Get It, publishing to Primo, or the Primo RTA.
- To define custom sorting:
-
In the Use Custom Sorting field, select Yes and then select the Set Custom Libraries Order link.
When this field is set to Yes, all other location ordering fields are removed from this page.
-
On the Custom Libraries Order page that opens, select Add Library.
-
In the dialog that opens, indicate the order for each desired library. Enter numeric values, where 1 is the library that appears first in the list of locations in the Get It tab.
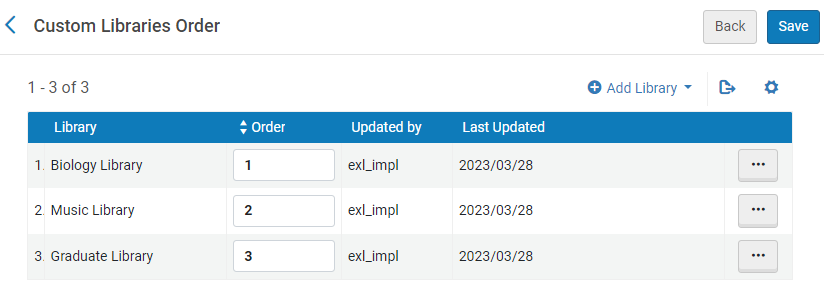 Custom Library Order
 -
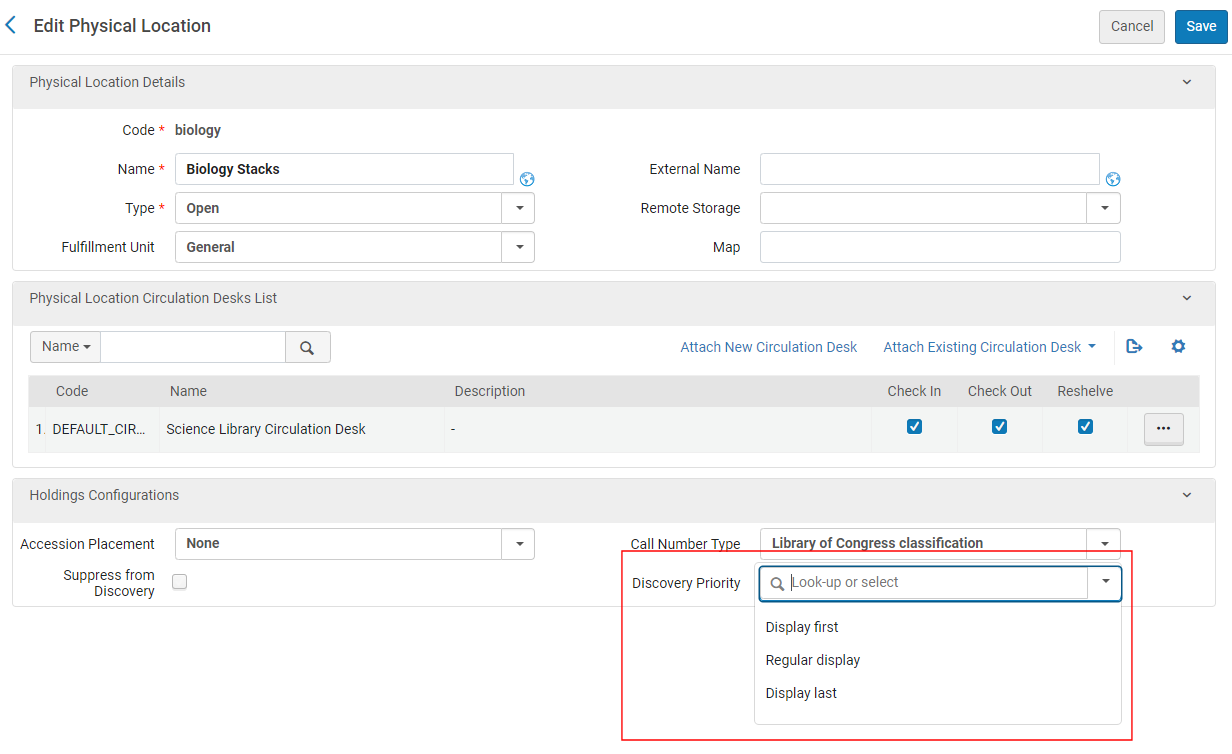
The priority of each location within the library can also be determined by configuring the Discovery Priority attribute of a location (Configuration Menu > General > Locations > Physical Locations) when the selected configuration scope is a library. All Display first locations of the same library are sorted before other locations of the same library, and all Regular display locations of the same library are sorted before Display last locations of the same library. Locations within the same Discovery Priority are sorted by availability. For more details, see Configuring Physical Locations.
 Edit Physical Location's Discovery Profile
-
-
Select Save.
Configuring Miscellaneous Display Options
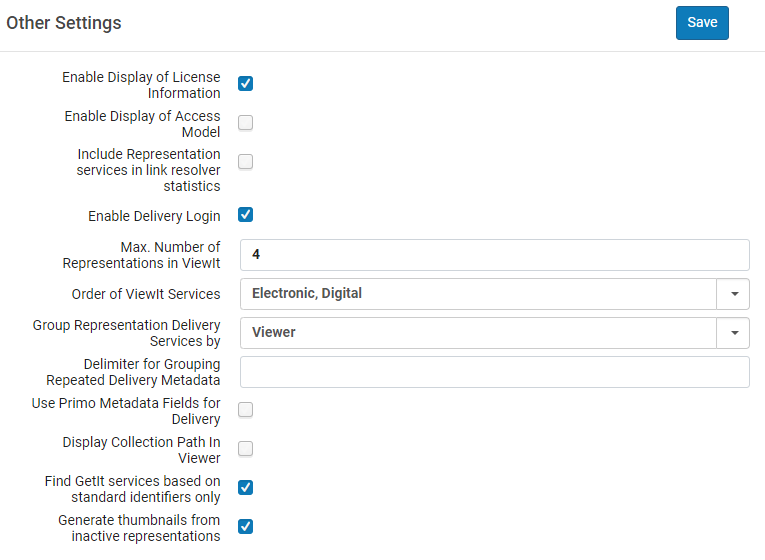
Enable Display of License Information
Alma enables you to display an electronic resource's license information in View It. The displayed terms of the license can be configured in Alma, as well as the license-related labels that display in View It. See Displaying License Information.
Enable Display of Access Model
To control the presentation of the access model to patrons via Alma Link Resolver, institutions can use a designated configuration. Select the checkbox Enable Display of Access Model to display in Primo and Primo VE the access model information located on the portfolio. The Enable Display of Access Model option is disabled by default. Institutions that want to control the presentation of the access model to patrons via Alma Link Resolver, need to select the Enable Display of Access Model option. See also Managing Access Models.
Include Representation Services Statistics in Analytics
Enable Delivery Login
Configure Maximum Number of Representations in ViewIt/Primo
Configure Order of View It Services
Configure How Representations are Grouped in ViewIt/Primo
- Viewer – representations are grouped by viewer
- Representation – representations are listed separately with the available viewers for each representation.
Configure a Delimiter for Grouping Delivery Metadata with Repeated Labels
If you enter a delimiter in the Delimiter for Grouping Repeated Delivery Metadata field, the Hide Repeated Labels checkbox for the Digital Viewer in Configuration > Fulfillment > Discovery Interface Display Logic > Viewer Services > Digital Viewer does not appear. To have it appear, you must remove the delimiter. For more information, see Configuring Digital File Viewer Services.
Use Primo VE Metadata Fields for Delivery
When this check box is selected, the method used to configure metadata for Primo VE replaces the Alma method, and the following options are disabled:
-
The Delimiter for Grouping Repeated Delivery Metadata field on this page is disabled.
-
The Delivery Profiles Metadata page (Configuration > Fulfillment > Delivery Profiles Metadata) is hidden. For more information on this method, see Configuring Delivery Profiles Metadata.
Display Collection Path in Viewer
Select the Display Collection Path in Viewer checkbox to display the collection path at the bottom of the Descriptive Information pane for all viewers. Selecting the path opens Primo VE’s collection page in a new tab.
Find GetIt services based on standard identifiers only
Primo/Primo VE Get It (used to request/discover local Alma physical holdings) uses specific standard identifiers. For more information see Using Standard Identifiers.
Enable Inactive Representations for Thumbnails
Select the Generate thumbnails from inactive representations checkbox if you want to enable the use of inactive representations to generate thumbnails for your records in Primo and Primo VE. Note that this refers to digital (non-remote) representations only.