
Configuring the Research Portal
To configure the research Portal settings, you must have the Configuration Manager role.
This page explains how to configure the various components of the research Portal, such as the headers and footers of its pages, its search bar, and the contents of its home page.
For information about configuring the general settings of the research Portal, such as branding and colors, the text appearing on labels, and the date display, see General Settings for the Research Portal and Profiles. For information about configuring researcher Profiles, see Configuring Researcher Profiles.
Watch the How to Customize your Research Portal video.
Working with the Research Portal Configuration Page
You can configure various aspects of the research Portal in the Research Portal configuration page. This page includes a number of tabs, each of which contains settings for specific parts of the research Portal. When you first open the page, you do so by selecting the tab you want to see when the page opens: Configuration Menu > Portal & Profiles > Research Portal > [desired tab]. Once you have the page open, you can open any of the other tabs without leaving the page. When you have finished configuring the settings in the page, select Save to implement them in the research Portal.
Updates to the settings in the Research Portal page are only implemented after you select Save at the top of the page.
Header/Footer Tab
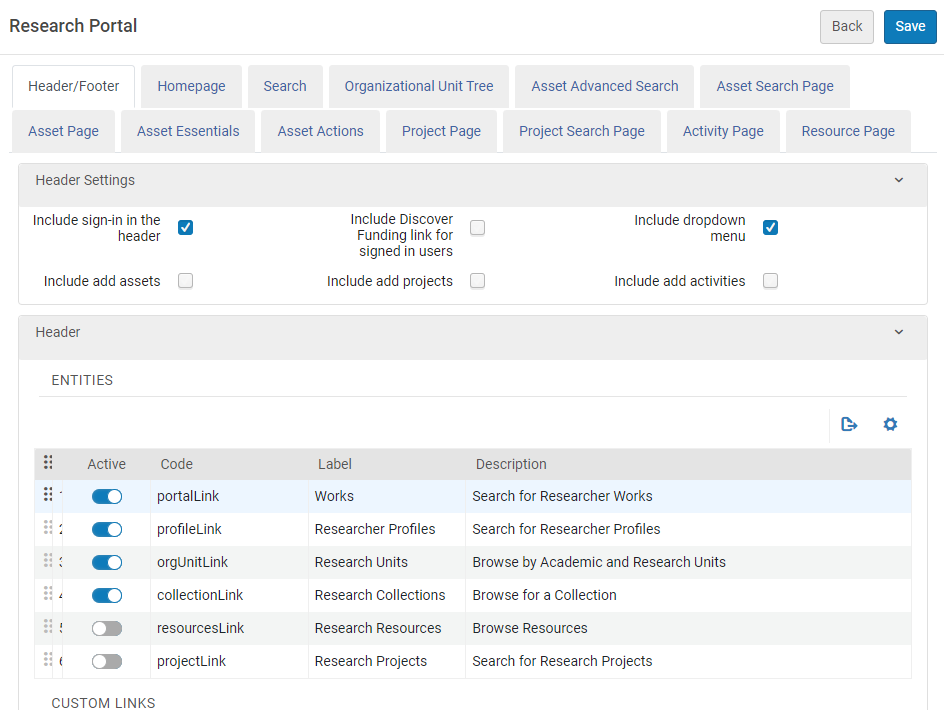
To configure the header and footer of the Esploro page, navigate to Configuration > Portal and Profiles > Research Portal > Header and Footer Configuration, or, when the Research Portal page is already open, select the Header/Footer tab.
Header Settings
You can do the following in this tab:
| Option: | Description: |
|---|---|
| Include sign-in in the header | Displays the Sign In link in the header. |
| Include Discover Funding link for signed in users | Displays the Discover Funding link when signed in to Researcher Profiles. Clicking this link displays funding opportunities from Pivot. For more information, see Pivot-PR Integration. |
| Include dropdown menu | Displays the dropdown menu in the header. |
| Include add assets | When checking this, the Output option displays in the drop down list under the ADD CONTENT button (see Add Content to Profile). |
| Include add projects | When checking this, the Project option displays in the drop down list under the ADD CONTENT button (see Add Content to Profile). |
| Include add activities | When checking this, the Activity option displays in the drop down list under the ADD CONTENT button (see Add Content to Profile). |
Header
In the Header section, you can define various parts of the header, as described below.
 Header Configuration
-
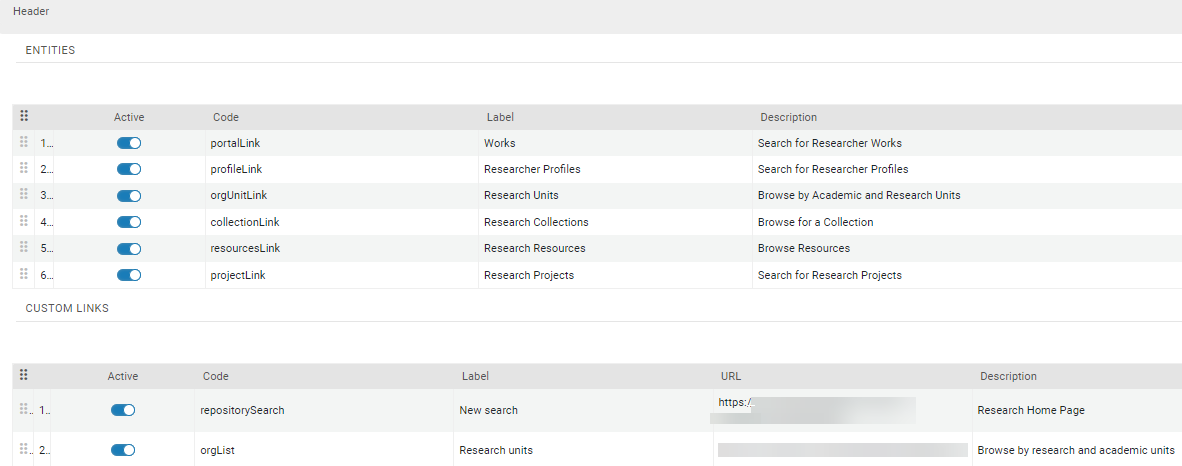
ENTITIES: This section defines the entities that display in the header drop down menu, as well as on the homepage of the Portal. Examples of entities are Works, Researcher Profiles, Research Collections, Projects, etc. To display an entity in the Portal, enable the Active button. You can change the order of entities by dragging and dropping.Entities will only display if they contain data.
-
CUSTOM LINKS: Here you can configure up to five custom menu links to display in the Portal header, as well as on the dropdown menu on the right of the page. You can include links in the header by selecting Configure from the row actions menu and then selecting the Include in header checkbox.
.png?revision=1)
Footer Settings
In this section you can control logos and copyright for the footer.

Footer
The Footer section includes two types of records: Titles and Entries. Titles are static text intended as a header for a column of links. Entries include a URL and are clickable links.
Social Media
The Social Media Links section enables you to add a link to your organization's various social media pages. The link is not intended for sharing the page being viewed.

Homepage Tab
In the Homepage tab you can configure the sections that display on the Portal homepage . You can can activate/deactivate and reorder all the sections except for home page essentials. To access this page, navigate to Configuration > Portal and Profiles > Research Portal > Homepage Configuration, or, when the Research Portal page is already open, select the Homepage tab.
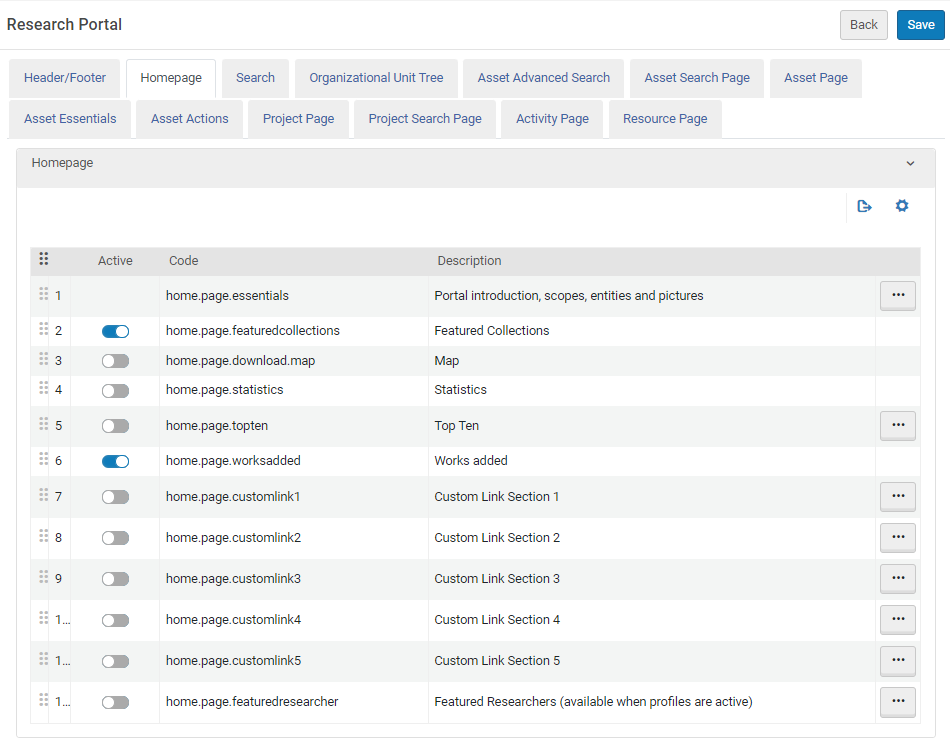
The sections are described below.
| Section | Description | Image |
|---|---|---|
| Homepage Essentials |
Configure the main items that display on the homepage. Homepage Essentials by default is at the top of the page and is the only homepage section that cannot be reordered. Select Configure in the row actions menu for home.page.actions. The options are listed below. |
|
|
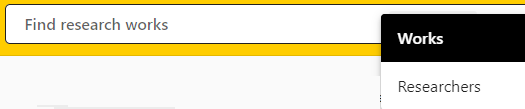
Homepage Essentials - Search |
Enable the homepage search (1 in the image). If this is disabled, the search bar will not display on the homepage. There is an additional search bar in the header (2 in the image) that cannot be disabled. |
 |
| Homepage Essentials - About | From the row actions menu for home.page.about, select Configure. You can provide a title and a short description of what visitors can expect to find in this Portal. The title and description display on the homepage. |  |
| Homepage Essentials - Scopes and links |
From the row actions menu select Configure. Here you can enable/disable scopes and change the order for the Output search. The following scopes are available:
The selected scopes also display as links under the About section on the homepage. You can determine the order for both the drop down menu and the links by dragging and dropping. You can add more links that will display to the right of the existing scope links. Select Add new link and enter the information, including the URL that the user will go to when clicking the link. The added links display to the right of the selected scope links. You can add up to four new links. Links can be enabled/disabled, but you cannot change their scope, which is defined by the URL that was entered for the link. |
|
| Homepage Essentials - Entities |
At the bottom of the homepage essentials are direct links to general search pages for example Output, Researcher Profiles, etc. These links are inherited from the Header Footer tab (Entities section), and appear in both the Entities section in the Homepage as well as in the drop down menu in the header. |
Homepage Essentials
Header Drop Down Menu
|
| Homepage Essentials - Pictures | Add up to five images to the image carousel displayed to the right of the About text. If no images are uploaded, the carousel will not appear in the Portal. Images must be stored locally and cannot be linked to another site. Each image can be up to 1MB in size. Higher resolutions are preferable, provided the image size does not exceed this limit. The image format must be .jpg or .gif. | .png?revision=1) |
| Statistics |
Displays organizational metrics: assets produced by researchers in the organization, and how many times they were viewed and downloaded. This data is updated live – e.g., when a user views an asset. |
.png?revision=1) |
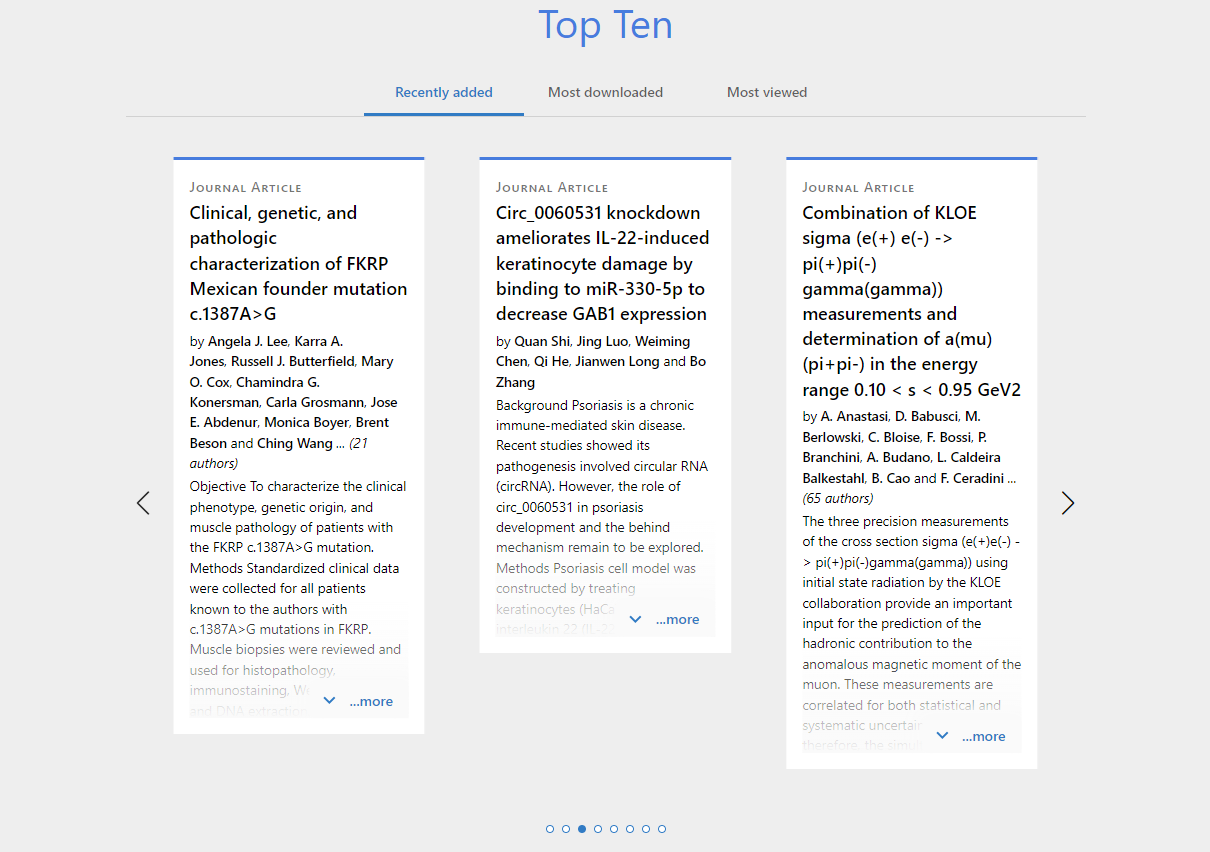
| Top Ten |
Enables to showcase sets of up to 10 assets. There are three pre-configured sets and you can add up to three itemized sets. To enable display of a set on the homepage, select Configure from the row actions menu and then select the checkbox next to the relevant set/s. You can update the label if needed, for each set. The three predefined sets are:
The above predefined sets do not include assets suppressed from the Portal. If you encounter issues with the display of these predefined sets, please contact Esploro Support. In addition, you can display assets from itemized sets that you created (up to three asset sets displayed on the Homepage in total). Provide a title for the set and select the assets to display. If a set is empty, it is not displayed on the Homepage. The label size is limited to 20 characters (to avoid issues with text wrapping). |
 |
| Works Added |
Displays the number of works published by year. In order for this Works Added section to display correctly, the Regular update of asset counts for use by the system job (see Viewing Scheduled Jobs) must be activated. When activated, this job runs automatically on a daily basis and updates the chart. |
.png?revision=1) |
| Download Map |
Displays the locations from where assets where downloaded. |
.png?revision=1) |
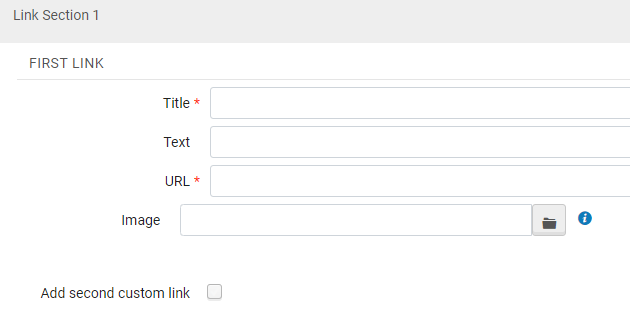
| Custom Link Sections |
You can add up to 5 custom link sections. Each section is displayed separately on the homepage. Each link must contain a title and URL. In addition, you can add an image to the link.
Custom Link
For a video on this topic see How to Add Custom Links to your Homepage. |
.png?revision=2) |
|
Featured Researchers |
If home.page.featuredresearcher is activated, the Featured Researchers section appears in the homepage. To add researchers to the section, from the row actions menu for home.page.featuredresearcher, select Configure. You can add researchers and provide short descriptions of their work in the text fields. The text fields of the descriptions can contain up to 500 characters, including HTML code. (For information about adding HTML to text fields, see The Research Hub Interface.)
In multi-lingual implementations of Esploro, you can add versions of the text in each of the languages that is activated in your system. Once you add a featured researcher, the text you add for them is stored as a label. To add a translation into another language, navigate to Configuration menu > Portal & Profiles > General settings > Labels, and edit the Research Portal Featured Researchers Text Labels table. (For information about adding translations to code tables, see The Research Hub Interface.) You can only feature researchers with an active public Profile (Researchers > Manage Researchers > Researcher > Edit > Researcher Settings). For more information, see Working with Researchers. |
 |
| Featured Collections |
Add featured collections to the homepage. See Working with Collections for more information. |
.png?revision=1) |

.png?revision=1)
.png?revision=1)

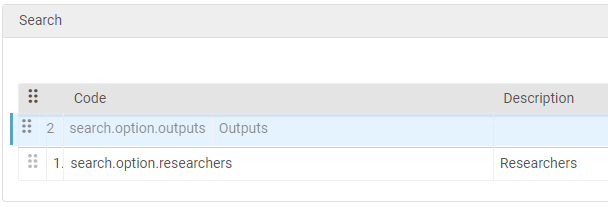
Search Tab
This section describes the various options in the Search tab. Note that in order to enable the homepage search you need to activate it from the Homepage Essentials - see Homepage Tab.
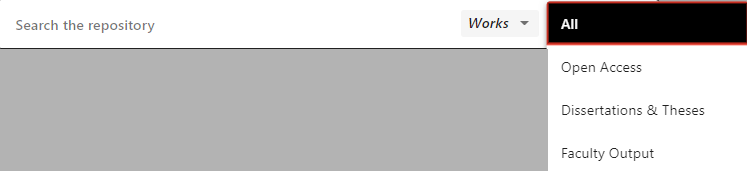
You can configure the search entities that appear in the Portal search bar. To do this, navigate to the page at Configuration > Portal and Profiles > Research Portal Configuration > Search and enable the relevant option.
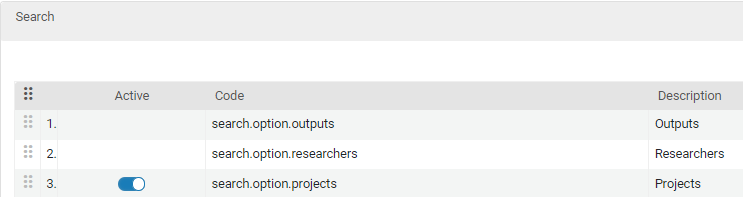
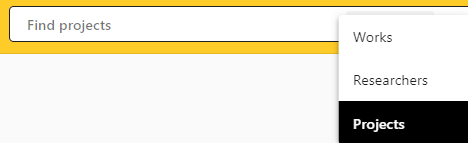
The Outputs option is enabled by default and cannot be disabled. The Researchers option will appear if Profiles were enabled, and there are active researcher Profiles. For more information see Profile Search Results. The Projects option can be enabled/disabled. For information on configuring searching for projects, see here. The labels that appear can be changed in the Research Portal Search table (Configuration > Portal & Profiles > Labels > Research Portal Search).
You can reorder the search fields by dragging them up or down.
The changes will only be implemented after selecting Save.
You can control the labels (placeholder text) that display in the search bar - see Labels for more information.
When searching from the drop down menu, you can control the scope of the search (see Homepage Tab).
Organizational Unit Tree Tab
You can configure the display of the organizational unit tree in the Research units tab of the Portal.
To configure the display of the organizational unit tree, navigate to Configuration menu > Portal and Profiles > Research Portal > Organizational Unit Tree Configuration, or, when the Research Portal page is already open, select the Organizational Unit Tree tab.
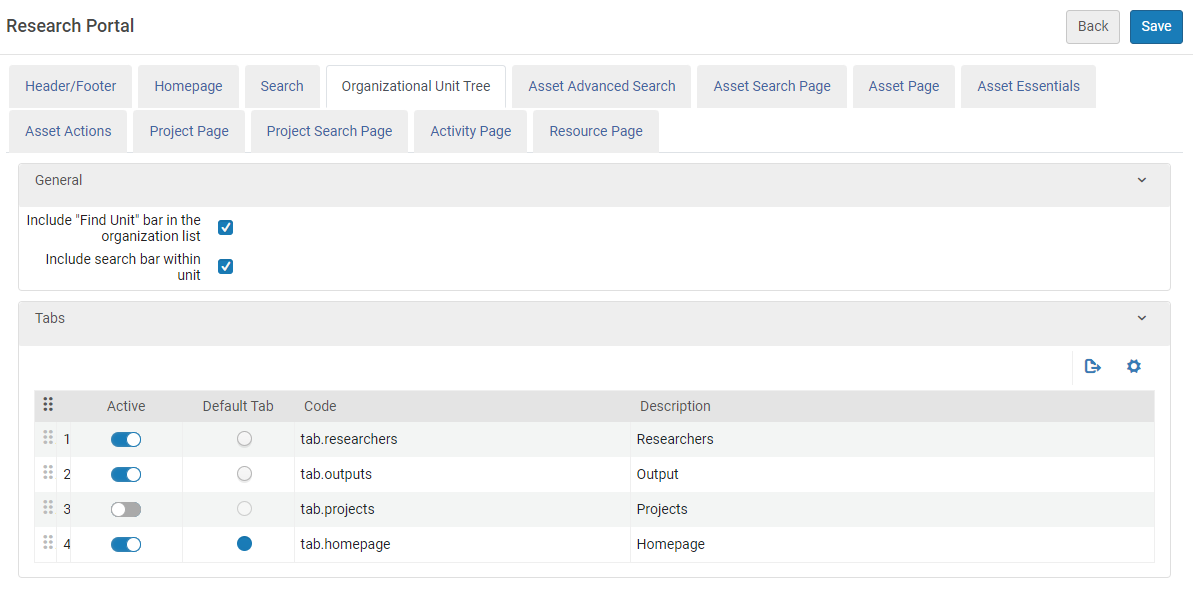
General Section
Under General, select the desired options, as follows:
- Include "Find Unit" bar in the organization list – Select this option to insert the Find unit by name box at the top of the organizational unit tree. This allows Portal users to quickly locate units in the list, even if they are under a collapsed level. This functionality finds units by their displayed names only.
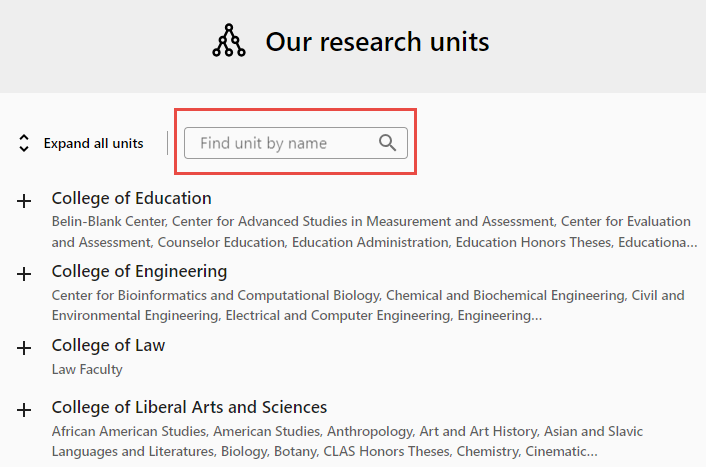
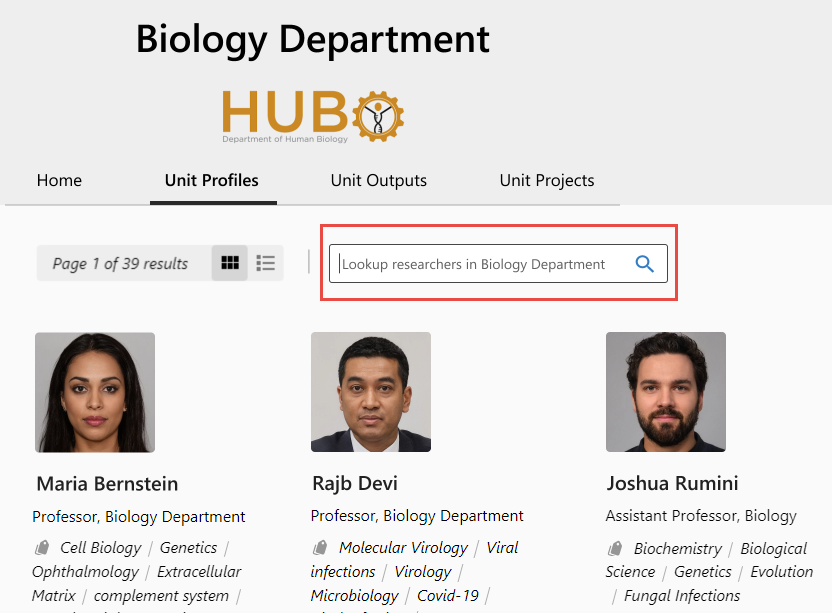
- Include search bar within unit – Select this option to insert a search option at the top of the list of items belonging to a selected research unit. This allows Portal users to search exclusively within the unit's outputs or Profiles.
Tabs Section
Under Tabs, select Active for the tabs that should appear for all organizational units, and clear Active for those that should not appear. Under Default Tab, choose the tab that should open when the user selects a research unit from the organizational unit tree.
The tabs appear in the Portal in the order in which they appear in this section. To change the order of the tabs, drag their Move icons (![]() ) up or down.
) up or down.
The Description column shows the label that will appear on each tab. These labels can be modified in the Esploro Portal Org Unit Tree Section Labels table at Configuration Menu > Portal & Profiles > General settings > Labels.
You can choose to hide a tab even if data exists for that category. For example, you can choose to hide the Projects tab, even if there are active projects in the Portal.
Tabs that are selected appear in the Portal even for units that do not have related researchers or output, but they are disabled in this case, and cannot be selected.

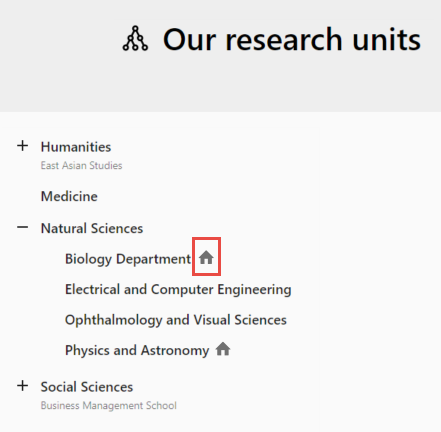
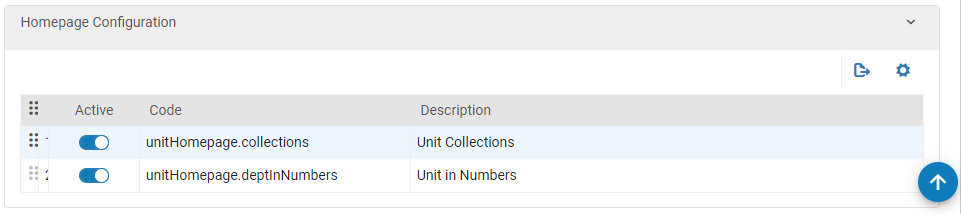
Unit Homepage-Tab Visibility
If you want to include a Homepage tab, in addition to selecting the option here, under Tabs, you must also set up the homepage of each organizational unit for which you want to have a homepage. This is done in the organizational unit's settings (Research Management > Manage Organizational Units); if you specify there that it should have a visible homepage (in the Visibility section, select Display unit homepage), the Homepage tab in the Portal becomes active. The contents of the homepage should also be configured in the organizational unit's settings. For additional information, see Working with Organizational Units.
In the Portal's Organizational Unit Tree, units that are configured to have homepages are marked with a Homepage icon (![]() ).
).
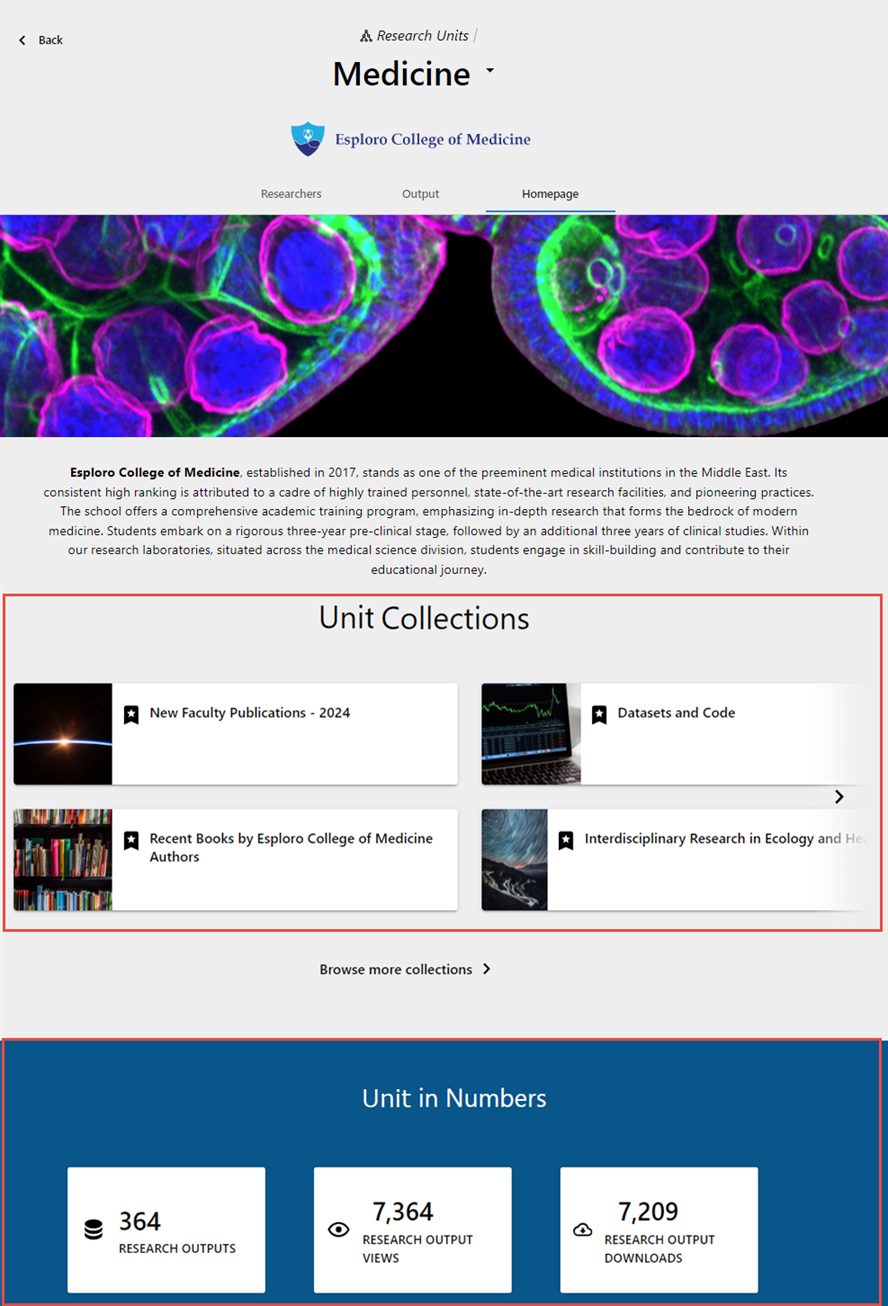
Optional Homepage Sections
Two optional sections can be added to the organizational units' Homepage tab:
- Unit Collections – Links to collections that are associated with the unit (in the Academic unit field of the collection settings – see Working with Collections).
Below the links to the unit's collections is a Browse more collections link that takes the user to the institution's Collections browsing page. This is the same link that appears in the Featured collections section of the organization's homepage (see Working with Collections). The text of the link can be modified in the Research Portal table (Configuration menu > Portal & Profiles > General Settings > Labels > Research Portal).
- Unit in Numbers – Unit metrics: outputs produced by researchers in the unit, and how many times they were viewed and downloaded. Note that these metrics are derived from Esploro Analytics data, and are updated once a day.
To activate or deactivate these sections, under Tabs, in the row actions of the Homepage tab, select Configure. The Homepage Configuration section is added to the page.
Select Active for the sections you want to include in the unit's homepage. If you choose to display both sections, you can change the order in which the sections appear in the tab. To do so, in the Homepage Configuration section of the Organizational Unit Tree settings, drag the Move icon (![]() ) of one of the sections up or down.
) of one of the sections up or down.
The Descriptions of these sections can be modified in the Esploro Portal Org Unit Tree Section Labels table (Configuration Menu > Portal & Profiles > General settings > Labels).
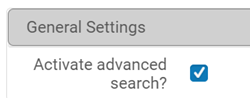
Asset Advanced Search Tab
To configure the advanced search, navigate to Configuration > Portal and Profiles > Research Portal Configuration and select the Asset Advanced Search tab. The following sections appear:

General Settings
Search Fields

Search Filters
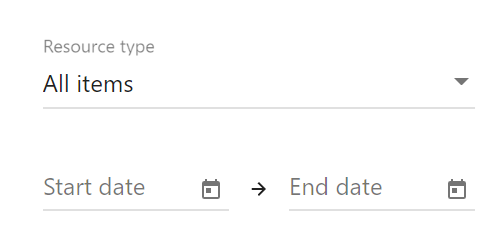
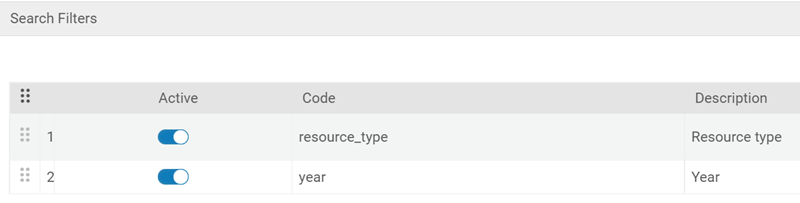
Asset Types

Asset Search Page Tab
You can configure the Sort by options (#1 in the illustration below), the facet display (#2), and display settings for the asset (#3) of the asset search-results page.
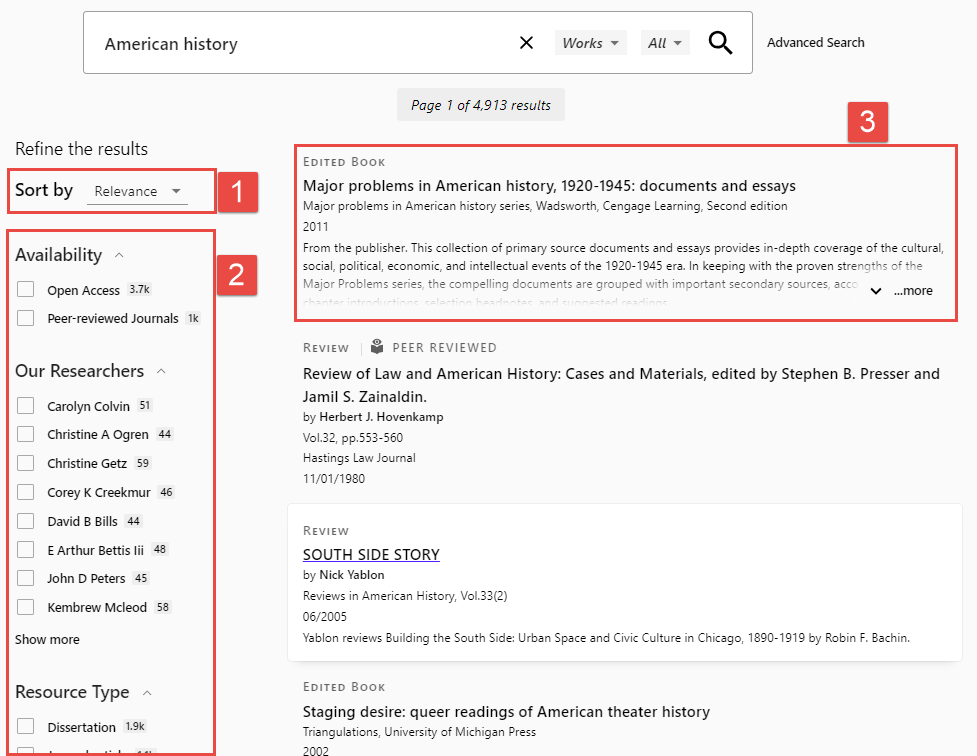
To configure these features, navigate to Configuration Menu > Portal and Profiles > Research Portal > Asset Search Page Configuration, or, if you already have the Research Portal page open, select the Asset Search Page tab.
Configuring the Sort Options
The Sort by field of the asset search-results page can be configured: Sort types can be activated or deactivated, and the order in which they appear in the dropdown list can be changed. The first item in the Sort list is used as the default sort type for the asset search-results. The Portal user can manually change the sort type using the Sort by drop down list in the search-results page.
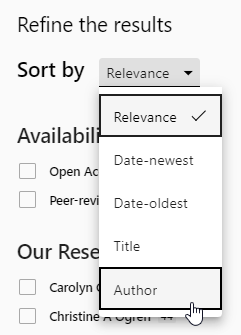
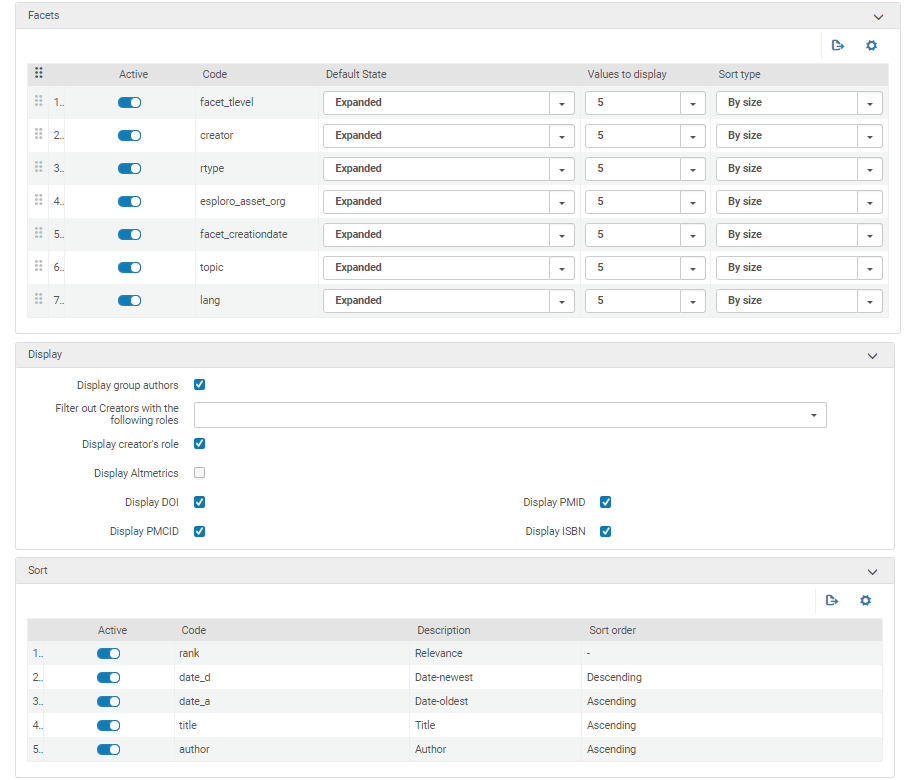
Configuring the Facet Options
Facets enable users to filter and refine search results by selecting properties that the assets in the search results must have, such as specific authors or resource types.
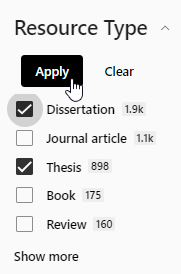
Available Facets
Below is a list of the available facets.
| Code in Configuration | Label in Portal | Description |
| facet_tlevel | Availability |
|
| creator | Author/Creator | The authors of all of the assets found in the current search results, regardless of their affiliation |
| affiliated_researcher | Our Researchers | The affiliated authors of all of the assets found in the current search results |
| non_affiliated_researcher | Other Researchers | The non-affiliated authors of all of the assets found in the current search results |
| rtype | Resource Type | The types of assets found in the current search results – for example journal article, book, or thesis |
| esploro_asset_org | Research Unit | The organizational units within the institution that are connected to the assets found in the current search results |
| facet_creationdate | Date | The range of publication years to include in the search results |
| topic | Subject | Keywords and topics that are required in order for assets to be included in the current search results |
| lang | Language | The content languages to include in the search results |
| project_type | Project Type | Limits the search results to ETDs with the selected ETD project types (see Working with ETDs (Electronic Theses and Dissertations)) |
| degree_in | Degree In | Limits the search results to ETDs in the selected areas of research (see Working with ETDs (Electronic Theses and Dissertations)) |
| degree_awarded | Degree Granted/Awarded | Limits the search results to ETDs for which the selected degrees were awarded (see Working with ETDs (Electronic Theses and Dissertations)) |
| resource_subtype | Resource Subtype | The resource subtypes to include in the search results (see Configuring Asset Details) |
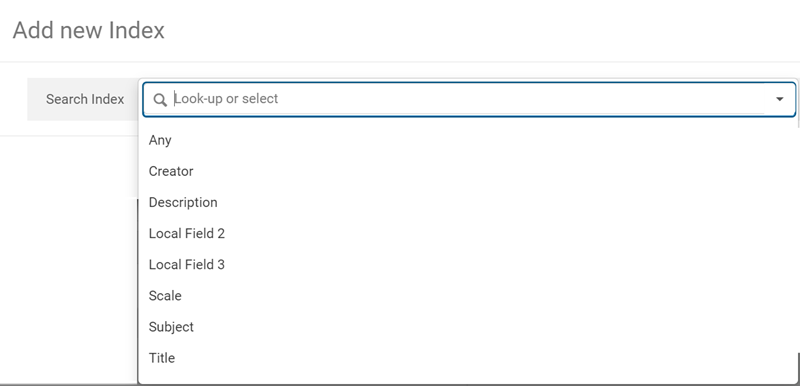
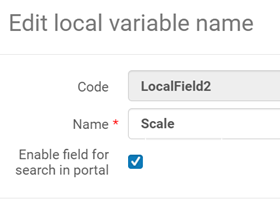
All the asset local fields (1-15) are also available as facets. These fields are configured at Configuration Menu > Repository > Asset Details > Asset Additional Fields.
Facet Options
You can configure the following features of the display of each type of facet:
- Order – You can drag and drop the facet lines to change the order where the facet displays on the page.
- Active – Activate or deactivate by using the Active toggle switch. You cannot add new facets.
You can configure local fields as facets. A local field will not display as a facet in the Portal, unless the "Enable field for search in Portal" checkbox is selected for it in the Configuring Local Asset Fields page. - Default State – This is the default state of the facet:
- Expand – This will show up to the number of values selected in the Values to display column. Additional values will be available by selecting more.
- Collapsed – show the facet name but no values
- Values to display – When the Default State is set to Expand, this shows how many values appear before the more link. Selecting more will show all values.
- Sort type – How the values under the facet should be sorted:
- By size – The values with the most assets appear first
- Alphanumeric – in alphabetical order
Configuring the Asset Display Settings
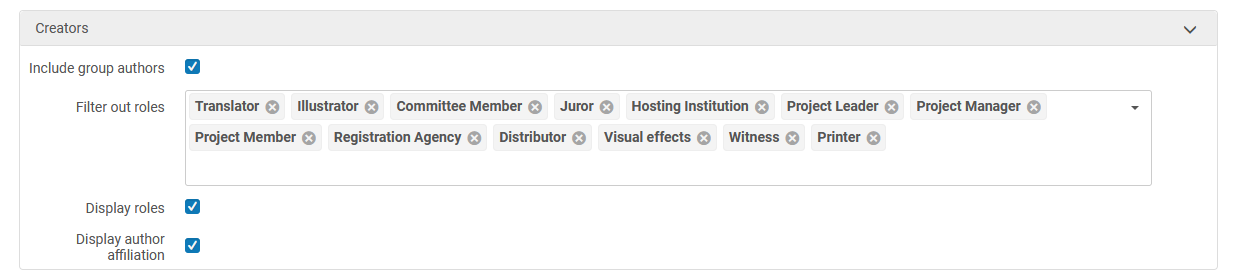
The following settings affect the display of the asset descriptions in the asset search-results page:
- Display group authors – Enable to include group authors in the list of authors.
- Filter out Creators with the following roles – Select one or more roles to that will not be listed.
- Display creator's role – Enable to display the role next to the author's name.
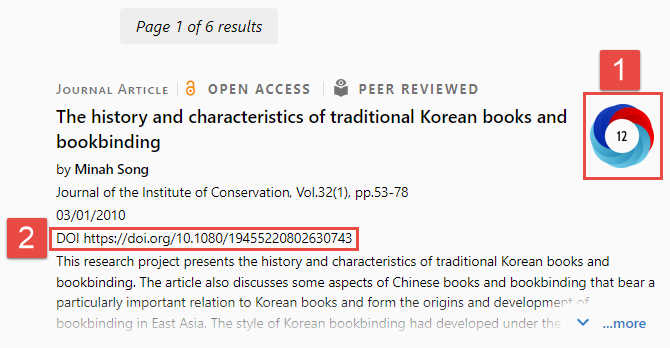
- Display Altmetrics – Clear the checkbox to remove the Altmetrics badge (#1 in the illustration below) from the search results display and the output list on Profiles. It remains active for the Full view, if configured. (For information on configuring Altmetrics to display in the Full view, see Metrics Settings, in the description of the Asset Page tab, below. To enable display of the Altmetric badge in the output list on the Profile, separately from the Portal, change the customer parameter Always_Display_Altmetrics_in_Profiles to True.)
- Display Identifiers – Clear the checkboxes to remove the following identifiers from the search results:
- Display DOI (#2 below)
- Display PMID
- Display PMCID
- Display ISBN
Asset Page Tab
- Navigate to Configuration Menu > Portal & Profiles > Research Portal > Assets Display Configuration, or, if the Research Portal page is already open, select the Asset Page tab.

- In the Active column, toggle its button.
- Drag the Move icons (
 ) of the sections up or down in the table.
- Select the Action button of the section (only available for configurable sections), and then select Configure. A region containing the configurable settings for the section opens below the Asset Page table. These regions are described below. Note that if you select Configure for multiple regions, all of the regions remain open below the Asset Page table until you exit the Research Portal page.
 Selecting Configure for the Files and Links Section of the Asset Page
Abstract and Keywords Settings
In the Abstract and Keywords region of the Asset Page tab, you can use the Active toggles to choose which components to include in the Abstract section of the Asset page, and drag the Move icons (![]() ) to change the order in which they appear.
) to change the order in which they appear.
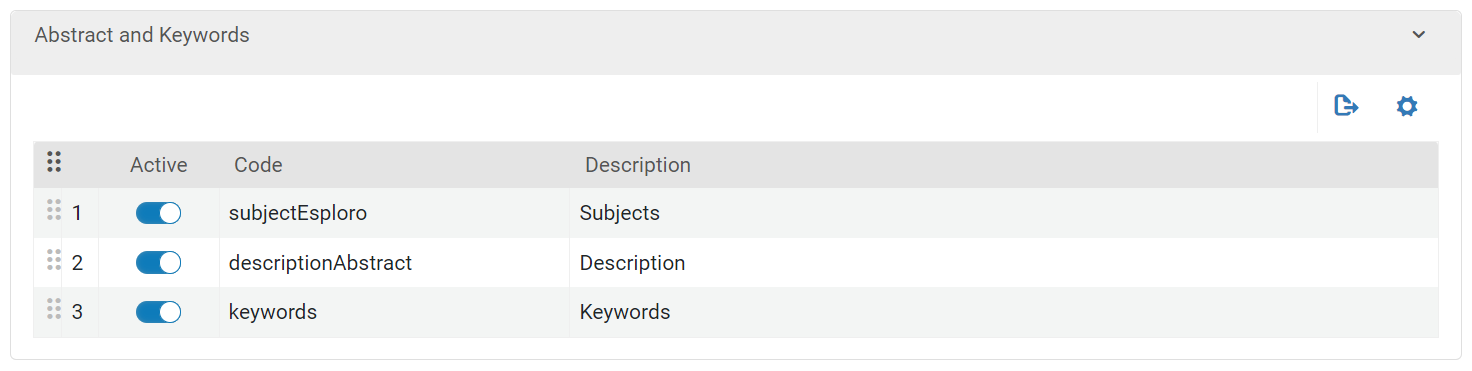
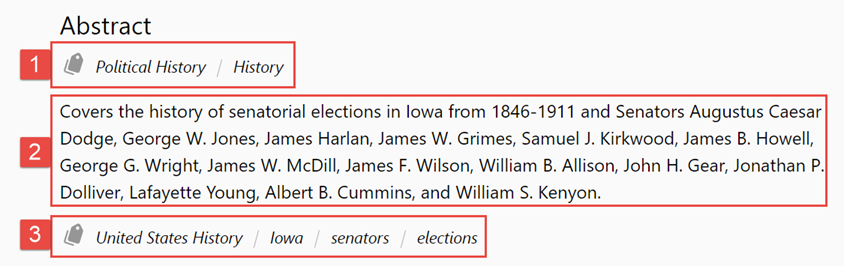
When the Subjects and Keywords sections appear one after the other in the configuration settings, they are combined in the Asset page. For example:

Files and Links Settings
The File and Links section of the Asset page in the Portal gives users of the Portal access to the asset itself, either in files that are uploaded to Esploro or via links to the relevant material.
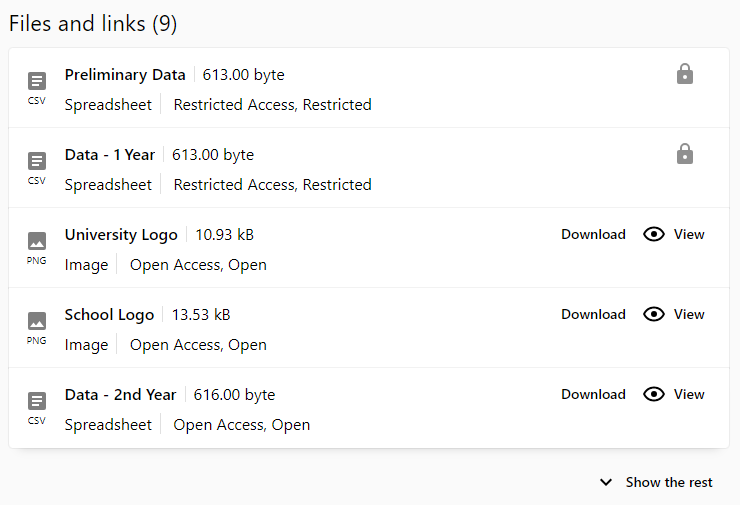
In the Files and Links region of the Asset Page tab, you can use the Active toggle of the Open URL setting to choose when Esploro shold send OpenURL requests to Alma. An OpenURL request attempts to locate the asset in the organization's library holdings by sending an OpenURL request to Alma (see OpenURL Resolving in the Alma Developer Network). When this option is inactive, Esploro does not send an OpenURL request to Alma. When the option is active, Esploro continues on to the next two configuration options: "Never send OpenURL for" and "Always send OpenURL for". Asset types that are included in the first configuration, "Never send OpenURL for" will never generate OpenURL request regardless of whether or not the asset includes files or links. Asset types that are included in the second configuration "Always send OpenURL for" will always generate an OpenURL request. Asset types that are not included in either configuration, will generate OpenURL queries when there are no Esploro files or links.

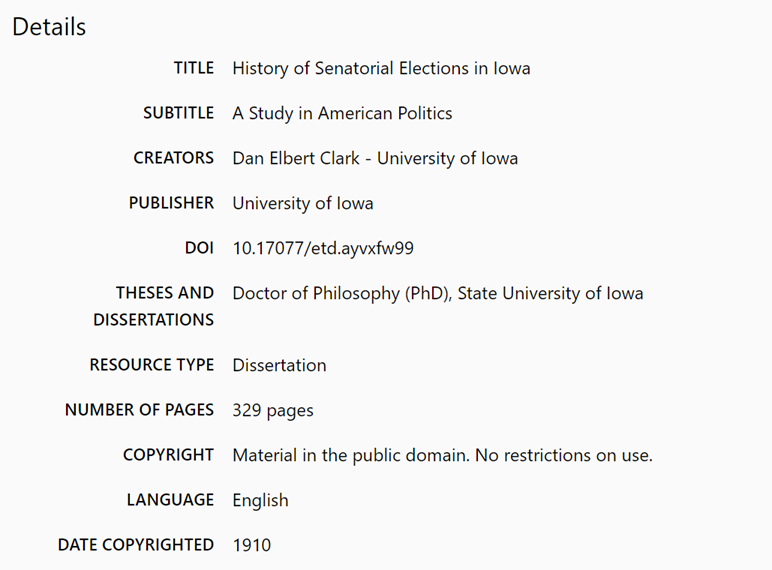
Details Settings
In the Details region of the Asset Page tab, you can use the Active toggles to choose which properties of the asset to include in the Details section of the Asset page, and drag the Move icons (![]() ) to change the order in which they appear. In addition, you can change the fields that are displayed for each property, and even choose to display multiple fields for a single property.
) to change the order in which they appear. In addition, you can change the fields that are displayed for each property, and even choose to display multiple fields for a single property.
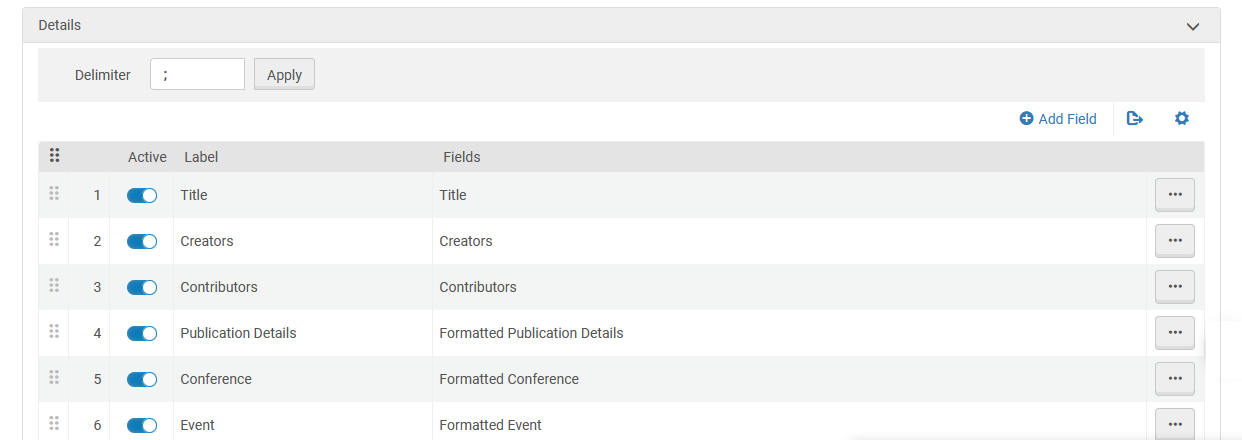
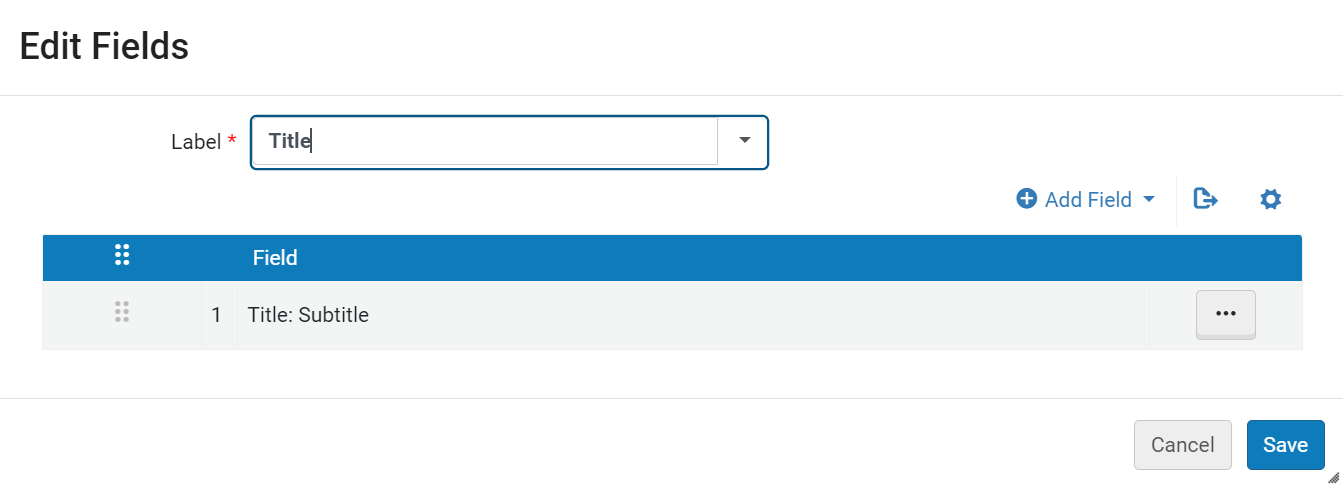
Changing the Fields that Are Displayed for a Property
- In the row of the property you want to modify, in the Actions menu, select Configure. The Edit Fields dialog box opens.
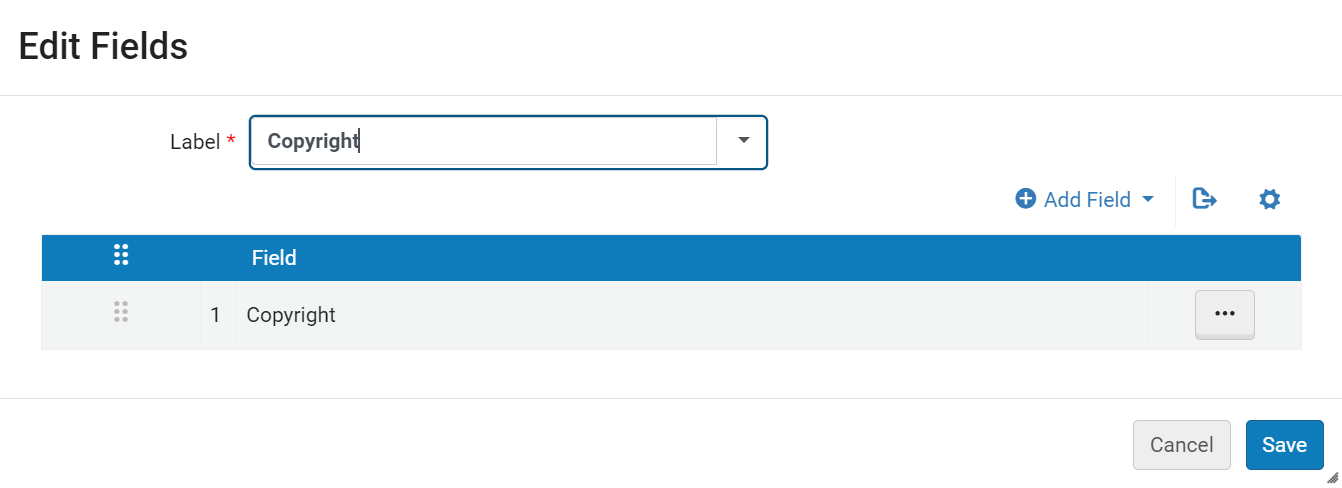
- To add an additional field to the property, do the following:
- Select Add Field.
- In the Sub-elements search box, select the field to add.
- Select Add. The field is added to the list of fields that are to be included in the property.

- To remove a field from the list, in the Actions menu of the field, select Delete, and then confirm the deletion.
- When the list of fields is as you want it, select Save. The Edit Fields dialog box closes, and the Details region in the Asset Page tab is updated.
- At the top of the Details region, under Delimiter, enter the character(s) to use as separators between multiple fields.
- Select Apply.
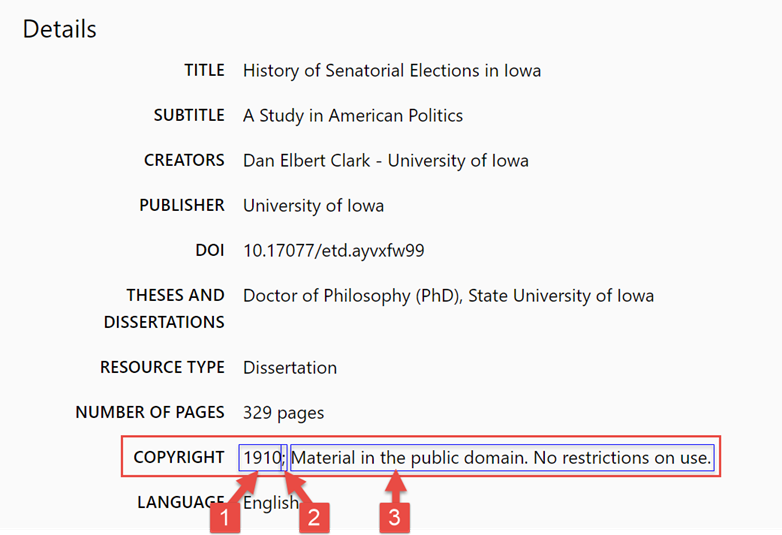
Displaying the Title and Subtitle on One Line, Separated by a Colon
It is possible to display the Title and Subtitle fields on one line, separated by a colon (regardless of the separator that is selected in the Delimiter field).
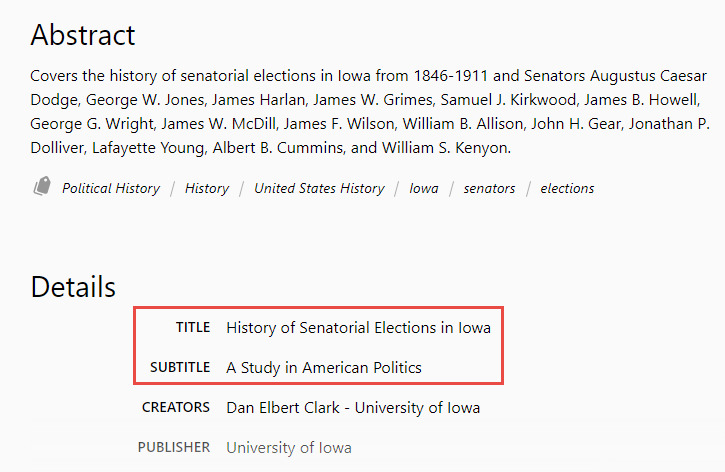
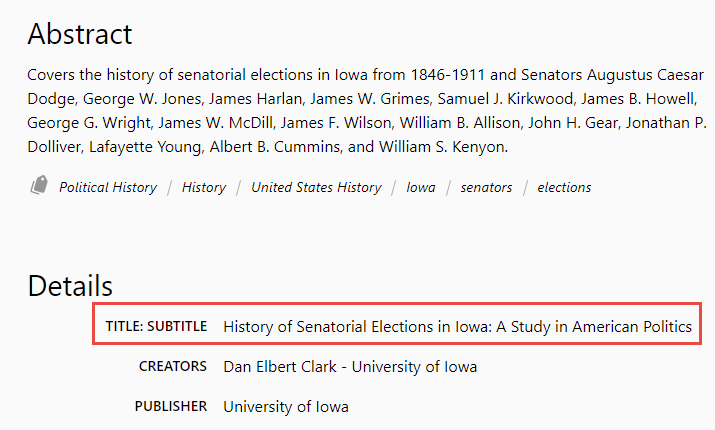
- Use the Title:Subtitle field in one of the following ways:
- Deactivate the Title and Subtitle properties, and activate the Title:Subtitle property. In this case, the label of the property in the Details section will be Title:Subtitle.
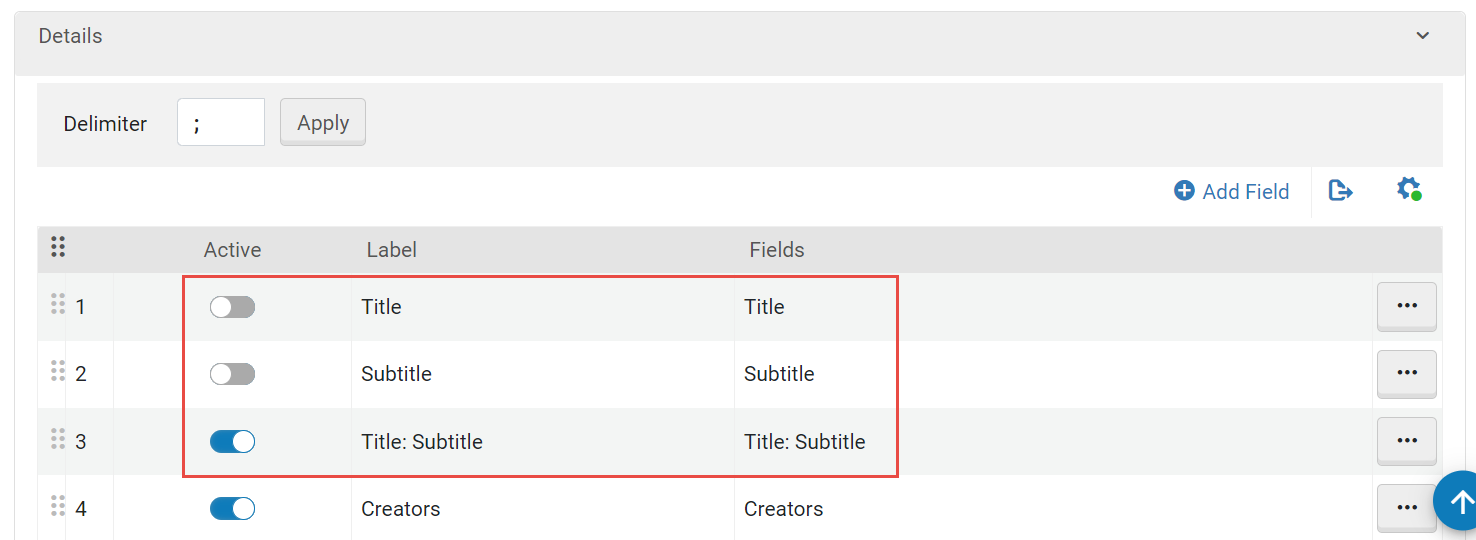
- Replace the Title field of the Title property with the Title:Subtitle field, and deactivate the Subtitle property. In this case, the label of the property in the Details section will be Title.
- Deactivate the Title and Subtitle properties, and activate the Title:Subtitle property. In this case, the label of the property in the Details section will be Title:Subtitle.
Options for Displaying a List of Creators
A number of properties are available for displaying a list of the asset's creators in its Details section:
- Creators – The role of each creator, and the first affiliation specified for them, are displayed. Any additional affiliations are not displayed in the Portal.
- Creators - without role – The roles of creators are not displayed, but all of their affiliations are displayed.
- Creators - without affiliation – The roles of creators are displayed, but their affiliations are not displayed.
- Creators - only name – The names of the creators are displayed, but their roles and affiliations are not displayed.
- Creators - institution only – The roles of creators and their affiliations within the institution are displayed, but affiliations outside the institution are not displayed.
- Creators - all affiliations – The roles of creators and all their affiliations are displayed.
- Creators - all affiliations, without role – All the affiliations of creators are displayed, but their roles are not displayed.
You can choose to include any of these versions of the list of creators in the Details section by adding them to the list of active properties for the section, as explained under Details Settings, above. As their names indicate, the differences between these options relate to whether each creator's name appears in the list with or without certain information:
- Roles – When a role is defined for a creator, if it is displayed, it appears in parentheses after the creator's name.
- Affiliations – When one or more affiliations are defined for a creator, if they are displayed, they appear after the creator's name and role. Depending on the option selected, all affiliations may be displayed, only those that are related to your institution, or only the first affiliation specified for the creator.

Deleting Properties
Properties can be removed from the list by deleting them. Deleted properties can be returned to the list by adding them.
- In the row of the property you want to delete, in the Actions menu, select Delete.
- At the top of the list, select Add Field. The Add Field dialog box opens.
- Under Add Field, select the property you want to return to the list.
- Select Save, and then confirm the selection. The property is added at the bottom of the list.
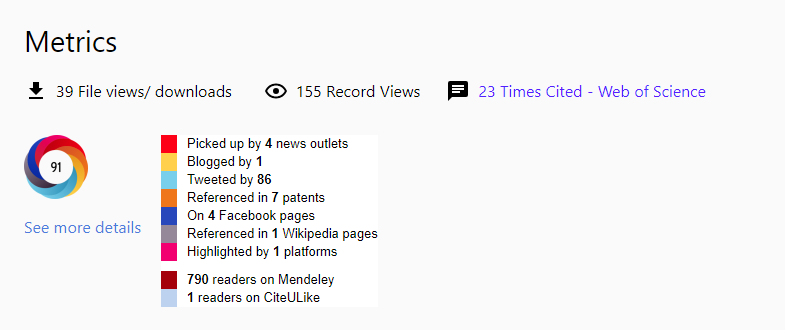
Metrics Settings
- Usage – Data about views and downloads of the asset from the Portal.
- Altmetric – Data about online attention and activity related to the asset, with links to the Altmetric page, where addition details can be seen.
- Web of Science – Citation counts for the asset from the Web of Science, with a link to the relevant Web of Science page. (The link is only included if Web of Science is integrated with Esploro; see Web of Science Integration.)
- Scopus – Citation counts for the asset from Scopus.

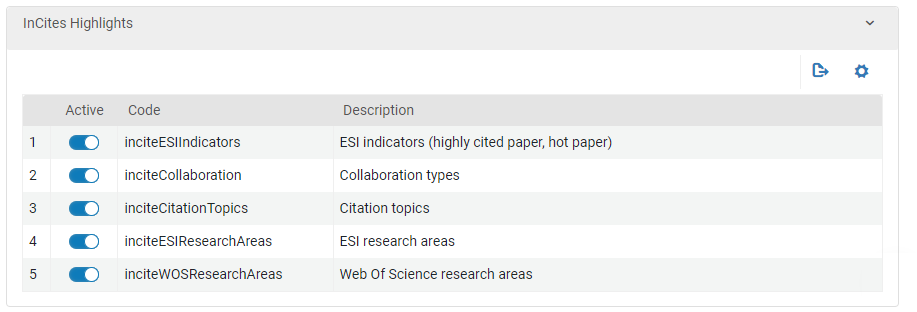
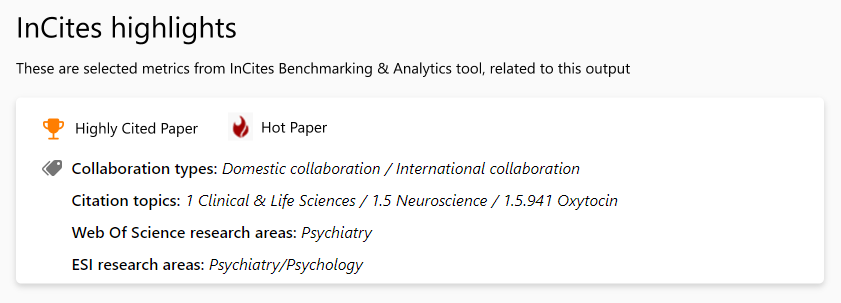
InCites Highlights Settings
InCites is a citation-based evaluation tool by Clarivate for analyzing institutional productivity and benchmark output. For more information, see InCites Benchmarking & Analytics.
Watch the How to Configure InCites Integration video (3:34 minutes).
In the InCites Highlights region of the Asset Page tab, turn the Active toggle on to display the InCites highlights section in Asset pages. In the row actions menu, select Configure to choose which InCites data should be included in the InCites highlights. Note that the order in which the selected data is displayed in the section of the Asset pages is fixed and cannot be modified.
In order for an InCites highlights section to appear in an Asset page, the following is required:
- You must be an InCites customer.
- The output must have a Web of Science ID.
- Ex Libris support must have activated the schemas you select in this section (Citation Topics, ESI research areas, Web of Science research areas).
- The Incites metrics job must have run (see InCites Integration).
For additional help, contact Ex Libris Support.
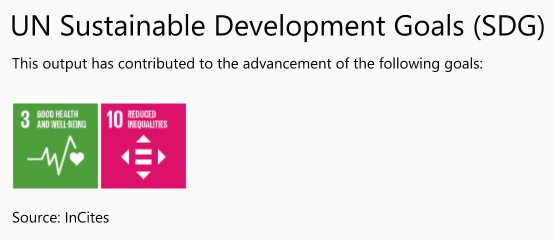
UN Sustainable Development Goals (SDGs)
You can choose whether to include the UN Sustainable Development Goals (SDG) section in Asset pages in the Portal. SDG is a UN initiative that encourages the setting of global research goals that promote prosperity while protecting the planet. For additional information about it, see Sustainable Development Goals.
In order for a UN Sustainable Development Goals (SDG) section to appear in an Asset page, one of the following must be true:
- SDG information was manually added to the asset in Esploro (see SDG Information from the Asset Record, below).
- SDG information was imported into Esploro from InCites (see SDG Information from InCites, below).
If both of these are true, the section appears, and the manually added information is given precedence; the InCites data is not displayed in the Portal. When only the second condition is true – there is only data from InCites – the InCites data displays in the Portal, and InCites is shown as the source (see SDG Information from InCites, below.)
SDG Information from the Asset Record
SDG information about an asset can be manually added under Sustainability Goals in the Description and Research Topics section of the record.

SDG Information from InCites
In order for SDG information from InCites to appear in the UN Sustainable Development Goals (SDG) section of an Asset page, the following is required:
- No SDGs have been manually added to the asset record (see above).
- The asset must have a Web of Science ID.
- Ex Libris support must have activated the SDG option.
- The InCites metrics job must have run (see InCites Integration).
For additional help, contact Ex Libris Support.
Related Media
You can choose whether to include the Related media section in the full asset page in the Portal. When activated, this section displays any media mentions that have been associated with the asset via the Media Mention page. For information about managing media mentions in Esploro, see Working with Media Mentions.

Asset Essentials Tab
In addition to the sections configured from the Asset Page Tab, you can configure the metadata from the Asset Essentials tab. The fields can be enabled, disabled, or reordered. To access this page, navigate to Configuration > Portal and Profiles > Research Portal Configuration and select the Asset Essentials tab.

Within this list, you can also select the Configure row action for more information about Authors (esploroCreators) and Identifiers.
The Creators row has additional information regarding the Show author details section of the Asset page.
For Identifiers, you can add, delete, or reorder the Identifiers shown on the Asset page.

Those items with the Linkable indicator will be displayed as a clickable link.
Asset Actions Tab
You can configure which options appear in the Search Results page after selecting records for Export and the Asset page of the Portal when the the user selects Export or Share. To do this, navigate to Configuration > Portal and Profiles > Research Portal > Assets Display Configuration and select the Asset Actions tab.
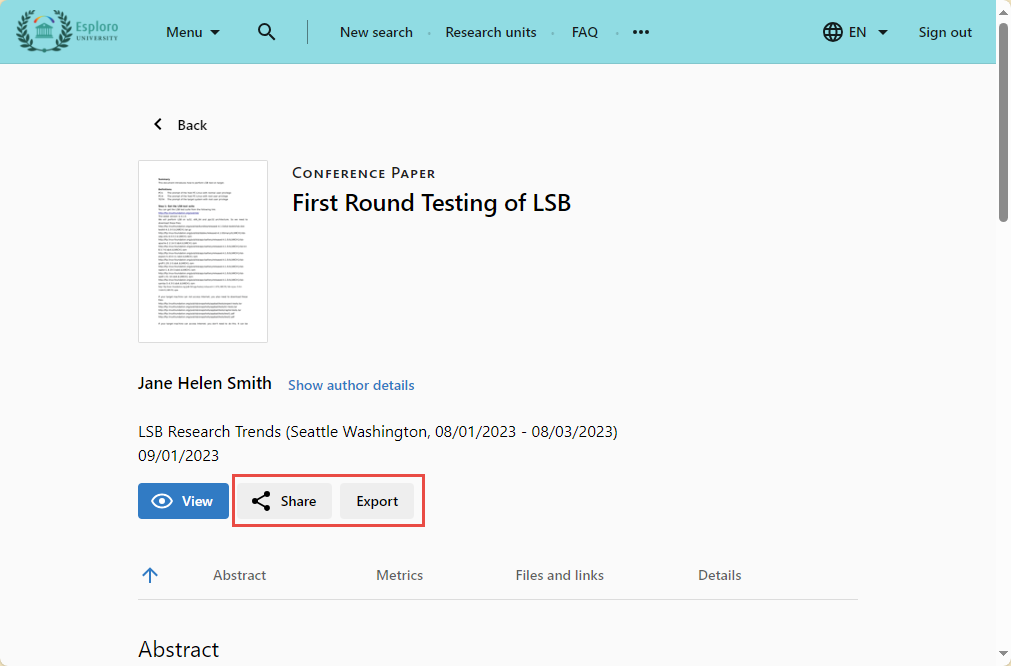
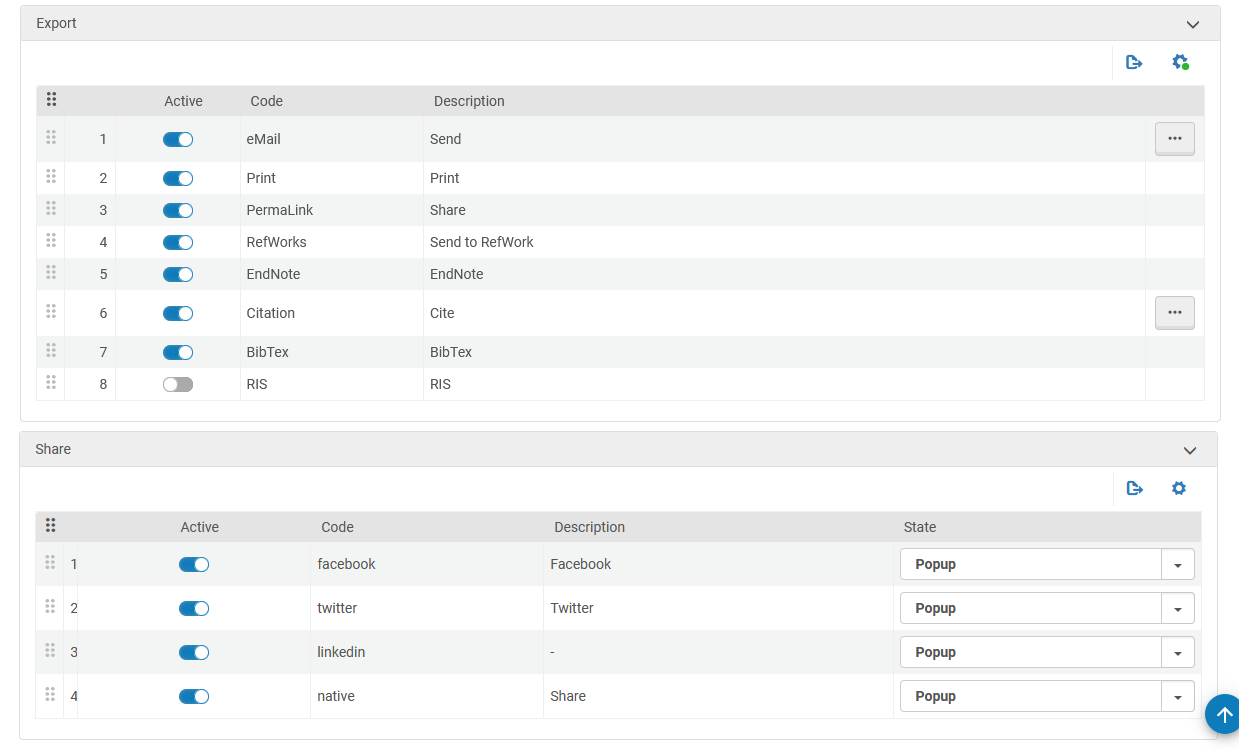
Export Selected/Export Options
You can configure which export actions appear in the Export Asset and Export Selected dialog boxes when the user selects Export in the Asset or Search Results page of the Portal. Each option that is set to Active is included in the dialog box of the Export Asset. If active, RIS, BibTeX, RefWorks and Citation will be included in the Search Results page. Drag the ![]() icons up or down to change the order in which the options appear in the Portal.
icons up or down to change the order in which the options appear in the Portal.
Some of the options can be configured, as explained below.
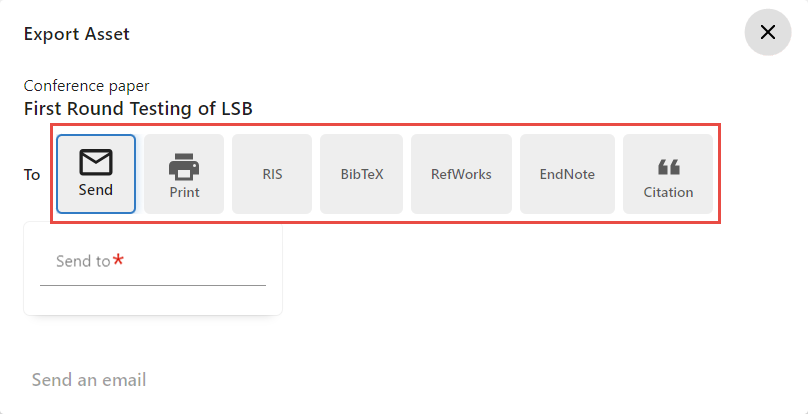
Email Option
The Email option enables the user to send an asset to an email address. When it is active, the Send option appears in the Export Asset dialog box. You can configure the email address from which the email is sent, and the text that should appear in the subject line of the email.
If you enable the Email option, make sure that the Researcher Asset Page Send Email Letter is enabled in Configuration > General > Letters Configuration. Otherwise, the Send option will appear in the Export Asset dialog box, but if the user selects it, no email will be sent.
- In the Export table of the Asset Actions tab, in the eMail row, select Configure from the row actions menu. An Email dialog box opens.
- Update the From address and Subject as needed.
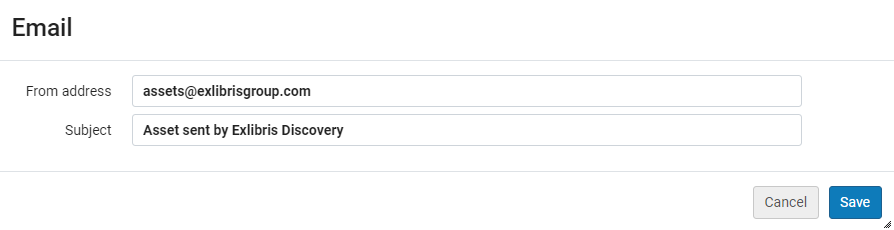
- Select Save. The dialog box closes.
- When you have finished configuring the settings in the Asset Actions tab, select Save.
Citation Option
The Citation option enables the user to create a citation for an asset in the style of their choice, and copy it to their clipboard. When it is active, the Citation option appears in the Export Asset dialog box. After selecting this option, the user can select the style they want from the Citation style dropdown list. You can configure which citation styles are available for the user to choose. By default, Esploro includes a number of common styles. You can add additional styles. Any citation style that has been defined with the Citation Style Language (CSL) and is stored in GitHub's CSL Style Repository can be added. For more information on citation styles, see Managing Citation Styles for Primo VE. See also Configuring Citation Sources.
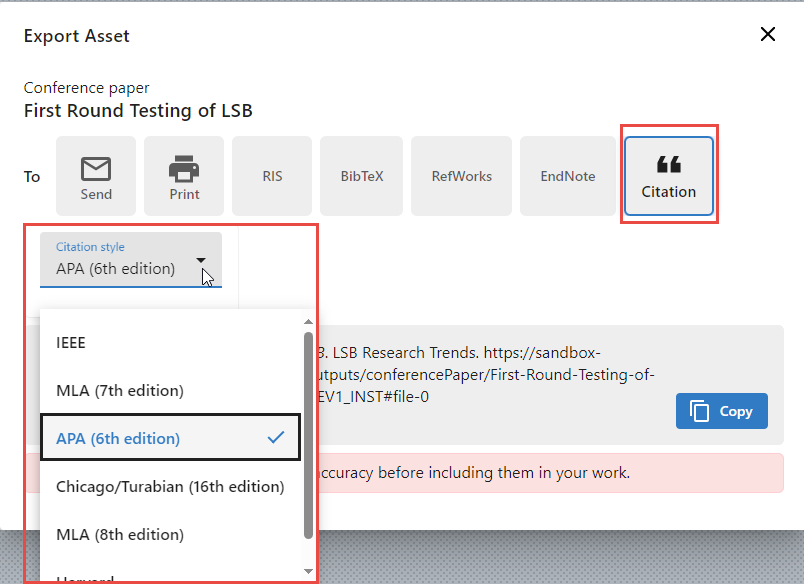
- In the Export table of the Asset Actions tab, in the Citation row, select Configure from the row actions menu. The Citation Styles List page opens.
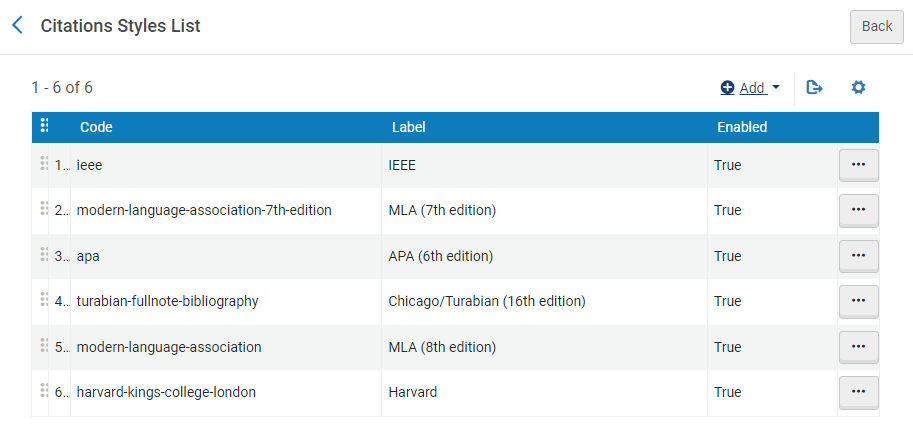
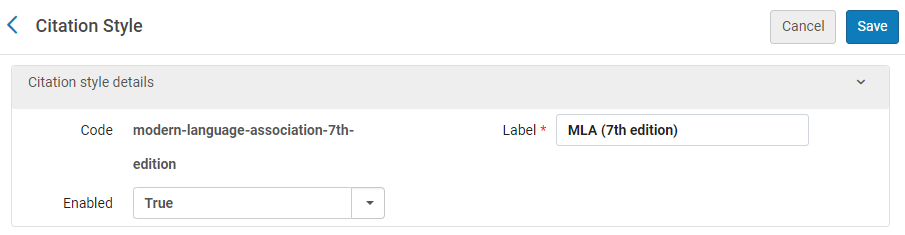
- For each style, in the list, you can choose whether to make the style available on the Portal or not. To do so, from its row actions menu, select Edit. The Citation Style page opens.
The Enabled field controls whether the style is included in the list of options in the Portal: select True to include it, or False to remove it from the list. Select Save to save the setting.
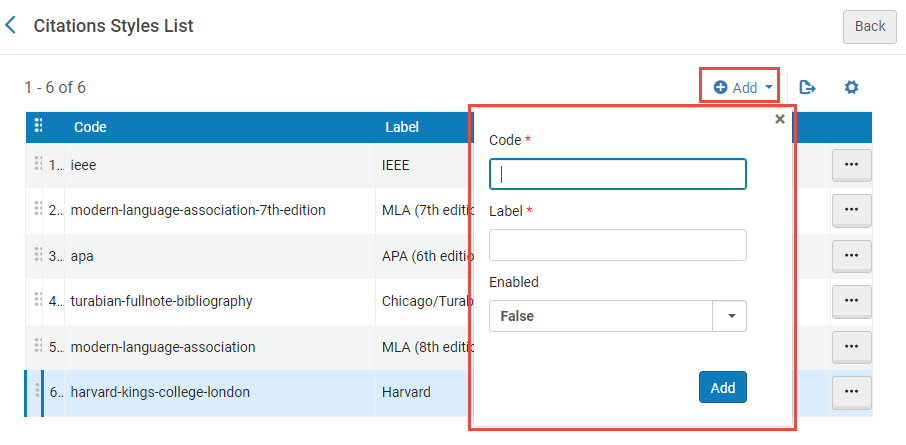
- To add an additional citation style that is not in the list, in the Citation Styles List page, select Add. A box appears, in which you can configure the new style.
You can use citation styles that have been defined with the Citation Style Language (CSL) and stored in GitHub's CSL Style Repository. The Code is the name from the GitHub list, without the format extension. The Label is free text. Select Add to add the style.
If the code you enter is not recognized, a message appears with a link to the site where you can view the list of valid codes.
- When you have finished configuring the settings in the Asset Actions tab, select Save.
BibTex Configuration
You can control the mapping of Esploro asset types to BibTex entry types. To access the configuration, navigate to Configuration > Repository > Esploro BibTex Mapping.
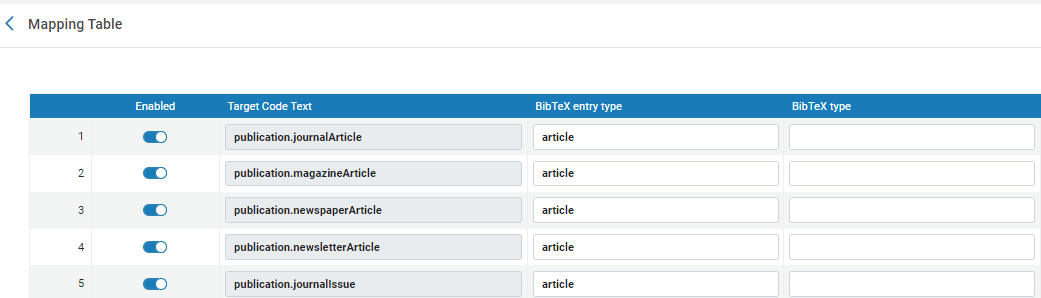
The value/s in the BibTeX entry type column are mandatory. The values in the BibTeX type column are not mandatory - they define a descriptive name for the type of work.
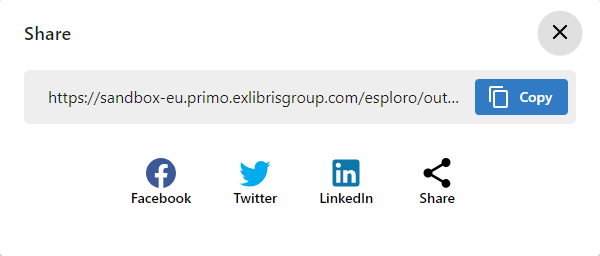
Share Options
You can configure which share actions appear in the Share dialog box when the user selects Share in the Asset page of the Portal. Each option that is set to Active is included in the dialog box. Under State, you can choose whether the option the user selects opens in a pop-up window or as a new tab in the browser. Drag the ![]() icons up or down to change the order in which the options appear in the Portal.
icons up or down to change the order in which the options appear in the Portal.
Project Page Tab
This section describes how to configure the Project page that appears in the Research Portal. For information about configuring the Project Search Page that appears in the Research Portal, see Project Search Page Tab, below. For general information about configuring project-management features, see Configuring Project Management on the Research Hub.
You can configure whether researchers can deposit and edit projects in the Header/Footer tab. To do so, select or clear the Include add projects option in the tab; see Header Settings, below.
To configure which sections will appear on the full Project page, and in which order they will appear, navigate to Configuration > Portal and Profiles > Research Portal > Projects Display Configuration, or, if you already have the Research Portal page open, select the Project Page tab.
- To hide a section from the Project page, deselect the Active toggle.
- To change the order in which the sections are listed, drag and drop them as needed.
Note that the General Information section of the Project page, which contains the project essentials (Project ID and acronym, Project URL, academic department, project start and end dates, and project status) cannot be hidden and always appears on top of the page. Since this section cannot be customized, it does not appear in the Projects Page tab.

You can configure the Members section of the Project page in the Portal to either display or hide non-affiliated project members. To do so, in the Project Page tab, in the row actions menu of the Members row, select Configure. A Project Members area opens at the bottom of the page. Select Display Non-affiliated Project Members to include non-affiliated members of projects in Project pages in the Portal, or clear the option to hide them in the Portal.

Project Search Page Tab
The Projects feature is for Esploro Advanced Edition customers.
Before configuring the search results for projects, you first need to enable searching for projects in the Research Portal (see here). Once the Portal search is enabled, you can also enable the Research Projects link to display in the drop down menu and the homepage on the Portal. (see here).
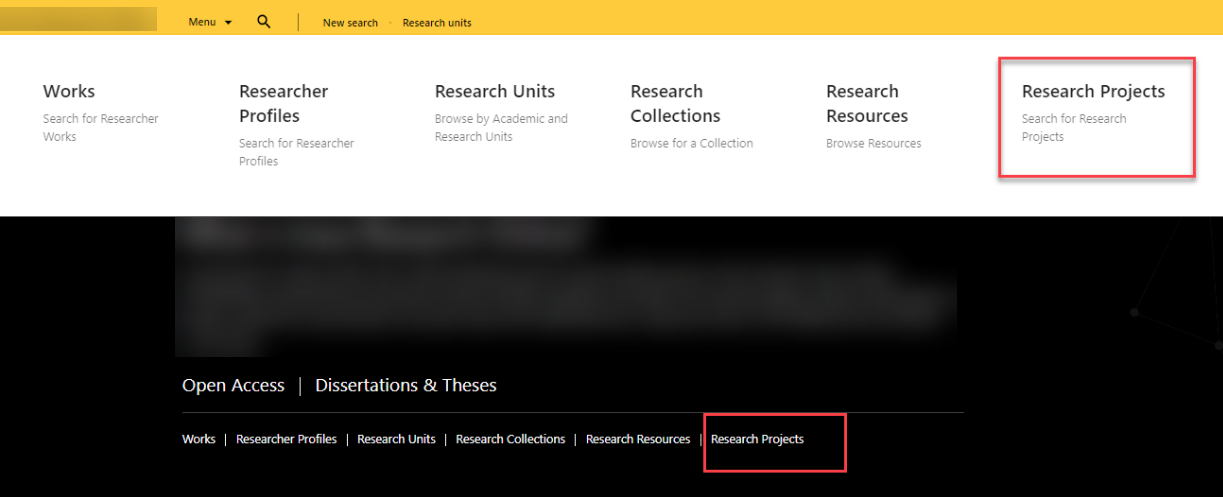
These links take you to the project search results with all projects appearing in the results by default. To configure the project search results, navigate by navigating to Configuration > Portal and Profiles > Project Search Page.
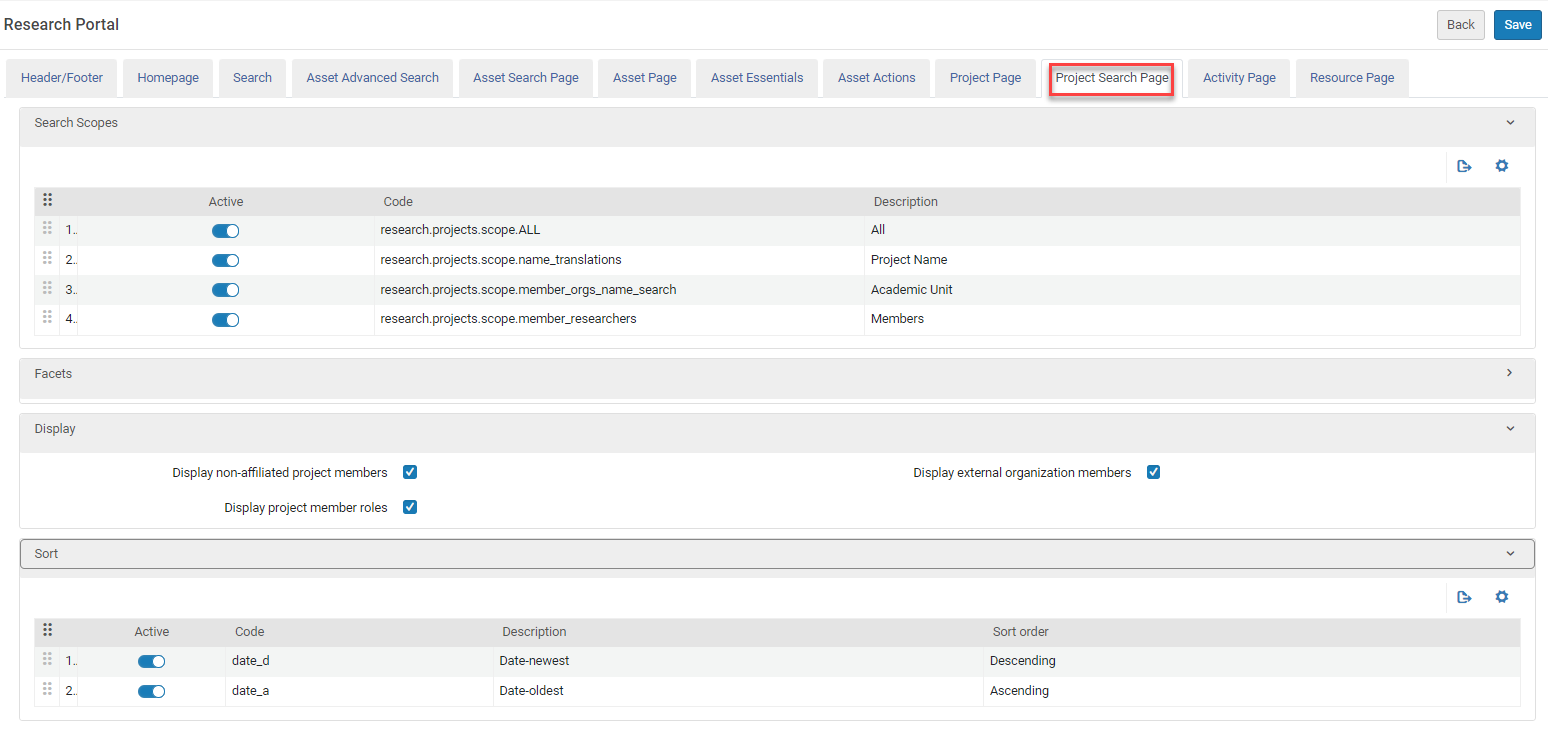
On this page you can configure the following:
- Search Scopes — Which options display in the drop down list when searching for projects in the Portal.
.png?revision=1&size=bestfit&width=736&height=304)
- Facets — Which facets display when searching for projects in the Portal.

Use the facets to filter and refine search results. Below is a list of the available facets.
| Code in Configuration | Label in Portal | Description |
| attributes | Attributes |
Taken from the configurable list at Configuration > Research Administration > Project Attributes. |
| facet_member_researchers | Project members | Displays project members by number of projects in the search results. |
| member_orgs_name | Member organizations | Displays organizations by number of projects in the search results. Includes both internal organization units and external institutions that are part of the project. |
| status | Project status | Taken from the configurable list at Configuration > Research Administration > Project Statuses. |
| type | Project type | Taken from the configurable list at Configuration > Research Administration > Research Project Types. |
| keywords_and_subjects_facet | Subject | Topics and keywords that are available for the projects in the search results. |
- Display — This controls the display for the brief results only, and does not impact the full project page.
- Display non-affiliated project members: By default, non-affiliated members do display. To exclude them from the brief results, select this option.
- Display project member roles: By default, the roles do not display. To add them to the brief results, select this option.
- Display external organization members: By default, the external organizations do not display. To add them to the brief results, select this option.
- Sort — Which sort options appear on the project search results page. You can drag the options up or down to change the sorting order.
Activity Page Tab
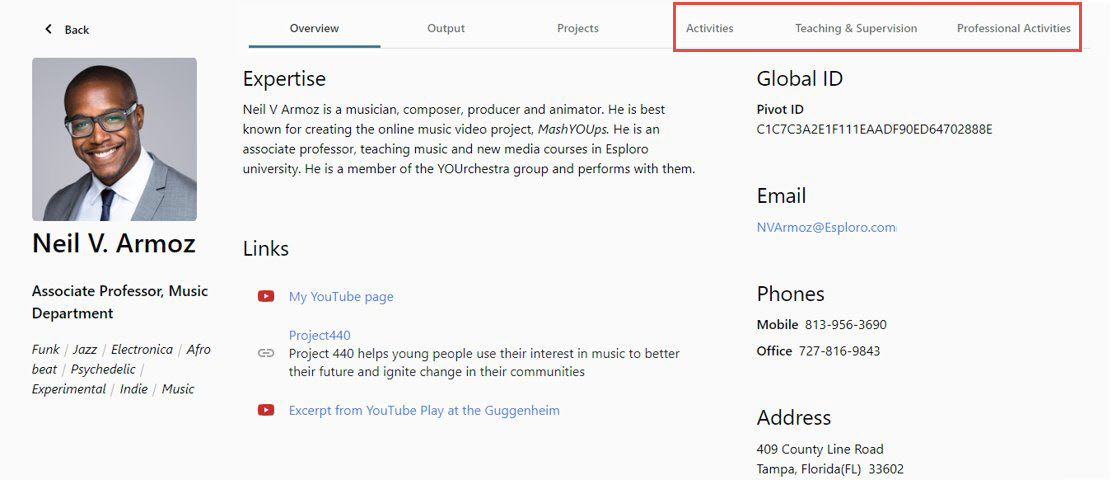
Information about researchers' activities in the institution, such as courses they are teaching, conferences at which they have spoken, and student projects for which they are serving as advisors, can be displayed in researcher Profiles in one or more Activity tabs.
Activity tabs only appear in a researcher's Profile if their Profile includes activities that belong to the categories assigned to those tabs.
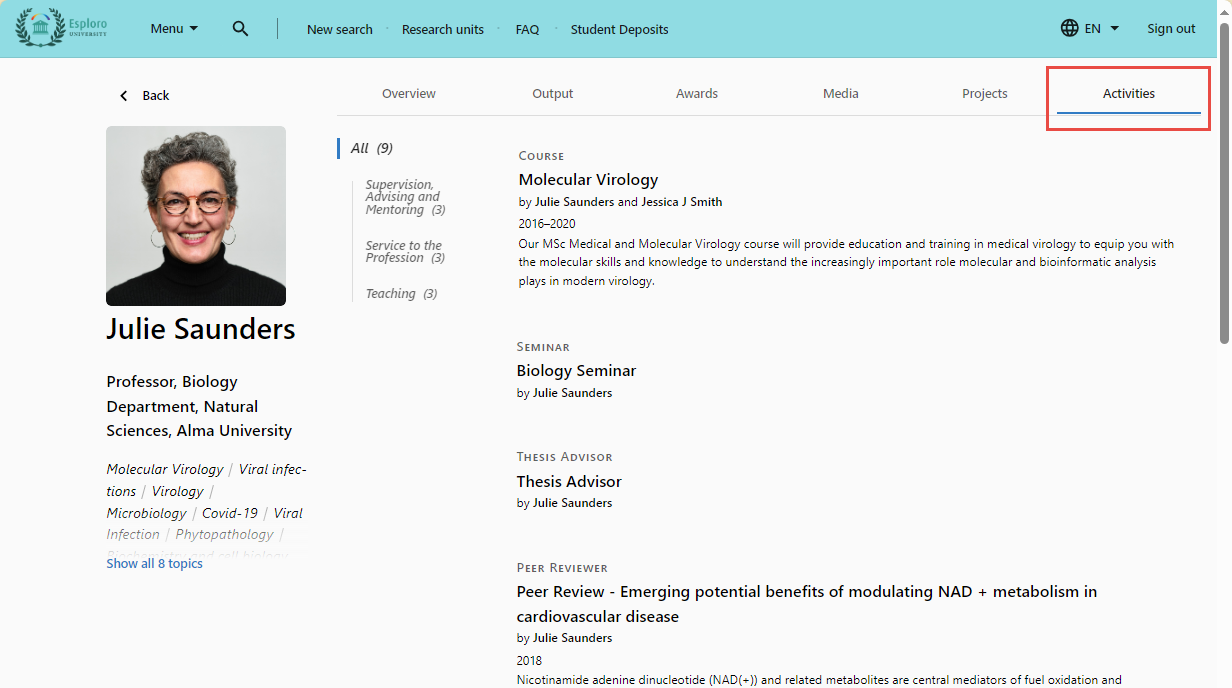
To configure the display of researcher activities in these tabs, go to Configuration > Portal and Profiles > Research Portal > Activities Display Configuration, or, if you already have the Research Portal page open, select the Activity Page tab. The Activity Page tab opens.
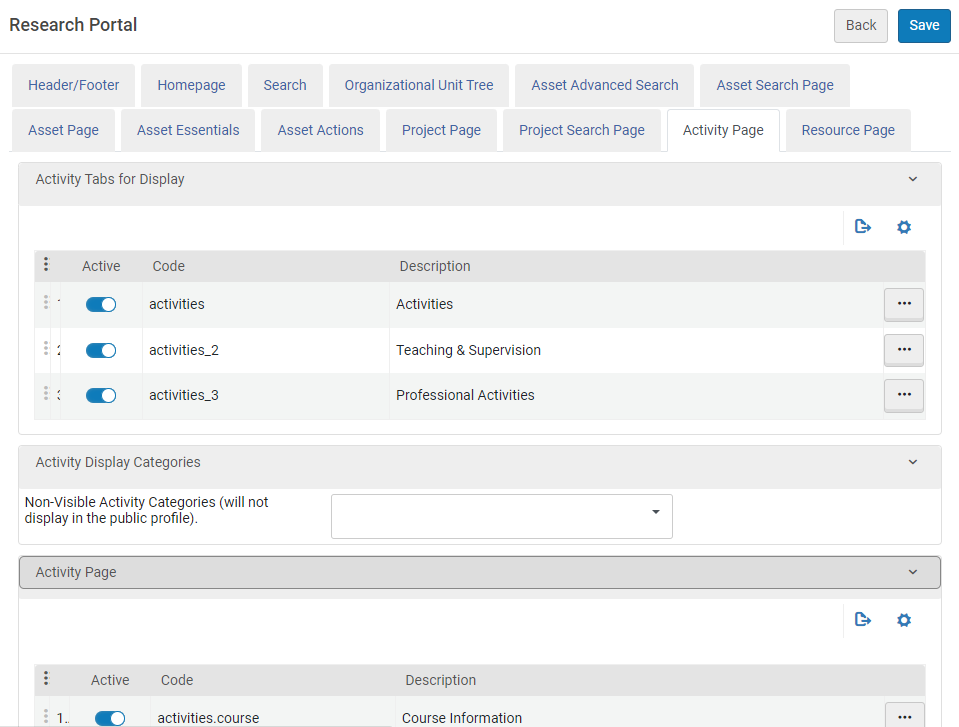
This tab contains three sections:
- Activity Tabs for Display – Choose whether to display all of a researcher's activities in a single, Activities, tab, or divide their activities into two or three tabs.
- Activity Display Categories – Choose to hide certain categories of activities from public display in researcher Profiles.
- Activity Page – Choose which types of researcher activities to include in their Profiles.
These sections are described below.
Activity Tabs for Display Section
In this section, you can choose up to three Activity tabs to include in researcher Profiles and what categories of activities should be included in each tab (see Choosing the Categories to Include in Each Tab, below.
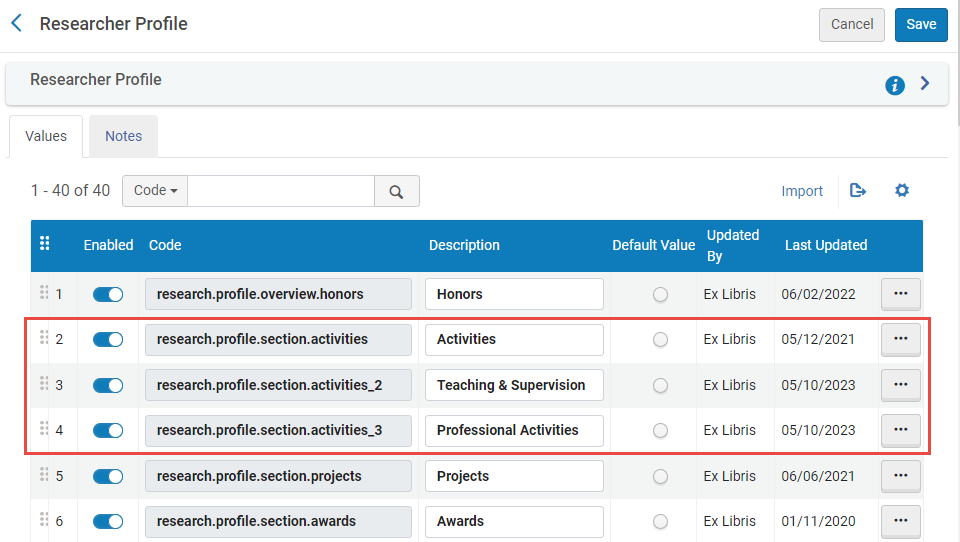
The Description of each tab is its label in the Portal. It can be changed in the Research Profile code table; see Changing the Descriptions of Activity Tabs, below.
- Turn on the Active toggle.
- Drag their icon up or down.
Choosing the Categories to Include in Each Tab
When you activate a tab, certain categories are assigned to it by default. You can either leave the assignments of categories as they were set up by default, or select which categories appear in each tab, as explained below. Categories that do not appear in any of the tabs are not shown in any place in the Portal, public or private. If you want a category to be available in researchers' Profiles but not visible to the public, list it in the next section, Activity Display Categories.
The same category can appear in more than one tab. If you do not want this to happen, make sure there is no overlap among the lists of categories selected for the tabs.
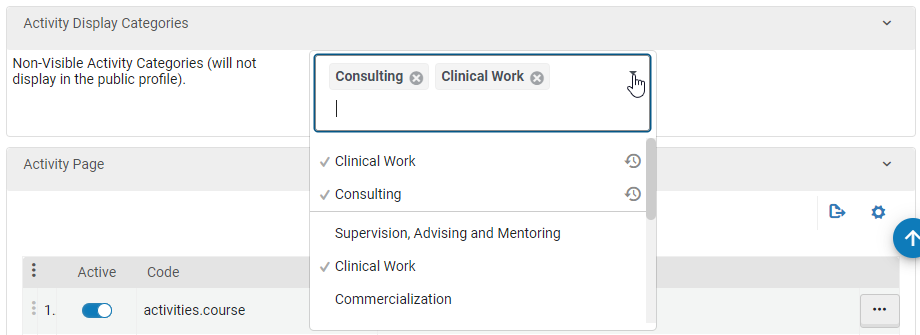
- In the row actions menu of the tab, select Configure. The Activity Categories per Tab dialog box opens. The categories of activities that are currently selected to appear in the tab appear in the Categories to Display field.
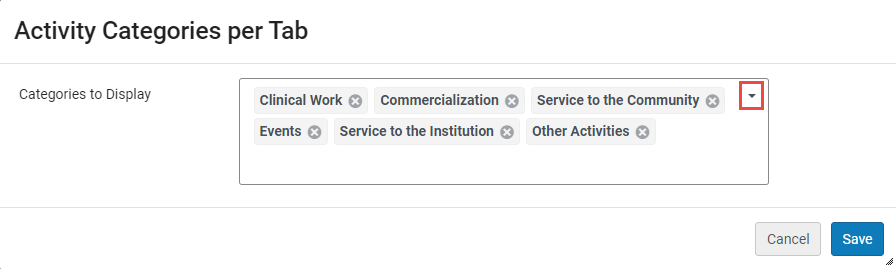
- To add additional categories to the tab, select the arrow in the corner of the field (marked in the illustration above) to open a list of all of the categories that exist in your system. Those that are currently selected have checkmarks beside them. Select other categories to add them to the list of selected categories.
- To remove categories from the tab, in the Categories to Display field, select the x beside each category you want to remove.
- When the list of categories is configured, select Save. The dialog box closes.
Changing the Descriptions of Activity Tabs
The Descriptions that appear for each tab under Activity Tabs for Display are used as the labels of those tabs in the Portal. These Descriptions can be modified in the label configuration at Configuration Menu > Portal & Profiles > General settings > Labels, in the Research Profile code table. Their codes in the table are research.profile.section.activities, research.profile.section.activities_2, and research.profile.section.activities_3. For additional information, see General Settings for the Research Portal and Profiles.
Activity Display Categories Section
In the Activity Display Categories section, you can filter out categories of activities so that they do not appear in public Profiles. Researchers can still deposit and edit activities in these hidden categories when they are logged into their private Profiles. Categories that are excluded from public Profiles do not appear in the public Profiles even if they appear under Categories to Display in the Activity Tabs for Display section.
- Under Non-Visible Activity Categories, select the categories to exclude from public Profiles.
Activity Page Section
In the Activity Page section, you can choose which fields to include in the activity information displayed in researcher Profiles.
In the Active column, enable or disable the fields to display in Profiles.
You can configure the Course Information and Associated Researchers by selecting Configure from their row actions menus.
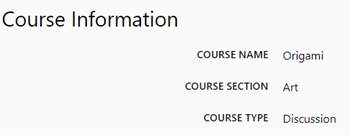
Course Information
For Course Information, in the row actions menu, select Configure to choose which course details will appear in Profiles. The options open below the Activity Page section.

Non-Affiliated Associated Researchers
For Associated Researchers, in the row actions menu, select Configure to choose whether or not to include non-affiliated researchers in activity information that appears in the Portal. The options open below the Activity Page section.
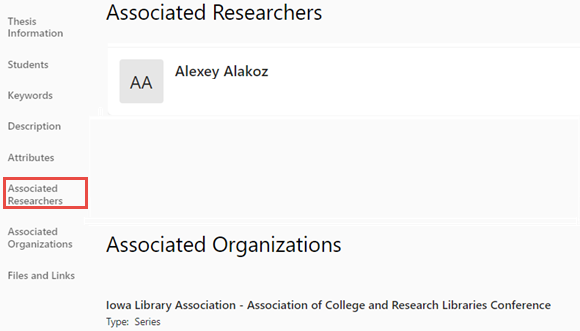
By default the checkbox is cleared, meaning that non-affiliated researchers will not appear under Associated Researchers in the Portal.

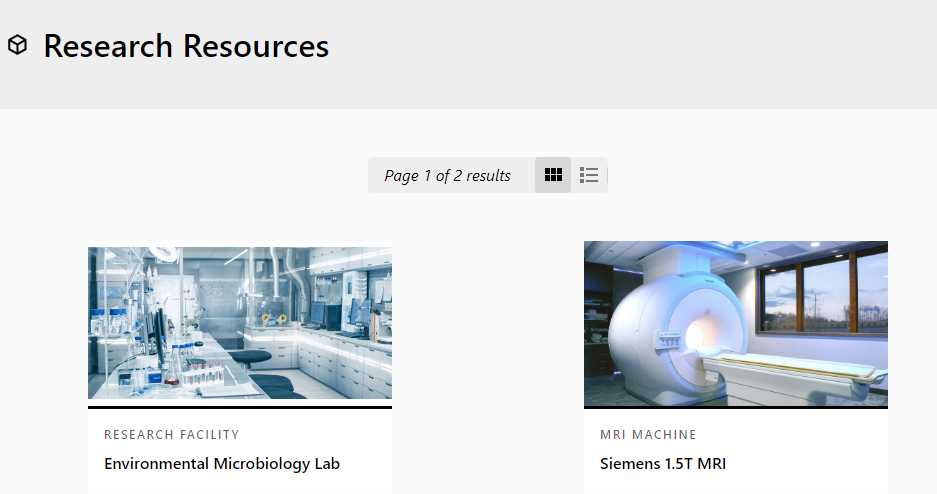
Resource Page Tab
You can configure the look of the Resources page from Configuration > Portal and Profiles > Research Resources Configuration.
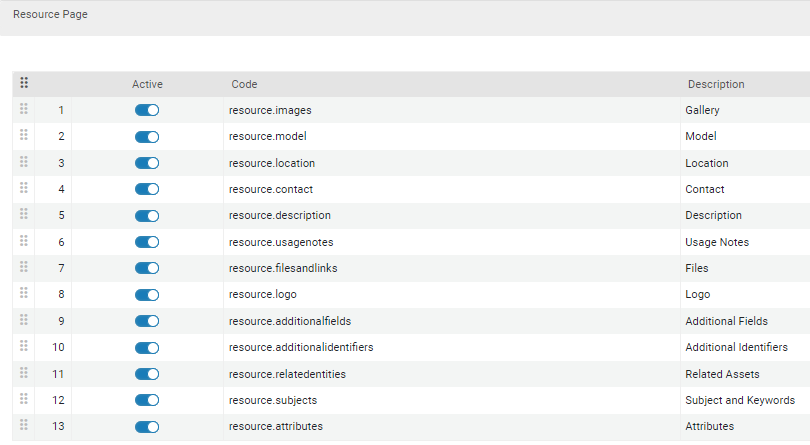
Sections that are enabled (Active) display in the full research resources page.
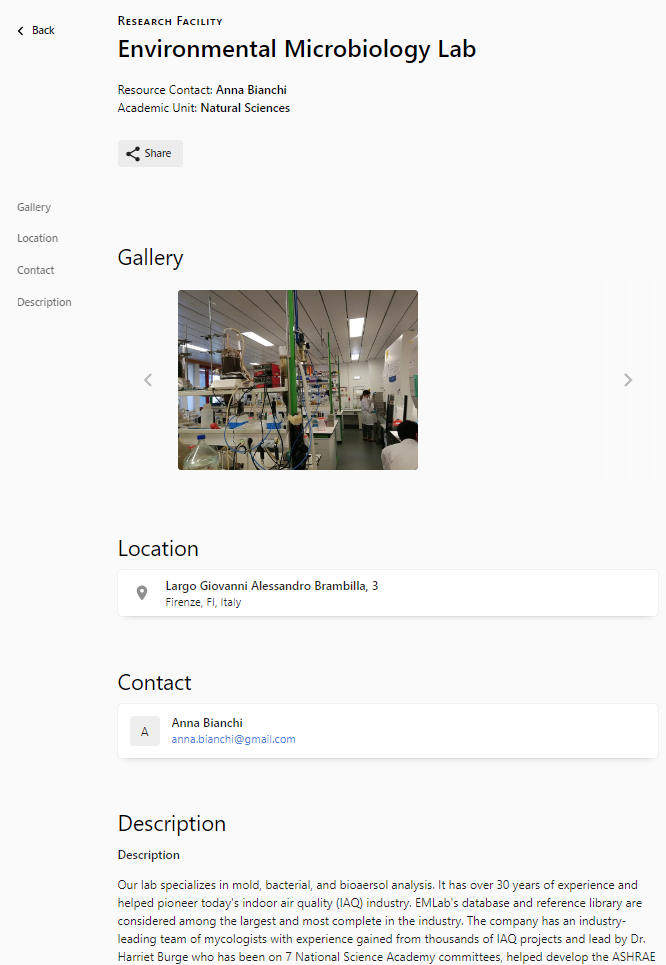
The image in the resources browsing page on the Portal is taken automatically from the first image of the Files and Links section for that resource.
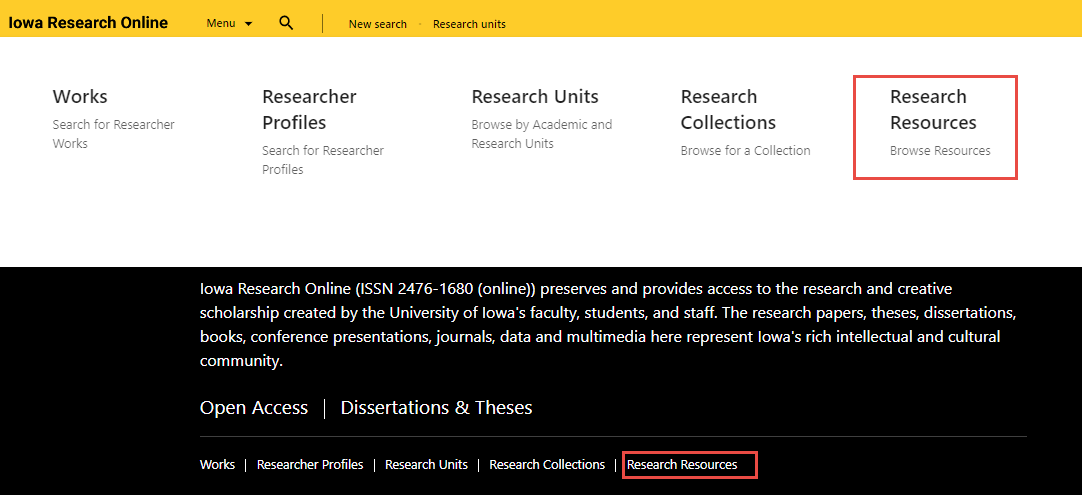
In order to enable the resource menu links on the Portal, you need to activate the Research Resources entity in the Header section (see Header).
Temporary Portal Banner Configuration
You can configure a temporary message as a portal and profiles banner. This is done from the Temporary Portal Banner Configuration menu at Configuration Menu > Portal & Profiles > Research Portal > Temporary Portal Banner Configuration.
Use Add Row to add a message. Enter an End Date to specify when the message should stop displaying.

Labels
You can configure various labels and placeholder text such as such as repository metrics, search bar, etc. This is done from the Labels menu at Configuration Menu > Portal & Profiles > General Settings > Labels. See Labels for more info.