
Managing Electronic Resources
- Electronic Inventory Operator
- Electronic Inventory Operator Extended (required for delete operations)
- Repository Manager
- Purchasing Operator
Managing Electronic Collections
Management Level indicators are included in search results for community managed collections and provide better transparency for the community to understand how and by whom each collection is maintained”. Here are the Management Level options:
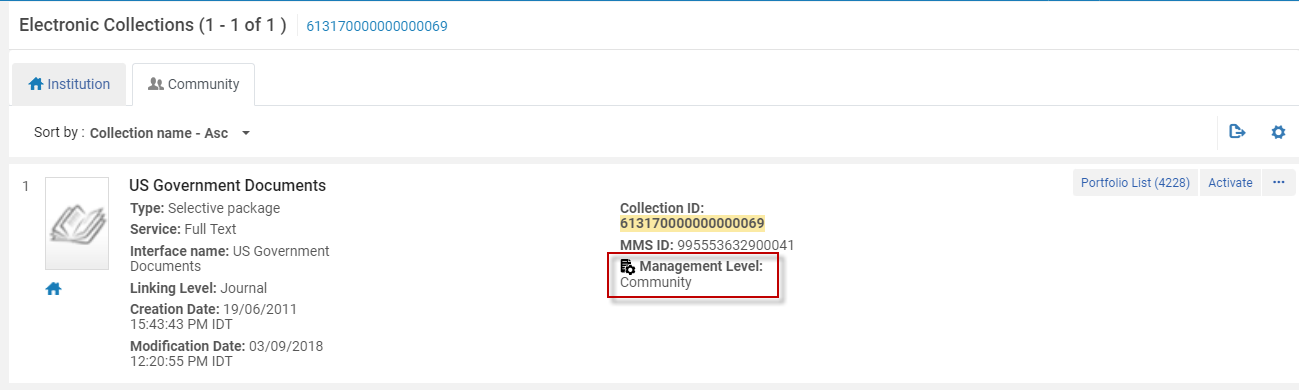
- Ex Libris (Managed by Ex Libris)
- Community (Managed on title level by community)
- Not maintained (The vendor no longer supports this collection - this is a dynamic list that will continue to be assessed by Ex Libris Content Operations over time)
- Contributed by Institution (Collection contributed and managed by an Alma institution)
- Pending deletion (Collection is planned to be removed in the coming 4 weeks)
Usage indicates how many times the Community Zone collection/portfolio was activated for full text.
- The electronic collection has an available service and has at least one available portfolio.
- The electronic collection has no service but its level URL is not empty and its Bibliographic record is not suppressed.
Region indicates from which region this collection was activated from.
- Asia Pacific
- Europe, Middle East, and Africa
- North America & Latin America
The information regarding the number of activation(s) and region(s) is refreshed every one week.
The information is reflected in the Community Zone collections search results only.
Adding a Local Electronic Collection
- On the Electronic Collection Editor page (Resources > Add Local Electronic Collection), enter the basic collection information.
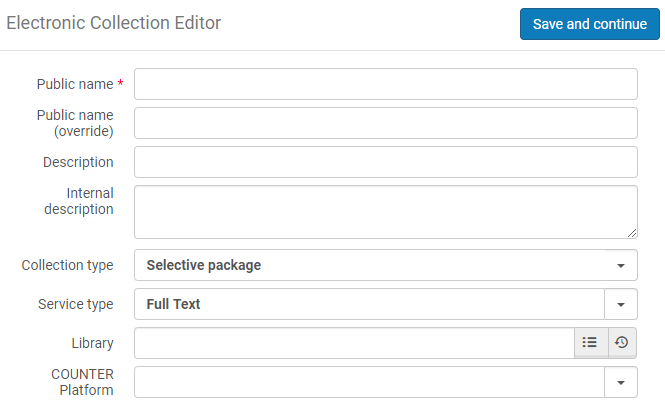
Initial Collection Information Option Description Public name The name to display in the discovery search results. For local electronic collections, this name can be modified later (after the electronic collection has been saved) from the Electronic Collection Description tab using the Electronic Collection Editor.Public name (override) The name to display in place of the public name for this electronic collection. Description The description to display in the search results (not editable). Internal description A description for internal reference only. Collection type One of the following: - Selective Package – An electronic collection for which the library typically will activate specific portfolios (and not the entire collection). Note that "Selective" package and "Aggregator" package behave the same when the flag "Automatically activate new portfolios" is checked in the electronic collection activation wizard.
- Aggregator Package – An electronic collection for which the library typically will activate the entire collection (and not only specific portfolios). Note that "Selective" package and "Aggregator" package behave the same when the flag "Automatically activate new portfolios" is checked in the electronic collection activation wizard.
- Database – Your collection begins with an online database record.
Service Type - Full Text – Display the full text of the e-resource,
- Selected Full Text – The provider displays full text for some of the articles of the journal, but not for all of them.
- None – Used only for databases without titles, such as abstracting or indexing databases. If you choose None, portfolios cannot be added.
Library Select the library for the collection. Users can work only with electronic resources whose library is the same as the library set on their role scope. Users are prevented from performing editing/managing operations on electronic inventory of other libraries. This is to ensure that portfolio activation and other actions are only done by authorized users. Condition Result No library is defined on the electronic collection - The electronic collection's library level is considered institution-level (across all libraries of the institution). This has the following implications:
- All the collection's portfolios are considered institution-level.
- Only users with institution-level role scope can manage the electronic collection and its portfolios.
- The collection's portfolios can be set with any library. In this case, only users with institution-level role scope and the specific library scope can edit the portfolio.
Specific library is defined on the electronic collection
Defining the library on the collection deletes the library previously set on the portfolios of the collection, and portfolios now inherit the library from the collection. This has the following implications:
- Only users with the specific library role scope can manage the electronic collection and its portfolios.
- Once you set a library on the electronic collection, the ability to define a library is disabled for the collection's portfolios.
- The "Library" parameter becomes hidden in the following locations:
- The Electronic Portfolio search results - the portfolio-level library label is hidden, and instead the parameter "Electronic collection library" is displayed.
- The Electronic Portfolio Editor - the portfolio-level library label is hidden, and instead the parameter "Electronic collection library" is displayed.
- The Portfolio table list in the Service editor.
- The library set on the electronic collection is displayed on the Portfolio Editor as a read-only parameter "Electronic collection library".
Selecting a library on an electronic collection deletes the library on all its portfolios. The deleted libraries cannot be restored. For this reason, when you add a library to a collection, a popup message is displayed: "Setting a library to the electronic collection will delete any existing library value from all its portfolios, and they will inherit the collection's library definition. This action will be done by a background process and cannot be reversed." Confirm this message to proceed. Alma displays a success message with the job ID and a link to the Monitor Jobs page where you can track the job.
Changing the library of the electronic collection does not trigger publishing of a portfolio.
The entire inheritance flow only works if limiting E-inventory actions is enabled.
The temp_user_scope_limits_electronic_resources customer parameter must be enabled for this functionality to work.
This parameter can only be enabled by Ex Libris Support.
- Select Save and Continue.
- If you selected service type None, the Electronic Collection Editor page appears. Continue with step 10.
- If you selected service type Full Text or Selected Full Text, the Activation tab on the Electronic Service Editor page appears:
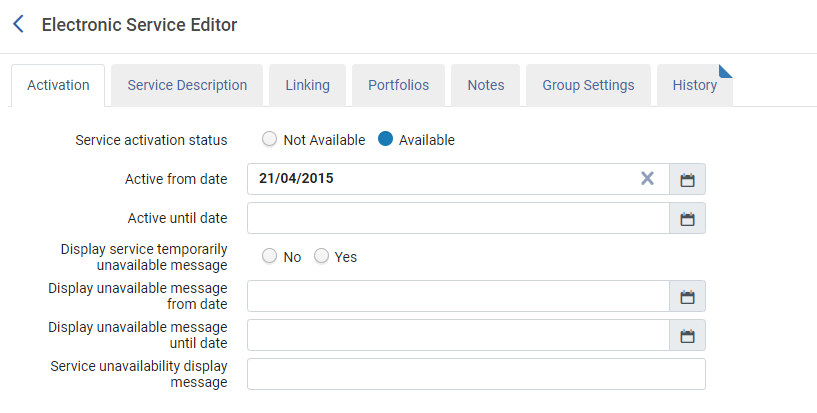
- Enter the activation information.
Activation Tab Options Field Description Service activation status Select Available if you want the service to be active, or Not Available otherwise. This field is ignored if either or both of the Active from date / Active until date fields are set.Activate new portfolios associated with service automatically? Select to automatically activate new portfolios when they are added to this service. This option is available for aggregator and selective packages.This option only applies to portfolios with service type Full Text. Portfolios of service type Selected Full Text do not automatically activate even if this option is set to Yes. Selected Full Text portfolios needs to be activated manually.After changing this setting to Yes, new portfolios are automatically activated, but no change is made to any existing portfolios. Portfolios that were inactive prior to this change remain inactive.When you use this option, the resulting automatically-activated portfolios can be retrieved by using the Portfolio added to auto-active electronic service report type in the Community Zone Updates Task List (Resources > Manage Inventory > Community Zone Updates Task List). See Portfolio added to auto-active electronic service for more information.Active from date A start date for the activation. If no start date is entered, activation starts from the current date (today). There is a daily job that runs and searches to see if the services "Active from date" and "Active until date" are defined. Depending on the definition, the service is either; "Activated (Available)" or "Deactivated (Not Available)".
The activation from and until date fields override the Service activation status field. Service activation status
Active until date An end date. If no end date is entered, activation continues indefinitely. There is a daily job that runs and searches to see if the services "Active from date" and "Active until date" are defined. Depending on the definition, the service is either; "Activated (Available)" or "Deactivated (Not Available)".
The activation from and until date fields override the Service activation status field.Service activation statusDisplay service temporarily unavailable messageSelect Yes or No to generate a service temporarily unavailable message either on the current date or on a specific date (see Display unavailable message until date). Note that this does not deactivate the service.This message is generated for all associated portfolios.Display unavailable message from date A date for when the service temporarily unavailable message is generated. If not entered, the current date (today) is used. Display unavailable message until date The Display unavailable message until date enables the Alma user to set a date where the Temporary Unavailable message expires and no longer appears in the View it.
This saves the Alma user from the need to proactively move the Display temporarily unavailable message back to No.Service unavailability display reason (message) The reason to appear in the service temporarily unavailable message. Use the OpenURL Link Resolver to preview on the Electronic Services page what will appear in the discovery interface for patrons. - Select the Service Description tab and review or edit the information as described in the table below:
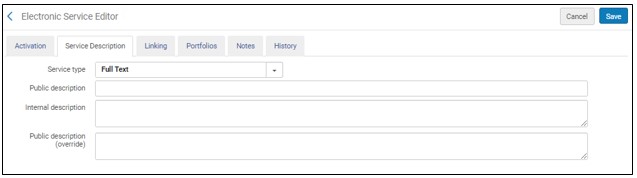
Service Description Tab Options Field Description Service Type This field has no functional implication. See the Initial Collection table.Public description See the Initial Collection table. Internal description See the Initial Collection table. Public description (override) This field is not currently functional. - Select the Linking tab and review or edit the information as described in the Linking Tab Options table below.
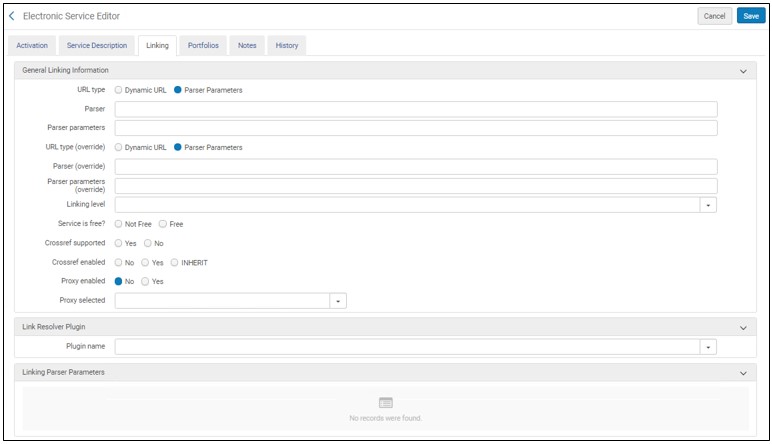
Linking Tab Options Option Description General Linking Information Parser The destination service. (Example: AIP::SCITATION) If the target URL of each portfolio is exactly the value of the jkey = statement in the portfolio parser parameters, use a Bulk::BULK Parser.Parser (override) A parser to override the value in the Parser field.
Parser parameters The linking/access information for the service. For example: url1=http://link.aip.org/link/? & url2=http://publish.aps.org/ & url3=http://link.aps.org/abstract/ & agg=sfxParser parameters (override) An override to the Parser parameters if an alternative one is specified by the service.
To remove the override and restore this field for multiple records in batch, in the Portfolio Loader replace the value of this field with the value “NULL”. For details, see Restore Community Zone linking parameters (remove override of parser).URL Type The type of URL that is used for this service: - Dynamic URL – Select a linking URL dynamically at the service level based on the list of conditions defined in the Dynamic URL field.
- Parser Parameters – An override for the parser’s parameters in the Parser parameters (override) field.
URL Type (override) Appears only for collections linked to the Community Zone. If you are the collection contributor, enter a value here to update the collection in the CZ. If you are not the contributor, enter a value here to update your local copy. Dynamic URL A list of IF conditions to determine the service’s linking URL when you select Dynamic URL as the URL Type. Select Test dynamic URL syntax to verify the syntax of the IF statements. For information on dynamic URLs, see Configuring Dynamic URLs for Electronic Collections and Portfolios.Linking level The linking level or unit to which the electronic collection will link such as volume, issue, or article.
This field is for information only, it does not have any implications in Alma.Linking level (override) Appears only for collections linked to the Community Zone. If you are the collection contributor, enter a value here to update the collection in the CZ. If you are not the contributor, enter a value here if you want to change the linking level value in your local copy. Service is free? Whether or not the service is free. Is free (override) Appears only for collections linked to the Community Zone. If you are the collection contributor, enter a value here to update the collection in the CZ. If you are not the contributor, enter a value here to update your local copy. Crossref supported This field displays whether or not CrossRef is supported in the Community Zone's electronic service for this resource. See www.crossref.org for more information regarding the CrossRef DOI (Digital Object Identifier) service. For records linked to the Community Zone, this field is set by Ex Libris in the Community Zone.For local electronic collections, you may select Yes/No. This setting is optional for local electronic collections. When you select Yes, confirm that the parser program that you select supports adding in the DOI to the URL. If it does not, setting this to Yes serves no purpose.Crossref supported (override) Appears only for collections linked to the Community Zone. If you are the collection contributor, enter a value here to update the collection in the CZ. If you are not the contributor, enter a value here to update your local copy. Crossref enabled Select Yes, No, or Inherit to indicate your preference for using the CrossRef service. - Yes – Get the DOI and use it for linking. You must also have your CrossRef information configured properly. See Alma Resolver Augmentation for information about configuring an Alma integration profile for DOI.
- No – Do not use the functionality related to CrossRef for linking this electronic resource.
- Inherit – Use the policy as defined by the previous (upper) level in the hierarchy. For a portfolio, the electronic service level policy is used. For an electronic service, the policy defined in Community Zone electronic service (as indicated in the Crossref supported field, above).
Proxy enabled Whether a proxy is enabled See Resolver Proxies for information about proxy relationships among portfolios, electronic collections, and services.Proxy selected A proxy profile. When you specify Yes for Proxy enabled, identify which proxy profile is used for authentication (of users outside the library’s network) to access the online database you have created. If you specify Yes for Proxy enabled and you make no selection here, Alma automatically uses the default proxy you configured. The procedure To configure a resolver proxy definition type of integration profile: in the Resolver Proxies section describes how to configure a default proxy profile.Availability rulesSelect the Service display condition rules link to view the rules automatically created by the system.See Display Condition Rules for more information.Link Resolver Plugin Link Resolver Plugin A link resolver plugin, if needed. These parameters are used for Aggregator and Selective collections only. For Databases, the linking parameters should be configured via the Additional tab of the Electronic Collection Editor.
For more information on CDI using these Linking Parser Parameters, see Customer Linking Parameters in CDI Links.
Additionally, some databases require configuration described in the following relevant documents for your environment:
Linking Parser Parameters The values, if needed, for the parameters configured in the parser parameter fields on the Linking tab. See the table below for more information. For the $$U_SHIBBOLETH parameter, the relevant entity ID must be specified. In addition, the value Yes must be entered for $$SHIBBOLETH.
Some electronic collections require parameters that are specific to your library. For SFX customers, this information is migrated from SFX. For non-SFX customers, you must enter the values for the electronic collections to which you subscribe.See the following table for a description of which parameters require information for which electronic collections. Note that this table is not exhaustive. Additional electronic collections that are not listed in this table may require information for their parameters. For more information, see the Alma and SFX Linking Parser Parameters Guide.
For more information on CDI using these Linking Parser Parameters, see Customer Linking Parameters in CDI Links.Collection Parameters Explanation ABC CLIO Databases USERNAME
PASSWORDAn ABC representative can provide you with your user name and password. CCC (Copyright Clearance Center) service BILL, ID, INST, MAIL, and SOURCE A CCC representative can provide you with the details for each of the following linking parameters: - BILL – The email address used for billing.
- MAIL – The email address used for sending an article.
- SOURCE – The university system code, which is provided by CCC.
- INST – The campus name code (for example, Fullerton), which is provided by CCC.
- ID – The libraryUserID of EZProxy users, which is provided by CCC.
If the university system and the institute are the same, the Get It Now service expects the SOURCE and INST parameters to have the same value.
Testing access to CCC Get It Now services (using the test access action in the staff search results) will not lead the staff user to an article because the electronic resource from which test access is performed is at the journal level.Ebook Central Perpetual and DDA Titles CUST_ID Library’s code assigned by Ebook Central. EBSCO CUSTOMER_ID, OPID - If you add the $$CUSTOMER_ID linking parameter, your institution will automatically log in when trying to access articles and journals in the EBSCO platform.
- If your institution adds your unique linking parameter called $$OPID in addition to the $$CUSTOMER_ID, the journal level link will work as above, but the article level links will be generated in the following way (EBSCO's new linking method): https://openurl.ebsco.com/c/{OPID}/openurl?prompt=true&{OpenURLcontextObject}
This is the recommended method.
If you only use the $$OPID parameter without the $$CUSTOMER_ID, the article level link will be created as above and will work as expected, but the journal level link will lead to the EBSCO login page.
- For SSO authentication - enter the value 'yes' in the SSO linking parameters
- For SHIBBOLETH/ATHENS authentication - enter the value 'yes' in the SHIBBOLETH linking parameters
- For IP authentication - enter the value 'yes' in the IPAUTH linking parameters
For details, see Transition to EBSCOhost New Target Parser - December 2021.
Eureka CUSTOMER_ID A Eureka representative can provide you with your customer ID. Factiva NAMESPACE, PASS, USER
Or:
SIDA Factiva representative can provide your namespace, user, and password information.
Or:
Specify your XSID value.When linking to Factiva with your XSID, there is no need to provide the other parameters.See the documents under Alma and SFX for additional parameter details.All Gale Databases LOC_ID
ART
DATABASEA Gale representative can provide you with your institution’s LOC_ID. The ART parameter must be yes.The DATABASE parameter is only relevant for the following collections:- Galegroup IT Custom Journals
- Galegroup IT Custom Newspapers
- Galegroup Military Intelligence
- Galegroup Religion Philosophy Collection
Journals at Ovid USERNAME
PASSWORDLibraries can connect to Ovid Journals using IP authentication or login credentials. If your library uses a user name and password, provide these values. IPAUTH If your institution is authenticated by IP authorization, type yes (in lowercase letters) in the Value column. In this case, there is no need to provide a user name and password. For other Ovid parameter information, see the documents under Alma and SFX. CSA Databases USERNAME Provide your library’s user name and access values. ACCESS ProQuest Databases CLIENTID A Client ID is necessary for users in a collaborative network implementing a Network Zone. In other cases, the Client ID is not necessary for linking to ProQuest databases, but may enable additional services, depending on your institution’s license with ProQuest.
Some ProQuest databases ask for CLIENTID, while others for ACCOUNTID. This is the same value in both cases, the ProQuest account ID.
A ProQuest representative can provide you with your Client ID.For the Chadwyck electronic collections based on the ProQuest platform, refer to the documents under Alma and SFX for parameter details.Westlaw SPONSORCODE A Westlaw representative can provide you with your customer code. - Select the Portfolios tab:
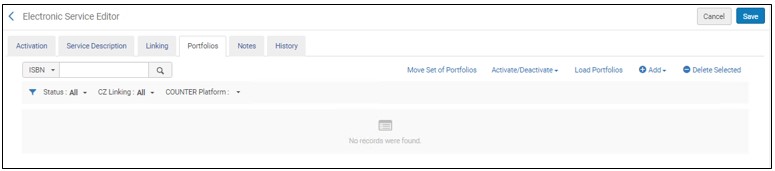
From the Portfolios tab, you can perform the following actions:Electronic Service Editor Page Action Description Add Local Portfolio
To add a local portfolio to the service, select Add and select Add Local Portfolio. The New Portfolio page appears. See Adding a Standalone Portfolio and the New Portfolio Page Options table for more information.When you have completed the information on the New Portfolio page, select Save and Done. Alma saves the portfolio and refreshes the Portfolios tab of the Electronic Service Editor page with options for activating (and deactivating) the portfolio.You can add the portfolio information later by doing one of the following:
- Edit the electronic collection and add the portfolio information.
- Add local portfolios using the Add Local Portfolio option accessed from Resource Management > Create Inventory > Add Local Portfolio (see Adding Portfolios Individually to an Electronic Collection).
Add Portfolios from Community Select this option to activate additional portfolios from this CZ collection. Select Add and the select Add Portfolios from Community. The Portfolios List page appears for the CZ collection. Mark the portfolios you want to activate and select the Activate selected button. Add All Portfolios from Community Select this option to activate all the portfolios from this CZ collection. Select Add and the select Add All Portfolios from Community. The Activate confirmation message appears. Select Confirm to activate all the portfolios in the collection. Load Portfolios Select an Excel-formatted file to load multiple portfolios. For more information, see Adding, Editing, or Removing Portfolio Information in Bulk Add from set Add portfolios from an existing set. Select to open available sets, then select one. Note that this is not an option for collections that are linked to the Community Zone. After adding at least one portfolio, the following additional actions are available
These actions are enabled only if the library set in the electronic resource matches the library defined on the user's role scope. For other electronic resources, these actions are disabled. For details, see Library set on electronic resource.
Actions (for each portfolio) Select the following operations for a portfolio: - Edit – Open the Electronic Portfolio Editor in edit mode. For more information, see Editing a Portfolio Using the Electronic Portfolio Editor.
- View – Open the Electronic Portfolio Editor in view-only mode.
- Test Access – Display the portfolio on the Electronic Services page (or when selecting Display in a new window, if direct linking is enabled).
When a Vendor website does not support iframe, Test Access displays a blank screen. For such cases, use the Display in new window option.
- Remove – Delete the portfolio. In the confirmation dialog box, select whether to:
- Delete the bibliographic record
- Do nothing
- Suppress the bibliographic record
- Deactivate – Deactivate the portfolio.
- Duplicate – Duplicates the local portfolio information (internal description, PO line, override information such as coverage, authentication note, and public note) from the local portfolio from which you selected this action, and opens the Electronic Portfolio Editor page with the duplicated information for you to edit.
Activate Selected Activate the selected portfolios Deactivate Selected Deactivate the selected portfolios Deactivate All Deactivate all portfolios in the list Activate All Activate all portfolios in the list Delete Selected Delete the selected portfolios. In the confirmation dialog box, select whether to: - Delete the bibliographic records
- Do nothing
- Suppress the bibliographic records
Tools 
- Extended Export – Export the list of portfolios with extended information to Excel
- Excel (Current View) – Export only the fields appearing in the list of portfolios to Excel
The export can include inactive (Not Available) portfolios.For more information, see Portfolio Loader.Specific to exporting portfolios from Alma to BrowZine, see Exporting Electronic Portfolios from Alma to BrowZine in the Developers Network. - In the Notes tab, you can enter an authentication note (a note related to authentication (to display in the discovery system) and a public note (information about the service (to display in the discovery system). For more information, see Notes Tab.
When a group setting is defined for an Electronic Collection, a public note defined in the Electronic Service Editor does not trickle down to portfolios. If a group setting is defined, define the public note in the Notes tab of the Collection Editor or in the service-level Group Settings Profile.
-
You can view information about changes to the service on the History tab (for more information, see History Tab). There is no information on this page when the service is first created. Each change includes the following information:
- Date
- Operator – The user who made the change.
- Field Name – The field that was changed. All fields of the Electronic Collection are tracked for changes.
- Old Value
- New Value
-
To restrict access to the resource(s) based on location, select the Group Settings tab and enter the necessary information. You must first configure inventory management groups (see Configuring Distributed Access to Electronic Resources).
- Electronic Collection Editor > Group Setting Tab
Should only be used for Alma Electronic Collections and Databases not indexed in CDI.
- Electronic Collection Editor > CDI > Group Setting Tab
Should be used to only assign group settings to Databases indexed in CDI.
- Select the group to which to restrict the resource.
- For Proxy Enabled, select:
- Yes – Add a proxy when resolving this resource. Specify the proxy in the Electronic Collection Proxy selected.
- No – Do not add a proxy when resolving this resource.
- Resource Default – Use the proxy definition from the resource. See Resolver Proxies for information on the hierarchy of proxy relationships among portfolios, electronic collections, and services. The default resource is determined by this hierarchy.
If using a proxy for resources limited to a specific inventory management group, set this option to 'Yes'. Setting it to 'Resource Default' for a group might not resolve correctly.
- Add a public name for the resource, and authentication or public notes, as required.
For public notes limited to a specific inventory management group, always include the campus/library that belongs to this group in the openUrl.
- Select Save Settings
After saving the group settings, you must also save the portfolio or service; otherwise, the group settings will not be applied.
 Group Settings - SavedFor an example, see Configuring Distributed Access to Electronic Resources.
- Select Save to save all the entries and changes on the Electronic Service Editor page. The Electronic Collection Editor page appears.
 Electronic Collection Editor
- Select Save to save all the entries and changes on the Electronic Service Editor page. The Electronic Collection Editor page appears.
- Review the tabs on the Electronic Collection Editor page and confirm your settings. See the table below for an explanation of the Electronic Collection Editor page tabs and fields.
Electronic Collection Editor Tabs and Fields Option Description Collection Name The electronic collection name. Collection ID The electronic collection ID. Electronic Collection Description tab: See the Initial Collection table.General tab – Summary and Inventory Information section: (Most of this information is relevant only for Database type electronic collections.)Electronic collection type Select a different electronic collection type if you decide to follow a more service-oriented ordering model. Type (override) Appears only for collections linked to the Community Zone. If you are the collection contributor, enter a value here to update the collection in the CZ. If you are not the contributor, enter a value here to update your local copy. Available from date Specifies when the portfolio is automatically set to Available. For more information, see Electronic Portfolio Editor Page. Available until date Specifies when the portfolio is automatically set to Not available. For more information, see Electronic Portfolio Editor Page. Interface name The vendor interface for this database. A link to the vendor interface description is provided when an interface name is entered.Interface name (override) Appears only for collections linked to the Community Zone. If you are the collection contributor, enter a value here to update the collection in the CZ. If you are not the contributor, enter a value here to update your local copy. Services The services information, if it is available. Process type
The only value that this field can display is 'Acquisition'. It is populated automatically once you click the Order row action on a Community Zone collection. This indicates that this collection was activated as part of the Acquisition workflow.
In other cases this field is blank.
Access type can be specified by one of the following options that identifies the licensing rights for the electronic collection:
- Current – This is the default option. For the electronic collection that you are creating, this identifies the licensing arrangement for which you are currently subscribing, paying.
- Perpetual – For the electronic collection that you are creating, this indicates that the titles of the collection have permanent access during the period of a license agreement.
- Current and perpetual – For the electronic collection that you are creating, this identifies the licensing arrangement that includes both current and perpetual resources.
Access type data is also available in Analytics.See Electronic collection access type and Access type (Portfolio) for more information.Access type (Electronic Collection)COUNTER Platform derived from interface This is a read-only field that displays the COUNTER platform that Ex Libris has mapped to the interface associated with this electronic collection. By default, Alma uses this platform to match the electronic collection to COUNTER reports in Alma Analytics. To override this platform value and use a different platform for matching in Alma Analytics, use the COUNTER Platform field described below. Use this parameter to indicate the platform by which you want usage data tracked for a specific electronic collection for Alma Analytics usage data and cost-per-use reports.
The list of options for this parameter comes from the list of platforms included in the loaded COUNTER reports. In order to have values appear in this list, you must have loaded COUNTER reports.
If you leave this COUNTER Platform field blank, Alma Analytics will use the platform in the COUNTER Platform derived from interface field (described above) to match the electronic collection to COUNTER reports in Alma Analytics.
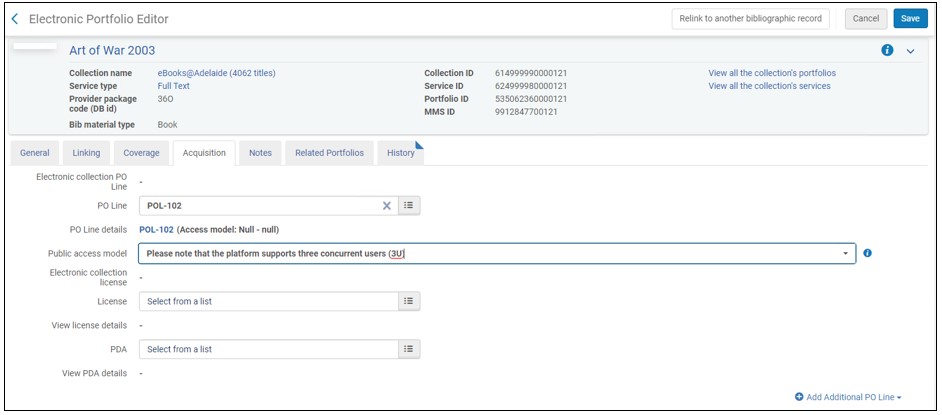
General tab – Acquisitions and License Information section: (Most of this information is relevant only for Database type electronic collections.)PO line The main PO line created for the database type electronic collection being added.
When trying to link an electronic collection to a PO Line, the PO Line must be of type Electronic Collection (Onetime or Subscription).
When adding a database type electronic collection, you may skip this option and process the order information later, after saving the database inventory record.PO line details A link to the main PO line details, if available. Public access model Displays the active access model associated with the portfolio, as inherited from the PO line that created the portfolio. For more information, see Public access model in the Acquisitions tab.
Users have the capability to establish an access model at the collection level, with all portfolios within that collection automatically adopting it. This enables libraries employing auto-activated collections to ensure that each new addition seamlessly inherits the access model.
For institutions that have the "Ebook Central Perpetual, DDA and Subscription Titles" Collection activated from the Community Zone and have the "Upload Electronic Holdings" integration enabled with "ProQuest Ebook Central", the new "Electronic Collection Access Model" field will be disabled.
Activation date The date on which the resource was marked as activated. Note that this is not necessarily the same as Activation from date (defined in the Activation tab). Expected activation date The expected activation date. License The vendor license for the collection that you are adding. View license details A link to the license details when an active license is selected. Additional PO LineA list of any additional PO lines associated with this collection. Select a link to view information about the PO line. To associate other PO lines as additional PO lines for this collection, search for or enter the PO line number in the Quick Add section and select Add PO Line. To remove a PO line as an additional PO line, select Delete in the additional PO line's row. General tab – Historical License Information section: This section appears only if a license was defined. Lines are added to this section each time the license changes. Select View to open the License Details page for this license.Additional tab – Electronic Collection Information section: Source For future use. Source ID For future use. Creator For future use. Alternative title For future use. Electronic Collection Level URL This is the URL entered for the local electronic collection. Up to 1,000 characters (longer URLs are trimmed).For a Community Zone record, this may be the URL identified in the Community Zone for the (activated) electronic collection. See Working with Electronic Collection Bibliographic Records and URLs Added to the Community Zone for more information.For a database type of electronic collection, this field and the Additional descriptive information are required for the electronic collection to be active and published to Primo.Both this field and the Additional descriptive information must be specified for the Institution Zone icon to become active.Electronic Collection Level URL (override) This is the URL entered to override the URL provided in the Electronic Collection Level URL field entered for the local electronic collection. See Working with Electronic Collection Bibliographic Records and URLs Added to the Community Zone for more information. Electronic Collection is free? Whether the collection is free. Is free (override) Appears only for collections linked to the Community Zone. If you are the collection contributor, enter a value here to update the collection in the CZ. If you are not the contributor, enter a value here to update your local copy. Electronic Collection Proxy Enable Whether to enable a proxy. Electronic Collection Proxy Selected A proxy profile. When you specify Yes for Electronic Collection Proxy Enable, identify which proxy profile is to be used for authentication (of users outside the library’s network) to access the online collection. If you specify Yes for Proxy enabled and you make no selection here, Alma automatically uses the default proxy. See Resolver Proxies for information regarding how to create a proxy profile. The procedure To configure a resolver proxy definition type of integration profile: in the Resolver Proxies section describes how to configure a default proxy profile.Language The language of the collection. Language (override) Appears only for collections linked to the Community Zone. If you are the collection contributor, enter a value here to update the collection in the CZ. If you are not the contributor, enter a value here to update your local copy. Category The subject that the online collection handles (optional). This field has no functional use. Category (override) Appears only for collections linked to the Community Zone. If you are the collection contributor, enter a value here to update the collection in the CZ. If you are not the contributor, enter a value here to update your local copy. Additional descriptive information The MARC bibliographic record to link to this collection. The MARC bibliographic record selected for this option appears in the discovery (Primo) search results. This is the MARC bibliographic record that the library’s cataloger has created specifically for the collection being added. This field is required for publishing to Primo.This field and Electronic Collection Level URL are required for the database to be active and published to Primo.Both this field and Electronic Collection Level URL must be specified for the Institution Zone icon to become active.Number of portfolios The number of portfolios in the portfolios list. Select this link to open the Porfolios List page connected to the electronic collection.Character set The character set information. Additional tab – Services section: Add Local Service Add a service to the electronic collection that you have open. See Adding a Local Electronic Collection, starting with the bullet under step 2 that references the Electronic Service Editor page for more information regarding adding a service. Refresh Use this function to follow the progress of a background job that is deleting services. When you select Refresh, the service information that appears in the Services section is updated. 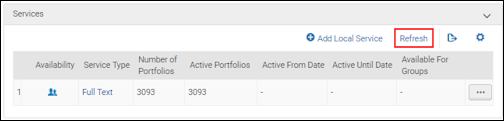 Refresh
Service rows The following actions are available for each service row:- Edit
- View
- Portfolio List - This opens the Portfolios tab on the Electronic Service Editor page.
- Deactivate
- Delete
This initiates a batch process to delete the service. You are prompted with a Delete confirmation message where you can select how to handle bibliographic records with no inventory when your delete request is processed. Your options are Do nothing, Delete bibliographic record(s), or Suppress bibliographic record(s).Select Confirm to process your delete request, and check the History tab on the Monitor Jobs page (see Viewing Completed Jobs) to view the results of your job. A job submitted confirmation message appears.See Delete Electronic Service Job Report on the Viewing Completed Jobs page for more information.
Linking Parser Parameters These parameters are used for Aggregator and Selective collections only. For Databases, the linking parameters should be configured via the Additional tab of the Electronic Collection Editor.
More information about CDI using these Linking Parser Parameters can be found at: Customer Linking Parameters in CDI Links.Additionally, some databases require configuration described in the following relevant documents for your environment:
Notes tab: For more information, see Notes Tab.
Authentication note A note related to authentication (to display in the discovery system). Public note Information about the database (to display in the discovery system). Group Settings tab – See the Group Settings tab explanation above in the step for editing the Group Settings tab. Also see Configuring Distributed Access to Electronic Resources. The following changes in this dialog box apply for services: - A service does not have a public name
- Enter any required linking parameter values. These parameters are defined on the Linking tab of the service. The values are used by the OpenURL link resolver to create correct links. For detailed information, see the Library-Specific Parameters table above and the Alma and SFX Linking Parser Parameters Guide.
History tab – Information on this tab is only relevant when editing the electronic collection. This is a read-only tab that displays a list of changes that were made to the electronic collection or the electronic collection's group settings (for institutions where the multi_campus_inventory_management customer parameter set to true).
Select one of the following radio buttons to indicate the historical information that you want to view:
- Portfolio changes
- Group Settings changes
For each change that is saved, the following information appears on the History tab.
Only changes made in the UI or by internal system processes appear in this tab; changes made by any other job do not.
- Date of the change
- Operator that made the change
- Group Name
- Name of the field that was changed
- Old (previous) value
- New value
For more information about this History tab, see the History Tab for Electronic Resources video (4:26 mins).CDI tab – Except for the Do not share as Full Text available in CDI even if active in Alma field, all other fields on this tab appear only when the collection is indexed in CDI (i.e. the Available for CDI search activation facet is set to Yes).
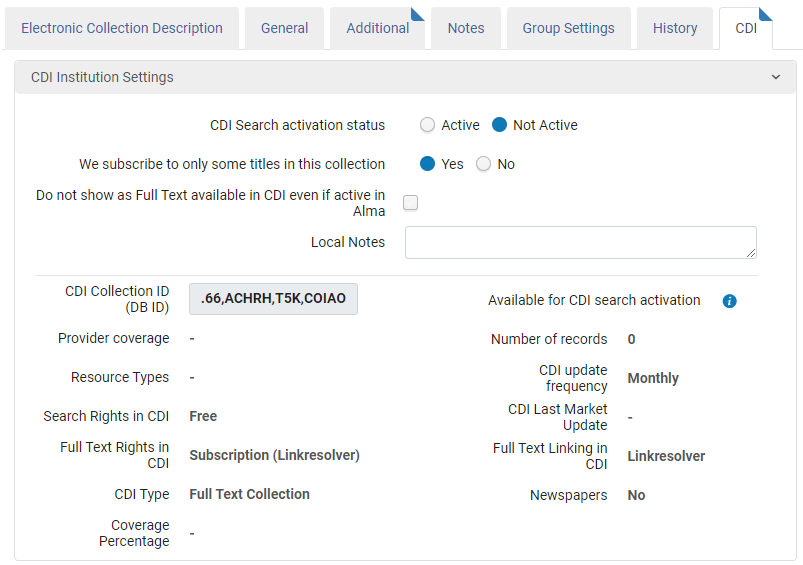 CDI Tab - Collection Indexed in CDI
CDI Search activation status (only available when the CDI model is Fully Flexible)
This setting controls which records will appear in the Primo ‘Expand’ search (when user selects the Expand beyond the Library collection option).
When set to Active, records from the collection will appear in the Discovery expand search. Records will be flagged as No full text available, unless there are full text activations for this collection. For the full text activations, the indication ‘Full text available’ will be shown.
When set to Not Active, records from the collection do not appear in the search results at all.
- Alma collections that you have active, because you subscribe to their full text, will become automatically searchable in CDI. For those collections no separate search activations are necessary.
- Collections that require a subscription to be searchable (for example, A&I databases) need to be active in Alma to be searchable. Such collections are marked on Alma as Search Rights in CDI: Subscription. Such collections cannot be simply activated for search because of the way the activation is published to CDI. If you subscribe to such collection, you need to activate it in Alma (in the same way you activate a full text collection) or set the collection to Full text in CDI only: Yes to ensure this collection will become searchable in CDI. Note that the word “full text” in “Full text in CDI only” is a bit misleading in the context of A&I databases but this function can still be used for such collections (see details in the “Active for full text in CDI only" section).
This option is used when the library wants the collection to be active in CDI but does not want to publish the bibliographic record of the collection and its content to Primo and does not want the collection to appear in the Alma Uresolver Services Page for OpenURL requests initiated from other sources (for instance, Google Scholar).
It can be used for all collections that use Link in record type of linking in CDI, regardless of whether the collection has portfolios or not. Content of collections that are using Link in record type of linking in CDI are set to full text available on the collection level. If Do not show as Full Text available in CDI even if active in Alma is selected as well, an error is generated when saving.
If you create groups in the CDI Group Settings section, the CDI-only full text activation appears only in the individual groups and is hidden from the institution section.
The effect of using this option is:
- The collections and the portfolio bib records are suppressed in Alma and are not published to CDI.
- The collection level record is published to CDI in the zero title file with the effect that the collection is set to full text available and is discoverable in CDI.
Select Yes to indicate a selective subscription (where you subscribe to only part of the content) or No to indicate a non-selective subscription for this collection (where you subscribe to all of the content in the collection).
This option is available only for Aggregator/Selective collections (not for Database types of collections where no portfolios exist). The default setting is Yes.
Selecting No should be done only in case your subscription is non-selective (for example for aggregator collections or where you subscribe to the full content of the collection) and will cause the Full Text Available indicators to appear for all records in the collection.
It is recommended to set the value to No for Link in Record link type of collections as these are typically non-selective subscriptions and this will make sure that also non-ID content is flagged as available.It is recommended to keep the default setting Yes for Linkresolver link type of collections because setting the value to No may result in linking failures, if the collection in CDI contains additional content that is not reflected in the object portfolio list in Alma.
Do not show as Full Text available in CDI even if active in Alma
Select this option to suppress this collection when publishing holdings information to CDI. As a result, content will not be flagged as Full text available in the filtered search, unless it is also available from another collection where it is active and not suppressed. The collection will still appear on your link resolver, and users can link to the full text when coming from other search engines or platforms.
When a collection is ‘suppressed’, its content is also not searchable in the expand search, unless the collection set to active for search or unless the same content is available from other active collections.This option appears only for collections with either of the following settings:
- The Available for CDI search Activation field is set to Yes.
- The Available for CDI search Activation is set to No, but the collection has portfolios in Alma.
Results:
-
All portfolios for the collection are removed from the CDI holdings file. This will ensure that the content is not flagged as 'Full text available' unless it is also available from another collection where it is active and not suppressed.
-
The collection still appears on your Alma Uresolver Services Page for OpenURL requests initiated from other sources (for instance, Google Scholar), but not from Primo/CDI.
-
Content from collections where the full text is suppressed is also not searchable in the expand search unless set to active for search or unless the same content is available from other active collections.
-
The local bibliographic records are not affected and are published to the local Primo Index for discovery.
Why use this option:
-
Prevent content from certain collections from appearing in Primo results for example for Open Access collections. For this content, you would like to make sure the full text appears in the Alma Uresolver Services Page for OpenURL requests initiated from other sources, but you do not want the same full text visible in the filtered search in discovery (Primo/CDI) because it could clutter the result lists for your users.
-
Prevent duplicate ebook results for a specific collection - where bib records are published to Primo local and in addition the CDI records appear in the result list. This option will make sure that the CDI records do not appear in the result list. Note that this will also eliminate the chapter level records in CDI.
For a full list of options for excluding duplicate ebook results, refer to: eBooks in Discovery
The following fields are view only and their information is taken from the registration system.
-
Unless otherwise noted, we update these fields quarterly.
-
To understand the various mix of settings possible and which ones to use to match to the outcome, see Activating Targets/Collections for CDI by Collection Type for Discovery.
CDI Collection ID
Used when publishing the CDI holdings file of the institution.
Number of records
The number of records currently indexed in CDI. This number includes all versions (participants) of a resource.
-
We update this information weekly.
-
The number that appears for DBID searches in Primo/Primo VE may not be same as the listed count since it depends on your institution's activations.
CDI update frequency
The estimated update frequency of the collection in CDI. Values can be weekly, monthly, quarterly or yearly. The update frequency is based on the average update frequency of the last 12 months.
We update this information weekly.
Full Text Rights in CDI
The following full text rights are supported:
-
Open Access – When the provider content for this collection contains an Open Access indication at the record level, or when the Provider collection name clearly indicates that it is open access content. In the latter case, note that some of the collection's CDI records may not have an Open Access indication, especially if the CDI content comes from alternative sources (provider Coverage = NO). For more information on OA content in CDI, see Open Access Content in CDI.
-
Subscription (Collection Level) – All collections that require a subscription for full text and are set to available on the collection level. They do not use the link resolver for selectively setting the collection content to available.
-
Subscription (Title Level) – All collections that require a subscription for full text and the availability setting is performed selectively on the item level, based on your link resolver activations.
CDI type
The type of database in CDI. Values can be:
-
A&I Database: Citation-only database. Records from the collection do not provide full text linking in CDI. However, some of the records from the A&I database may be included in the CDI filtered search, with ‘Full text available’ indication, in case there are active portfolios in Alma from other collections.
-
Full Text Collection: Records from the collection provide full text linking in CDI.
-
Hybrid: Only part of the collection has a direct link to full text on the provider platform.
Newspapers
The following Newspaper Search options are supported:
-
Yes – Newspaper content in this collection available in both the Newspaper Search interface and the regular search interface in Primo/Primo VE.
-
Yes, Newspapers search only – Newspaper content in this collection is available exclusively via the Newspaper Search interface, not via the regular search interface in Primo/Primo VE.
-
No – This collection does not include any newspaper content.
Available for CDI search activation
Yes indicates that at least 80% of the content of the collection is searchable in CDI. No indicates the data in the collection is not searchable or less than 80% of the content is searchable in CDI.
For most of the collections, a data feed is received directly from the provider. For collections that are not directly indexed from the provider, CDI will automatically use the metadata from other collections in the index and the content will still be searchable.Provider Coverage
Indicates how a collection is indexed in CDI.
If set to ‘Yes’, the collection is indexed with data received directly from provider.
If set to ‘No’, we do not get a database directly from the provider, but at least 80% of the content of the collection is covered in CDI by data received from other providers.
Resource Types
Lists up to 5 of the most frequently index resource types for the collection.
The content types published in the CDI tab and in the Collection lists are created automatically from a process analyzing the CDI records. Since on the records we have the more granular resource types, these are the content types we also publish in the CDI tab.
CDI Search Rights
Select Free for all collections whose content can be searched for free or Subscription for all collections that require a subscription for searching their content.
CDI collections with Search Rights: Subscription require the patron in Primo/Primo VE to be logged in to retrieve search results from the collection.
CDI Full Text Linking
Indicates which type of link (collection level or link resolver) is needed to provide full text for a collection. Valid values are Link via Link resolver, Link in record, and Hybrid.
For CDI records, in case the CDI full text linking is ‘Link in Record’ – the Alma link resolver is not invoked at all, the linking will use the link from the provider record directly. As a result, any configuration for services in Alma (name of the collection, display rules or sort order of services, as well as note information) is not used.
Coverage Percentage
This field indicates the percentage of titles, from this specific collection, which has coverage in the Index. The coverage can come from the same provider or from other sources.
When it is a Collection of Type Database and it has FT, the coverage will be 100%.
Database of type A/I do not have Coverage Percentage.
We update this information weekly.
CDI Last Market Update
Last date that at least one record in the Electronic collection was updated in the CDI index.
We update this information weekly, but if no information is available, it is left blank.
CDI activation required – (only available when the CDI model is EasyActive)
With the EasyActive setting, all collections are automatically searchable for the user and do not require search activation, except those listed in the EasyActive collection list. These collections do require activation in Alma (either via the ‘CDI only full text activation’ option or via regular Alma activation) and will in Alma get the indication ‘CDI activation required = Yes’.
These collections will meet one of the following criteria:
-
The providers either do not want their content to be searchable automatically or their databases require subscriptions.
-
Some collections are likely to be used only by some institutions.
What the users see in the filtered search is fully controlled by your full text activations in Alma. Additional search activations impact only the expanded search.
For more information about this option, see: Managing Collections for Discovery with EasyActive
- When you have completed your review, select Save or Contribute to Community (see Community Zone Contribution Guidelines for more information).
Modifying an Electronic Collection
This action is enabled only if the library set in the electronic resource matches the library defined on the user's role scope. For other electronic resources, this action is disabled. For details, see Library set on electronic resource.
- Search for the electronic collection that you want to update.
- Select Edit Collection from the row actions list. The Electronic Collection Editor page appears.
- Update the fields on each tab of the Electronic Collection Editor page to match your requirements. For information on all tabs, see the Electronic Collection Editor Tabs and Fields table.
- Select Save to save your changes to the electronic collection.
Modifying an Electronic Service
- Search for the electronic collection that has the electronic service that you want to update.
- Select Edit from the row actions list. The Activation tab of the Electronic Service Editor page appears.
- Update the fields on each tab of the Electronic Service Editor page to match your requirements.
- For information on all tabs except the History tab, see Adding a Local Electronic Collection, step 3 through step 7.
- For information about the History tab, see the Electronic Collection Editor Tabs and Fields table.
- Select Save to save your changes to the service.
Working with Database Type Electronic Collections
- Open the Electronic Collection Editor page (Resources > Create Inventory > Add Local Electronic Collection).
- Enter the initial database information. For more information, see the Initial Collection table.
- For Collection Type, select Database.
- For Service Type, select None (this is selected by default).
- Select Save and Continue. The Electronic Collection Description tab in the Electronic Collection Editor appears.
- Enter the information as described in the Electronic Collection Editor Tabs and Fields table. For the database to be available in Primo, you must enter at least a collection level URL and the additional descriptive information (the bibliographic record) on the Additional tab.
- After completing the information on the tabs, select Save. The Repository Search page appears with the database record that you added (see the figure below). With this record, you can process other tasks related to the online database such as placing an order.
- Locate the database type of electronic collection for which you want to place an order.
- Select Order from the row actions list. The PO Line Owner and Type page appears.
- Enter the Purchase Type and PO Line Owner and select Create PO Line.
- Enter the PO line information for the online database. (See Creating PO Lines for additional information regarding these fields.)
- When you have completed entering the PO line information, select Order Now.
When you have completed the order, the Purchase Order Lines in Review page appears and your usual acquisitions workflow can be completed.Once the order is complete, an electronic resource activation task is automatically added to the Electronic Resource Activation Task List. See Activating Electronic Resources for additional information. For a continuous order, you must select Done for this order in the task list to allow Alma to renew the order.
- Complete an All titles repository search for the online database.
Locating the online database inventory record with an All titles search requires that the online database record includes a repository link. The repository link is entered on the Additional tab in the Additional descriptive information option.
- Select View It from the row actions list.
- Optionally, select Display in a new window.
In order for a Database Type of Electronic collection to be discoverable in CDI, the conditions defined in step 1 AND (step 2 OR step 3) must be met:
- The database collection has CDI settings: Provider coverage: Yes.
AND - The bib record for the collection is unsuppressed and the collection has a collection-level URL.
OR - The CDI-only full text activation option on the CDI tab is selected.
-
To deactivate an electronic collection of type database, delete the URL from the electronic collection and suppress the bibliographic record. For customers using CDI, this ensures that the content from this database will no longer appear and will be flagged as Full text available in CDI, unless the CDI-only full text activation setting is used for the database. In this case, remove the CDI-only full text activation flag. To ensure the content of the collection will no longer be searchable (and appear in the CDI expanded search results), the collection should also be deactivated for search in CDI.
Linking a Local Electronic Collection to the Community Zone
If your collection does not have portfolios, you can instead delete the collection and activate it from Community Zone.
- Search for a local electronic collection that you want to link to the Community Zone.
- Select Link to Community. The Link Electronic Resources to Community page appears. The page contains a general header with the electronic collection name, type of collection (selective package, aggregator package, or database), and vendor interface name (when available) and the following sections:
- Local Information – Within this section, the following information is provided:
- Service type (full text, selected full text, or none)
- Total number of portfolios
- Number of local portfolios
- Community Information – Use this section to identify the name of the electronic collection to which you want to link in the Community Zone. Once you have specified this information, the Type, Interface name, and Service type information is updated based on the information provided by the Community Zone link.
- Bibliographic Records Configuration – Use this section to identify how you want Alma to use the bibliographic record information available in the Community Zone. If you select Yes and a portfolio match is found in the Community Zone, the bibliographic record associated with the linked portfolio is the Community Zone bibliographic record. If you select No and a portfolio match is found in the Community Zone, the portfolio that is linked to the Community Zone portfolio will use the local bibliographic record. The match routine for this job uses either the ISSN or the ISBN identifier to confirm a match between the local portfolios in the electronic collection being linked with portfolios in the Community Zone.
- Local Information – Within this section, the following information is provided:
- Using the browse capability of the Electronic collection name option, locate the electronic collection in the Community Zone to which you want to link.
- Select an electronic collection from the list of results.
The Link Electronic Resources to Community page appears with your selection and related information.The fields in the Community Information section and the Bibliographic Records Configuration sections are dynamically updated once you have selected the electronic collection name from the Community Zone. - Select Yes or No for the Use the community bibliographic records option and select Link. A dialog box appears with a summary/warnings regarding the linking selections that you made.
- Review the information in the dialog box and, if everything is okay, select Confirm. Alma displays a success message that the linking job (your request) was submitted. (This is the linking job that Alma automatically runs when you process a Community Zone link request, as described in the previous steps.)
Deleting Electronic Collections
The deletion is done by a background process, since it may be time consuming, if the number of portfolios in the collections is large. When the deletion process has been completed, Alma notifies you by an email.
This action is enabled only if the library set in the electronic resource matches the library defined on the user's role scope. For other electronic resources, this action is disabled. For details, see Library set on electronic resource.
For information on deleting electronic collections of 'database' type, see Working with Database Type Electronic Collections.
- Search for a electronic collection that you want to delete.
- In the collection's list of row actions, select Delete. The Delete Confirmation message opens.
- In the message, select how you want to handle bibliographic records without inventory:
- Do nothing - leave the bib records in Alma as they are (without inventory)
- Delete bibliographic records
- Suppress bibliographic records
- Click Confirm. The process starts running. While it runs, the collection is displayed with a comment 'in deletion process', and without its list of row actions, to prevent users from performing any other changes on this collection.
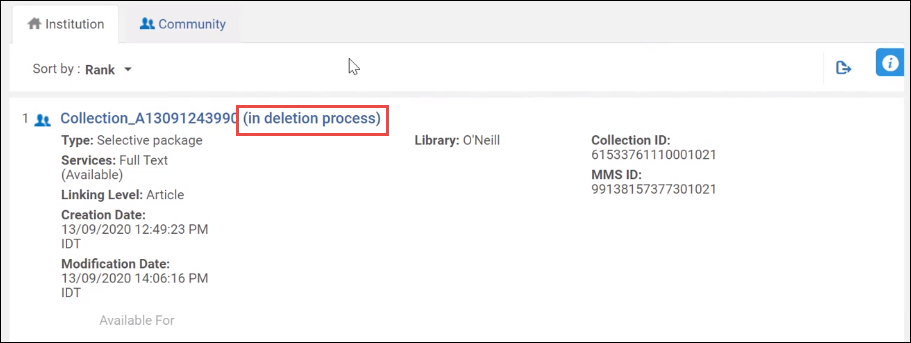
Electronic collection in the deletion process - Go to Admin > Monitor Jobs. The Running tab opens showing the job status of the Delete Electronic Collection job.
- Once the job completed running, select the History tab to view the job results.
In the report, the deleted electronic collections are listed under "bibliographic records without inventory".
- Select Report from the list of row actions to open the job report.

Managing Local Portfolios
- Electronic Inventory Operator
- Electronic Inventory Operator Extended (required for delete operations)
Electronic Material Types
- For an electronic collection added by Ex Libris, the electronic material type of its associated portfolios is assigned automatically for the Electronic material type originating from Bib parameter. Alternatively, you can manually specify the type on the portfolio level using the Electronic material type parameter (see Electronic material type).
- When you add a local standalone portfolio, you can select the material type.
It is currently not possible for libraries to create their own custom Electronic material types.
- Book
- Journal
- Dissertation
- Proceeding
- Conference
- Report
- Document - This type is sometimes used for portfolios in electronic collections in the Community Zone when the type is not otherwise know. If you see this type in a collection and believe that it is incorrect, please open a Salesforce case to correct it.
- Series
- Newspaper
- Transcript
- Database
- Wire
- CD-ROM
- Manuscript
- Sound Recording
- Map
- Other Visual Material - Includes slides and pictures.
- Musical Score
- Streaming Video
- Streaming Audio
- Data Set
- Website
- Video
- Primary (Master) Thesis
- Government Document
Adding a Standalone Portfolio
- After you add a portfolio, you can locate it using the repository search and link it to a matching portfolio in the Community Zone. For more information, see Link to Community.
- The maximum number of portfolios that an electronic collection can contain is 500,000 portfolios. This limit is recommended by Ex Libris for optimum performance.
For linking standalone portfolios to the community zone, see Best Practice Toolkit: Linking Standalone Portfolios to Community Zone.
- Open the New Portfolio page (Resources > Create Inventory > Add Local Portfolio).
- Enter the required portfolio information as described in the following table, when Portfolio Type is set to Standalone. (For a portfolio that is part of an electronic collection, see Adding Portfolios Individually to an Electronic Collection.)
New Portfolio Page Options (Standalone and Electronic Collection) Field Description Descriptive Information: Creation Type Select to either create a new title or use an existing title. Record Type This parameter is available if Creation Type is Create new title. Select either One Time or Continuing. If you select One Time, the LDR of the created record will have m in pos. 7. If you select Continuing, the LDR of the created record will have s in pos. 7. Note that 008 and pos. 23 will be o (online)Placement of new record This parameter is only available in a collaborative network. For information, see Selecting Where to Create New Bibliographic Records. Choose Title
When you select Use an existing title, use the Choose Title parameter to select an existing title.
Select the Select from a list icon to open the Repository Search page and select a bibliographic record.
Title
Enter a new title. This is required when you have selected Create a new title as the Creation Type.
This identifies the name of the local portfolio that you are creating and is used to create the title (245 field) in the bibliographic record for the portfolio that you are creating.
Alternative Title 1 Additional information if you created a new title. Alternative Title 2 ISSN e-ISSN ISBN e-ISBN Record Format
This field appears only if your institution supports multiple record formats such as MARC 21, KORMARC, UNIMARC, or CNMARC.
From the drop-down list, select the type of format to be used when creating the bibliographic record for the portfolio that you are creating.Language (new portfolios only)
When creating a new portfolio, select the portfolio language from the drop-down list. The default value is English for MARC 21 and blank/empty for KORMARC, UNIMARC, and CNMARC. Note that this parameter is only available when creating a new portfolio.
The language information that you select for this parameter is placed in the new bibliographic record's 008 (positions 35-37) for MARC 21 / KORMARC and the 101 0# $a for UNIMARC / CNMARC.
This parameter is optional. When it is left blank, the system places the following information in the bibliographic record that is created:
- MARC 21: eng
- KORMARC: empty (the 008, positions 35-37 are left blank)
- UNIMARC / CNMAR: empty (the 101 0# $a is left blank)
General Information: Portfolio Type
Select Standalone or Part of an electronic collection.
When you select "Part of an electronic collection", a popup opens where you need to select the electronic collection to which to link the portfolio. The selection screen that opens all collections, but allows selecting only the collections that match your role scope(s). For details, see Library set on electronic resource.
When linking a standalone portfolio that has a library set, and attaching it to an electronic collection that has a library set, the portfolio's library is deleted. When the library of the standalone portfolio and the library of the destination electronic collection are different, a warning is displayed on the collection selecting popup (see below): "The portfolio you are about to attach has a different library definition than the selected electronic collection.Once confirmed, the portfolio will inherit the electronic collection's library definition. Note that this action cannot be reversed."Electronic Collection (for part of an electronic collection) Enter the name of the electronic collection to which you want to link the local portfolio that you are creating. Select the Select from a list icon to open the search page and select the electronic collection from the repository.
When you create a portfolio as a step in creating an electronic collection, the electronic collection link defaults to the one being created.Service (for part of an electronic collection) Enter the service (such as Full Text) for the selected electronic collection. When you select an electronic collection from the repository, the Service parameter is completed using the service identified for the electronic collection that you selected. Interface name (for standalone) Select a vendor interface for the standalone portfolio. Use the Select from a list icon to search from the available list of vendor interfaces. Library
When you choose an electronic collection that this portfolio will be part of, and this electronic collection has a library set, then the "Library" parameter displays the library set on the selected electronic collection in read-only mode. If the collection does not have a library set, then you set a library for the portfolio. You can only select from libraries within your role's scope. For details, see Library set on electronic resource.
COUNTER Platform
Specify a COUNTER Platform for tracking usage information.
See COUNTER Platform for more information.
Coverage Information: Date Information: From Year Coverage field that indicate the content that was purchased/activated. These fields affect service resolution (such as Primo). Coverage appears in the repository search results (available from/until). This identifies the portfolio threshold.
During CDI availability calculation, only the Year, Month and Day fields (not the Volume and Issue fields) are used in the calculation.
Until Year From Month Until Month From Day Until Day From Volume Until Volume From Issue Until Issue Embargo/Rolling Year: Operator A moving wall of availability. Number of Years Number of Months Inventory and Linking Information: Parser (for part of an electronic collection)The necessary linking information (if these details are not the same as the electronic collection linking information). Example: EBSCO_HOST::ebsco_amThis defaults to the parser information available with the electronic collection that you selected in the General section. For detailed information, see the Library-Specific Parameters table above and the Alma and SFX Linking Parser Parameters Guide.Service parser parameters (for part of an electronic collection)The electronic collection’s parser parameters. Example:db_host=poh&ebscohosturl = http://search.ebscohost.com & linkurl=http://openurl.ebscohost.com/linksvc/linking.aspx & shib=$$SHIBBOLETH & customer_id=$$CUSTOMER_IDThis defaults to the service’s parser parameters available with the electronic collection that you selected in the General section.Parser Parameters
or
URLEnter one of the following optional parameters as needed: - The portfolio-level parser parameters (part of an electronic collection), if this setting is different from the Service Parser Parameters previously identified (above). Alma uses the portfolio-level parser/parser parameters when they are different from the service-level parser/parser parameters.
- The URL (standalone or part of an electronic collection) for accessing the portfolio. This URL overrides the URL created based on the parameters taken from the electronic collection, service, and portfolio.
Proxy Enabled Whether the proxy is enabled. See the Resolver Proxies section for information regarding proxy relationships among portfolios, electronic collections, and services.Proxy Selected A proxy profile option from the drop-down list. When you specify Yes for Proxy enabled, you must identify which proxy profile is used for authentication (of users outside the library’s network) to access the online database you have created. If you specify Yes for Proxy enabled and you make no selection from the Proxy selected drop-down list (that is, you leave the option blank), Alma automatically uses the default proxy you have configured. See the Resolver Proxies section for information regarding how to create a proxy profile. The procedure To configure a resolver proxy definition type of integration profile describes how to configure a default proxy profile.Availability Status Whether the portfolio is active or inactive. Available from date Specifies when the portfolio is automatically set to Available. For more information, see Electronic Portfolio Editor Page. Available until date Specifies when the portfolio is automatically set to Not available. For more information, see Electronic Portfolio Editor Page. Electronic material type The electronic material type from the drop-down list of options; see Electronic Material Types. Notes: Authentication Note Additional information related to authentication Public Note A note regarding the portfolio that appears to patrons. Internal Description Additional information for staff regarding the portfolio. - Select one of the following Save options.:
- Save and Done – Save the portfolio information and close the New Portfolio page.
- Save and Create Duplicate – Save the portfolio information and repopulate the New Portfolio page with the same information for you to edit for the next portfolio.
- Save and Create New – Save the portfolio information and reopen the New Portfolio page for you to enter the next new local portfolio, thereby saving the steps of opening the New Portfolio page again manually.
To view a video of the Save options, see Efficient Creation of Multiple Portfolios for a Bibliographic Record (4:00 mins).Once you save a portfolio, you can test the link access using the OpenURL Link Resolver that displays results on the Electronic Services page. See Using the OpenURL Link Resolver Debugger Tool.
Adding Portfolios Individually to an Electronic Collection
- Open the New Portfolio page (Resources > Create Inventory > Add Local Portfolio).
- Enter the required portfolio information as described in the New Portfolio Page Options (Standalone and Electronic Collection) table in Adding a Standalone Portfolio, making sure that Portfolio Type is set to Part of an Electronic Collection and the associated electronic collection and service are specified. (For a standalone portfolio, refer to Adding a Standalone Portfolio.)
- Select one of the Save options.
Adding a Set of Standalone Local Portfolios to a Local Electronic Collection
- Create a set of local standalone portfolios.
- To add the set of standalone portfolios to an existing local electronic collection, do the following or skip to step 3 to add portfolios to a new electronic collection.
- Complete a search to locate the existing local electronic collection.
- Select Edit Service and continue with step 4 below.
- To add the set of standalone portfolios to a new local electronic collection:
- On the Electronic Collection Editor page (Resources > Create Inventory > Add Local Electronic Collection), enter the Public name for the electronic collection and other details.
You can specify the service type — Full Text, Selected Full Text, or None — on the Electronic Collection Editor page (eliminating additional steps to make this specification). Note that there is no functional implication to selecting Full Text or Selected Full Text. If None is selected (for databases), portfolios cannot be added.
- Select Save and Continue. The Electronic Service Editor page appears.
- On the Electronic Collection Editor page (Resources > Create Inventory > Add Local Electronic Collection), enter the Public name for the electronic collection and other details.
- Select the Portfolios tab.
- Select Add from set. The Add From Set page appears.
- Search/select the set name (that you created/saved in step 1).
- Select Submit and select Confirm for the confirmation message. The Electronic Service Editor page shows a job submitted message, and a System Job Notification message is emailed with the job details.
- Select Save. The Electronic Collection Editor page appears with an electronic collection successfully updated message.
- Select Portfolio List from the row actions list to view the standalone portfolios added to the electronic collection.
Removing a Local Portfolio from an Electronic Collection
- Complete a repository search for the electronic collection containing the local portfolio that you want to remove.
- In your search results containing the local portfolio to remove, select Edit Service.
- Select the Portfolios tab. The electronic collection contents appear.
- Select the portfolio you want to remove and select Delete Selected, or select Remove from the row actions list.
- Select Save.
Using Portfolio Loader for Adding, Updating or Removing Portfolio Information in Bulk
- Related Portfolios can only be updated using the Portfolio Loader. Creation of Related Portfolios using the Portfolio Loader is not supported.
- This action is enabled only if the library set in the electronic resource matches the library defined on the user's role scope. For other electronic resources, this action is disabled. For details about library inheritance by portfolios, see Library Set on Electronic Resource.
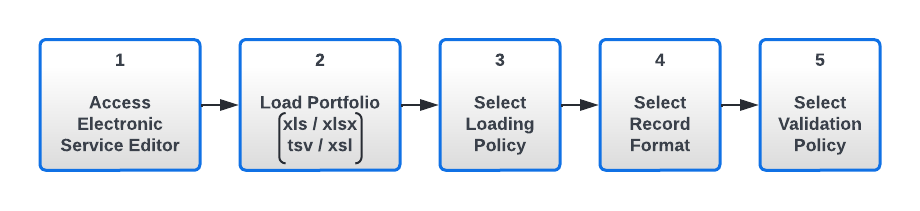
- From the Portfolios tab on the Electronic Service Editor page, select Load Portfolios.
The Activation Wizard File Upload page appears.
- In the Format field, select the file type you are loading into the Portfolio Loader. For instance, select either the default Portfolio Loader Format (an Excel file) or KBART file.
- In the Select File section, enter the name and path of the Excel file (with either the .xls or .xlsx extension) or KBART file (with either the .tsv or .xsl extension ) you prepared, or select Browse
 to select the file.
 Select Format and File - Load Portfolios
 - Select one of the following Loading Policy Types in the Select Loading Policy section:
- Complete – Loads a complete set of portfolios, overwriting any existing portfolios. The following options are available when this is selected:
- Add local portfolios – Process the portfolios (in the input Excel or KBART file) in the following manner:
- If a match is found in the Community Zone for the portfolio, the portfolio is added and linked to the Community Zone.
- If a match is not found in the Community Zone for the portfolio (based on the identifier), a match is attempted in the Institution Zone and, if found, the portfolio is added as a local portfolio in the electronic collection. Otherwise, a new local portfolio record is created and added to the electronic collection.
- Update portfolios – Update existing local portfolios with the information listed in the Excel or KBART file for the matching portfolios when this option is selected. For portfolios linked to the Community Zone, only parser parameters and coverage information is updated when this option is selected.
When updating local portfolios using the portfolio loader, the parser is always changed to Bulk:BULK.
Verify that the URL type (override) is not set for Parser parameters if the Parser parameters (override) value is empty. Otherwise, the service results in an error. - Delete portfolios – Select this option to indicate that:
- If portfolios are in the electronic collection and not in the Excel or KBART file, they will be deleted.
- If portfolios are in the Excel or KBART file but not in the Community Zone-linked electronic collection, they will be activated from the Community Zone (this only applies if the portfolios exist in the Community Zone and if the collection itself is linked to the Community Zone).
The Delete portfolios option provides the following additional options to enable you to specify how you want to handle bibliographic records when deleting portfolios results in bibliographic records without inventory:- Delete bibliographic record(s)
- Suppress bibliographic record(s)
- Do nothing
- Add local portfolios – Process the portfolios (in the input Excel or KBART file) in the following manner:
- Incremental – Loads a file that includes only the incremental changes to the portfolio list of a specific electronic collection. With this option, you can load only the portfolios that have been updated since the last load.
When you choose Incremental, the page refreshes to display the following incremental options:
- Add New – This option adds new portfolios to existing collections in the following cases:
- When the electronic collections are linked to the Community Zone and Add New is selected, this operation attempts to match titles in the Excel or KBART file with portfolios of the same collection in the Community Zone, and if found, activates the relevant portfolios. If no match is found, local portfolios are created.
- When the electronic collection is local and Add New is selected, the portfolio loader adds the titles in the Excel or KBART file as local portfolios.
Whenever there is an existing bibliographic record in the Community Zone, the portfolio loader prefers to use this record. This is the case even when the portfolio loader creates local portfolios; the preference is still for Community Zone bibliographic records.
- Update – This option updates the details of all electronic collection portfolios that are listed in the file.
- Delete – When this option is selected, any portfolios that are in the Excel or KBART file that match the portfolios in the electronic collection are deleted from the repository.
This differs from the Delete portfolios option under the Complete loading policy type (see the description above).The Delete option provides the following additional options to enable you to specify how you want to handle bibliographic records when deleting portfolios results in bibliographic records without inventory:
- Delete bibliographic record(s)
- Suppress bibliographic record(s)
- Do nothing
- Add New – This option adds new portfolios to existing collections in the following cases:
For more information on the Alma portfolio loader, see Portfolio Loader. - Complete – Loads a complete set of portfolios, overwriting any existing portfolios. The following options are available when this is selected:
- For Record Format, select the type of records to create.
This field appears only if your institution supports multiple record formats (enabled by Ex Libris).
- Select the appropriate validation policy, according to the below guidelines:
- Files up to ~2 MB can be validated online.
- For files bigger than ~2 MB and up to 10 MB, select the Validate offline option.
Select one of these options:- Load file if there are no errors – If the validation completes (offline) with no errors, the portfolio records in the Excel or KBART file are uploaded and activated. If any lines have errors, the job completes successfully but no lines are uploaded or activated.
- Load file – ignore lines with errors – If the validation completes (offline) with errors, the portfolio records in the Excel or KBART file with errors are ignored and the remaining portfolio records are uploaded and activated.
- Analysis only – Performs a pre-emptive analysis of the uploaded file without making any changes to the collection. This option compares the file contents to the existing collection and generates a report indicating which portfolios would be activated, updated, or deleted if the file were to be loaded. After the analysis is complete, you can review the results under Admin > Monitor Jobs by searching for the job ID or the job name, which will be formatted as: Electronic activation job – [collection name].
- Select Next.
If there are validation errors in the Excel or KBART file, the Activation Wizard File Upload page specifies that errors exist. Correct the errors in your original Excel or KBART file and re-import/upload the file as described in the previous steps.
Export/Support Split Coverage Using the Portfolio Loader
When using the Extended Export function (E.Collection search > Portfolio list > Extended Export), the exported file supports the export of portfolios with multi-coverage (in addition to the existing support for single-coverage). The exported file is structured and formatted so that it is suitable for use in the portfolio loader (E.Collection search > Edit Service > Portfolios (tab) > Load Portfolios).
This enables users to utilize the exported file, easily edit it and upload it using the portfolio loader. The portfolio loader loads all of the date ranges for the various coverages and does not require the user to manually update multi-coverage portfolios.
See here for an example file that presents the structure of the Export/Load file. In this example you can see a single portfolio with multi coverage, each row represents different coverage information for the same portfolio.
Portfolio Loader Support to KBART Files
The Portfolio Loader also supports the KBART format, which is used in institutions around the world for electronic resource exchange with vendors. To learn more about the KBART format, see here.
Only specific KBART fields are supported by Alma. See List of Supported KBART Fields.
The types of KBART formats that are supported are *.tsv, *.txt, *.xls, and *.xlsx.
The KBART file has a standard, for the upload E holdings to function. Two things need to occur:
- The publisher needs to ensure their KBART files follow the standard above (click the standard link).
- The publisher needs to work with Ex Libris to ensure the integration functions as expected.
Uploading KBART Files in the Portfolio Loader
The "Format" option was added to the Portfolio Loader:

The following options are available:
- Portfolio Loader Format (previously, the only option) - Select to upload an input file in the Excel format. For details, see Portfolio Loader.
- KBART - Select to upload an input file in the KBART format.
In cases where the KBART file contains additional columns beyond the supported ones listed below, the upload will work without errors.
List of Supported KBART Fields
The following KBART fields are supported by the Portfolio Loader:
This only supports uploading static URLs via the title_url field. If customers need to upload portfolios with parser parameters or dynamic URLs, they should use the Excel upload method.
To avoid potential complications, the order of the columns (KBART fields) in the *.xlsx file should be as follows:
publication_title, print_identifier, online_identifier, date_first_issue_online, num_first_vol_online, num_first_issue_online, date_last_issue_online, num_last_vol_online, num_last_issue_online, title_url, first_author, title_id, embargo_info, coverage_depth, coverage_notes, publisher_name.
The required KBART fields are print_identifier and/or online_identifier, but it is customary to include the others.
[Journals] - Click here for a sample file.
[eBooks] - Click here for a sample file.
| Alma Field | KBART Field | JP-KBART Extension | Examples |
|---|---|---|---|
| Access type | access_type | ||
| Coverage notes | coverage_notes | ||
| Date of first issue available online | date_first_issue_online | ||
| Date of last issue available online | date_last_issue_online | ||
| Date of monograph first published online | date_monograph_published_online | ||
| Date of monograph first published in print | date_monograph_published_print | ||
| Embargo information | embargo_info | ||
| The last name of the book’s first author | first_author | ||
| First editor | first_editor | ||
| Ichushi Code | ichushi_code | Other System Number (e.g. 035 # $a + prefix ICHUSHI) | |
| J-STAGE CDJOURNAL | jstage_code | Other System Number (For example 035 ## $a + prefix JSTAGE) | |
| Language | language | ||
| Edition for monograph | monograph_edition | ||
| Volume for monograph | monograph_volume | ||
| NCID | ncid |
Other System Number For example:
|
|
| NDL Bibliographic ID | ndl_bibid | Other System Number (For example 035 ## $a + prefix JTNDL) | |
| NDL Call No | ndl_callno | Other Classification Number (For example 084 ## $a <call-num> $2 kktb) | |
| Number of first issue available online | num_first_issue_online | ||
| Number of first volume available online | num_first_vol_online | ||
| Number of last issue available online | num_last_issue_online | ||
| Number of last volume available online | num_last_vol_online | ||
| Online-format identifier | online_identifier | ||
| Print-format identifier | print_identifier | ||
| Title | publication_title | ||
| Publication type | publication_type | ||
| Publisher name | publisher_name | ||
| Title alternative | title_alternative | ||
| Title identifier | title_id | ||
| Title transcription | title_transcription | ||
| Title-level URL | title_url |
Portfolio Loader
- Activate/deactivate electronic portfolios managed in the Community Zone
- Create a new electronic collection in the Institution Zone
- Import and export portfolio information (proxy settings, URL, parser parameters, inventory management groups, etc.).
- Excel file with the necessary information to Alma. The Excel spreadsheet must include particular columns in a particular order (see below).
- KBART file, for more information, see Uploading KBART Files in the Portfolio Loader.
- To add new portfolio information, use the blank file linked here - Excel spreadsheet.
- To edit existing information, you can export this information from Alma, edit in Excel, and then upload it back again. To do that, go to the portfolios tab in the Electronic Service Editor, select the portfolios you want to edit, and select
 Export > Extended Export. This generates a file identical to the above, but with a few additional columns that are not part of the Portfolio Loader file/import process. These additional columns are noted in the description for License in the table below.
To access the Electronic Service Editor, open the existing electronic collection containing the portfolio(s) you want to edit and from the row actions menu, select Edit Service.
Export > Extended Export. This generates a file identical to the above, but with a few additional columns that are not part of the Portfolio Loader file/import process. These additional columns are noted in the description for License in the table below.
To access the Electronic Service Editor, open the existing electronic collection containing the portfolio(s) you want to edit and from the row actions menu, select Edit Service.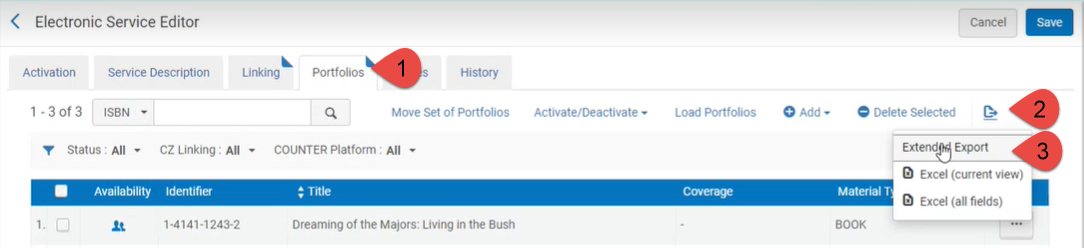
- The Excel file maximum size is 10 MB.
- The supported formats are .xls and .xlsx.
- You can load local portfolios (see Adding, Editing, or Removing Portfolio Information in Bulk) without an identifier such as ISSN, ISBN, or portfolio ID.
- If there are duplicated ISBNs/ISSNs in the Excel spreadsheet, remove them before loading into Alma. If you do not, the Portfolio Loader will show the correct number of portfolios to be activated, even if the activation job completes successfully.
- For update and checking purposes, you can include only the columns needed. For example, if you want to only update portfolio URLs in a collection, you can just include the fields PORTFOLIO_PID, MMS, and URL to make this change.
- New values replace old values in the portfolios. To delete portfolio information, manually run the Change Electronic Portfolio Information job.
- If a portfolio being activated is a local portfolio and not from the Community Zone, the material type is used from the input file. However, if the portfolio being activated is from the Community Zone, the material type value is ignored in the input file and, if needed, can be entered later using the Portfolio Editor.
- When creating a new bibliographic record, the bib material type will be affected by the portfolio Record Type. If the portfolio Record Type is set to ‘One time’, the bib material type will be 'Book'. If the portfolio Record Type is set to ‘Continuing’ – the bib material type will be 'Serial'.
- If you load a new local portfolio, the newly created bibliographic record type will be affected by the presence of an ISBN column in the input file. If there is an ISBN for the portfolio in the input file, the bib material type will be set to 'Book'. If not, the bib material type will be 'Journal'.
-
To clear the following fields using the Portfolio Loader, include a blank cell for these columns in the input file: FROM_YEAR, TO_YEAR, FROM_MONTH, TO_MONTH, FROM_DAY, TO_DAY, FROM_VOLUME, TO_VOLUME, FROM_ISSUE, TO_ISSUE, PUBLICATION_DATE_OPERATOR, PUBLICATION_DATE_YEAR, PUBLICATION_DATE_MONTH, ACCESS_TYPE, PERPETUAL_FROM_YEAR, PERPETUAL_TO_YEAR, PERPETUAL_FROM_MONTH, PERPETUAL_TO_MONTH, PERPETUAL_FROM_DAY, PERPETUAL_TO_DAY, PERPETUAL_FROM_VOLUME, PERPETUAL_TO_VOLUME, PERPETUAL_FROM_ISSUE, PERPETUAL_TO_ISSUE, PERPETUAL_PUBLICATION_DATE_OPERATOR, PERPETUAL_PUBLICATION_DATE_YEAR, PERPETUAL_PUBLICATION_DATE_MONTH, AUTHENTICATION_NOTES, INTERNAL_DESCRIPTION, PDA, PUBLIC_NOTES.
-
To clear the following fields for a group setting, specify the group name and use a blank cell for these columns in the input file: GROUP_FROM_YEAR, GROUP_TO_YEAR, GROUP_FROM_MONTH, GROUP_TO_MONTH, GROUP_FROM_DAY, GROUP_TO_DAY, GROUP_FROM_VOLUME, GROUP_TO_VOLUME, GROUP_FROM_ISSUE, GROUP_TO_ISSUE, GROUP_PUBLICATION_DATE_OPERATOR, GROUP_PUBLICATION_DATE_YEAR, GROUP_PUBLICATION_DATE_MONTH, GROUP_PROXY_ENABLE, GROUP_PROXY_SELECTED, GROUP_AUTHENTICATION_NOTES, GROUP_PUBLIC_NOTES.
-
A known issue exists where after running the portfolio loader, the portfolios in the list are activated, even when the respective column is not in the uploaded file. To rectify this issue, export the relevant portfolios with the availability. Then run the Portfolio Loader on the exported file (including the "Availability" column), with the addition of the changes you want to introduce.
The following table describes the fields that the portfolio loader Excel file may contain.
| Field | Description | ||||||||||||||||||||||||||||||||||||||||||||||||||||
|---|---|---|---|---|---|---|---|---|---|---|---|---|---|---|---|---|---|---|---|---|---|---|---|---|---|---|---|---|---|---|---|---|---|---|---|---|---|---|---|---|---|---|---|---|---|---|---|---|---|---|---|---|---|
|
LOCALIZED |
The localized field in the Excel file indicates that a Community Zone portfolio has been localized/activated for your institution. See Extended Export for more information. |
||||||||||||||||||||||||||||||||||||||||||||||||||||
| ISSN | One or more (for cases in which more than one ISSN—such as an E-ISSN—exists) ISSN identifiers (up to three). Alma uses the first identifier that provides a successful match.
At least one of the following must be available in the Excel file: PORTFOLIO_PID, ISSN, ISBN, or OTHER_SYSTEM_NUMBER.
|
||||||||||||||||||||||||||||||||||||||||||||||||||||
| ISBN | One or more (for cases in which more than one ISBN—such as an E-ISBN—exists) ISBN identifiers (up to three). Alma uses the first identifier—ISBN10 or ISBN13—that provides a successful match.
At least one of the following must be available in the Excel file: PORTFOLIO_PID, ISSN, ISBN, or OTHER_SYSTEM_NUMBER.
|
||||||||||||||||||||||||||||||||||||||||||||||||||||
|
One or more other system numbers (up to three). Alma uses the first other system number that provides a successful match. At least one of the following must be available in the Excel file: PORTFOLIO_PID, ISSN, ISBN, or OTHER_SYSTEM_NUMBER. |
|||||||||||||||||||||||||||||||||||||||||||||||||||||
|
PORTFOLIO_PID |
The internal PID number used for the portfolio in Alma. This identifier is available only if you selected Extended Export and exported portfolios listed in the Electronic Service Editor Page Portfolios tab to Excel. It is exported in cases where there is no ISSN or ISBN. If you are adding this field manually to the input file Excel sheet, then it should be added in cells which are formatted as text. At least one of the following must be available in the Excel file: PORTFOLIO_PID, ISSN, ISBN, or OTHER_SYSTEM_NUMBER. |
||||||||||||||||||||||||||||||||||||||||||||||||||||
| MMS | This field is used for the Alma MMS ID. | ||||||||||||||||||||||||||||||||||||||||||||||||||||
| TITLE | The 245 |a to apply for this title. This field is added to the local portfolio information when Add local portfolios is selected (see procedure below) and no match is found. | ||||||||||||||||||||||||||||||||||||||||||||||||||||
| FROM_YEAR | The year of the coverage start date of the title (in YYYY format). | ||||||||||||||||||||||||||||||||||||||||||||||||||||
| TO_YEAR | The year of the coverage end date of the title (in YYYY format). | ||||||||||||||||||||||||||||||||||||||||||||||||||||
| FROM_MONTH | The month of the coverage start date of the title (in MM format). | ||||||||||||||||||||||||||||||||||||||||||||||||||||
| TO_MONTH | The month of the coverage end date of the title (in MM format). | ||||||||||||||||||||||||||||||||||||||||||||||||||||
| FROM_DAY | The day of the coverage start date of the title (in DD format). | ||||||||||||||||||||||||||||||||||||||||||||||||||||
| TO_DAY | The day of the coverage end date of the title (in DD format). | ||||||||||||||||||||||||||||||||||||||||||||||||||||
| FROM_VOLUME | The numeric volume number from which the title coverage begins. | ||||||||||||||||||||||||||||||||||||||||||||||||||||
| TO_VOLUME | The numeric volume number at which the title coverage ends. | ||||||||||||||||||||||||||||||||||||||||||||||||||||
| FROM_ISSUE | The numeric issue number from which the title coverage begins. | ||||||||||||||||||||||||||||||||||||||||||||||||||||
| TO_ISSUE | The numeric issue number at which the title coverage ends. | ||||||||||||||||||||||||||||||||||||||||||||||||||||
| WARNINGS | A system-generated message indicating that multiple coverages were defined and that only the first coverage defined is being exported. | ||||||||||||||||||||||||||||||||||||||||||||||||||||
| PUBLICATION_DATE_OPERATOR | Embargo date operator. Use one of the following: >, <, or = | ||||||||||||||||||||||||||||||||||||||||||||||||||||
| PUBLICATION_DATE_YEAR | The number of years for coverage information. This relates to the Number of Years field for Embargo/Rolling Year under Coverage Information for a portfolio (refer to the New Portfolio Page Options (Standalone and Electronic Collection) table in Adding a Standalone Portfolio). | ||||||||||||||||||||||||||||||||||||||||||||||||||||
| PUBLICATION_DATE_MONTH | The number of months for coverage information. This relates to the Number of Months field for Embargo/Rolling Year under Coverage Information for a portfolio (refer to the New Portfolio Page Options (Standalone and Electronic Collection) table in Adding a Standalone Portfolio). | ||||||||||||||||||||||||||||||||||||||||||||||||||||
| GLOBAL_FROM_YEAR |
Global coverage information as shown on the Electronic Portfolio Editor > Coverage Information tab. Coverage of multiple periods (for example, from 2011 to 2015 & from 2017 to 2020) is not supported by the Portfolio Loader. If several periods are stated in the Excel file, only the last period is taken. Entering additional coverage periods can be done from the Electronic Portfolio Editor (see Editing a Portfolio Using the Electronic Portfolio Editor). |
||||||||||||||||||||||||||||||||||||||||||||||||||||
| GLOBAL_TO_YEAR | |||||||||||||||||||||||||||||||||||||||||||||||||||||
| GLOBAL_FROM_MONTH | |||||||||||||||||||||||||||||||||||||||||||||||||||||
| GLOBAL_TO_MONTH | |||||||||||||||||||||||||||||||||||||||||||||||||||||
| GLOBAL_FROM_DAY | |||||||||||||||||||||||||||||||||||||||||||||||||||||
| GLOBAL_TO_DAY | |||||||||||||||||||||||||||||||||||||||||||||||||||||
| GLOBAL_FROM_VOLUME | |||||||||||||||||||||||||||||||||||||||||||||||||||||
| GLOBAL_TO_VOLUME | |||||||||||||||||||||||||||||||||||||||||||||||||||||
| GLOBAL_FROM_ISSUE | |||||||||||||||||||||||||||||||||||||||||||||||||||||
| GLOBAL_TO_ISSUE | |||||||||||||||||||||||||||||||||||||||||||||||||||||
| GLOBAL_WARNINGS | An Alma system-generated message indicating that multiple global coverages were defined and that only the first coverage defined is being exported. | ||||||||||||||||||||||||||||||||||||||||||||||||||||
| GLOBAL_PUBLICATION_DATE_OPERATOR | Global coverage information as shown on the Electronic Portfolio Editor > Coverage Information tab. | ||||||||||||||||||||||||||||||||||||||||||||||||||||
| GLOBAL_PUBLICATION_DATE_YEAR | |||||||||||||||||||||||||||||||||||||||||||||||||||||
| GLOBAL_PUBLICATION_DATE_MONTH | |||||||||||||||||||||||||||||||||||||||||||||||||||||
| ACCESS_TYPE | Current, Perpetual, or Current, Perpetual | ||||||||||||||||||||||||||||||||||||||||||||||||||||
| PERPETUAL_FROM_YEAR | See the Perpetual Date Information section for more information. | ||||||||||||||||||||||||||||||||||||||||||||||||||||
| PERPETUAL_TO_YEAR | |||||||||||||||||||||||||||||||||||||||||||||||||||||
| PERPETUAL_FROM_MONTH | |||||||||||||||||||||||||||||||||||||||||||||||||||||
| PERPETUAL_TO_MONTH | |||||||||||||||||||||||||||||||||||||||||||||||||||||
| PERPETUAL_FROM_DAY | |||||||||||||||||||||||||||||||||||||||||||||||||||||
| PERPETUAL_TO_DAY | |||||||||||||||||||||||||||||||||||||||||||||||||||||
| PERPETUAL_FROM_VOLUME | |||||||||||||||||||||||||||||||||||||||||||||||||||||
| PERPETUAL_TO_VOLUME | |||||||||||||||||||||||||||||||||||||||||||||||||||||
| PERPETUAL_FROM_ISSUE | |||||||||||||||||||||||||||||||||||||||||||||||||||||
| PERPETUAL_TO_ISSUE | |||||||||||||||||||||||||||||||||||||||||||||||||||||
| PERPETUAL_PUBLICATION_DATE_OPERATOR | See the Perpetual Embargo/Rolling Year section for more information. | ||||||||||||||||||||||||||||||||||||||||||||||||||||
| PERPETUAL_PUBLICATION_DATE_YEAR | |||||||||||||||||||||||||||||||||||||||||||||||||||||
| PERPETUAL_PUBLICATION_DATE_MONTH | |||||||||||||||||||||||||||||||||||||||||||||||||||||
| AVAILABILITY | One of the following values:
The values above are case sensitive and must be all CAPITALIZED for the loader to work. |
||||||||||||||||||||||||||||||||||||||||||||||||||||
| PUBLISHER | Free text. This field is added to the local portfolio information when Add local portfolios is selected and no match is found. | ||||||||||||||||||||||||||||||||||||||||||||||||||||
| PLACE_OF_PUBLICATION | This field is taken from the 260 $$a of the bibliographic record. | ||||||||||||||||||||||||||||||||||||||||||||||||||||
| DATE_OF_PUBLICATION | This field is taken from the 260 $$c of the bibliographic record. | ||||||||||||||||||||||||||||||||||||||||||||||||||||
| URL |
A URL that is only intended for overriding URLs of global portfolios or for setting a URL on local portfolios. This field is added to the local portfolio information when Add local portfolios is selected and no match is found. The content of the URL column will be added to the Static URL (override) parameter on the Linking tab. |
||||||||||||||||||||||||||||||||||||||||||||||||||||
|
PARSER_PARAMETERS |
Linking information (like on the Linking Information tab in the Electronic Service Editor). When the Portfolio Loader Excel file is uploaded, the content of the PARSER_PARAMETERS column is added to the Parser parameters (override) parameter on the Linking tab. See the example below.
To remove the override and restore the value of this field for multiple records in batch, replace the value of this field with the value “NULL”. For details, see Restore Community Zone linking parameters (remove override of parser). |
||||||||||||||||||||||||||||||||||||||||||||||||||||
| PROXY_ENABLE | True is the same as selecting the Yes radio button for Proxy enabled on the Linking Information tab in the Electronic Portfolio Editor.
False is the same as selecting the No radio button for Proxy enabled on the Linking Information tab in the Electronic Portfolio Editor.
This parameter is case sensitive. The option that you enter must be in lowercase (true or false).
The “portfolio” PROXY_LEVEL must be specified in order to use PROXY_ENABLE.
|
||||||||||||||||||||||||||||||||||||||||||||||||||||
| PROXY_SELECTED | When you specify true for the PROXY_ENABLE field, specify the proxy to use.
The “portfolio” PROXY_LEVEL must be specified in order to use PROXY_ENABLE.
|
||||||||||||||||||||||||||||||||||||||||||||||||||||
| PROXY_LEVEL | Specify portfolio or service.
This parameter is case sensitive. The option that you enter must be in all uppercase (PORTFOLIO or SERVICE).
|
||||||||||||||||||||||||||||||||||||||||||||||||||||
| AUTHOR | Free text. This field is added to the local portfolio information when Add local portfolios is selected and no match is found. | ||||||||||||||||||||||||||||||||||||||||||||||||||||
| ELECTRONIC_MATERIAL_TYPE | One of the code values from the drop-down list.
It is important to select the code value and not the description in the drop-down list options (see below).
|
||||||||||||||||||||||||||||||||||||||||||||||||||||
| OWNERSHIP | The name of the library that owns the portfolio. | ||||||||||||||||||||||||||||||||||||||||||||||||||||
|
GROUP_NAME |
The name of the inventory management group. Multiple group names may be specified in this field when separated by a semicolon. When multiple group names are specified for this field, the order of the information in the group coverage fields follows the same sequential order by group as the order of the groups in the GROUP_NAME field. Note that multiple groups' coverage information can be entered into one cell and separated by semicolons. For coverage information that is not specified for a portfolio, a semicolon is used as a placeholder. See the example below.
In this example, there are two group names specified in the following order: CC Group 1 and CC Group 2. Group From Year / To Year information is:
CC Group 1 has no volume information and appears a follows with semicolons as placeholders for the information that is not present.
|
||||||||||||||||||||||||||||||||||||||||||||||||||||
| GROUP_FROM_YEAR | Group coverage information as shown on the Group Settings tab of the Electronic Portfolio Editor. | ||||||||||||||||||||||||||||||||||||||||||||||||||||
| GROUP_TO_YEAR | |||||||||||||||||||||||||||||||||||||||||||||||||||||
| GROUP_FROM_MONTH | |||||||||||||||||||||||||||||||||||||||||||||||||||||
| GROUP_TO_MONTH | |||||||||||||||||||||||||||||||||||||||||||||||||||||
| GROUP_FROM_DAY | |||||||||||||||||||||||||||||||||||||||||||||||||||||
| GROUP_TO_DAY | |||||||||||||||||||||||||||||||||||||||||||||||||||||
| GROUP_FROM_VOLUME | |||||||||||||||||||||||||||||||||||||||||||||||||||||
| GROUP_TO_VOLUME | |||||||||||||||||||||||||||||||||||||||||||||||||||||
| GROUP_FROM_ISSUE | |||||||||||||||||||||||||||||||||||||||||||||||||||||
| GROUP_TO_ISSUE | |||||||||||||||||||||||||||||||||||||||||||||||||||||
| GROUP_PUBLICATION_DATE_OPERATOR | |||||||||||||||||||||||||||||||||||||||||||||||||||||
| GROUP_PUBLICATION_DATE_YEAR | |||||||||||||||||||||||||||||||||||||||||||||||||||||
| GROUP_PUBLICATION_DATE_MONTH | |||||||||||||||||||||||||||||||||||||||||||||||||||||
| GROUP_PROXY_ENABLE | |||||||||||||||||||||||||||||||||||||||||||||||||||||
| GROUP_PROXY_SELECTED | |||||||||||||||||||||||||||||||||||||||||||||||||||||
| GROUP_AUTHENTICATION_NOTES | |||||||||||||||||||||||||||||||||||||||||||||||||||||
| GROUP_PUBLIC_NOTES | |||||||||||||||||||||||||||||||||||||||||||||||||||||
| AUTHENTICATION_NOTES | Authentication notes as shown in the Electronic Portfolio Editor > Notes tab. | ||||||||||||||||||||||||||||||||||||||||||||||||||||
| PUBLIC_NOTES | Public notes as shown in the Electronic Portfolio Editor > Notes tab. | ||||||||||||||||||||||||||||||||||||||||||||||||||||
| INTERNAL_DESCRIPTION | An internal description as shown in the Public Note field of the Electronic Portfolio Editor > Functional Notes tab. | ||||||||||||||||||||||||||||||||||||||||||||||||||||
| COVERAGE_STATEMENT | One of the following coverage statements that appears on the Coverage Information tab in the Electronic Portfolio Editor:
|
||||||||||||||||||||||||||||||||||||||||||||||||||||
| ACTIVATION_DATE | The activation date information as shown on the Electronic Collection Editor > General Information tab. | ||||||||||||||||||||||||||||||||||||||||||||||||||||
| EXPECTED_ACTIVATION_DATE | The expected activation date information as shown on the Electronic Collection Editor > General Information tab. | ||||||||||||||||||||||||||||||||||||||||||||||||||||
| LICENSE | The license details information as shown on the Electronic Collection Editor > General Information tab and the Electronic Portfolio Editor > Acquisition Information tab.
When using Extended Export from a portfolio list, the exported Excel file contains the following extra columns: LICENSE_NAME, COLLECTION_LICENSE, AND COLLECTION_LICENSE_NAME. These columns are not used during an import/portfolio load.
|
||||||||||||||||||||||||||||||||||||||||||||||||||||
| PDA | Used for patron-driven acquisitions as shown in the Electronic Portfolio Editor > Acquisition Information tab. | ||||||||||||||||||||||||||||||||||||||||||||||||||||
|
Language |
This column contains the language information for the portfolio(s). It is expected to contain the three-character abbreviation for the portfolio language such as eng (English), fre (French), kor (Korean), and so forth. When you use the Load Portfolios action to load multiple portfolios into Alma using the Portfolio Loader Excel spreadsheet, a bibliographic record is created for each portfolio; and the language information is placed in the following fields:
If this column is empty when loading records into Alma, the following is entered into the bibliographic record by default:
It is a known issue that similar to the behavior in the MD Editor where you can enter invalid / uppercase values in the 008 field (to include the Language portion of that field) of a bibliographic record, you can also import invalid / uppercase values to the 008 field of the bibliographic record that is created from the content that is entered in the Language cells of the Portfolio Loader file. |
||||||||||||||||||||||||||||||||||||||||||||||||||||
|
COUNTER Platform |
Specify the COUNTER Platform that you want used for the portfolio being loaded into Alma. |
||||||||||||||||||||||||||||||||||||||||||||||||||||
| NOTES | Any notes you would like included in the portfolio’s General Notes field.
Notes are appended to existing note content when imported. Duplicate note content may occur when you export notes and, subsequently, import the same note content.
|
||||||||||||||||||||||||||||||||||||||||||||||||||||
| PO_LINE | This columns is used only at portfolio export.
It is ignored in the Portfolio Loader. If desired, you can remove this column from the spreadsheet.
|

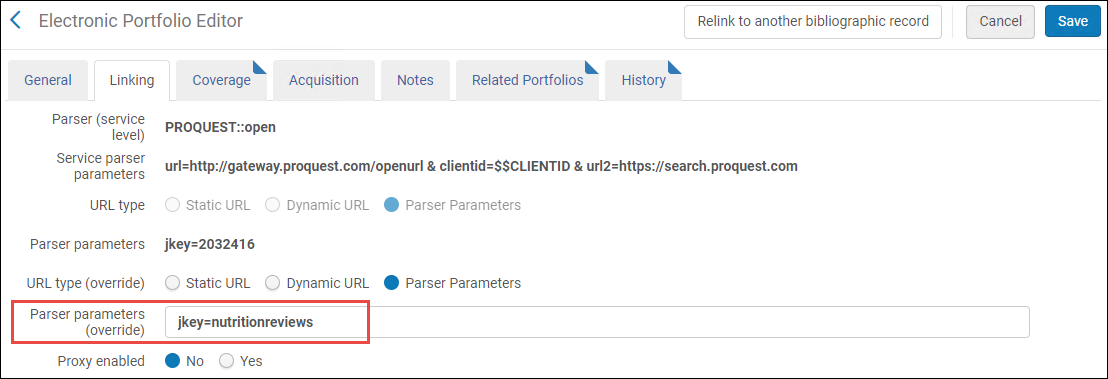


Editing a Portfolio Using the Electronic Portfolio Editor
- Search for the electronic portfolio that you want to update. The brief results display for the electronic portfolio.
- Select Edit Portfolio. The Electronic Portfolio Editor page appears.
- Update the fields on each tab as required. See the table below for a description of the portfolio parameters.
Electronic Portfolio Editor Page Field Description Electronic Portfolio Information: Resource Description The title of the electronic portfolio. Select the title to display the simple view of the MARC bibliographic record for the portfolio. Collection Name (Electronic Collection only) The electronic collection name that the portfolio is a part of. Select the collection name link to open the Electronic Collection Editor page to view and edit the electronic collection information. Collection ID (Electronic Collection only) The ID of the electronic collection record that the portfolio is a part of. View all the collection's portfolios Use this link to open the Electronic Service Editor to view and/or edit the information on this page. It defaults to opening the Portfolios tab that lists all the portfolios. Interface Name (Standalone only) The vendor interface name for standalone portfolios. Service type The electronic service type for the electronic collection. Select the service type link to open the Electronic Service Editor page to view and edit the electronic service information. Service ID The ID of the electronic service type record. View all the collection's services Use this link to open the Electronic Collection Editor to view and/or edit the information on this page. It defaults to opening the Additional tab that contains the Services section. Bib material type
This identifies the material type that is stored with the bibliographic record for this resource.
Portfolio ID The record ID for the portfolio. Base Status Read-only fields that display relevant information of the electronic collection in which the portfolio is included. See Collection Activation Tab Options.
These parameters are displayed only for portfolios included in electronic collections; they are not displayed for stand-alone portfolios.
Activate from Activate to Site Down Site Down Date Site Down Date Selective Indication Read-only fields that display relevant information of the electronic service linked with the portfolio. See Collection Activation Tab Options.
These parameters are displayed only for portfolios included in electronic collections; they are not displayed for stand-alone portfolios.
Interface Public Name General tab: Portfolio availability Whether the portfolio is active. When active (Available), the current date is entered in the Activation date field. When inactive (Not Available), the Expected activation date field is enabled.Available from date
Available until dateSpecifies when the portfolio will be automatically set to Available.
Specifies when the portfolio will be automatically set to Not available.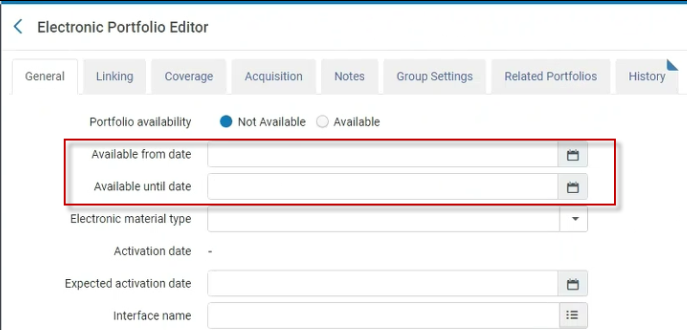 Available from date and Available until date fields
These two fields enable users to set a date which defines:
- When the portfolio becomes Available.
- When the portfolio becomes Not available.
- A date range in which the portfolio are Available.
A daily job (Electronic portfolio availability update) runs every day and checks the dates defined on the portfolios and according to these dates, sets the portfolio as Available or Not available.
The Electronic portfolio availability update job activates or deactivates portfolios based on the "Active from date" field.
Alma will wait until the end of the calendar date to activate or deactivate the portfolio.These two fields enable institutions that have electronic collections where they purchase 1 year of access for selected titles to set a date when these selected titles will be set as Not available.
The existing Activation date (the date when the portfolio was first activated) and Expected activation date fields remain as informative fields only.
In the case where the Electronic Service is set as Available and the Portfolio is set as Not available, then the Portfolio will be Not available. But in the case where the Electronic Service is set as Not available the Portfolio will be Not available (even if it is defined as Available on the Portfolio level).
When Alma looks at the records to update, it looks at the Bib records and their portfolios. There could be cases where a single Bib record holds more than one portfolio. In that case, the Monitor jobs (History tab) presents the count of the processed Bib records (not the Portfolios). When clicking on the report action and entering the report, there is a counter of how many Portfolios were actually handled by the job.
Available until date Specifies when the portfolio will be automatically set to Not available. Electronic material type originating from Bib
(previously known as Electronic material type)
For portfolios linked to the Community Zone, this read-only field displays the material type copied from the portfolio's bibliographic record and stored in the portfolio record when the portfolio was created in the Community Zone.
If at a later time the material type is changed in the bibliographic record, the material type in this field is not automatically synchronized and, therefore, will not match the material type specified in the bibliographic record.
Alternatively, you can use the Electronic material type parameter (see Electronic material type) to manually specify the electronic material type on the portfolio level. For advanced searches that use the Material Type (Electronic Portfolio) search criteria, the value in the Electronic material type parameter overrides the material type specified in the Electronic material type originating from Bib parameter.
Use this parameter to select the material type for this portfolio. You may use this parameter to identify the electronic material type for both local and Community Zone linked portfolios.
Previously (prior to the July 2018 release), you could only manually specify electronic material type for local portfolios.
When you perform an advanced search using Material Type (Electronic Portfolio) for your search criteria, the value stored in this parameter (Electronic material type) is used for locating the records with a matching material type. The value in this parameter overrides the value stored in the Electronic material type originating from Bib parameter.
Note that if you want to search for material type at the bibliographic record level (not the portfolio level), you need to use the Material Type search criteria on the Title level in advanced search.
See Electronic Material Types for more information.
The material type appears only in the Get It and Details tabs in Primo.
Activation date The date on which the portfolio was activated. Expected activation date When the portfolio is inactive, an expected date of activation. Electronic collection library This read-only parameter displays the library inherited by the portfolio--which is the library set for the electronic collection. For details about library inheritance by portfolios, see Library Set on Electronic Resource. This parameter is not displayed for standalone portfolios (which are always in the scope of the user role).
When this parameter is displayed, the portfolio-level parameter "Library" is hidden.
Interface name (Standalone only) Choose a vendor interface from the Select Vendor Interfaces page. Library Select the library for the portfolio. Note that this field is displayed only when a library was not defined on the collection. If the library was defined for the collection, the portfolio inherits this library and it appears in the read-only "Electronic collection library" field. For details about library inheritance by portfolios, see Library Set on Electronic Resource.
The access type inherited from the electronic collection appears. See Access type (Portfolio) for more information.
Access type can be specified by one of the following options that identifies the licensing rights for the electronic portfolio (which can be different from the access type inherited from an electronic collection:
- Blank – Select this option to use the inherited access type from the electronic collection.
- Current – For the electronic portfolio that you are editing, this identifies the licensing arrangement for which you are currently subscribing, paying.
- Perpetual – For the electronic portfolio that you are editing, this indicates the right to permanently access the title during the period of a license agreement as represented in the perpetual access coverage date/embargo range.
- Current and perpetual – For the electronic portfolio that you are editing, this identifies the licensing arrangement that includes both current and perpetual resources.
See the Perpetual Date Information section and the Perpetual Embargo/Rolling Year section for more information.
COUNTER Platform derived from interface This is a read-only field that displays the COUNTER platform that Ex Libris has mapped to the interface associated with this electronic collection. By default, Alma uses this platform to match the electronic collection to COUNTER reports in Alma Analytics. To override this platform value and use a different platform for matching in Alma Analytics, use the COUNTER Platform field described below. This parameter shows the COUNTER Platform specified at the electronic collection level. If the electronic collection to which the portfolio is linked has a platform specified, then it is inherited from the electronic collection to the portfolio and is the default platform for the portfolio.
If you want to override the electronic collection's selection, select a different platform from the drop-down list for COUNTER Platform parameter. See COUNTER Platform below.
Use the COUNTER Platform parameter in the Electronic Portfolio Editor to indicate the platform by which you want usage data tracked for a specific portfolio. The platform that you select for this parameter overrides the electronic collection's COUNTER Platform selection when the electronic portfolio is linked to the electronic collection and a COUNTER Platform is specified at the electronic collection level. See Electronic collection COUNTER Platform.
The list of options for this parameter comes from the list of platforms included in the loaded COUNTER reports. In order to have values appear in this list, you must have loaded COUNTER reports.
If you leave this COUNTER Platform field blank, Alma Analytics will use the platform in the COUNTER Platform derived from interface field (described above) to match the electronic collection to COUNTER reports in Alma Analytics..
Linking tab: Parser (Service Level) (Electronic Collection only) The destination service specified for the electronic collection.
On the Electronic Portfolio level, the parser is inherited from its parent collection and cannot be overridden.
For detailed information, see the Library-Specific Parameters table above and the Alma and SFX Linking Parser Parameters Guide.
Service Parser Parameters (Electronic Collection only) The linking/access information for the service. Parser Parameters (Electronic Collection only) The linking/access information for this portfolio. URL (Electronic Collection only) The URL for accessing the portfolio. The URL can be specified as an alternative to the Parser Parameters (override) option. (Standalone only) The URL for accessing the portfolio.The URL parameter cannot be edited. For standalone portfolios, if the URL is incorrect, use the other URL parameters (Static URL or Dynamic URL) to override the URL parameter.URL Type The type of URL that is used for this portfolio: - Dynamic URL – Alma selects a linking URL dynamically at the portfolio level based on the list of conditions defined in the Dynamic URL field.
- Static URL – Override the linking URL with the static URL defined in the Static URL parameter.
- Parser Parameters – (Electronic Collection only) An override for the parser’s parameters in the Parser parameters (override) field.
Alma dynamically encodes dynamic and static URLs, which means that it transforms certain characters in the URL to their HTML representations (Alma only transforms & with %26, which is not a full encode). Thus, it is not necessary for you to include the encoded form. If you would like patrons to be redirected to an encoded URL, encode it twice before saving. In this case Alma will decode it once and it will then be encoded again.
Dynamic URL A list of IF conditions that Alma uses to determine the service’s linking URL. The Test dynamic URL syntax button allows you to verify the syntax of the IF statements. For information on dynamic URLs, see Configuring Dynamic URLs for Electronic Collections and Portfolios.Static URL This URL overrides the URL created based on the parameters taken from the electronic collection, service, and portfolio.
Example: http://link.aip.org/link/?Static URL (override) / Static URL (override) / Parser Parameters (override)
Depending on what is selected for URL type (override) field
(Electronic Collection only)
Either the parameters to override the electronic collection parser parameters OR enter URL for accessing the portfolio.
Example: url1=http://link.aip.org/link/? & url2=http://publish.aps.org/ & url3=http://link.aps.org/abstract/ & agg=sfxFor information on library-specific parameters, see the Library-Specific Parameter table.If the fields Static URL (override), Dynamic URL (override) or Parser parameters (override) are left empty, Alma ignores the URL type (override) field.
Proxy enabled Whether a proxy was enabled (Yes/No). See the Resolver Proxies section for information regarding proxy relationships among portfolios, electronic collections, and services.Proxy selected A proxy profile. When you specify Yes, identify which proxy profile to use for authentication (of users outside the library’s network) to access the online database you have created. If you specify Yes and make no selection from the Proxy selected drop-down list (that is, you leave the option blank), Alma automatically uses the default proxy you have configured. See Resolver Proxies for information regarding how to create a proxy profile. The procedure To configure a resolver proxy definition type of integration profile: in Resolver Proxies describes how to configure a default proxy profile.Test access Select to test access to the resource. Crossref Supported, Read-only fields that display relevant information of the electronic collection in which the portfolio is included. See Collection Linking Tab Options.
These parameters are displayed only for portfolios included in electronic collections; they are not displayed for stand-alone portfolios.
Crossref Enabled, Proxy Selected, Link Resolver section Linking List section Which coverage statement will be applied? Newly activated resources come with a global coverage statement that you can accept entirely (ONLY global), select portions based on your institution’s preferences (ONLY local), or require a BOTH/AND or an OR/EITHER presence of coverage. Specify the coverage statement within an electronic collection:- ONLY local: Full text is displayed if the issue date of the article is included in the local coverage added to the portfolios.
- Global AND local: Full text is displayed if the issue date of the article is included in the local coverage added to the portfolios AND in the coverage defined in the Central Knowledge Base.
- Global OR local: Full text is displayed if the issue date of the article is included EITHER in the local coverage added to the portfolios OR in the coverage defined in the Central Knowledge Base.
- ONLY global: Full text is displayed if the issue date of the article is included in the coverage defined in the Central Knowledge Base.
Coverage tab - Global Date Information section: From Year The coverage fields that indicate the content that was purchased/activated. These identify the portfolio threshold. These fields affect service resolution (such as Primo). Coverage appears in the repository search results. For example, if the resource is available from 1980, enter 1980 in the From Year field.From Month From Day From Volume From Issue Until Year Until Month Until Day Until Volume Until Issue Coverage tab - Local Date Information section: From Year
The coverage fields that indicate the content that was purchased/activated. These identify the portfolio threshold.
These fields affect service resolution (such as Primo). Coverage appears in the repository search results. For example, if the resource is available from 1980, enter 1980 in the From Year field.
This is the local coverage (your institution's coverage) information that you want to override the global coverage (coming from the Community Zone) information specified in the Date Information section.
When coverage date information is added to an electronic resource (as in the Electronic Portfolio Editor, for example), and only the year and month content has been entered, the system defaults the From Day to the first of the month and the Until Day to the thirty-first of the month.Select Add Date Information to add specific date and volume ranges of coverage.From Month From Day From Volume From Issue Until Year Until Month Until Day Until Volume Until Issue Coverage tab - Global Embargo/Rolling Year section: Operator A moving wall of availability. Enter these details to match the specifics of your portfolio. For example, if the portfolio is available from 1980, but the last five years are not available, enter 1980 in the From Year (as indicated above), select Greater than from the Operator drop-down list, and enter 5 in the Number of Years box.
The operators that you can select are 'Greater/Less than' and 'Greater/Less than or equal to':
- 'Greater/Less than': Preceding/following the year you got as the result, not including the year of the result. For example, 'less than 20 years' means that the coverage includes 20 years from today's date.
- 'Greater/Less than or equal to': Preceding/following the year you got as the result, including the year of the result. For example, 'less than or equal to 20 years' means that the coverage includes 19 years from today's date+current year.
Number of Years Number of Months Coverage tab - Local Embargo/Rolling Year section: Operator
A moving wall of availability. This is similar to the the Global Embargo/Rolling Year section but applies to one of the following selected local coverage statement options:
- Only local
- Global and local
- Global or local
See also above for additional details.
Number of Years Number of Months Coverage tab - Perpetual Date Information section: From Year
The information in this section identifies the dates, volumes, and/or issues that are part of the perpetual coverage for the portfolio.
Select Add Date Information to enter this information.
The Perpetual Date Information section only appears when Perpetual or Current and perpetual are selected for the access type. See Access type (Portfolio) for more information.
The information in the Perpetual Date Information section is for staff information purposes. If you want this same information available for discovery, you need to add it to the Local Date Information section.See also above for additional details.From Month From Day From Volume From Issue Until Year Until Month Until Day Until Volume Until Issue Coverage tab - Perpetual Embargo/Rolling Year section: Operator
A moving wall of availability. This is similar to the the Global Embargo/Rolling Year section but applies to one of the following selected local coverage statement options:
- Only local
- Global and local
- Global or local
The Perpetual Embargo/Rolling Year section only appears when Perpetual or Current and perpetual are selected for the access type. See Access type (Portfolio) for more information.
The information in the Perpetual Embargo/Rolling Year section is for staff information purposes. If you want this same information available for discovery, you need to add it to the Local Embargo/Rolling Year section..
Number of Years Number of Months Acquisitions tab: Electronic collection PO line (Electronic Collection only) The main PO line for the electronic collection. PO line The main PO line for the portfolio. PO line details The portfolio's main PO line details, if available. Public access model Displays the active access model associated with the portfolio, as inherited from the PO line that created the portfolio. Any updates to the access model on the PO line are reflected in this field. You can also change the value of this field, and this determines the active access model of the portfolio. However, changing the access model on the portfolio does not update the access model on the PO line. - In case a PO line of type 'License Upgrade' was added to the portfolio as an additional PO line, the Public Access Model field on the portfolio displays the access model associated with the license-upgrade order.
To control the presentation of the access model to patrons via Alma Link Resolver, institutions can use a designated configuration located under Fulfillment > Discovery Interface Display Logic > Other settings. Select the checkbox Enable Display of Access Model to display in Primo the access model information located on the portfolio. The Enable Display of Access Model option is disabled by default. Institutions that want to control the presentation of the access model to patrons via Alma Link Resolver, need to select the Enable Display of Access Model option. See Configuring Other Settings.
Users have the capability to establish an access model at the collection level, with all portfolios within that collection automatically adopting it. This enables libraries employing auto-activated collections to ensure that each new addition seamlessly inherits the access model.
For institutions that have the "Ebook Central Perpetual, DDA and Subscription Titles" Collection activated from the Community Zone and have the "Upload Electronic Holdings" integration enabled with "ProQuest Ebook Central", the new "Electronic Collection Access Model" field will be disabled.
Electronic Collection License (Electronic Collection only) The license of the electronic collection. License The active license for the portfolio. View License Details Select the license link to view details about the portfolio's license. EBA Plan ID If EBA plans were defined as part of Rialto for your institution (see Working with Evidence Based Acquisition (EBA)), this displays the EBA plan's ID. This is the ID of the electronic portfolio made available by the Vendor to access and select titles from through the EBA agreement.
For portfolios that are not part of an EBA plan, this field is always empty and you can ignore it.
PDA
Use this to associate migrated electronic books to a PDA program. Select the Browse icon to display the Patron Driven Acquisition List page and select a PDA from the list to assign to the portfolio.
The PDA information that you specify and save appears in the Other details tab in the Electronic Portfolios search results.
 Other Details TabTo assign a PDA to a set of electronic portfolios, run the Change electronic portfolio information job. See Performing Global Changes on Portfolios Using a Job for more information.For more information about assigning a PDA to an electronic portfolio, refer to the Assign a PDA to Electronic Portfolios video (5:08 mins).
View PDA details Select the PDA link (ID) to view details regarding the patron-driven acquisition. Additional PO LineA list of any additional PO lines associated with this portfolio. Select a link to view information about the PO line. To associate other PO lines as additional PO lines for this collection, search for or enter the PO line number in the Quick Add section and select Add PO Line. To remove a PO line as an additional PO line, select Delete in the additional PO line's row. Ebook Central & JSTOR Purchase Model Section
For the electronic portfolio that you are editing, this section identifies which purchase methods apply to that portfolio:
This option is displayed only for portfolios that belong to the “Ebook Central Perpetual, DDA and Subscription Titles” collection, or the “JSTOR Autoholdings Books” collection. For more information, see Upload Electronic Holdings from Ebook Central for Subscriptions/Owned/DDA and Upload Electronic Book Holdings from JSTOR.
When notes are entered and saved, the Notes indication icon (
 ) appears in the portfolio search results.
Authentication note A note related to authentication (to display in the discovery system). Public note Information about the database for patrons. (The note appears in the discovery system.) Internal description Information for staff users. (The note appears only to staff.) General Notes Use the Quick Add section to add any additional notes for the staff users. For more information, see Notes Tab. Group Settings tab: Enter inventory management group settings (Available For Information) for the portfolio that you are editing. Inventory management group settings are provided at the following levels:- Electronic Collection
- Electronic Service
- Portfolio
See the Group Settings tab explanation in step for editing the Group Settings tab in Adding a Local Electronic Collection for more information.The following inventory management group settings can be configured for a portfolio:- Group - The name of the group to which the settings apply.
- Date
- Embargo/Rolling Year - A moving wall of availability (Embargo/Rolling Year) can be specified for the group that you selected. See the description above.
- Fields:
- Proxy enabled
- Proxy selected
- Authentication note
- Public note
Unlike the inventory management group settings for electronic collections and electronic services, a portfolio does not have a public name.
Select Add Date Information to add specific date and volume ranges of availability. The date, volume, and issue settings appear.See Configuring Distributed Access to Electronic Resources for more information.Related Portfolios tab This tab displays a list of all portfolios that are linked to the same bibliographic record as the electronic portfolio that you are editing and provides each portfolio's coverage information across providers for all access types (Current, Perpetual, and Current and Perpetual).
With each portfolio's coverage information centralized under one tab, you can more easily make purchase decisions related to your preferred coverage.
Perpetual information that is viewable in the Related Portfolios tab can be entered into the Coverage tab for portfolios with the access type Perpetual and Current & Perpetual.
With the appropriate permissions, you can Edit and View each portfolio listed in the Related Portfolios tab.
The following columns of information are provided on this tab: Availability, Portfolio ID, Access Type, Interface Name, Collection Name, Coverage, Perpetual Coverage, Available For Groups, Identifier, Title, Material Type, and MMS ID.
When there are related portfolios, the Related Portfolios indication icon (
 ) appears in the portfolio search results.
History tab This is a read-only tab that displays a list of changes that were made to the electronic portfolio or the electronic portfolio's group settings (for institutions where the multi_campus_inventory_management customer parameter set to true).
Select one of the following radio buttons to indicate the historical information that you want to view:
- Portfolio changes
- Group Settings changes
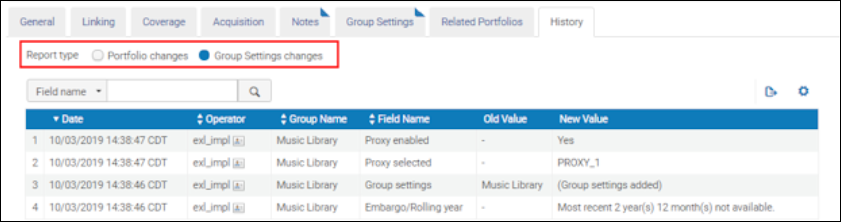 History Tab Radio Buttons
For each change that is saved, the following information appears on the History tab.
Only changes made in the UI or by internal system processes appear in this tab; changes made by any other job do not.- Date of the change
- Operator that made the change
- Group Name
- Name of the field that was changed
- Old (previous) value
- New value
For more information about this History tab, see the History Tab for Electronic Resources video (4:26 mins). - For single, standalone portfolios, optionally select Attach to an electronic collection to link to an existing electronic collection using the Electronic Portfolio Editor. This button only appears for standalone portfolios. See the procedure Linking a Standalone Portfolio to an Electronic Collection for more information.
- Optionally, select Relink to another bibliographic record when a portfolio is associated with an incorrect descriptive record; or perhaps, there is a better descriptive record for a portfolio and you want to relink it to a different bibliographic record. For more information, see Linking a Portfolio to a Different Record.
- Select Save.
Linking a Portfolio to a Different Record
A portfolio linked to the Community Zone receives Community Zone updates even if the bibliographic record for the portfolio is not linked to the Community Zone (local).
- Using Repository Search, locate the portfolio that you want to relink and open it in the Electronic Portfolio Editor.
- Select Relink to Another Bibliographic Record. The Relink Confirmation dialog box appears.
- Browse for the bibliographic record (choose the title) to which you want to relink the portfolio.
The Repository Search page appears so that you can perform a search for the bibliographic record to which you want to link. You can select the Community tab and the Network tab (in a collaborative network) to locate a different bibliographic record to which to link the electronic portfolio.For more information about relinking a portfolio’s bibliographic record to a different bibliographic record in the Community Zone or Network Zone, see the Change Bibliographic Record of a CZ or NZ Record video (01:51 minutes).
- Select the tab (Institution, Network, or Community) to match your requirements and complete your search for the bibliographic record to which you want to link.
- Select the bibliographic record to which you want to relink. The Relink Confirmation dialog box appears with the title that you selected.
When you search for the bibliographic record to link to using the Community or Network tabs, Alma determines whether the selected bibliographic record is already localized. If the selected record is not localized, Alma localizes the selected bibliographic record and processes the relinking as usual.
- Select one of the following options for Handling bibliographic records without inventory:
- Delete bibliographic record(s)
- Do nothing
- Suppress bibliographic record(s)
- Select Confirm.
Linking a Standalone Portfolio to an Electronic Collection
- Using Repository Search, locate the standalone portfolio that you want to link to an electronic collection and open it in the Electronic Portfolio Editor.
To assist your search, use the Is Standalone electronic portfolio search option in Advanced Search. - Select Attach to an Electronic Collection. The Select a Collection and Service dialog box appears.
- Browse to select the electronic collection to which you want to add the portfolio. A popup opens where you select the electronic collection. The selection screen displays all collections, but allows selecting only the collections whose library matches the libraries defined your role scope(s). For details about library inheritance by portfolios, see Library Set on Electronic Resource.
- Select the electronic collection to which you want to add the portfolio.
When linking a standalone portfolio that has a library set to an electronic collection that has a different library set, the portfolio's library is deleted. A warning is displayed: "The portfolio you are about to attach has a different library definition than the selected electronic collection. Once confirmed, the portfolio will inherit the electronic collection's library definition. Note that this action cannot be reversed." Select Confirm to proceed. - In the Select a Collection and Service dialog box, select the type of service and select Confirm.
Editing a Portfolio in an Electronic Collection Using the Electronic Service Editor
- Complete a search for an electronic collection.
- Select Edit Service. The Electronic Service Editor opens to the Activation tab.
- Select the Portfolios tab. In addition to the information here, you can see other services and related electronic resources by selecting the View all services link above the tabs. This opens the Electronic Collection Editor page that contains the total number of portfolios, how many of the portfolios are active, and the active from/until dates by service type.
- Select Edit from the row actions list for the portfolio that you want to edit.
- See Editing a Portfolio Using the Electronic Portfolio Editor for information about editing the electronic portfolio.
Performing Global Changes on Portfolios Using a Job
- Remove local coverage
- Set a proxy
- Update URLs (such as removing the EZproxy prefix, for example)
- Associate portfolios with a license
- Activate/deactivate portfolios
- Delete portfolios (with the appropriate permissions)
- Apply a library to multiple electronic resources in bulk (For details, see Library set on electronic resource).
This tool cannot be used to update bibliographic record data.
- Run the Change Electronic Portfolio Information or Delete Portfolios jobs.
Deleting Local Portfolios
- Deleting portfolios by running a job
- Manually deleting a local standalone portfolio
- Manually deleting a local portfolio that is part of a local or Community Zone electronic collection
- Locate the portfolio that you want to delete using repository search.
- Select Delete. The Delete confirmation pop-up window appears.
- Select the Handling bibliographic records without inventory option that you prefer and select Confirm. A success message appears when processing is complete.
- Using a repository search, locate the electronic collection to which the portfolio belongs and select Edit to open the Electronic Collection Editor.
- In the Additional tab, select Portfolio List from the row actions list in the Services section to display a list of all the portfolios that are included in the collection.
- Select the portfolio that you want to delete and select Delete Selected. The Delete confirmation pop-up window appears.
- Select the Handling bibliographic records without inventory option that you prefer and select Confirm. When processing is complete, Alma displays a success message.
Linking a Local Portfolio that is part of a Community Zone-Linked Collection to the Community Zone
- Locate the Community Zone-linked electronic collection that contains the local portfolios you want to link to the Community Zone.
- Select Edit Service for the electronic collection containing the local portfolio that you want to link to the Community Zone. The Electronic Service Editor page appears.
- Select the Portfolios tab.
- Select Link Local Portfolios to Community. The Link Electronic Resources to Community page appears.
- In the Bibliographic Records Configuration section, select Yes or No for the Use the community bibliographic records option and select Link. Alma displays a confirmation dialog box with a summary/warning of the linking actions.
- Review the information that is provided and if everything is acceptable, select Confirm. When the linking job is successfully completed, all the local portfolios on the Portfolios tab (from step 3) are linked to the Community Zone.
Associating a License to a Portfolio
- Other details
The name of the license appears in the Other details tab (see Working with the Portfolio List for additional information). Select the name link to display the details of the license information.
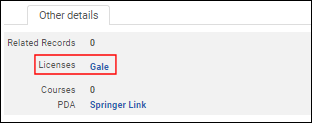 Other Details License Information
 - View It/Alma Link Resolver Show license link
When you use the View It link (from the Electronic Titles search results) to display a resource’s information using the OpenURL Link Resolver, the Show (Hide) license link in the OpenURL Link Resolver window displays the license information defined at the portfolio level.
- Acquisitions license details Inventory tab
In Acquisitions, the filter in the Active Resources section and the History of Resources section of the Inventory tab for license details provides filter options for both electronic collections and portfolios. The Resource Type column displays the electronic collection or portfolio information in the Inventory tab.For related information, see Managing Licenses and Amendments.
- Associate the license on the Acquisition tab of the Electronic Portfolio Editor page. For more information, see Editing a Portfolio Using the Electronic Portfolio Editor.
Link Resolver Usage in Portfolio Search Results
When reviewing search results for portfolios, you'll now see a counter that tells you how many times patrons were shown the portfolio's service and how many times they actually clicked on it using the link resolver. This combined count is also displayed at the title level. This usage data is provided for Network Zone institutions as well, and you can find it in both electronic portfolio search results and on the Held by page.
The time period of the data in the counters is for the past 12 months.
This feature is an addition to the COUNTER usage information already available in analytics. It's designed to help institutions that use data to make informed decisions about their electronic holdings.

Additionally, the portfolio usage is shown in different ways for Institution Zone and Network Zone institutions:
In the Institution Zone:
- In portfolio search results, you'll see two numbers:
- Link Resolver Usage (Appearance) - The number of times the portfolio appeared in the "View it" section. This is a counter that indicates how many times patrons were shown the electronic service.
- Link Resolver Usage (Access) - The number of times patrons clicked on the portfolio. This is displayed as "Link Resolver Usage: x out of y". This is a counter that indicates how many times patrons accessed the electronic services.
- For "All Title" search results in the Other details tab, you'll see total usage values for all the portfolios under the title and the total number of times the portfolios appeared.
- In electronic title search results in the Other details tab, you'll also see total usage values for all the portfolios under the title.
In the Network Zone:
- You can view portfolio usage in electronic portfolio search results.
- In the Held by tab for all titles, you'll find usage information per portfolio, per institution.
- The usage data presented in the Other details tab is taken from Alma analytics.
- For Network Zone institutions, the Held by page displays the usage for each institution.
Working with the Portfolio List
- Edit (Institution) – Open the Electronic Portfolio Editor page to edit the portfolio record. For more information, see Editing a Portfolio Using the Electronic Portfolio Editor.
- View (Institution) – Open the Electronic Portfolio Editor page to view the portfolio record. Information accessed through this option is read only.
- Activate/Deactivate (Institution and Community) – Activate/deactivate an electronic portfolio. To activate/deactivate multiple resources, select the check box for each resource and select Activate or Deactivate from the drop-down list and select Execute. In addition, when accessing the Portfolio List from the Community tab, select Localize selected to activate multiple portfolios.
- Order (Institution and Community) – Open the PO Line Owner and Type page to initiate a purchase order (see Creating PO Lines). This includes the ability to order a portfolio from an e-collection that is already locally activated.
- Link to Community (Institution) – Link portfolio to the Community Zone.
- Create E-Activation Task (Institution) – Create an electronic activation task for the resource.
- Test access (Institution) – Test the access to an electronic portfolio.
- Delete (Institution) – Delete "childless bibliographic records" or "bibliographic records without inventory".
- Send to Ex Libris (Institution and Community) – Submit a request.
- View It (Network) – Opens the electronic portfolio in the UResolver page.
- Document Delivery – Opens the Create Request page.
Row level actions Edit, Move, Remove, Duplicate, Deactivate, Delete (enabled for the Electronic Inventory Operator Extended role) are enabled only if the library set in the electronic resource matches the library defined on the user's role scope. For other electronic resources, these actions are disabled. For details about library inheritance by portfolios, see Library Set on Electronic Resource.
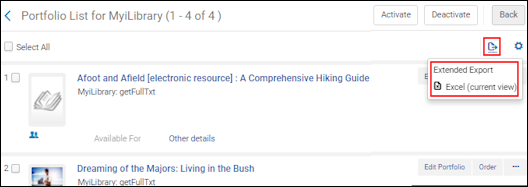
-
Extended Export – Export all portfolios in the electronic collection to an Excel file. See Portfolio Loader for a list of all the information (Excel columns) that is exported.The date columns (such as the Activation Date column) can be sorted as a date (not just a string of text) using the Excel Sort & Filter options.If the collection contains more than 5,000 portfolios, portfolios for each type of service are stored in separate files and the job is run in the background. You can use the Monitor Job page (see Viewing Running Jobs) to monitor the job’s progress and view the Excel files. Collections with fewer portfolios are also saved to an Excel file, but the job is run in the foreground and portfolios for each type of service are stored in separate tabs in the Excel file.The portfolio loader supports the matching of Community Zone portfolios based on the Community Zone portfolio ID and not just the ISSN or ISBN.The localized field in the Excel file indicates that a Community Zone portfolio has been localized/activated for your institution.
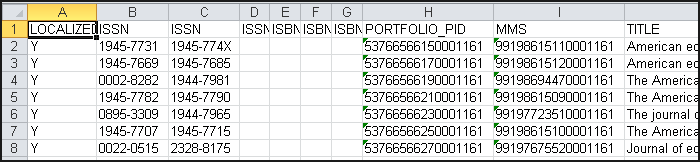 Sample Extended Excel ExportFor more information about Extended Export, see the Export Tasks From CZ Updates Task List video (3:43 mins).
 - Excel (current view) – Export the list of portfolios to an Excel file.
Moving Portfolios to a Different Electronic Collection
- Moving a Single Portfolio to a Different Electronic Collection
- Moving a Set of Portfolios to a Different Electronic Collection
The Move action is enabled only if the library set in the electronic resource matches the library defined on the user's role scope. For other electronic resources, this action is disabled. For details about library inheritance by portfolios, see Library Set on Electronic Resource.
Moving a Single Portfolio to a Different Electronic Collection
-
From the Portfolio List page (Electronic Collection search results -> Portfolio List (action) ) or the Portfolios tab on the Electronic Service Editor page (Electronic Collection search results -> Edit Collection -> View Full Text Service (link in the summary section) -> Portfolios (tab) ), select Move from the list of actions.
-
Enter the Destination electronic collection and Destination service type information. Any key characteristics of the portfolio to be moved are noted in the Move Portfolio pop-up window. Read this information carefully before continuing.
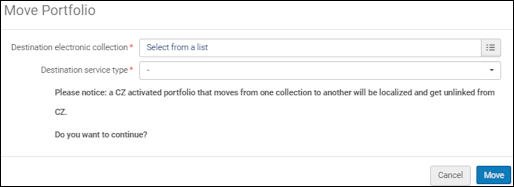 Move Portfolio Destination Electronic Collection and Service Type Information
 -
Select Move. The portfolio is moved.
Moving a Set of Portfolios to a Different Electronic Collection
- A Community-Zone activated portfolio that moves from one collection to another will be localized and get unlinked from Community Zone.
- This action is enabled only if the library set in the electronic resource matches the library defined on the user's role scope. For other electronic resources, this action is disabled. For details about library inheritance by portfolios, see Library Set on Electronic Resource.
-
From the Portfolios tab on the Electronic Service Editor page of the source Electronic Collection of the set of portfolios, select Move Set of Portfolios.
-
Enter the Set name, Destination electronic collection, and Destination service type information. Any key characteristics of the set of portfolios to be moved are noted in the Move Portfolio pop-up window. Read this information carefully before continuing.
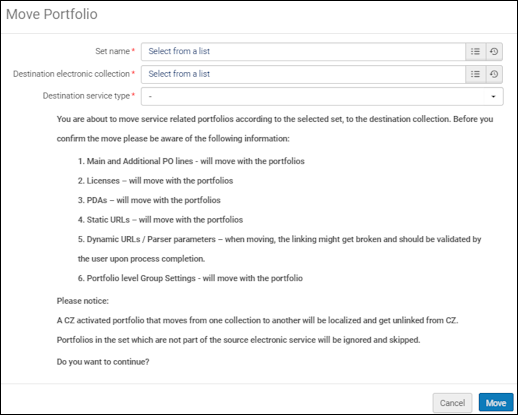 Move Portfolio Set Name, Destination Electronic Collection, and Service Type Information
 -
Select Move. The job "Move Portfolios to another Electronic collection" runs to move the portfolios. You can review the job report.
-
Select the Select to download report link next to Detailed counters report. The same portfolio ID appears in a new row of the Excel file report for each transaction or status change.
 Detailed Counters Report Excel File
Accessing the Community Zone Update Task List from Electronic Resource Editors
You can easily navigate from the electronic resource editors (Electronic Collection Editor / Service Editor / Portfolio Editor) to the Community Zone Update Task List page (see Working with the Community Zone Updates Task List). To do that, select the button "Review CZ Updates (X)", where "X" indicates the number of CZ updates available in the Review tab of the Community Zone Update Task List for that resource.

This button appears for resources linked to the Community Zone, including portfolios that were linked to CZ in the past and got localized due to portfolio deletion from the CZ. This button appears only for users with Repository Manager role (regardless if the role's scope is library-level or institution-level).