Managing Users
This page describes how to manage users including adding, editing, deleting and distributing users. For information on working with user roles (including user profiles) see Managing User Roles.
- User Manager
- User Administrator
- Circulation Desk Manager
- Circulation Desk Operator
Users with the Fulfillment Service Operator role can view the user information described below, but cannot edit it.
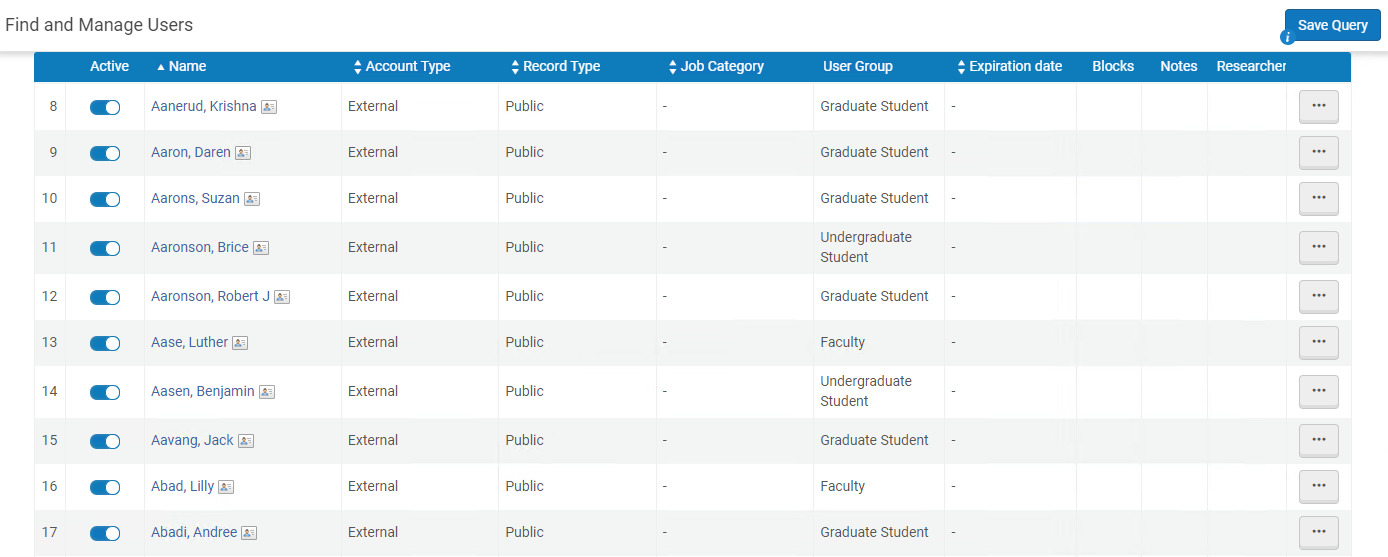
For information on finding and editing existing users and adding new users, watch the Users in Alma video (4:33 min).
- When searching for Email or Identifiers, you must enter the entire string; a partial match is not performed.
- For additional information on managing users in a collaborative network, see Centrally Managing Users in a Network Zone.
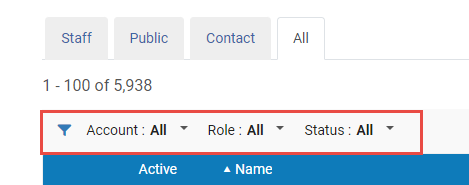
- Account filter - filter the user list to display only; a) External, b) Internal, c) Internal with external authentication, and d) All users.
- Role filter - filter the user list to display only the users with a specific role, i.e. Catalog Administrator, and so forth.
- Status filter - filter the user list to display only users with the following statuses; a) All, b) Active and not expired, c) Not active or expired.
| Column Name | Description |
|---|---|
| Active | New users are activated automatically.
Marking a user as not active is equivalent to blocking the patron account. For example:
|
| Name | The name of the user. Select this link to open the User Details page (see Editing Users). |
| Account Type |
|
| Record Type (All tab only) | The type of user. See Adding Users for more information about this field.
|
| Job Category | The user’s job category; see Configuring Job Categories. |
| User Group (not in Contact tab) | The user’s user group; see Configuring User Groups. |
| Status | Whether the user is Active or Inactive. For internal users, who are authenticated by Alma, this is a manual setting not tied to the expiration date. For more information about authentication, see Expiration Date below. |
| Expiration Date | Alma distinguishes between authentication, which is the act of determining if the user is a legal user, and authorization, which is the act of determining what the user may do in the system:
Expiration date may impact the due date of the loan. The due date is shortened to the patron’s expiry date. This can be configured using the extend_due_date_beyond_user_expiry parameter. If a patron is nearing her expiration date, the due date of the loan is automatically set as the expiration date, and cannot be changed manually. See also the knowledge article Is it possible to change an item due date past the user expiration date in Alma?
The User Registration Terms of Use (see Configuring Terms of Use) enable you to configure the User Renewal Period policy and other policies associated with how patrons are registered at the circulation desk. For more information, see Configuring Terms of Use.
After you define the User Registration Terms of Use, assign the Terms of Use for each user group (see Configuring User Registration Rules).
|
| Blocks (not in Contact tab) | Whether there are any blocks on the user. |
| Notes | Whether there are any notes about the user. |
- Adding Users
- Editing Users - This action is typically required immediately after adding a new user.
- Deleting Users - Only the User Manager or User Administrator Roles can delete users.
- Distributing Users
Adding Users
- External users are synchronized with Alma using the User integration profile.
- When creating a patron by selecting Register New User on the Manage Patron Services page (see Registering Patrons), it is possible to register external users as well.
- All primary and additional identifiers must be unique for users, including for the same user.
- On the Find and Manage Users page (Admin > User Management > Manage Users), select Add User.
The Quick User Management page appears.
- On the All tab, you are prompted to select the record type (Staff, Public, or Contact).
Contact is reserved for vendor contacts and should not be used.
- On any other tab, the record type is set according to the tab.
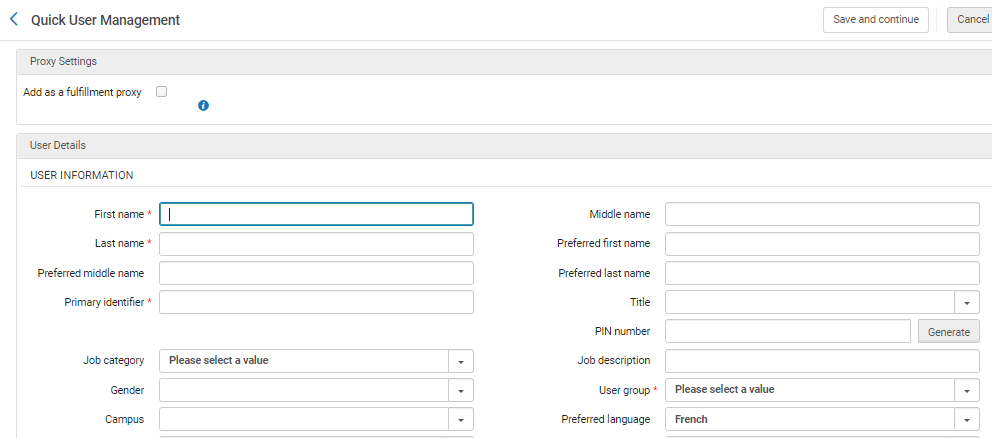 Quick User Management Page
- On the All tab, you are prompted to select the record type (Staff, Public, or Contact).
- Enter the following information. The fields marked as mandatory in the following table are by default; an administrator can configure which fields are mandatory (see Configuring Patron Information).
An Authorized for resource sharing requesting checkbox is visible for institutions that use Rapido when new users are created. For more information, see Enabling Self Registration for Net Lenders.
Quick User Management Page Fields Section Field Description Proxy Settings Add as Fulfillment Proxy Selecting this option will create the new user as a fulfillment proxy. All requests by this patron and loans checked out to this patron will be associated with the sponsor user Not local Find user in other institution See Registering Patrons. User Information To configure how user names appear in Alma, see Configuring the Display of User's NamesFirst / middle / last name First and last names are mandatory. Preferred first / middle / last names Preferred names replace the main first/middle/last names in all places that the name appears within Alma, for example, letters, Manage Patron Services, and the Active Hold Shelf. A search for name finds both the regular and preferred entries. For example, a search for the last name finds both the Last name and Preferred last name values. They are both indexed under last name.
For information about using preferred names in system notifications and letters, see Working with Names in System Notifications and Letters.
The preferred name fields are editable by internal users similar to the other name fields. For external users, the preferred name fields are updated by the SIS system and can be manually updated. For more information, see the SIS details provided in the Ex Libris Developer Network.
Primary identifier (mandatory) The primary user ID. The ID must be unique within the institution. For details on identifiers, see https://developers.exlibrisgroup.com...ser-management. You may be required to enter a primary identifier in a particular format. See the parameter primary_identifier_regex in Configuring Other Settings.If you arrived at this page by selecting Register New User on the Patron Identification page, this field is pre-filled if you have configured user ID generation; see Configuring User ID Generation. You can change the pre-generated ID.Title A user title. These can be configured by an administrator; see Configuring User Titles. PIN number A four-digit number which serves as a password for the user to log on to the self-check machine (SIP2); see Configuring SIP2 Bin Configuration. Manually enter a number or select Generate to generate a PIN number. The PIN number is sent in the PIN Number Generation Letter. PIN number generation is available only if the pin_number_method parameter is enabled and set to fourDigit. For information, see Configuring Other Settings.Job category The user’s job category. For example, Acquisitions Operator, Cataloger, or Manager. The job categories available depend on the record type selected (above). To configure job categories, see Configuring Job Categories. To associate job categories with record types, see Mapping Job Categories to User Record Types. If the job category is associated with role assignment rules (see Configuring Role Assignment Rules), then the role profiles associated with the job category are added to the user after you select Save. In this way, job categories enable you to assign multiple roles to a user at once, so that you do not have to configure roles individually for the user.Job description A free text description of the user’s responsibilities. Gender The user's gender. User group
(not required for Contacts)The user’s user group, such as Faculty, Patron, and so forth. The user groups available depend on the record type selected (above). To configure user groups, see Configuring User Groups. To associate user groups with record types, see Mapping User Groups to User Record Types. If the user group is associated with role assignment rules (see Configuring Role Assignment Rules), then the role profiles associated with the user group are added to the user after you select Save. In this way, user groups enable you to assign multiple roles to a user at once, so that you do not have to configure roles individually for the user.Campus The user's campus. See Managing Campuses. Website URL The user's website, if any. Preferred language The language for email correspondences. For email correspondences to be sent in the selected language, the language must be enabled in the Institution Languages Mapping Table. For details, see Configuring Institution Languages. Status (edit only) The user's status, active or inactive. Status date (edit only, read-only) The date of the last status change for the user. Birth date The user's birth date. Expiration date The estimated date when the user is expected to leave the institution. For more information, see Expiration Date. Purge date The date on which the user will be purged. See Purging Users. Last Patron Activity Date The last date that selected activities were executed. When the feature is enabled, this field is updated when any of the following activities are executed:
- Placing a request of any type - hold, booking, digitization, acquisition, resource sharing
- Borrowing an item (all workflows, including self-check / API)
- Returning an item (all workflows, including self-check / API)
- Loan renewal (except automatic renewal), or renewal request (for resource sharing loans)
- Update of user information from Primo
The following activities do NOT update this field:
- Using the Pay button on the Manage Patron Services page
- Canceling a request in Alma or Primo
- Patron Purchase Request sent from Primo
Due to privacy concerns, data will only be collected from the feature activation onward. If the option is disabled, all data collected in this field will be deleted for all users.
To enable this option, select yes in the Record Last Patron Activity Date page.
Watch the Last Patron Activity Date video (1:36 min).Resource sharing library A resource sharing library responsible for resource sharing requests initiated by this user. Only libraries defined as resource sharing libraries appear in the list. (To configure resource sharing libraries, see Configuring Parameters of a Resource Sharing Library.) You can select one or more resource sharing libraries in this multi-select field. When multiple resource sharing libraries are selected, they appear in the For library field on the Primo Get it tab, according to the ill_item_creation_lib_code parameter (see Configuring Other Settings).When no value appears in this field, the default library specified in the ill_item_creation_lib_code value is used.When modifying this field for an existing user, the new value of the field is not overridden during an SIS/User API update.Purchase request library A library responsible for purchase requests initiated by the user. You may select one or more libraries in this multi-select field. When libraries are selected, they appear on the Primo purchasing request form in the Get it tab. Cataloger level The cataloger level. This field appears only if cataloging permissions are enabled for your institution; see Cataloging Privileges. Selected Patron Letters Opt the user into or out of notifications. Select or clear the check boxes next to each notification that you want to enable or disable for the user. For more information, see Configuring Library Notices Opt In. Research letters appear only if your institution is enabled for Esploro. See Managing Researchers in the Esploro documentation.
Send social login invitation letter See Social and Email Login. User Management Information (not mandatory) Patron has institutional record (appears only after selecting Register New User on the Patron Identification page) See Registering Patrons. Password A user's password for Alma, Leganto, and/or Primo (see https://developers.exlibrisgroup.com...ser-management). As long as this password is not changed in the Primo account, it remains valid for both Alma and Primo. Any text you enter here is not echoed back to you, so enter the password carefully. Passwords are optional for internal users. Verify password Re-enter the password to ensure that you entered it correctly. Force password change on next login When selected, the user must change their password the next time they log into Alma (relevant for Alma only). Enable multi-factor authentication Add multi-factor authentication for this user. This checkbox only displays if the mfa_for_alma_hep parameter is enabled (see User Settings).
For more information on MFA see Ex Libris Identity Service.User Identifier (this section appears if Identifier 1 is selected as a mandatory field for this record type; see Managing User Identifiers) Identifier Type (mandatory) Select the user identifier type. Value (mandatory) The user identifier. The following fields that appear on the Quick User Management page when adding a user appear in the Contact Information tab when editing a user. Email Addresses Email types (mandatory) You must enter an email address. Select an email address type: - Alternative (staff/public only)
- Claim (contact only)
- Order (contact only)
- Payment (contact only)
- Returns (contact only)
- Personal
- Work
- School (public only)
Email address (mandatory) The user's email address. You may be required to enter an email address in a particular format. See the parameter email_regex in Configuring Other Settings. Addresses Address types Select a mailing address type: - Claim (contact only)
- Order (contact only)
- Payment (contact only)
- Returns (contact only)
- Home
- Work
- Alternative (public only)
- School (public only)
- Street address - You may be required to enter a street address in a particular format. See the parameters address_lineX_regex in Configuring Other Settings.
- City
- State/Province
- Postal code - You may be required to enter a postal code in a particular format. See the parameters postal_code_regex in Configuring Other Settings.
- Country
Phone numbers Phone types Select a phone number type: - Home
- Mobile
- Office
- Claim fax (contact only)
- Claim phone (contact only)
- Order fax (contact only)
- Payment fax (contact only)
- Payment phone (contact only)
- Returns fax (contact only)
- Returns phone (contact only)
- Office fax (staff/public only)
Phone number The user's phone number. You may be required to enter a phone number in a particular format. See the parameter phone_regex in Configuring Other Settings. - Select one of the following options: In either case, continue configuring user details as described in each of the following topics.
If you add a user that has the same first name, last name, and birth date as an existing user, a warning message appears.
- Select Save or Save and Continue. The new user is saved and you return to the Find and Manage Users page. Continue with editing the user; see Editing Users.
- Select Save and Continue. The user is saved and you continue with editing the user. See Editing Users.
Editing Users
- For internal users, you can edit all user record fields.
- External users are maintained in an external system, such as SIS (Student Information System). For external users:
- You can edit only certain fields in the General Information tab of the User Details page.
Changes to the General Information fields that are edited are not overridden by subsequent SIS updates. You can select the original value option from the drop down of selectable values if you would like to revert a changed field and re-synchronize it with the value that is managed in the SIS system. This option appears only if the field is manually changed from the value supplied by the SIS feed. Manually changing the field value to the value that is stored in the SIS has the same effect of re-synchronizing the field with future updates from the SIS.
- You can add contact information in the Contact Information tab, but cannot edit information there.
- You can edit only certain fields in the General Information tab of the User Details page.
- To edit users in bulk, see Editing/Messaging Users in Bulk.
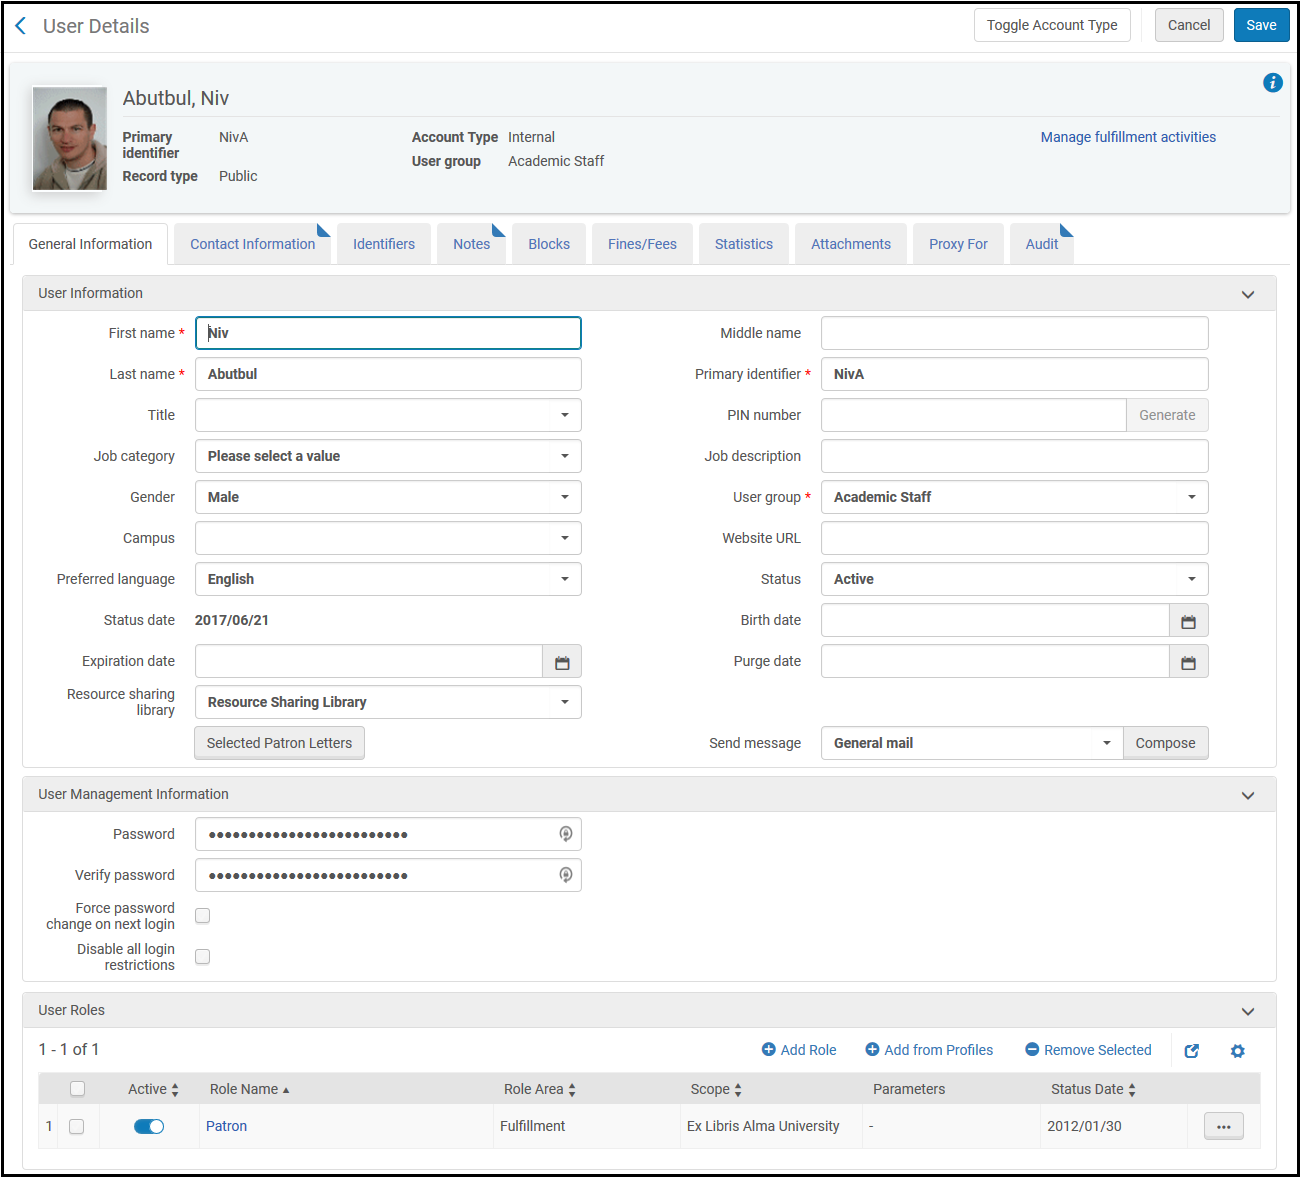
- On the Find and Manage Users page, select Edit in the row actions list or select the user’s name. The User Details page appears.
 User Details Page
 - If the patron has a social account attached, select Detach from Social Account to disassociate the social login from the patron.
- To distribute the user in a Network Zone, see Centrally Managing Users in a Network Zone.
- To enable editing other fields of external users, select Open for Update, and select Yes. Edit the relevant fields and select Save. Note that changes you make to most fields will be lost after the next SIS synchronization job. However, Alma prompts you to determine whether the following fields will be overridden with the next SIS synchronization job: Title, PIN number, Job category, User group, Campus, Preferred language, Resource sharing libraries, Cataloger level, Selected patron letters. (Note that this determination is kept internal and is not externalized in the user record in any way.)
- To change an internal user to an external user (and vice versa), select Toggle Account Type.
When toggling an account from internal to external, the owner is set to SIS_temp. This is a code that is used to mark the next user synchronization job to update the record.
Only users with the User Manager or User Administrator roles can toggle accounts. - Edit the required information in the General Information tab. For information about most of the fields on this page, see Adding Users.
- Website URL - The user's website.
- Status - Whether the user is Active or Inactive.
- Status date - The date on which the user was registered or the date of the user's last status change.
- Send Message - Select the type of message you'd like to send.
Operators with Can't edit restricted users configured are not able to send an Email to a user account defined as restricted for editing. For more information, see Restricting Users for Editing.The options you can choose from are (any other options, such as an identity provider option, are for future use):
- General mail - This sends a general message. Select Compose to open the E-mail Message pop-up window, where you can write an email to send to the user with any questions, issues, or notifications. Fill in the fields and select Send E-Mail to send the message. (For more information on the letters, see Configuring Alma Letters. To configure the default From: address of this email, see the parameters disable_from_address and from_address in Configuring Other Settings. To send emails to users in bulk see Editing/Messaging Users in Bulk.)
The General mail letter does not appear in General > Letters > Letters Configuration, with no additional configuration changes options.
The letter ILL Email to User needs to be activated for the General mail function to work. This letter is not customizable. - Patron personal information mail - This sends an email with an attached file containing the complete XML record of the data stored about the patron in their user accounts, including attachments. The message is sent to the patron's preferred email. The email letter itself is the Personal Information Letter.
In order to send a Personal Information Letter to a patron, the parameter Send Patron Information Letter must be enabled under Circulation Desk roles'. The parameter Send Patron Information Letter is activated for users with a Circulation Desk role by default. If it is not activated or you wish to
deactivate it, open a ticket with Ex Libris support. - Social Login Mail - This sends a letter containing information to activate login to Primo/Alma with a social network. This option appears if an integration profile is defined for a social network. The letter used is the Social Login Invite Letter. For more information on this integration profile, see Configuring Integration Profiles.
- General mail - This sends a general message. Select Compose to open the E-mail Message pop-up window, where you can write an email to send to the user with any questions, issues, or notifications. Fill in the fields and select Send E-Mail to send the message. (For more information on the letters, see Configuring Alma Letters. To configure the default From: address of this email, see the parameters disable_from_address and from_address in Configuring Other Settings. To send emails to users in bulk see Editing/Messaging Users in Bulk.)
- Created By - The staff user or process (e.g. SIS job, APIs) that created this user.
- Updated By - The staff user or process (e.g. SIS job, APIs) that last updated this user.
- Disable all login restrictions - Select to disable login restrictions by IP range. (New for May) This checkbox may be automatically unchecked and read-only, depending on the options selected on the Login Restriction Configuration page. For more information, see Restricting Alma Logins by IP Range.
- Allow Ex Libris Simulated Login - Give permission to Ex Libris to simulate login for this user. This checkbox only appears when the allow_exl_to_login_as_staff_users option is enabled (see Configuring Other Settings for User Management).
- User Roles - See Adding Roles to Users
The Created By and Updated By fields have been moved to an information box that is accessed by selecting the
 icon on the top right corner of the page. The information box also includes Created Date, Last Updated Date, and Last Updated by Job.
The Last Updated Date is updated when making a change to the user’s details in the General Information tab, and also when adding a note in the user’s Notes tab or a block in the Blocks tab
- Edit the information in the following tabs:
- Contact Information – See Managing User Contact Information.
- Identifiers (not available for Contact users) – See Managing User Identifiers.
- Notes – See Managing User Notes.
- Blocks (not available for Contact users) – See Blocking and Unblocking Users.
- Fines/Fees (available only for users with the Patron role) – See Managing User Fines and Fees.
- Statistics – See Managing User Statistics.
- Attachments – See Managing User Attachments.
- Proxy For – See Managing Proxy Users
- History - See Viewing Changes to the User Record.
- If the user has the Patron role, select Manage Fulfillment Activities to access the Patron Services page. Actions like loan, return, or pay a fine are not available when viewing Manage Fulfillment Activities via User Management. For details on patron services, see Managing Patron Services. Select Back to close the Patron Services page and return to the User Details page.
- To edit the user picture, see Managing User Pictures.
- If you made changes in the General Information tab, selecting Save is required to have the changes saved. You are then returned to the Find and Manage Users page.
Changes made to other tabs in the User Details screen are automatically saved in Alma.
-
Changes made to other tabs
-
The Identifiers and Blocks tabs are not available for Contact users.
-
The Fines/Fees tab is available only if the user has been assigned the Patron role (see Managing User Roles).
-
Demerits information appears only when enabled by Ex Libris and only for the following roles: Circulation Desk Operator, Circulation Desk Operator - Limited, Circulation Desk Manager, Fulfillment Services Operator, Fulfillment Services Manager, Fulfillment Administrator. To enable demerits information, contact Ex Libris Support. For more information on demerits, see Configuring Demerits.
Managing User Contact Information
- Users can also be configured to receive email notifications that are sent after a scheduled job runs. You can configure notifications to be sent to Alma users and/or to manually entered email addresses. For information, see Configuring Email Notifications for Scheduled Jobs.
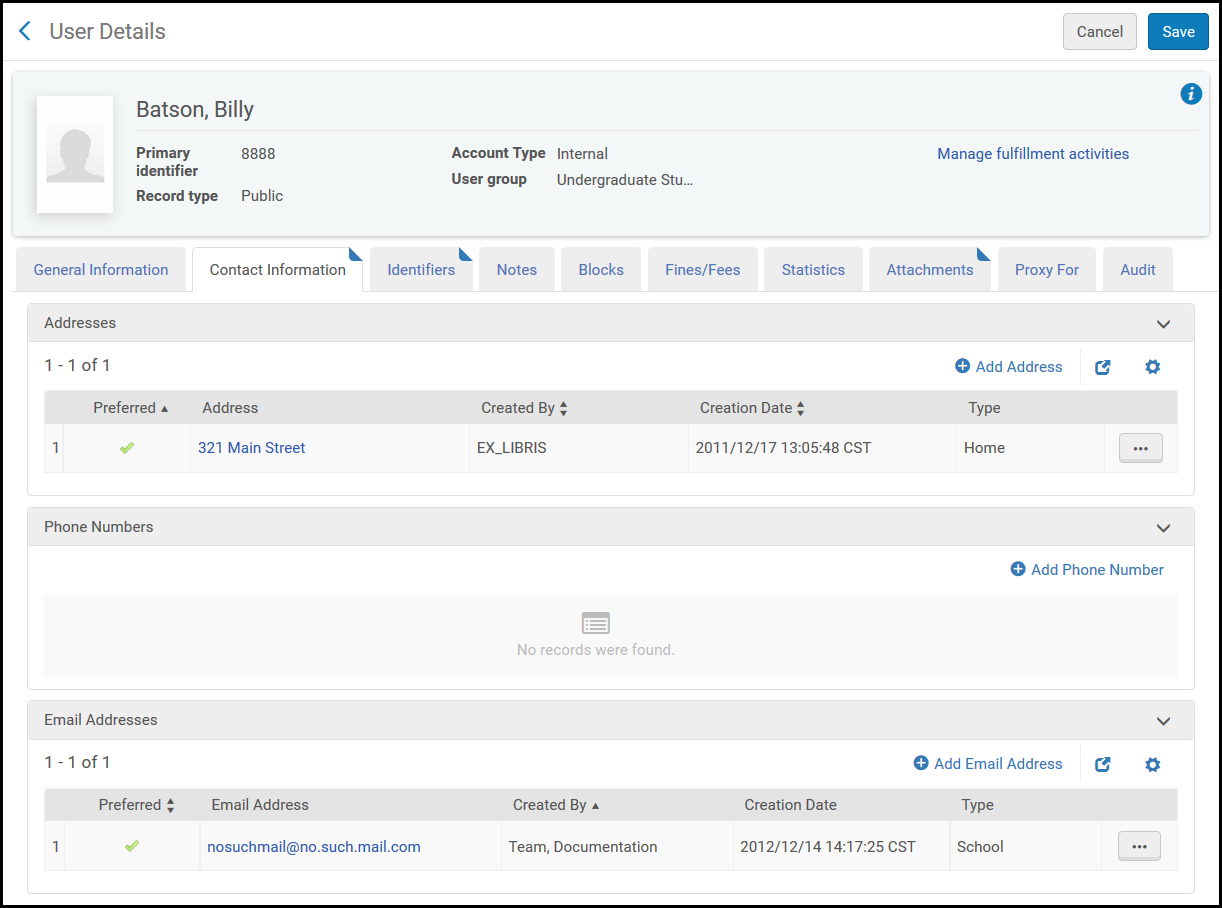
- In the Contact Information tab of the User Details page (Admin > User Management > Manage Users), select Add Address, Add Phone Number, or Add Email Address. The relevant dialog box opens.
- Enter the contact details, as required.
Note that you can set the address, phone number, and email address as preferred in this step, as shown below:
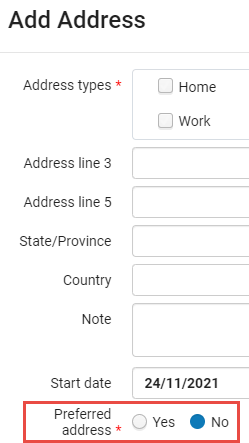
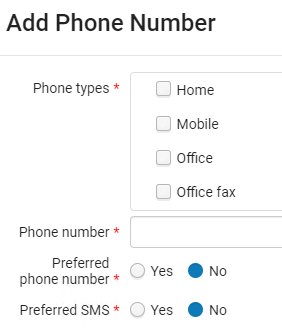
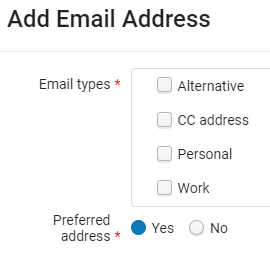 Note that the Start date and End date are for informational purposes only. The Start date is the date from which the address is relevant and the End date is the date after which the address is no longer relevant.When working with an external user, the Add as an external check box appears. Select this option to add the contact information as external data which is overwritten during SIS synchronization. If you do not select this check box, the contact information is added as internal data and is not overwritten during SIS synchronization. For more information, see https://developers.exlibrisgroup.com/alma/integrations/user-management/sis.
Internal fields cannot be turned into external – they need to be removed instead. - Save the details to the Contact Information tab as follows:
- Select Add to save the details and add additional entries.
- Select Add and Close to save the address details and exit the dialog box.
When saving external data, a green check mark appears in the External Data column.
Managing User Identifiers (Tab)

- Identifier Type - The type of identifier. Ex Libris creates and configures the types when setting up your institution. In addition to social media options, other options include barcode and institution ID (the ID assigned to the user from an SIS; see Student Information Systems). This list may be different for staff and public users.
- Value - The value of the identifier for this user.
- Note - An optional note.
- All primary and additional identifiers must be unique for users, including for the same user.
- User identifiers associated with social logins (Twitter, Google, and Facebook) do not appear in this tab, even if they are defined for the user. They still exist: they can be used to login using the social login page (see Social and Email Login), and you can search for the user using the identifier.
- When working with an external user, the Add as an external check box appears. Select to add the identifier as external data which is overwritten during SIS synchronization. If you do not select this option, the identifier is added as internal data and is not overwritten during SIS synchronization (unless the same value is later sent by the SIS, in which case the identifier is marked as external). For more information, see https://developers.exlibrisgroup.com/alma/integrations/user-management/sis.
- When defined by Ex Libris, some identifiers must be unique across the institution in order for the user to be able to log in to Alma or Primo.
- When saving external data, a green check mark appears on the in the External Data column.
- When a user is changed from internal to external, all internal identifiers become external.
Managing User Notes

- In the Notes tab, select Add Note. The Add Note dialog box appears.
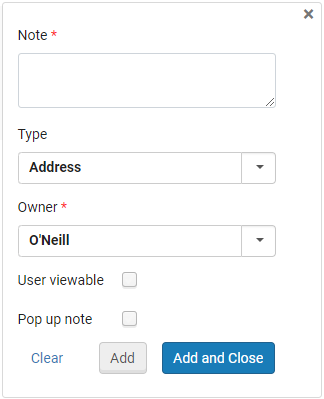
- Under Note, enter the text of the note.
- Under Type, select a note type. The types of notes are for informational purposes only and do not serve a functional purpose in Alma. The list of note types is standard across all institutions.
- Under Owner, select the library that owns the note. Only users whose role is scoped to this library will be able to see this note. This option only appears if library independence is activated for the institution (see above).
- Select Pop up note to make the note pop up when the user record is displayed in the Manage Patron Services page.
- Select User viewable to enable the indicated user to view the note.
When working with an external user, the Add as an external check box appears. Select this option to add the note as external data which is overwritten during SIS synchronization. If you do not select this option, the note is added as internal data and is not overwritten during SIS synchronization. For more information, see https://developers.exlibrisgroup.com/alma/integrations/user-management/sis.
- Save the note:
- Select Add to save the note details and add additional notes.
- Select Add and Close to save note details and close the Add Note dialog box.
Blocking and Unblocking Users
The Blocks tab is not available for Contact users.
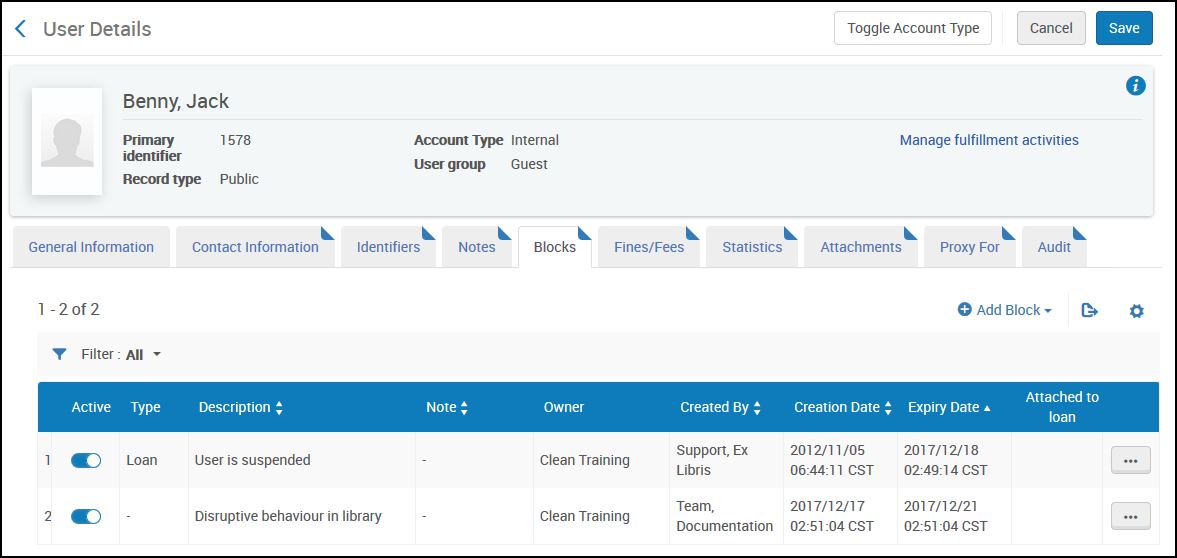
- Block description - The block type. This list is pre-configured by Ex Libris.
- Expiry Date - An optional date when the block will be lifted.
- Under Owner, select the library that owns the block. Only users whose role is scoped to this library will be able to see this block. This option only appears if the library independence is activated for the institution (see above).
- Note - An optional note.
- When working with an external user, the Add as an external check box appears. Select this option to add the block as external data which is overwritten during SIS synchronization. If you do not select this option, the block is added as internal data and is not overwritten during SIS synchronization. For more information, see https://developers.exlibrisgroup.com/alma/integrations/user-management/sis.
- a user has an active block, a check mark appears in the Blocks column on the Manage Users page for that user.
- When saving external data, a green check mark appears in the External Data column.
Managing User Fines and Fees
- The Fines/Fees tab is available only for users with the Patron role.
- The Circulation Desk UI also supports managing fines and fees with additional functionality - see Managing Fines and Fees.
Users can select fines and fees across the full paginated fees list (among multiple pages) and waive them by selecting the Waive All option in the Fines/Fees tab.
It is not possible to waive more than 100 selected fees in one action. This limit can be configured with the waiving_fines_fees_limit parameter (see Configuring Other Settings). For waiving fines and fees (specifically or in bulk) on the Manage Patron Services page, see Managing Patron Services at a Circulation Desk. You can also use a dedicated job to waive fines and fees in bulk (see Waiving Fines and Fees Using a Job).
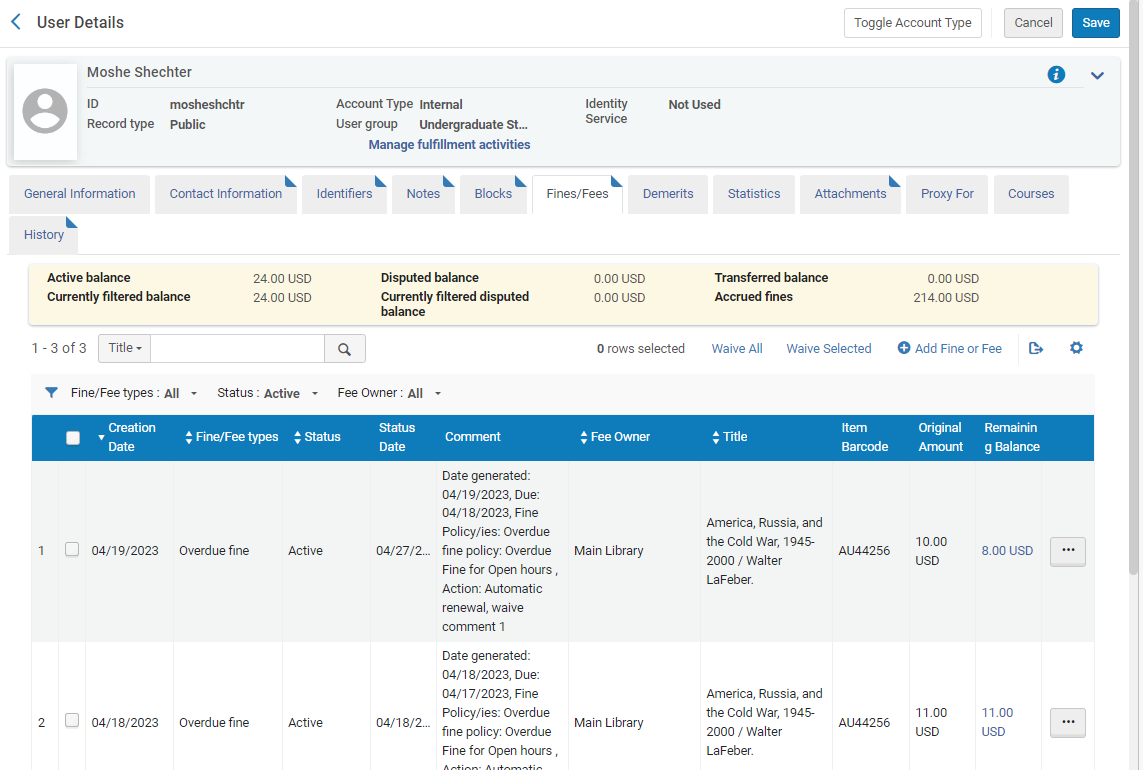
- Active balance: The balance of fines and fees. This may include transferred balance depending on the allow_activity_on_transferred_finesfees parameter. See Configuring Other Settings (Fulfillment).
- Currently filtered balance: The balance of fines and fees that are currently filtered due to your selections in the filters.
- Disputed balance: The balance of disputed fines and fees.
- Currently filtered disputed balance: The balance of disputed fines and fees that are currently filtered due to your selections in the filters.
- Transferred balance: When bursar fees are set to Exported status, they appear as transferred balances.
- Accrued fines: Additional fines that may still be increasing, because the patron has not yet returned an overdue loan. Note that accrued fines are not included in the calculation of the debt limit that, if reached, would prevent the patron from borrowing additional items (see Patron Configurations).
Accrued fines are calculated only if the patron does not have more than 100 overdue loans.
- Creation Date
- Fine/Fee Type
- Status
- Status Date
- Comment
- Fee Owner
- Title
- Item Barcode
- Original Amount
- Remaining Balance
- Original VAT
- Remaining VAT
- Bursar Transaction ID - see Configuring Bursar Transaction IDs.
- Waive Reasons
- Is not included in the user’s Active Balance
- Is not displayed on the list of fines in Primo
- Is not factored when invoking a block based on the amount due.
For example:
- A patron cannot borrow items when the amount they owe is $100 or greater
- The patron owes $100, but has disputed $20 of that amount
- Alma views the patron as owing $80, and the block is not invoked
In order to register a Credit, select the Credit fee type and enter the amount as a positive sum. When you save it, the Credit fee appears in the Fines/Fees list with a negative amount. If you select the Credit fee type, the Comment field is mandatory.
- In the Fines/Fees tab, select Add Fine or Fee. The Add Fine or Fee dialog box appears.
- Select the fine/fee type. The types are those configured for manual creation on the Fine Fee Type Definition mapping table; see Configuring Fines/Fees Behavior.
- Select the owning library or institution. Libraries are selectable only if the fee type has been defined as 'allow a library scope'.
- Enter the amount of the fine or fee (The amount cannot be negative).
- In the Item barcode field, browse for the item to which you want to attach the fee, as required.
When adding a barcode, the fine/fee is associated with the item specified by the barcode. The item and barcode appears on the Fines/Fees tab of the User Details page.
- In the Comment field, optionally enter a comment for the fine or fee, as needed.
If you select the Credit fee type, the Comment field is mandatory.
- Save as follows:
- Select Add to save the fine or fee details and add additional fines or fees.
- Select Add and Close to save fine or fee details and close the Add Fine or Fee dialog box.
The patron's active balance is updated with the amount added; if the fine/fee is subject to VAT, VAT is included to the amount. (The VAT columns are hidden by default on the page. To configure the VAT, see Configuring Fines/Fees Behavior.) For a Credit type fee, the amount is subtracted from the balance. For all other fee types, the amount is added to the balance.
- In the Fines and Fees tab of the User Details page, select Link to Item in the row actions list for a Fine/Fee. The Link to Item page appears.
- In the Item barcode field, browse for the item to which you want to attach the fee.
- Select Link to Item. The Title and Item Barcode column values on the Fines and Fees Details page update accordingly.
In the Fines/Fees tab, select the fines/fees you want to waive and select View Loan in the row actions list. The Loan Audit Trail page appears. For more information, see Viewing Loan History.
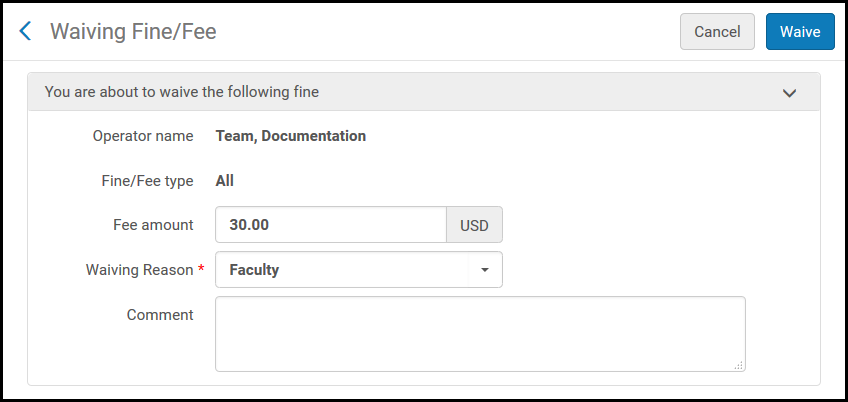
- In the Fines/Fees tab, select the fines/fees you want to waive and select Waive Selected in the table actions list. Alternately, select Waive in the row actions list for the fine/fee that you want to waive. The Waiving Fine/Fee page appears.
 Waiving Fine/Fee Page
 - Enter the amount of the fee you want to waive in the Fee amount field.
- In Waiving reason select a reason for waiving the fee (this list is predefined by a system administrator; see Configuring Reasons for Waiving Fines/Fees).
- Enter any text/comment for waiving the fine or fee in the Comment field.
- Select Waive. and select Confirm in the confirmation dialog box. The amount that is waived is deducted from the amount of the fine or fee (in the Original Amount column), and the balance owed for the fine or fee in the Remaining Balance column is reduced. The balances shown in the Fines and Fees Summary area for Active balance and Disputed balance are updated.
- Select Dispute in the row actions list for the fine or fee that you want to dispute. The Dispute Fine/Fee page appears.
- Enter any text/comment for disputing the fine/fee in the Comment field.
- Select Dispute and select Confirm in the confirmation dialog box. The balances shown in the Fees and Fines Summary area for Active balance and Disputed balance are updated.
- Select Restore in the row actions list for the disputed fine or fee that you want to restore (ensure the Status filter is set to All or In Dispute). The Restore a Fine or Fee page appears.
Only fines or fees that are in dispute can be restored.
- Enter any text/comment for restoring the fine or fee in the Comment field.
- Select Restore and select Confirm in the confirmation dialog box. The original amount of the fine or fee (in the Original Amount column) is restored, and the balance owed for the fine or fee in the Remaining Balance column is adjusted. The balances shown in the Fees and Fines Summary area for Active balance and Disputed balance are also updated.
Managing User Statistics
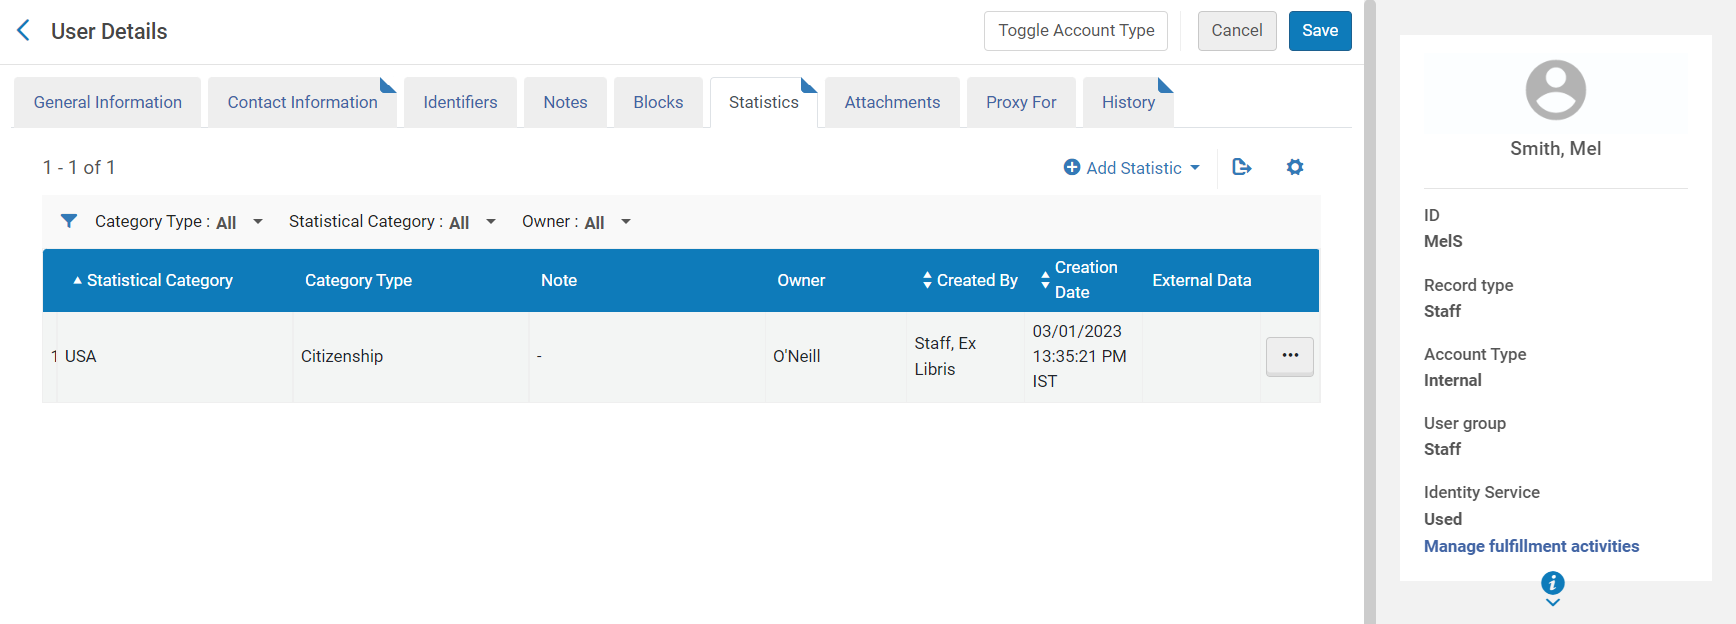
- Category type - Category types are predefined by a system administrator in the Statistical Categories Types mapping table (see Creating Statistical Category Types).
- Statistical category - Statistical categories are predefined by a system administrator in the Statistical Categories context of User Management Configuration (see Configuring Statistical Categories).
- Note - Add a note as required.
- Owner - When library independence is activated for an institution, this field appears in the Statistics tab. In this case, users can only see statistical information that is owned by the libraries that are within these users' scopes (see Managing User Roles). Information that is outside of a user's scope is not displayed in this tab, is not retrieved in searches, and is excluded from API calls. Library-level statistics can only be activated in institutions in which library independence is turned on. For additional information about library independence, see Fulfillment Library Independence.
- When working with an external user, the Add as an external check box appears. Select this option to add the statistical category as external data which is overwritten during SIS synchronization. If you do not select this option, the statistical category is added as internal data and is not overwritten during SIS synchronization (unless the same value is later sent by the SIS, in which case the statistical category is marked as external). For more information, see https://developers.exlibrisgroup.com/alma/integrations/user-management/sis.
- When saving external data, a green check mark appears on the in the External Data column.
Managing User Attachments
Managing Proxy Users
- Open the Proxy For tab of the User Details page. Select Add Proxy For.
- In the Proxy for field, enter or select the patron for whom you want the current user to be a proxy.
- Select Add User. The patron is added; the user is now a proxy for this patron.
A user record may be created as a Fulfillment Proxy at the time the new user record is created. Unlike the regular circulation proxy, the Fulfillment Proxy is a full proxy, for example not only are this patron's loans associated with the sponsor, but also the patron's requests and resource sharing requests. Emails that have to do with the request, such as hold shelf notifications and request reminders are also sent to both the proxy user and the sponsor user. The Fulfillment Proxy cannot be unlinked from the sponsor record and cannot place requests or check out items without the request or loan being associated with the sponsor record. In addition, requests placed by the Fulfillment Proxy are listed in both the proxy's and the sponsor's My Account in Primo.
While Fulfillment Proxy users can request both local and AFN items on behalf of the Proxy Sponsor, and Fulfillment Proxy and Proxy Sponsor users receive On Hold Shelf notifications for local items, only the Proxy Sponsor receives On Hold Shelf notification emails for AFN items. The Fulfillment Proxy does NOT also receive the letter for AFN items on hold.
Viewing Changes to the User Record
Changes to the Last patron activity date are not recorded in the user's History tab. For more information on the Last patron activity date, see Managing Users and Configuring Last Patron Activity Date.

Only changes related to the following fields are displayed in the user history tab:
- General Tab:
- user name
- first name
- last name
- middle name
- user title
- pin number
- job title
- campus code
- user group
- user language
- expiry date
- purge date
- rs library code
- cataloger level
- record type
- password
- address
- phone
- identifiers
- notes
- blocks
- proxy for
- roles
Managing Courses
(Leganto only) The Courses tab allows you to view all courses to which a student has enrolled and to delete specific courses or all courses to which a student has enrolled.
For information on how to load user enrollment information, see Configuring Importing Course Enrollment Jobs.

Managing User Pictures
- photo_server_url - The URL to the location (directory) containing user pictures. The URL must use HTTPS. In order to use HTTPS, the certificate may not be self-signed and must be signed by a known certificate authority (the list of supported certificates can be found here). The URL must end with a forward slash (/). For example, http://institution.edu/pictures/ .
- photo_identifier_type - The user identifier to use as the user picture file name. Possible values are: USERNAME (the primary ID) or a code in the User Identifier Types code table (see Viewing User Identifiers).
- photo_suffix - The suffix to use for the user picture file suffix. For example, png .
- Upload user pictures to the directory defined in photo_server_url with the name <user identifier>.<photo_suffix>, for example 12345.png.
- Ensure that each user has an identifier that matches the user picture file name. See Managing User Identifiers.
Deleting Users
- They do not have a balance due on their account.
- They do not have outstanding loans.
- They do not have any assigned PO lines, POs, or invoices.
- They do not have any locked bibliographic records.
- They do not have any assigned import profiles.
- They are not currently working in the MD Editor.
- They do not have active Purchase Requests (Purchase Requests with the following status are considered ‘not active’ and do not prevent deleting a user: Rejected, Approved, Order Complete, To be Canceled, Failed, Cancelled).
- The user record is not currently locked by a running job.
- (If Esploro is enabled for your institution) they have associated assets or grants.
- On the Find and Manage Users page (Admin > User Management > Manage Users), select Delete in the row actions list for the user you want to delete. A confirmation dialog boxes appears.
Find the user record you want to delete using the persistent search bar’s ‘Users’ option.
- If the user can be deleted, select Confirm. The user is deleted.
- If the user cannot be deleted, a message such as the following appears.
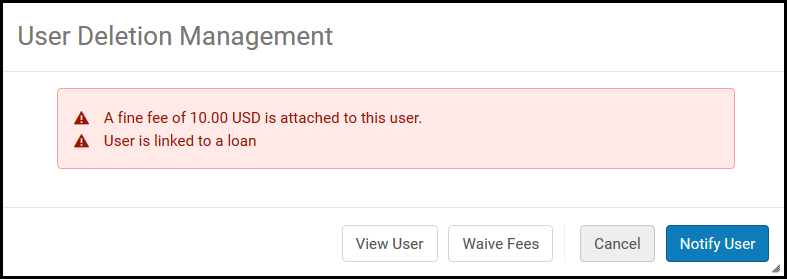 User Deletion Management Dialog BoxChoose one of the following options:
- Cancel – Do not delete the user.
- View User (appears only when fines/fees are attached to the user) – See Editing Users.
- Waive Fees – See Managing User Fines and Fees. A new confirmation dialog box appears, where you can confirm that you want to delete the user.
- Notify User (appears only when fines/fees are attached to the user) – Send the User Deletion Letter informing the user that there is a balance due on the user’s account. A copy of the email is added to the Attachments tab (see Managing User Attachments). For more information on configuring the letter, see Configuring Alma Letters.

