Summon: Administration Console: Settings
- Product: Summon
How do I change the Summon Administration Console settings?
This is part of a larger set of documentation about using the Administration Console to configure your Summon service.
Use the Summon Administration Console's Settings page to customize the look and feel of your library's Summon search and results pages. The console default settings match the settings that most libraries prefer. If a setting other than the default would better serve your patrons, change that setting's slider bar to Custom and then select the On or Off radio button to change the setting state:

If you change one or more settings and then decide you don't want those changes, click Reset form. This clears any changes that have been made since the last save.
Finally, click Save Settings to apply your changes to the user interface. Changes take effect in five minutes).
You can see brief help tips by hovering over the question icon for each field.
The rest of this document describes the functions of the various settings sections.
General
Use the General settings to modify your search-page display:

-
Change the slider bar to Custom for the setting you want to change.
-
Modify the general settings as needed:
General Settings Field Description Page Title
Type the text to be displayed on the browser title bar.
Home Link
Type the URL of your institution's library.
Force HTTPS via redirect
While your site may be HTTPS compliant, URLs from outside of your site (such as bookmark and email links or links typed in the browser’s address
bar) may be referred across HTTP rather than HTTPS. When this option is ON, any referring URL is redirected over HTTPS regardless of the original URL.Feedback Email Address
Type an email address if your institution would like to receive a copy of the feedback that has been submitted using the default feedback form. Libraries using the Summon 2.0 interface: By default, the Summon 2.0 user does not need to include their email address.
Feedback Client Email Required
Select ON to make feedback client email a requirement.
Feedback Link
Type your site URL if you want to use your own site for feedback. Feedback can be set either to the Summon default form or to your custom site.
Feedback Roles
When set to ON, users may select a role on the Feedback Form. The following roles are provided and are not configurable: Undergraduate Student, Graduate Student, Researcher, Faculty, Alumni, and Other. This option is enabled by default.
Help Link
If you prefer that the end user Help link goes to your own Help page, enter the URL. Remember to include http:// at the beginning of any URL address you enter.
Enable RSS Icon
By default the RSS feature in Summon 2.0 is ON; use this setting to turn the RSS feature OFF so that users do not see the RSS button at the top of their Summon search results.
Standard Autocomplete Enabled
When set to ON, this option provides suggestions while users type their search queries. For more information, see Summon: Autocomplete Feature.
Enhanced Autocomplete Enabled
When set to ON, this option provides suggestions from the following sources (if enabled in Admin Console) while users type their search queries: Popular Searches, Topics, Best Bets, and Database Recommendations. This option is disabled by default.
When enabled, this feature overrides the Standard Automplete feature.
For more information, see Summon: Enhanced Autocomplete Feature.
Query Suggestions Enabled
Related Searches displaying at the bottom of the Summon results page are ON by default. Select OFF to disable.
Use Enhanced Did You Mean
Enables the Enhanced Did You Mean (DYM) feature. For more details, see Summon: Did You Mean Feature.
-
Select ON to proactively correct spelling before issuing a search.
-
Select OFF to use the regular DYM feature.
When enabled, the additional processing required to support the enhanced version may increase search response times.
Call Numbers and Dewey Numbers fields and display options can be customized. Call Numbers and Dewey Numbers can display in the record Availability field, in the Preview window Call Number field, and in the Saved Items record.
Call Numbers Enabled (Availability)
Set to ON to see call numbers displayed from CDI if they are not returned by your availability service. Set to OFF to see call numbers displayed from your availability service, and not from CDI.If you see two sets of call numbers, select the OFF button to hide CDI Call Numbers.Dewey Numbers Enabled (Availability)
Set to ON to see CDI Dewey Numbers in the Availability field if they are not returned by your availability service. Set to OFF to hide Dewey Numbers from CDI in the Availability field.
Call Numbers Enabled (Preview)
Set to OFF to hide call numbers in the Preview pane, and ON to display the numbers.
Dewey Numbers Enabled (Preview)
Set to ON to see Dewey Numbers in the Preview field, or set to OFF to hide the numbers.
Display Call Numbers if Availability fails
Select ON to display Call Numbers from CDI if your catalog is either down or slow.
Display Dewey Numbers if Availability fails
Select ON to display Dewey Numbers from CDI if your catalog is either down or slow.
Disable OneClick for IE
This setting pertains to libraries using the legacy version of 360 Link, not the enhanced 360 Link with IEDL. You can disable legacy 360 Link's 1-Click feature for users browsing with Internet Explorer (IE) by setting Disable OneClick for IE to ON. In certain configurations 1-Click does not work properly with IE.
Google Analytics Tracking Code
Specify your Google Analytics Tracking ID. Your Summon instance must first register with Google Analytics to receive a tracking ID. See the Google Analytics Getting Started Page here for instructions on how to register. You must define your Summon instance as a new account in the Google Analytics system. In Google Analytics, add the following domain: http://<xxx>.summon.serialssolutions.com. Replace <xxx> with your Summon prefix. Google Analytics will provide you with a tracking code.
Google Universal Analytics will no longer process data on July 1, 2023 and is replaced with Google Analytics 4 (GA4). To continue tracking data with Google Analytics after July 1, 2023, register for GA4 and enter the new tracking ID in this field.
For additional details on Summon and Google Analytics, see Summon: Google Analytics.
Google Tag Manager Tracking Code
Specify your Google Tag Manager Tracking ID. Your Summon instance must first register with Google Tag Manager to receive a tracking ID.
Default Number of Search Results
Select either 10 or 25 results per page. The default setting is 10.
Exclude Citation Online Content
Select ON to exclude from search results any records for subscription content that do not have full text. Selecting ON does not impact users when they check the "Add results beyond your library's collection" option. A change to this setting takes 24-72 hours to process.
Enable Widgets Link
When this selection is ON, a link appears at the bottom of the Summon search results page that takes users to the custom search boxes and widgets interface, which allows them to create their own customized search boxes and search widgets.
Enable Citace.com export option
When this selection is ON, the user action to export to Citace.com is enabled.
-
-
Click Save Settings.
Search Results
Use the Search Results settings to modify settings associated with the search results:

| Field | Description |
|---|---|
|
Citation Counts Display |
The Citation Counts Display setting is ON by default, which means that if you have Web of Science or Scopus activated in your profile, citation counts appear in your Summon search results. Turn the setting OFF to keep Web of Science or Scopus activated in your profile but not have citation counts displayed to your Summon users. |
|
Sender Email To Email Citations |
When set to ON, the From field is displayed to enable users to include their email address when sending citations to users. This field is set to OFF by default. |
|
Sender Email To Email Citations Required |
When set to ON, users must specify an email address in the From field when sending citations to users. This field is set to OFF by default. |
|
Results Counts Display |
The Result Counts Display setting is ON by default, which means search results are numbered. Turn the setting OFF to have search results display without any numbering. |
|
Show Rollups |
The Show Rollups setting is ON by default, which means particular content types such as newspaper articles are grouped together in search results sets. Turn the setting OFF to not group the items together and instead display the items throughout the search results set. |
|
Show Image Spotlighting |
The Show Image Spotlighting setting is ON by default, which means images are grouped together in a single area (a horizontal row). Turn the setting OFF to instead display images throughout the search results set. |
|
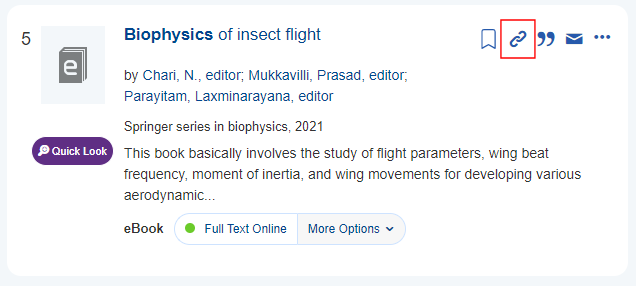
Show Permalink |
The Show Permalink setting is ON by default so that the Summon Record includes a persistent link to the item (see below). The link provides an easy way to access the Summon record at a later date via places such as a browser bookmark. Select OFF to hide the display of the permalink.
|
|
Shorten Permalink |
The Shorten Permalink setting is OFF by default. When it is set to ON, the system generates a permanent link in the TinyURL format when the Permalink icon |
|
Merged document physical priority |
The Merged document physical priority setting is OFF by default, which means that sort priority is given to the electronic format of the record over the physical format when both formats are available. When set to ON, priority is given to the physical format of the record. In either case, the records from your library catalog are listed first. |
|
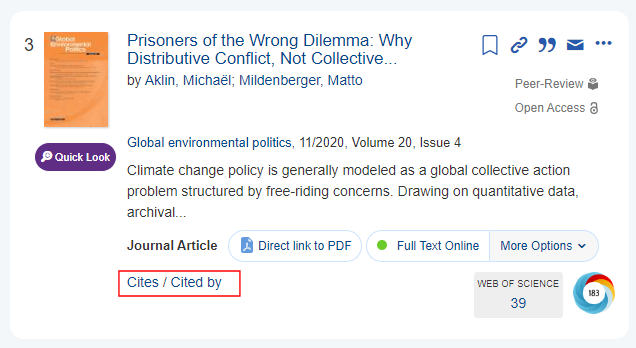
Citation Trail Displays |
The Citation Trail Displays setting is OFF by default. When set to ON, the Summon Record displays citation links (Cites and/or Cited by) if the record cites other records or is cited by other records. For more information about Citation Trails, see Summon: Citation Trails.
|
|
Related Items |
The Related Items setting is OFF by default. When set to ON, the Summon Record allows users to view additional information related to the item (such as book chapters and reviews). For more information about related items, see Summon: Contextual Relationships. |
|
Secondary Content Type |
The Secondary Content Type setting is OFF by default. When set to ON, the Summon Record displays secondary content types (such as Primary Source or Retracted Publication). For more information about these content types, see Summon: Glanceability Feature. |
|
Display eResource Public Notes |
The Display eResource Public Notes setting is OFF by default. When set to ON, public notes appear in the Item Preview. Public Notes are returned only for documents that contain IEDL links. For more information about public notes, see Intota and 360 Core: Public Notes and Location Notes. |
|
Display eResource Location Notes |
The Display eResource Location Notes setting is OFF by default. When set to ON, location notes appear in the Item Preview. Location Notes are returned only for documents that contain IEDL links. For more information about location notes, see Intota and 360 Core: Public Notes and Location Notes. |
|
Display PDF Quicklinks |
When set to ON, PDF Quicklinks are enabled in Summon Search results. By default, this option is enabled. For more details, see Summon: Quicklinks in Summon. |
|
Display HTML Quicklinks |
When set to ON, HTML Quicklinks are enabled in Summon Search results. By default, this option is enabled. For more details, see Summon: Quicklinks in Summon. |
|
Auto Activate Quicklinks May 2024 |
Indicates whether Quicklinks are enabled automatically for your library with the May 2024 release. By default, this field is set to ON , which automatically enables PDF and HTML Quicklinks in the May release. After the May release, this field is view only. You may disable Quicklinks at any time using the Display PDF Quicklinks and Display HTML Quicklinks fields. |
|
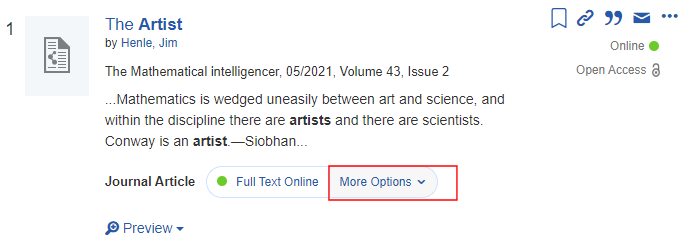
The Enable Additional Full Text Links setting is ON by default. When set to ON, Summon displays the More Options menu, which allows users to choose from multiple Direct Links (IEDL) if more than one exists for the title in the search results. Otherwise, additional links are not displayed.
More Options Enabled
|
|
|
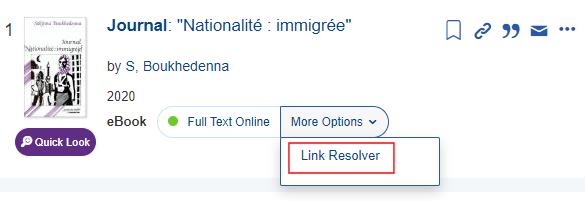
Display Link Resolver |
The Display Link Resolver setting is OFF by default. When set to ON, Summon displays the Link Resolver link under the More Options menu to allow users to view the record from your link resolver. Otherwise, no link is displayed.
Link Resolver Link Enabled
|
|
Maximum Full Text Link Options |
Configures the maximum number of direct links that display under the More Options menu. The valid values are 1-10 and 25. The default setting is 5. For more details, see Summon: More Options Link. See the Enable Additional Full Text Links option to enable/disable the More Options menu. |
|
Open Access Indicator |
The Open Access Indicator setting is ON by default. When set to ON, Summon displays an indicator for records that are open access. For more information, see Summon: Open Access Filter.
Open Access Indicator Displayed
|
|
Open Access Links |
The Open Access Links setting is OFF by default. When set to ON, the Open Access indicator links directly to the Open Access source regardless of subscription.
|
|
Peer Review Indicator |
The Peer Review Indicator setting is OFF by default. When set to ON, Summon displays an indicator for records that are peer reviewed.
Peer Reviewed Indicator Displayed
|
|
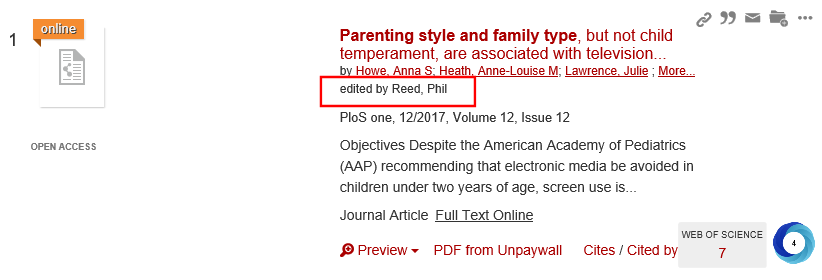
Display Editor |
The Display Editor setting is OFF by default. When set to ON, Summon displays the editors in a display line below the authors for each record in the results. When appropriate, editors are also included in citations.
Editors Shown in Summon Results
|
|
Proxy DOI Links Enabled |
The Proxy DOI Links Enabled setting is ON by default. When set to ON, Summon applies your proxy settings to the DOI links in the preview pane of search results. |
|
Enable Short Availability Status |
The Enable Short Availability Status setting is OFF by default. When set to ON, short availability statuses display in the results. |
|
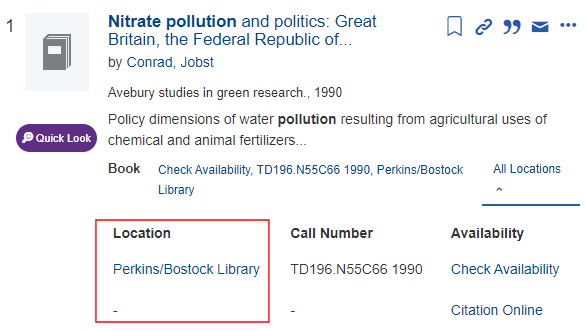
Enable Locations Column |
The Enable Locations Column setting is ON by default. When set to ON, Summon displays the Location column in the search results for the availability of physical items. Otherwise, the Location column does not appear.
Locations Column Displayed
|
|
Show Online Access Indicator |
The Show Online Access Indicator setting is OFF by default. When set to ON, online access indicators display in the results.
Online Access Indicator Displayed
|
|
Display Journal Coverage Ranges |
This setting is OFF by default. When set to ON, a coverage range summary display in the results for journal-level records. The Coverage Details link opens the coverage details in the Quick Look pane.
Coverage Ranges Displayed for Journals
|
|
Allow Download Search Results |
This setting is OFF by default. When set to ON, the Export Results button appears above the search results, enabling users to send the first 1000 records in a CSV file to a specified email address.
Export Results Button
|
|
By default, the Notes field is not included with the default search fields. As a result, local catalog metadata mapped into the Notes field can no longer be searched from the basic search field. When this option is set to ON (enabled), the Notes field is included for basic searches. The default setting is OFF (disabled). For additional information, see the Custom Search Fields and Display Library Notes fields. |
Research Assistant
Use the Research Assistant section to configure settings associated with the Quick Look pane. For more details, see Getting Started with Summon Research Assistant.

-
If you want to customize any of the fields listed in the table below, change the field's slider bar to CUSTOM.
If you change the slider bar to DEFAULT, the field's setting returns to the default value.
Research Assistant Settings Field Description Enable Research Assistant
Select On to enable Research Assistant in the Summon UI. The default setting is Off.
How to Cite URL
Enter the URL containing information on how to cite AI-generated content. When entered, the How to Cite AI-generated Content link appears below the Overview of Sources section in the response from the Research Assistant. This link is disabled by default.
-
Select Save Settings.
Quick Look
Use the Quick Look section to configure settings associated with the Quick Look pane.

-
If you want to customize any of the fields listed in the table below, change the field's slider bar to CUSTOM.
If you change the slider bar back to DEFAULT, the field's setting returns to the default value.
Quick Look Settings Field Description Quick Look Items
Select Custom to configure whether the following areas are initially expanded or collapsed in the Quick Look pane: Subjects, Syndetics, Record Details, Library Notes, and Keyword Subjects. By default, all areas (except for Keyword Subjects) are expanded in the Quick Look pane. To expand/collapse an item, move it to the appropriate column (Expanded or Collapsed).
Select Custom to configure whether the Library Notes (as defined in the MARC 5XX fields) are displayed in the Quick Look pane. Set the toggle to ON to display the field. For information on how to map the 5XX fields to your Summon instance, see Displaying Library Notes in Summon.
-
This functionality requires mapping and content processing for your specific institution before any content is available for display in your instance of Summon.
-
The Summon Notes field was removed from the default search fields in November 2023. As a result, local catalog metadata mapped into the Notes field is no longer searched from the basic search field by default. Instead, Summon users can search in the Notes field using either the field search syntax (for example, Notes:"some notes") or the Notes field if enabled in Advanced Search. For additional information, see the Include Notes Field In Default Search and Custom Search Fields fields.
Select Custom to configure whether Subjects that were not normalized with the enablement of Normalized Subjects appear in the Quick Look pane under the Keyword Subjects field. Set the toggle to ON to display the field.
This field is applicable only when Normalized Subjects are enabled. For more information, see Subject Terms section.
-
-
Select Save Settings.
Logos
Logos must be in the appropriate file format and size to display in the Summon service. Refer to the table below for specifications:
|
Favicon Logo |
The Favicon Logo suggested size is 16 x 16 pixels, less than 10 KB in size and in .ico format. If for whatever reason it cannot be scaled down, the Summon Administration Console allows icons that are 32x32 or 48x48. A favicon (short for favorites icon), also known as a shortcut icon, web site icon, URL icon, or bookmark icon is a 16 x 16 pixel square icon associated with a particular web site or web page. Browsers that provide favicon support typically display the page's favicon in the browser's address bar and next to the page's name in a list of bookmarks. Browsers that support a tabbed document interface typically show a page's favicon next to the page's title on the tab. Larger favicons can also be used for app icons, such as for a tablet or mobile phone. Here are suggested dimensions for those. Icons should be in .png format.
|
|
Small Logo |
The Small Logo suggested size is 183 x 32 pixels, less than 10 KB in size, and in .gif format. If an image with a height greater than 32 pixels is uploaded, the image appears with a re-sized height of 32 pixels. The Small Logo appears to the left of the search box on the results page. This image links to your library's home page. |
|
Large Logo |
The Large Logo suggested size is 312 x 53 pixels, less than 50 KB in size and in .gif format. The Large Logo appears above the search box on the standard Summon search page. |

-
Change the slider bar to Custom for the logo you want to upload.
-
Click Select file and browse to (and open) your new logo.
-
Click Save Settings.
Uploading a new logo replaces (delete) any logo currently saved in that position.
For more information, see Basic Search.
Subject Terms
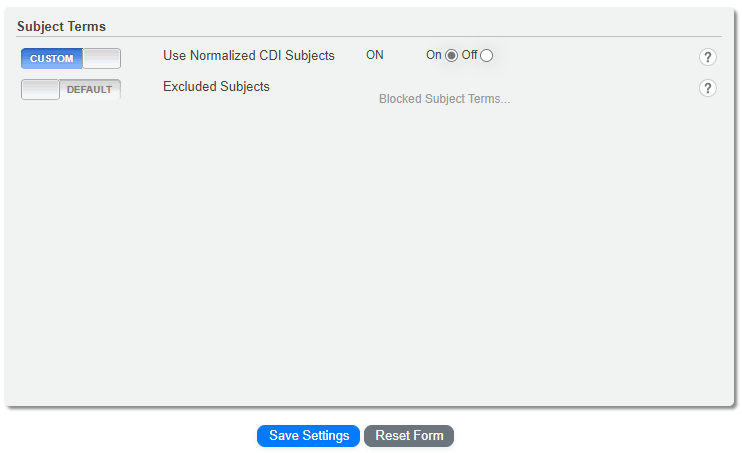
The Subject Terms section allows you to configure settings associated with Subject Terms.
-
If you want to customize any of the fields listed in the table below, change the field's slider bar to CUSTOM.
If you change the slider bar back to DEFAULT, the field's setting returns to the default value.
Advanced Search Settings Field Description Enables normalized CDI Subjects, which means that only normalized subjects appear for the Subject Terms facet and the Subjects display field in Quick Look. In addition, subjects that were not normalized are available for display in Subject Keywords field in Quick Look. For more information, see Using Normalized Subject Headings from CDI.
When enabled, you can display the CDI Subjects that were not normalized under the Keyword facet. To enable the Keyword facet, see Quick Look.
Excluded Subjects
Defines the list of objectionable subject terms that you want to block from display under the Subjects facets. While these objectionable terms can be useful for a variety of reasons, display of this information in the facets can be undesirable. Add a term or phrase (one per line) that you want to exclude from display in facets.
-
Select Save Settings.
Authentication
The Authentication Banner provides a way for remote users to sign in to your library's single sign-on system so that they can access full-text content as well as IP-restricted resources. The banner displays at the top of the Summon results page.

-
Change the slider bar to Custom for the setting you want to change.
-
Make changes in the text box:
-
Type the text to be displayed on the Banner Text box. The default display text is: Off Campus? Log in to access full text and more content.
-
Type the URL of your institution's authentication site in the Banner URL text box. This should be left blank unless you want to direct users to a proxy server or site other than the proxy server listed in Client Center > Library Settings > Library URLs.
-
-
Click Save Settings.
Facets
This section controls the display and order of the Filters and Facets on the Search Results page.

-
If you want to customize any of the fields listed in the table below, change the field's slider bar to CUSTOM.
If you change the slider bar back to DEFAULT, the field's setting returns to the default value.
Facets Settings Field Description Contextual Faceting Enabled
When set to ON, this area of the search results is enabled and displays the Author, Genre, Region, and Time Period facets for a search limited to books or items in your library's catalog. The default value is ON.
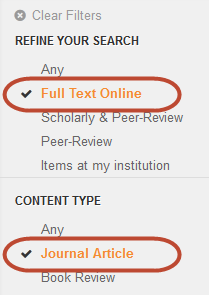
Refine Your Search Filters Enabled
When set to ON, this area of the search results is enabled and displays filters such as Items with Full Text Online and Exclude Newspaper Articles on the Summon service search page. The default value is ON.
Contextual Faceting for Union Catalogs Enabled
For consortia clients only: This setting is related to the Library Location facet and indicates whether you want it to always display or only after an Institution has been selected.
Select ON to contextualize the Library Location facet. It will display only after an Institution has been selected and holdings are identified within a library location at the user's institution. The default value is ON.
The facet does not display the libraries of other institutions; only those associated with the user's institution are displayed.
Facets
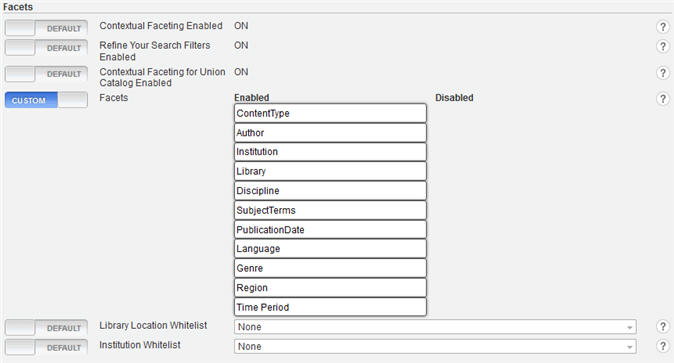
This setting lets you select which facets are enabled on the Summon service search page. To enable/disable a facet, drag it to the Enabled/Disabled column. Facets appear in the order displayed in the Enabled column.
By default, all facets are Enabled except for the Institution facet, which applies to libraries that use a union catalog in Summon.
Facets Display
This setting lets you select which facets are expanded by default on the Summon service search page. To enable/disable the default expansion of a facet, drag it to the Enabled/Disabled column.
Selected Facets View Disabled
When set to ON, the Selected Facets section is disabled on the Summon service search page. The default value is OFF.
Independent Scrolling Enabled ON
When set to ON, the list of facets scrolls independently of the search results. The default value is OFF.
-
Select Save Settings.
For more information, see Search Result Facets and Refine Your Search Filters.
Whitelisting Library Locations
This control allows libraries to specify a library location value that always appears in the top six facet values unless there are none.
-
Change the slider bar to Custom for the Library Location Whitelist.
-
Use the drop-down menus on the right to select available library locations:
Whitelisting Institutions
For libraries using Union Catalogs in Summon, this control allows libraries to specify an institution value that always appears in the top six facet values unless there are none.
-
Change the slider bar to Custom for the Institution Whitelist.
-
Use the drop-down menus on the right to select available institutions.
RefWorks
This section configures the URL that Summon uses to export records to RefWorks. For more details, see Summon: Exporting Search Results and Saved Citations.

The following default URL is valid for most U.S. clients:
The following URL is valid for most Canadian clients:
-
Change the slider bar to Custom for the Refworks Export URL.
-
Specify the new URL for RefWorks.
-
Select Save Settings.
Syndetics
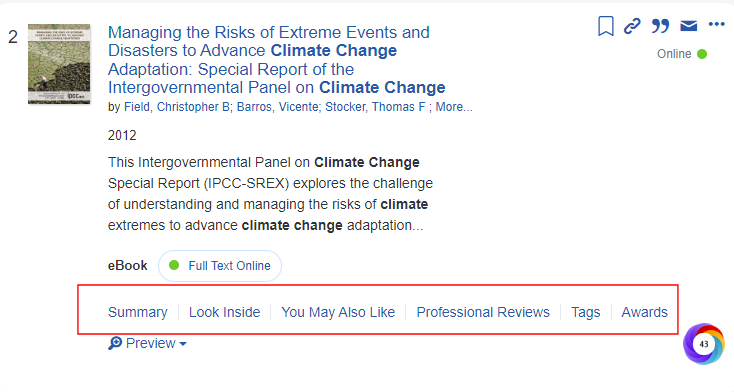
The Syndetics subscription service provides enrichment content such as awards, tables of contents, book cover images, and more. These settings apply to institutions with a Syndetics Classic, Syndetics Plus, or Syndetics Unbound subscription. The default setting is OFF and enrichment content is hidden.

-
Change the slider bar from DEFAULT to CUSTOM.
-
In the Syndetics ID field, enter the ID for your standard Syndetics Summon subscription if you want to:
-
Use Syndetics Plus anywhere in Summon (such as Preview Pane or Detail Page). Note that additional configuration is required to display Syndetics Plus information in specific areas within Summon.
-
Display Syndetics cover images in Summon search results. For more details, see Summon: Cover Images. Note that the Syndetics Cover Images field is no longer in use.
-
-
Set the Syndetics Plus Enabled field to ON if you want to display Syndetics Plus in the Preview pane of the brief results. This option requires you to configure the Syndetics ID field.
-
In the Syndetics Unbound ID field, specify the ID for your Syndetics Unbound subscription If you want to display your configured Syndetics Unbound topics in the brief results.
-
If you want to enable/disable the display of Syndetics Plus and/or Syndetics Unbound topics on the record's Detail Page (Pages > Detail Page tab in the Admin Console), you must enter their associated subscription IDs in this configuration section and also configure their display settings under the Detail Page settings. For more information, see Summon: Administration Console: Detail Page.
-
Click the Save Settings button at the bottom of the Settings page.
Languages
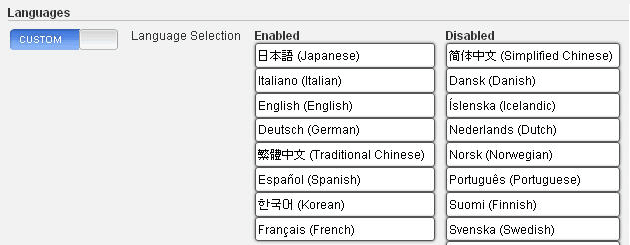
Alternate user-interface languages are available to your users via a drop-down menu that displays within the menu on the top right corner of the Summon results page:

Here is the settings screen in the administration console:
-
Change the Language Selection slider bar to Custom.
-
To Enable or Disable languages, drag and drop the language name into the appropriate column. Languages appear in the drop-down menu in the order that they display in the Enabled column.
-
Click Save Settings.
Summon's Preferred Language Boost feature applies to any language made available to users (except Danish and Swedish). This technology boosts the relevance of results in the language that is the same as the language chosen for that search.
Use the Default Language setting to select which language displays if a user does not select a language in the language drop-down menu.
Libraries using the Summon 2.0 interface: The Enable Language Detection setting is turned OFF by default, and the Default Language is displayed (unless the patron uses the language drop-down menu). Turn Enable Language Detection ON if you want the default language to be based on the user's web browser language preference setting. A language must be listed in the Enabled column on the Summon Settings administration page in order for the user's web browser language to display in Summon.
If you want to set the language by passing a language parameter in the Summon URL, you can do this so that Summon recognizes the language parameter regardless of whether Enable Language Detection is set to ON or OFF. Setting the language parameter in the Summon URL does require that the language be listed in the Enabled column on the Settings administration page.
Participant Record Prioritization
For libraries using Union Catalogs in Summon, and libraries with multiple locations, this feature lets you specify which record appears as the main/prioritized record within a merged record.
Prioritize your records by dragging and dropping from the Unordered to the Ordered column, and then drag up and down within the Ordered list until it is prioritized to your liking. Click Save Settings when done.
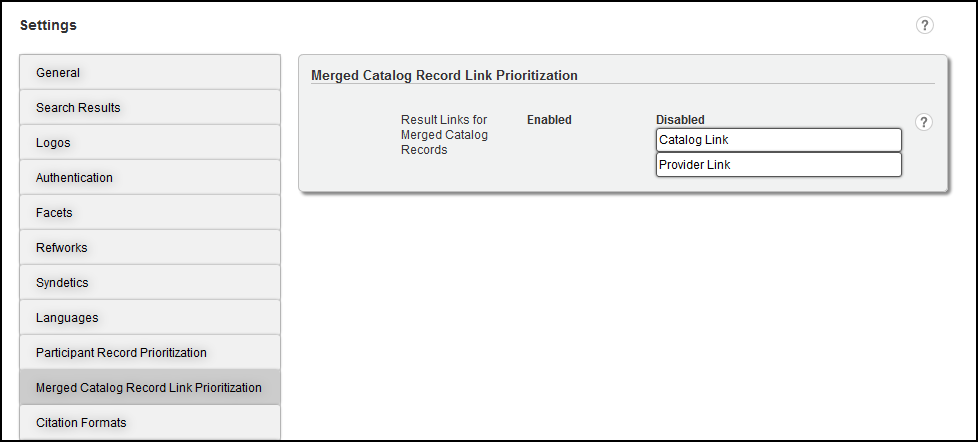
Merged Catalog Record Link Prioritization (Alma-Summon Only)
Citation Formats
Use the Citation Formats settings to specify which citation formats are available to users in the UI (brief results and Saved Items folder). You can select from either the formats provided by RefWorks or any custom formats shared by your institution or other institutions in the open source Citation Style Language (CSL) Style repository in GitHub. For more details about CSL, see Citation Style Language - Style Repository in GitHub.

-
If you enable any CSL styles, all RefWorks styles are disabled.
-
When the UI language is localized in Summon, the locale is submitted along with the citation request and translated in the formatted citation for some citation styles.
-
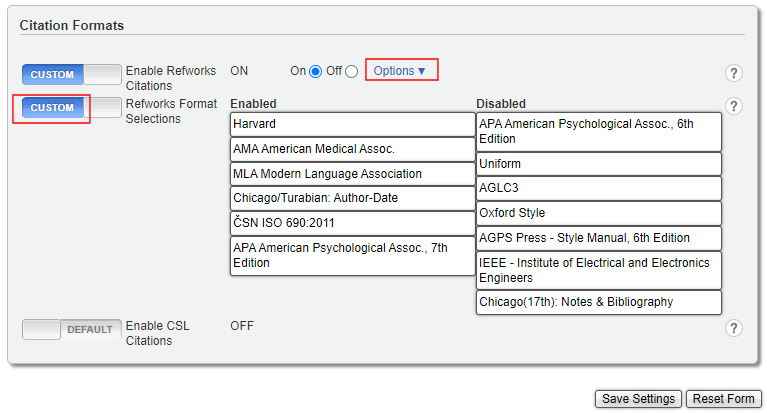
If you want to use formats provided by RefWorks, ensure that the Enable Refworks Citations field is set to ON, which is its default setting.
-
To customize the settings for Refworks citations:
-
Set the Enable Refworks Citations slider to Custom, and then open the Options drop-down list to display the RefWorks Format Selections section.
-
Drag and drop formats into the appropriate column to enable/disable them. If RefWorks formats are enabled, the system requires that at least one citation format be listed in the Enabled column. The Citation formats appear in the Saved Items folder in the order in which they appear in the Enabled column.
-
-
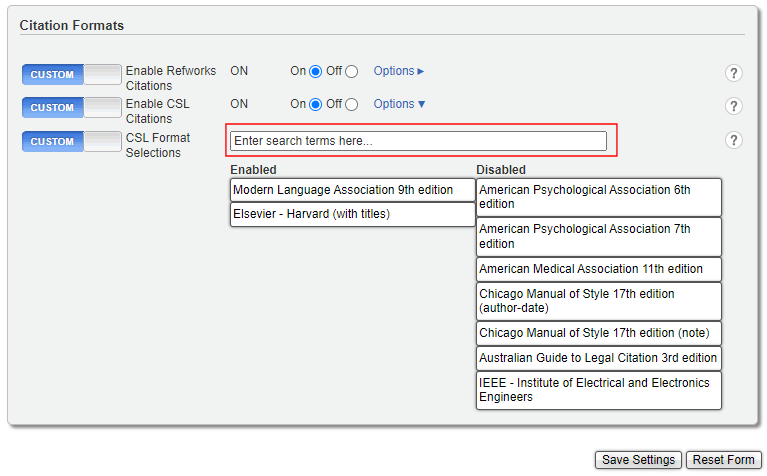
If you want to enable and select CSL styles from the CSL repository:
-
Set the Enable CSL Citations slider to Custom, select ON. and then open the Options drop-down list to display the CSL Format Selections section.
-
Drag and drop formats into the appropriate column to enable/disable them. If CSL formats are enabled, the system requires that at least one citation format be listed in the Enabled column. The CSL citation formats appear in the Saved Items folder in the order in which they appear in the Enabled column.
Initially, the default RefWorks styles (except for Harvard since it has many variations from which to choose in the CSL repository) are automatically copied to the Disabled column in the CSL Formats Selections section. In the search box above the enabled/disabled formats, you can search for styles in the CSL repository and load them into the Enabled column directly. Since Summon does not retain disabled CSL formats for future use, you must reload them to enable them again.
-
-
Select Save Settings.
Web of Science
The Web of Science feature allows the Summon service to index all of the Web of Science content and add citation counts to the displayed search results.
A paid subscription is required for this service. If you do not have a Web of Science subscription, no action is needed.
Even though it does not display on your Settings page, the Web of Science feature can be customized by contacting us using the Ask a Question feature above. Customizations include aspects such as the ability to turn off the metadata flyout window.
While Scopus also allows the Summon service to index all of the Scopus content and add citation counts to the displayed search results, the above mentioned customizations currently do not apply to Scopus.
Advanced Search
This configuration enables you to display or hide sections of the Advanced Search screen. The OFF setting hides the section.

-
If you want to customize any of the fields listed in the table below, change the field's slider bar to CUSTOM.
If you change the slider bar back to DEFAULT, the field's setting returns to the default value.
Advanced Search Settings Field Description Advanced Search Enabled
Displays a link to the Advanced Search page, which allows users to construct more sophisticated search queries in Summon. The Off setting hides this capability.
Custom Search Fields Enabled
Set this field to On to customize the search fields in Advanced Search. To configure the custom fields, click Options and then configure Custom Search Fields.
When using the Notes search field, the following fields are included unless your library has customized its mapping:
500 a; 502 a, b, c, d, g, o; 362 a, z; 506 a, b, c, d, e; 510 a, b, c; 511 a; 518 a; 530 a, b, c, d; 533 a, b, c, d, e, f, m, n; 534 p, a, b, c, e, f, k, l, m, n, t; 538 a, i; 583 a, b, c, d, e, f, h, i, j, k, l, n, o, x, zWhen Custom Search Fields Enabled is set to On, customize the search fields and search rows that display in Advanced Search. These customizations allow you to specify the following: searchable fields, default search field per search row, and conditional operator between search rows. By default, advanced searches display at least two search rows.
Option Description Search field
To enable a search field, drag and drop the field to the Enabled column.
Default search field
Select a default field per search row. The default is All Fields.
Default conditional operator
Select one of the following conditions to apply between two search rows: AND, OR, and NOT.
Add search row
Click Add a row to add another search row, which requires you to specify a default search field and a conditional operator.
Refine Your Search Filters Enabled
Set this field to On to enable the Refine Your Search Filters (such as Open Access) in Advanced Search. To configure the supported facets, click Options and then configure the Refine Your Search Filters.
Refine Your Search Filters
When Refine Your Search Filters Enabled is set to On, users can limit their searches to the options placed under the Enabled column.
To change an option, move it to either the Enabled or Disabled column:
-
Limit to Peer Reviewed – Limits results to peer-reviewed content and verifies that an article has been reviewed by peers in the profession, determined to be of academic quality, and is suitable for publication. The Summon service uses the same peer-reviewed standards as Ulrich's for journals and abstracts.
-
Full Text Online – Limits results to items with online full-text.
-
Limit to Scholarly – Limits results to journals that have a scholarly designation from Ulrich's.
-
Items in catalog – Limits results to items in your library catalog.
-
Add Results Beyond Catalog – Limits results to items not in your library catalog.
-
Open Access – Limits results to content identified as Open Access.
-
Physical Books Filter – Limits results to physical books.
-
eBooks filter – Limits results to eBooks.
Facets Enabled
Set this field to On to enable Facets (such as Content Type) in Advanced Search. To configure the supported facets, click Options and then configure Facets.
Facets
When Facets Enabled is set to On, users can limit their searches to the following filters: Content Type (such as such as a book or article), Discipline (such as Law or Medicine), Language, and Library Location.
Dates Published Filter
Displays the month and year search-limiting fields.
Search within Journal Widget
When set to ON, this option displays a Search within <journal_name>? link below the Summon search box if a search query contains a journal's title, acronym, or ISSN, and the search results include a significant percentage of articles from the journal.

Selecting the link opens a new tab/window that displays the results of the search within the selected journal.

The following conditions are necessary for end users to trigger this functionality in Summon:
-
In general, search queries must include at least three words, not counting stop words. The number of words is determined by white space. For CJK languages, there is currently no support for journal titles that do not contain white space.
-
Acronyms for journals must contain no punctuation and match an entry in our acronym list. In addition, each of its letters must be capitalized—for example, JAMA.
Exact phrase searches (phrases enclosed with double quotes) are more likely than non-exact phrase searches to return a higher percentage of the search results that include articles from the journal. It may be necessary to enclose the full journal title with double quotes.
Journal Title Search from Journal Link
When set to ON, this option enables the journal title search link in the results.
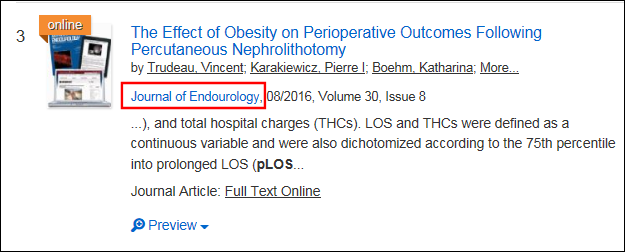
When selected, it opens a new tab/window that displays the results of the search within the selected journal.
This is enabled only for citations labeled "Journal Article." It does not appear for magazine or newspaper articles.

Saved Items Enabled
When enabled, users can save items between Summon sessions. See the Saved Search and Saved Items Types field to configure the supported types of cloud drives.
 Add to Saved Items Icon
For users who have not signed in to a cloud drive, their items are saved for the current session only. For usage information, see Summon: Saving Items (Citations).
-
Users cannot access any saved items on their cloud drives directly.
-
When performing searches on a public computer, it is recommended that users sign out of their Google and Microsoft accounts directly when they are done with their sessions.
When enabled, users can save searches between Summon sessions. See the Saved Search and Saved Items Types field to configure the supported types of cloud drives.
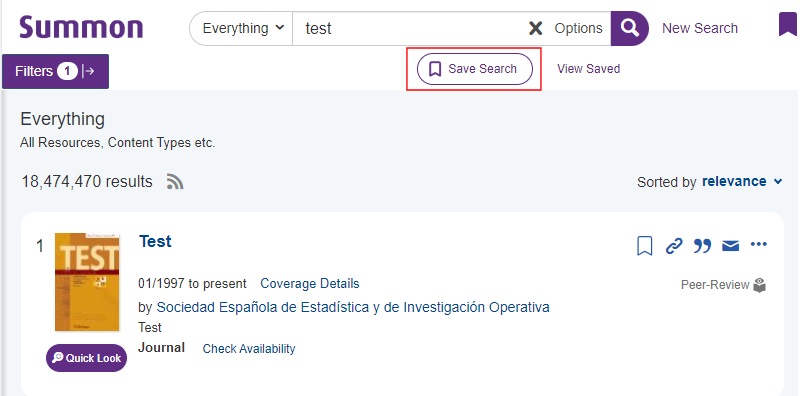 Save Search Button
For users who have not signed in to a cloud drive, their queries are saved for the current session only. For usage information, see Summon: Saving Searches.
-
Users cannot access any saved searches on their cloud drives directly.
-
When performing searches on a public computer, it is recommended that users sign out of their Google and Microsoft accounts directly when they are done with their sessions.
Saved Search and Saved Items Types
When Saved Searched Enabled/Saved Items Enabled is set to On, users can select one of the following cloud drives to which they can save searches/items between Summon sessions: Google Drive, Microsoft OneDrive, and Summon Cloud (SAML config required).
To specify which types of cloud drives are available to users:-
Select Options and drag the permitted cloud drives to the Enabled column.
-
Select Save Settings.
-
-
If you want to use the custom settings for a field, make sure that the field's slider bar is set to ON.
The OFF setting retains your customizations, but they do not appear in Summon.
-
Click Save Settings.
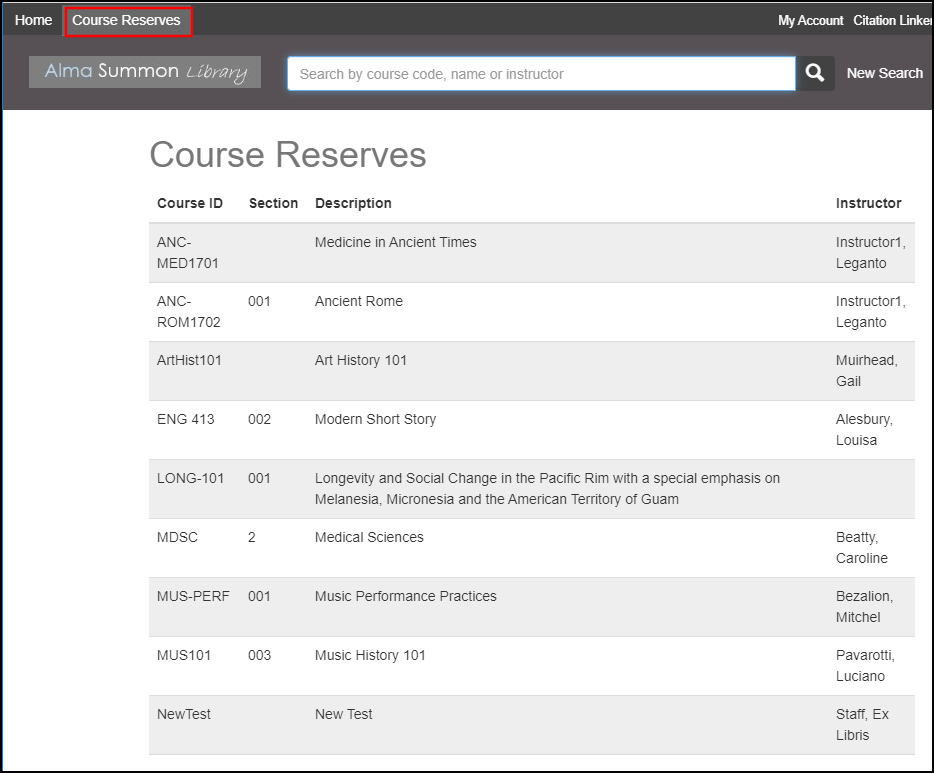
Course Reserves (Alma-Summon Only)
Refine Your Search
The Refine Your Search section of the Summon search page enables patrons to filter search results in various ways. For an overview, see Search Result Facets and Refinements.
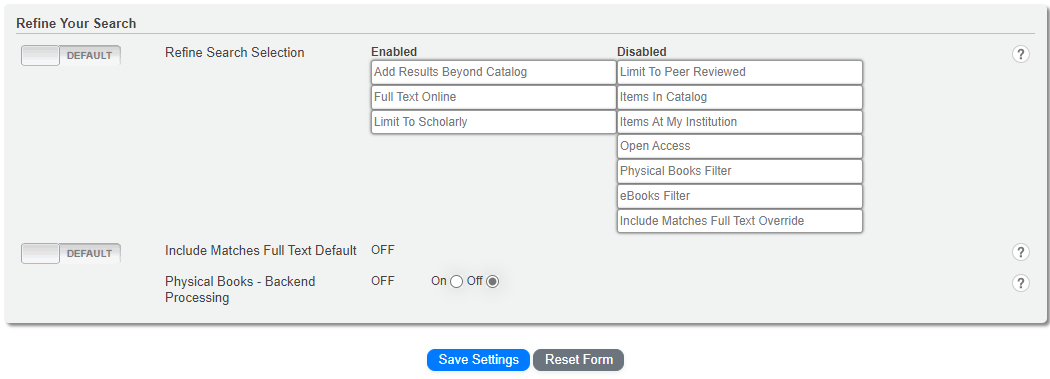
-
Refine Search Selection – Enable/disable the following refinements by moving them to the appropriate column (Enabled or Disabled):
-
Add Results Beyond Collection – If enabled, the Add results beyond your library's collection check box is displayed above the search results set. When selected, all items in the full Central Discovery Index that match the search criteria are displayed, not just those to which your institution subscribes. Libraries that support interlibrary loan requests via their link resolver are the most common library type that choose to display this check box. Note that this check box does not appear when results are refined to the library catalog.
-
Full Text Online – If enabled, users can limit their search results only to those items available in full text.
-
Limit to Scholarly – If enabled, the Scholarly & Peer-Review filter is displayed to users. A user can apply the filter to limit a search results set to items classified as scholarly and/or peer-reviewed by Ulrich's.
-
Limit to Peer Reviewed – If enabled, the Peer-Review filter is displayed to users. Users can apply the filter to limit to only those items classified as peer-reviewed by Ulrich's. Scholarly but not peer-reviewed items are not included in the search results.
-
Items in Catalog – If enabled, the Library Catalog filter is displayed to users. A user can select the filter to limit search results to items in your library catalog.
-
Items at my Institution – If enabled, the Items at my Institution filter is displayed if your library has a union catalog (consortia) loaded in Summon. A user can select the filter to limit a search results set to only those items available at your institution.
-
Open Access – If enabled, the Open Access filter is displayed to users. Users can limit the search results set to records that allow open access.
-
Physical Books Filter – If enabled and Physical Books - Backend Processing is set to ON, Summon displays the Physical Books in Library Catalog filter for physical books.
-
eBooks Filter – If enabled and Physical Books - Backend Processing is set to ON, Summon displays the eBook Full Text Online filter for electronic books.
-
Include Matches Full Text Override – If enabled, users can override the default setting of the Include Matches Full Text Default option. For more information, see Including Matches in Full Text.
-
-
Include Matches Full Text Default – If set to ON, basic searches do not include matches in the full text. Searches that exclude matches in full text result in smaller, more focused result sets and faster search response times. Off is the default setting. For more information, see Including Matches in Full Text.
-
Physical Books - Backend Processing – If set to ON, Summon generates separate refinement filters under Refine Your Search for physical and electronic books. To enable the display of the Physical Books in Library Catalog and eBook Full Text Online refinement filters, see the Physical Books Filter and eBooks Filter refinements above.
-
Because the backend process is part of the twice weekly CDI search index update process, the refinement filters will likely show no results until the update process completes.
-
When this option is enabled, it has no effect on the Book / eBook Content Type, and it continues to display under the Content Type facet.
-
-
Select Save Settings.
Search Scopes
The Search Scopes section allows you to define and manage your own search scopes (such as for a specific library collection) that users can select prior to performing a search. For an overview, see Summon Search Scopes.
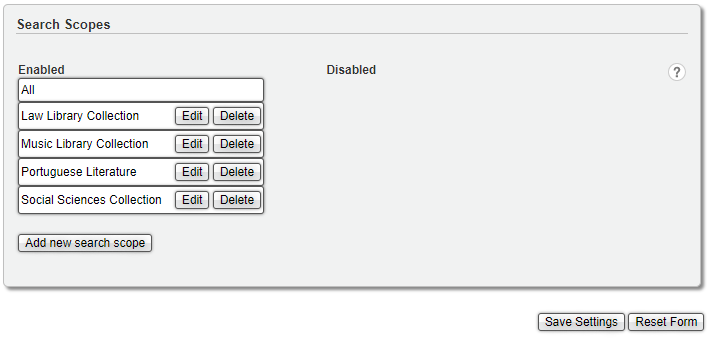
-
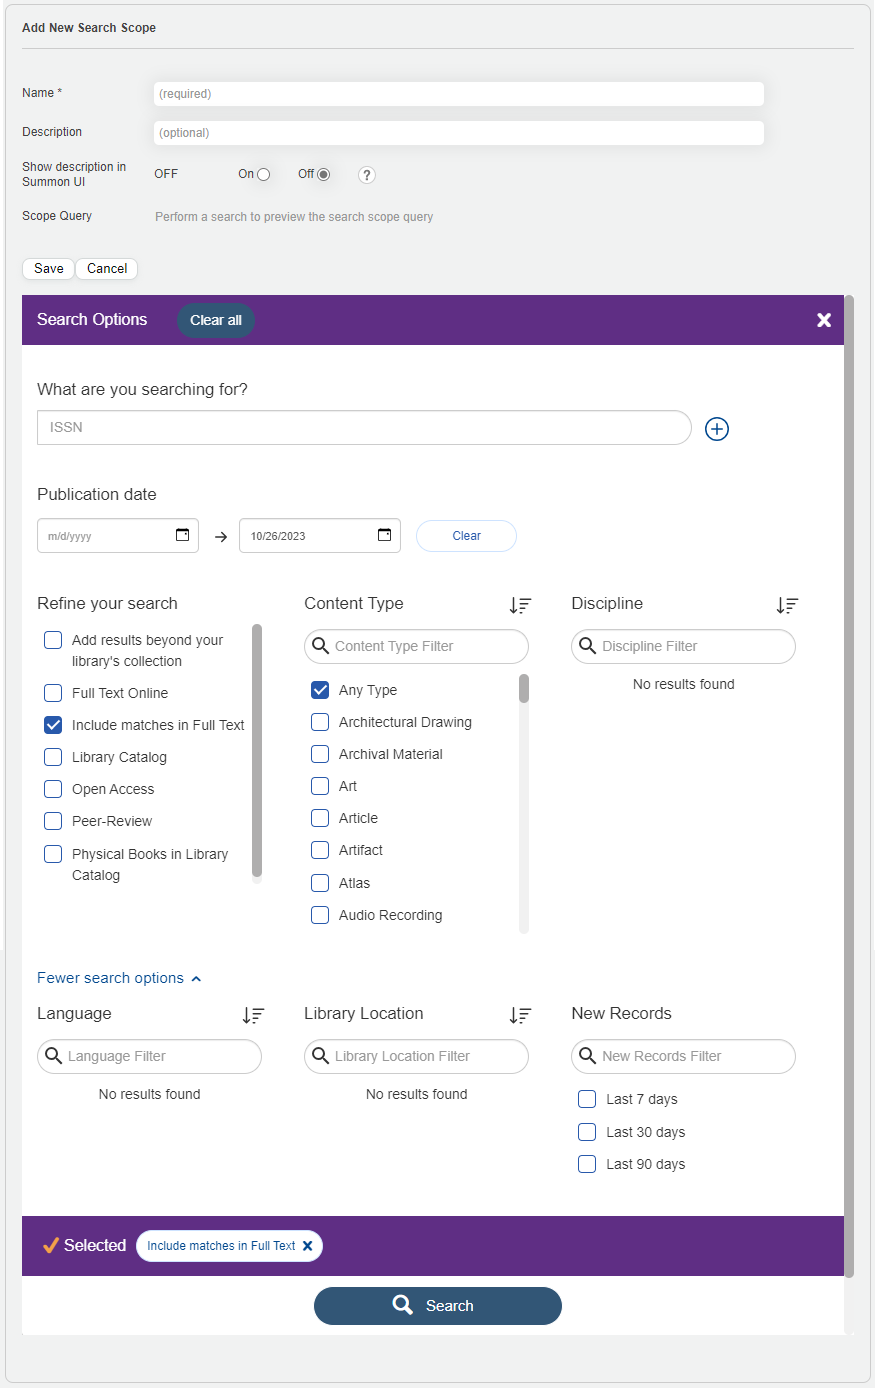
Select Add new search scope to open the search scope configuration area.
-
Specify the following fields:
-
Name – Specify a unique name for the search scope.
-
Description – Specify a description for this search scope.
-
Show description in Summon UI – Select ON to display the scope's description in the Summon UI. The default value is OFF.
-
Scope Query (view-only) – After performing a search in the search area below this field, it displays your selected query, which is then used as the scope of this search.
-
-
In the search area, select all necessary search fields (such as location) and filters and then select Search. The query for the search scope is saved in the Scope Query field.
-
The What are you searching for field? field must be left blank or set to an ISSN.
-
The exclude option is not available for the Library Location filter. This option was removed since it will likely not have the clients' intended effect due to Summon's Match and Merge process. For example, if your library has multiple copies of the same book in different locations, those records are merged by the Match and Merge process to form one logical record. If you created a search scope to exclude a copy of the book in one location, it would also exclude all copies of the same book in other locations.
-
-
Verify that the results for the new search scope meet all necessary requirements and update as needed.
-
Select Save.
-
Select Edit next to the search scope in the Enabled or Disabled column.
-
In the search area, set all necessary fields and filters and then select Search.
-
Verify that the results for the updated search scope meet all necessary requirements and update as needed.
-
Select Save.
Custom Link
The Custom Link feature allows you to add a customized link in the upper-right corner of the Summon user interface. The link displays at the top of the screen (highlighted below) as well as within the menu (also highlighted below) when a user clicks on it:
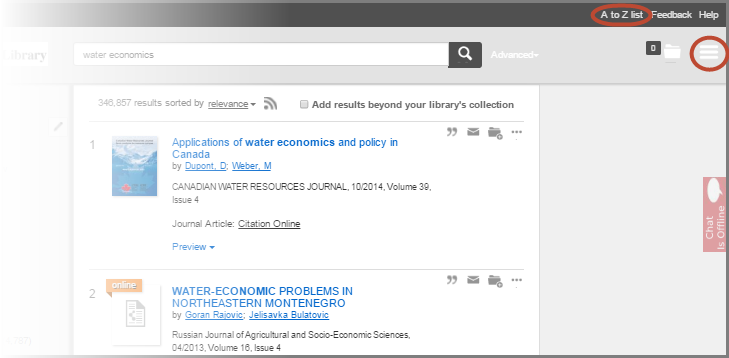
In the administration console you can define the link with text or upload an image. Common link uses include a link to the library's A - Z resources page or to an Ask a Librarian page.

-
Click the Url slider bar and change to Custom.
-
Enter your Url address in the field. (Note: Remember to include "http://" at the beginning of your Url address.)
-
Choose to add text or an image:
-
Either click the Text slider bar, and then enter your display text in the field, or
-
Click the Image slider bar, and then click Select file to browse to your Custom image.
-
-
Click Save Settings.
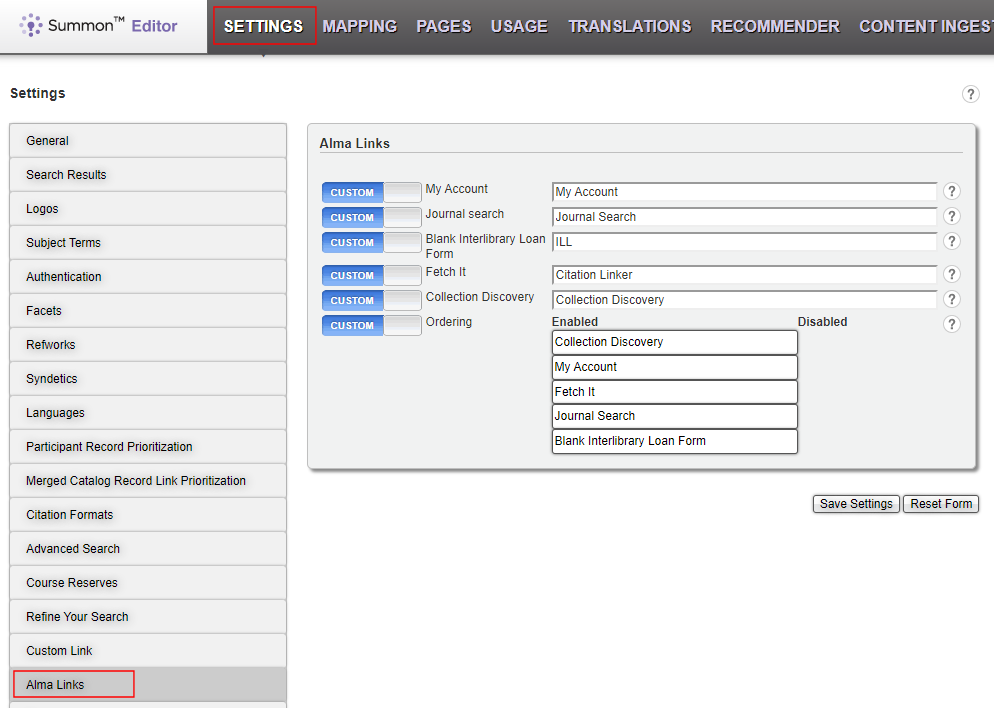
Alma Links (Alma-Summon Only)
Topics
By default, the Topics section displays above the Custom Panel section on the results page in Summon. For more details on the Topics section, see Summon: Summon Topics.
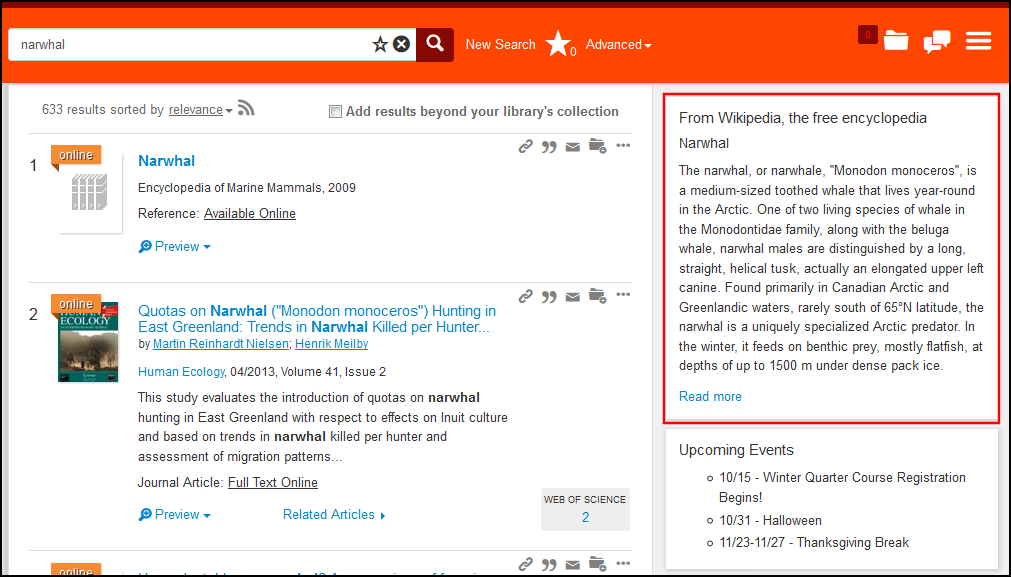
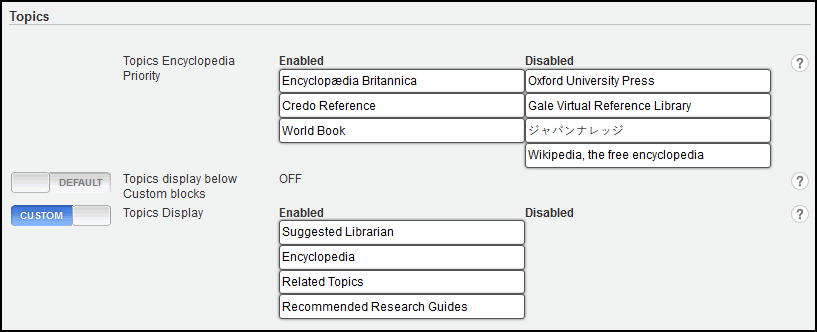
The Topics page allows you to configure various settings associated with the Topics section (such as the position of the Topics section and the source of the topics).
-
Click the DEFAULT slider bar for each of the following options:
Topics Settings Field Description Topics Encyclopedia Priority
This option enables the sources that are used to provide topics and defines the priority given to each source.
Enable/Disable a source:
To enable a source drag it to the Enable column. Sources in the Disable column is not used for topics.Assign priority to a source:
Highest priority is given to the sources at the top of the Enabled column. To increase a sources priority, drag it to a position closer to the top of the list. To decrease the priority, move the source down in the list. The following sources are currently available for prioritization:-
Oxford University Press (if the library has a subscription)
-
Credo Reference (if the library has a subscription)
-
Encyclopedia Britannica (if the library has a subscription)
-
Gale Virtual Reference Library (if the library has a subscription)
-
JapanKnowledge (if the library has a subscription)
-
World Book
-
Wikipedia
Topics display below Custom blocks
When set to OFF (default), the Topics section displays above the Custom Panel section.
To display the Custom Panel section first, set this field to ON.
Topics display
This setting allows you to configure the following:
-
Specify which types of topics appear in the Topics section. Drag and drop a type to the Disabled column if you do not want to display it.
-
Specify the order in which the types appear in Topics section. Drag and drop each type to its desired position in the list. Items at the top of the list appear first.
By default, all types of topics are enabled and appear in the following order:
-
Encyclopedia
-
Suggested Librarian
-
Related Topics
-
Recommended Research Guides
-
-
Click Save Settings.
Resource Link Prioritization
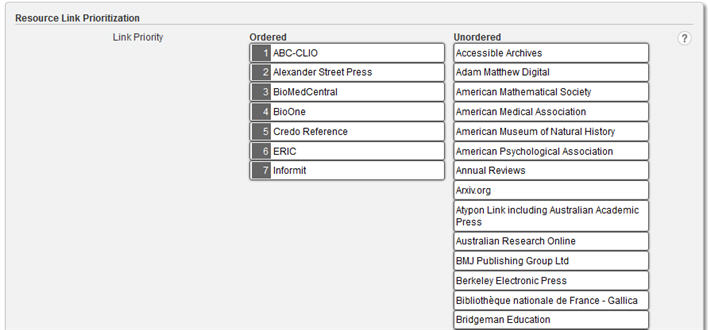
If your library has rights to more than one resource with a direct link available, you may set the linking priority in the Resource Link Prioritization section. If you do not choose to set a priority order, the Summon service randomly links to a resource in the unordered list:
-
Drag and drop resource names from the Unordered column to the Ordered column.
-
Drag and drop resources within the Ordered column to re prioritize resources.
-
Click Save Settings.
Transliteration (880 Fields)
The Enable Transliteration Display field indicates whether transliterations appear next to titles. By default the setting is ON. For more information, see Display of non-Latin data in the 880 field.
The transliteration for titles appears only in the details, not the brief results.
Configuration
The Configuration section displays IP Ranges, the Link Resolver BaseURL, and the Proxy URL as they have been entered in the Client Center's Library Settings section. These settings are read-only. For more on entering these values in the Client Center, click here.
User Survey
At times, ProQuest activates a pop-up user survey with the Summon service. During a period where the survey is active, the survey randomly displays for English users 5% of every page view in the Summon service (English users consist of anyone using the English, English (AU), English (NZ), or English (UK) Summon interface). Cookies are used so that a user only sees the survey once. If a computer does not support cookies there is a slight chance a user sees the survey more than once.
Survey is currently not available.
The survey helps to better gauge the use of the Summon service and help drive the future of the service. The survey should take 1 minute to complete, and the questions include:
-
How often do you use this search engine? (About once a week, About once per month, About once per semester, Only a few times before, This is my first time)
-
What are you using this search engine for today? (A Research Paper/Project, Course Homework, Just looking for a Book, Just looking for a DVD, Just looking for an Article, Trying to find a database, The latest research in my area of study)
-
When using this search engine, I commonly find what I am looking for (Always, Usually, Sometimes, Seldom, Never)
-
When using this search engine, I am able to access the materials/articles I found (Always. Usually, Sometimes, Seldom, Never)
-
When using this search engine, I am typically searching for (Newspaper Article, Journal Article, Book, eBook, Print Journal, eJournal, Research Guide, Images, Video, Encyclopedia, Dissertation)
-
What did you do if you did not find or could not access what you were looking for (Ask librarian for help, Pick other material, Try a different database, Request from another library, Use Google)
-
Overall satisfaction (5 (Extremely Satisfied), 4, 3, 2, 1 (Not Satisfied))
-
How likely would you be to recommend this search engine to a friend/student/colleague? (5 (Extremely Likely), 4, 3, 2, 1 (Would not recommend)
-
What is your status level?
-
What is your major/subject area?
If you would like to see an image of how this shows up for your patrons, click here.
Data is collected for internal use only and the responses are kept completely anonymous.
When a user survey is available in the Summon service, selecting OFF for Enable User Survey hides the survey so that it is never presented to your users.

A&I Detail Page
The A&I Detail page displays for abstracting and indexing resources (A&I) marked as Citation Online and within your library's holdings.
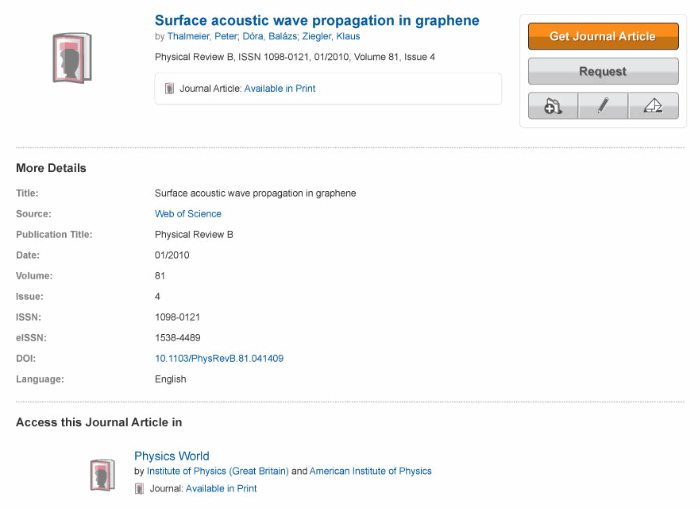
Two configurable buttons display to the user; both buttons support linking either to the library's ILL service (interlibrary loan system or link resolver) or to the print record in the library's catalog. Here is an example of an A&I Detail Page displaying an item available in the library's print collection (Get Journal Article button links to the print record in the library's catalog, and the Request button links to the library's ILL service):
The Primary Action setting in the administration console is used to choose which action you want users to try first when a print record does exist in your catalog:

The orange (top) button in the above sample A&I Detail Page provides the primary action. The secondary, gray button displays the other action. By default, the Primary Action setting is "Link to catalog for print record," suggesting to users that they pursue the print item when available. At the same time, the opportunity to submit an ILL request exists with the secondary gray button.
Text for both "Get" and "Request" button labels can be customized in the Translations tab of the Summon Administration Console.
Entering your Interlibrary Loan Base URL is done on the Interlibrary Loan (Request Button) section of the Detail Page in the administration console.
-
You must use this section of the Detail Page to enter a Base URL, and Enable the Request button, in order to implement the changes on the A&I Detail Page.
Chat Widget Settings
Click here to learn about configuring the following chat widgets in your library's Summon search and results interfaces: LibraryH3lp, SpringShare's LibAnswers, QuestionPoint, or WhatsApp.
Summon 2.0 Configuration
Librarian Contact URL: When a search yields 0 results found, the user can be presented with a Contact a Librarian link in addition to the other suggestions provided to the user:
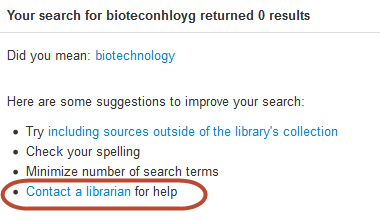
To add a Librarian Contact URL, click the slider bar so it changes from Default to Custom, and add your URL.
Saved Items Timeout: By default, items placed in the Saved Items folder will be available for 120 minutes without the user actively working in Summon (a user that is actively working in Summon will have their Saved Items available for the duration of their search session). Use this setting to adjust the number of minutes; you can enter any number that is higher than 10. There is no limit on the highest number you can enter.
Summon 2.0 Customization
This section of settings applies to color customization for your Summon 2.0 interface.
Below is a description of each color customization option. Activate your institution's colors by clicking the Enable Custom Colors slider bar so it changes from Default to Custom. Select the ON radio button.
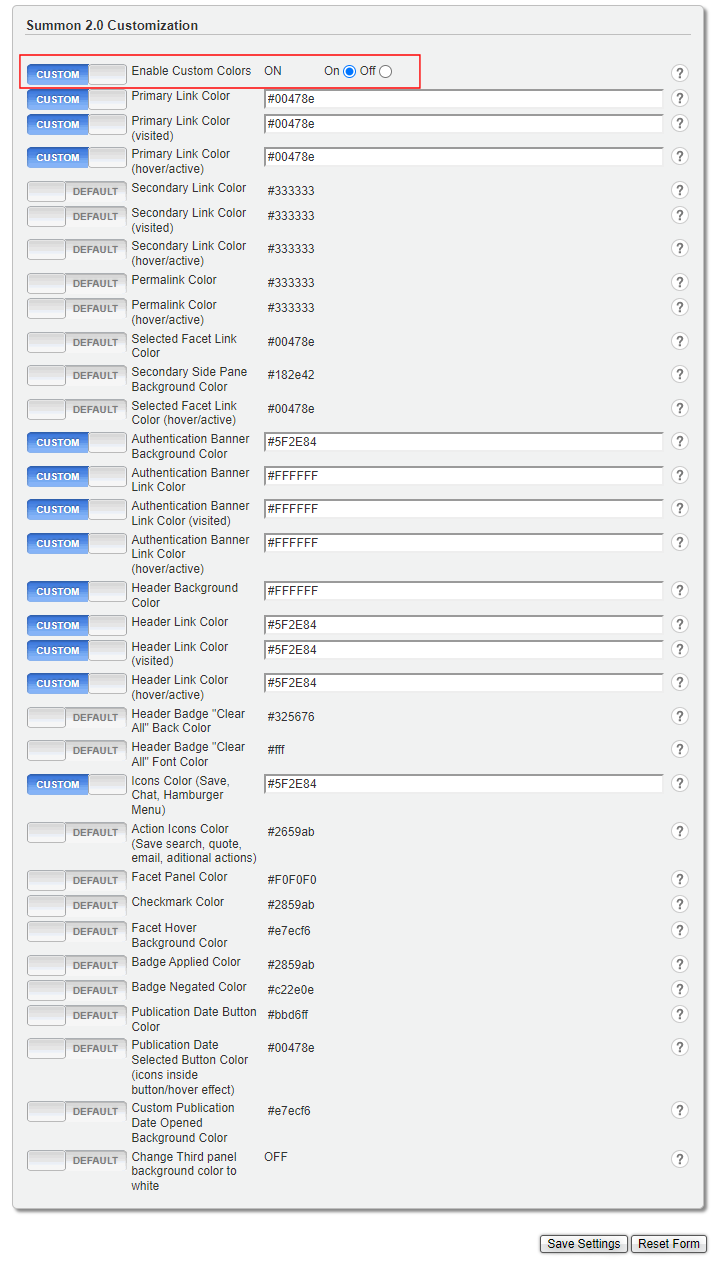
Each color customization is applied by changing the slider bar to Custom and replacing the default HTML color's hexadecimal (HEX) value with the HEX value for your desired color. If you need a HEX color chart, many exist online such as the HTML Color Picker from w3schools.
Color Customization Options
The following tables describes each color setting:
| Setting | Description |
|---|---|
|
Primary Link Color |
Customizes the record title link and preview pane links, along with links in the Topic pane and Advanced Search. Default color is #2659ab (medium blue).
|
|
Primary Link Color (visited) |
Customizes the color used for primary links that a user has visited. Default color is #004792 (Dark Blue). |
|
Primary Link Color (hover/active) |
Customizes the color used for primary links that a user holds/clicks and holds their mouse over. Default color is #004792 (dark blue). |
|
Secondary Link Color |
Customizes links in the left-side pane. Default color is #333333 (Dark Gray). Consider using this setting along with the Selected Facet Link Color setting. |
|
Secondary Link Color (visited) |
Customizes the color used for secondary links that a user has visited. Default color is #333333 (dark gray). |
|
Secondary Link Color (hover/active) |
Customizes the color used for secondary links that a user holds/clicks and holds their mouse over. Default color is #333333 (dark gray). |
|
Permalink Color |
Customizes the link in the Summon Record that provides a persistent link to the item. Default color is #333333 (dark gray). |
|
Permalink Color (hover/active) |
Customizes the color used for premalinks that a user holds/clicks and holds their mouse over. Default color is #333333 (dark gray). |
|
Selected Facet Link Color |
Customizes user-selected links in the left-side pane. Default color is #00478e (dark blue). Consider using this setting along with the Secondary Link Color setting.
|
|
Selected Facet Link Color (hover/active) |
Customizes the above Selected Facet Links that a user holds/clicks and holds their mouse over. Default color is #00478e (dark blue). |
|
Authentication Banner Background Color |
Customizes the background color of the banner for remote users / top banner on the page with Help and Feedback links. Default color is #505050 (dark gray). |
|
Authentication Banner Link Color |
Customizes the link in the authentication banner / top banner on the page with Help and Feedback links. Default color is #e6e6e6 (light gray). |
|
Authentication Banner Link Color (visited) |
Customizes the color used for the authentication banner link that a user has visited. Default color is #e6e6e6 (light gray). |
|
Authentication Banner Link Color (hover/active) |
Customizes the color used for the authentication banner link that a user holds/clicks and holds their mouse over. Default color is #e6e6e6 (light gray). |
|
Header Background Color |
Customizes the background color around the search box on the results page. Default color is #e3e3e3 (light gray). When you customize the header color, check that the color contrast between your new color and the white icons in the header (Advanced Search, Saved Items and Menu (highlighted below)) complies with accessibility standards. A web search for check color contrast accessibility provides many free resources that you can use to test color contrast. For more information: https://www.w3.org/TR/UNDERSTANDING-WCAG20/visual-audio-contrast-contrast.html.
|
|
Header Link Color |
Customizes links in the menu ("hamburger" icon) on the top right of the Summon screen. Default color is #2659ab (medium blue). The menu icon on the top right of the screen contains the header links to resources such as the Widget Builder and the Languages drop-down menu (if your library has it turned on):
|
|
Header Link Color (visited) |
Customizes the above header links that a user has visited. Default color is #172e5a (dark blue). |
|
Header Link Color (hover/active) |
Customizes the color used for the header links that a user holds/clicks and holds their mouse over. Default color is #004792 (medium blue). |
|
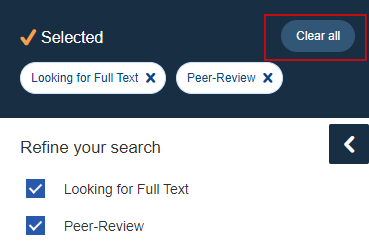
Header Badge "Clear All" Back Color |
Customizes the background color of the Clear All button in the Header Badge, which appears at the top of the Facet Panel. Default color is #325676 (blue).
|
|
Header Badge “Clear All” Font Color |
Customizes the text color of the Clear All button in the Facet Panel's header, which appears at the top of the Facet Panel. Default color is #fff (white). |
|
Icons Color (Save, Chat, Hamburger Menu) |
Customizes the colors of icons (such as hamburger and saved items) and the New Search link in the header of the UI. Default color is #FFFFFF (white).
|
|
Action Icons Color (Save search, quote, email, additional actions) |
Customizes the colors of Action icons (such as Save search) for records in results. Default color is #2659ab (medium blue).
|
|
Facet Panel Color |
Customizes the background color of the Facet Panel. Default color is #F0F0F0 (light gray). |
|
Checkmark Color |
Customizes the color of check boxes and their background in the Facet Panel's header. Default color is #2859ab (medium blue). |
|
Facet Hover Background Color |
Customizes the background color of facets when the cursor is hovered over them. Default color is #e7ecf6 (very light blue). |
|
Badge Applied Color |
Customizes the color of the summary count of included facets at the top of each facet. Default color is #2859ab (medium blue).
|
|
Badge Negated Color |
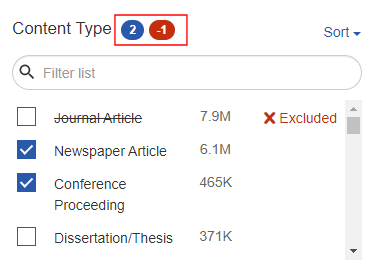
Customizes the color of the summary count of excluded facets at the top of each facet (see image above). Default color is #c22e0e (red). |
|
Publication Date Button Color |
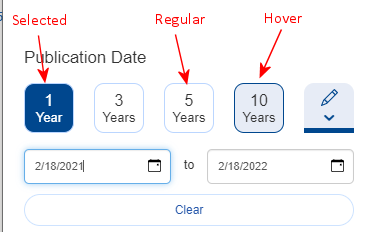
Customizes the outline color of the Publication facet buttons. Default color is #bbd6ff (light blue).
|
|
Publication Date Selected Button Color (icons inside button/hover effect) |
Customizes the background color of the Publication facet buttons when selected, and the outline color of the facets when the cursor is hovered over them (see image above). Default color is #00478e (medium blue). |
|
Custom Publication Date Opened Background Color |
Customizes the background color of the Publication facet buttons when the cursor is hovered over them (see image above). Default color is #00478e (light gray). |
|
Change Third panel background color to white |
When set to ON, the background color of the third panel is changed to white. The default is OFF. |
Summon 2.0 External Script
This section enables you to add the following types of external customization to your Summon 2.0 interface: JavaScript (URL, file or manual upload) and CSS stylesheet (manual upload only).

-
For one or more the following fields, select the slide bar to switch from DEFAULT to CUSTOM.
-
Custom Script URL – Add the URL for your custom JavaScript file (.js), or select Select File to browse for a local JavaScript file and upload it to your Summon interface. Once uploaded, the text field is replaced with a static URL to your JavaScript. If you no longer need the script, remove the URL. The following is an example of a third-party URL: https://s3.amazonaws.com/browzine-ad...mon-adapter.js.
-
JavaScript Code – Select Edit and then type or paste your JavaScript code in the text box. Select Save to upload the JavaScript to your Summon interface. Once uploaded, the text field is replaced with a static URL to your JavaScript. To remove the static URL, select Edit and Save.
-
CSS Stylesheet – Select Edit, then type or paste your CSS stylesheet in the text box. Select Save to upload the CSS stylesheet to your Summon interface. Once uploaded, the text field is replaced with a static URL to your JavaScript. To remove the static URL, select Edit and Save.
HTML <style> tags should be omitted since enclosing your CSS with them will cause an error.
-
-
Select Save Settings to finalize your changes.
Personal Accounts with ProQuest RefWorks
Integration with ProQuest RefWorks: By default, the New RefWorks is an option available to your users when they save citations in Summon. Change the setting to OFF if you do not want the New RefWorks to display as an option to your users.
Web of Science - Free View
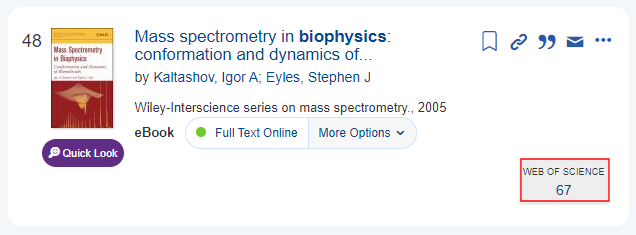
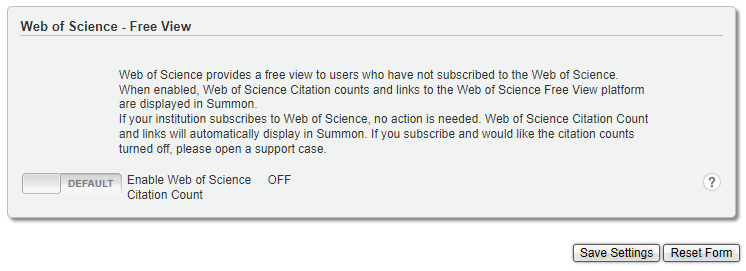
This section enables Summon to display the Web of Science (WoS) Times Cited count, which users can click to display the citations on the free version of the WoS Citing Articles Summary page. For more details, see Web of Science Citing Articles Summary Page FAQ.
-
For institutions that subscribe to WoS, users are taken to the full version of the WoS Citing Articles Summary page if they are connected to the institutional network or have connected using the institution's remote login system.
-
The Times Cited count is calculated from the Web of Science Core Collection exclusively. Therefore, it is available only for content that is indexed in the Web of Science Core Collection. This count may differ from citation counts that are not exclusive to the Core Collection.
-
Select the DEFAULT slider bar to display the configuration options.
-
Select On.
-
Select Save Settings.
Altmetrics
Choose to display article level metrics to Summon users with citation badges from altmetric.com. Altmetric badges display information about an article's scholarly impact as expressed through online, social media and news mentions. Your institution does not need a subscription to Altmetrics. If you do have an institutional subscription, Summon currently can only display the Altmetrics version that does not require a subscription.
Here is an example of the Altmetric badge displaying within the Preview section of a Summon record:
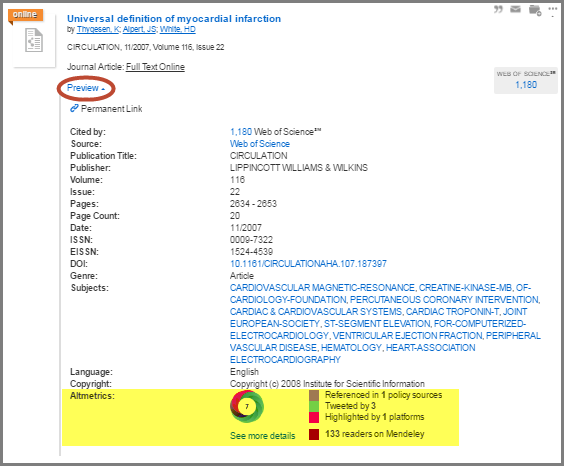
The Altmetric badge displays for an article when 1) there is a match on DOI or PMID and 2) the Altmetric score is greater than 0 (in other words, there is Altmetric data about the article). The Altmetric score displayed (67 in the example screenshot above) is the number of people that have mentioned the article.
The Altmetric section of the Summon record includes a See more details link which opens up a new tab in your browser displaying an altmetric.com page including details such as the actual tweets, blog posts and news stories.
Click the slider bar to change the admin console setting from Default to Custom and then select ON for both of the first two settings; Altmetric badges start appearing in the Preview section of Summon records. The third setting below (Altmetrics in detail page) is for the A&I (Abstracting and Indexing) Details page.

bX Recommender - Related Articles
Use this section to configure Summon so that users are presented with additional article recommendations via Ex Libris' bX Recommender service. See details at Summon: Providing Related Articles via bX Recommender.
Custom Sections
This section configures the display of custom panels in the Custom Panel Sections of the Summon UI.

-
Click the DEFAULT slider bar for each of the following options to customize their settings:
Custom Sections Field Description Show 'More' enabled
This option enables/disables the More link in the Custom Panels section in the Summon UI, which allows users to display all remaining active Custom Panels. For information regarding the configurations of Custom Panels, see Summon Custom Panel Sections.
When set to ON, the UI displays the default number active Custom Panels followed by the More link if there are any additional active Custom Panels. This is the default setting.
When set to OFF, the More option is disabled and all active Custom Panels display.
Default sections displayed
When the Show 'More' enabled field is set to ON, this field configures the maximum number of Custom Panels displayed above the More link. The default number of panels is 3. The valid number of panels is 1-10, and 25.
Display Order
Move the following sections to the desired position in the Summon UI: SpringShare A-Z Database Finder, Custom Panels section, and Topic Explorer.
In addition, you can enable/disable the display of these sections by moving them to the appropriate column: Enabled or Disabled.
-
Select Save Settings.
Sierra
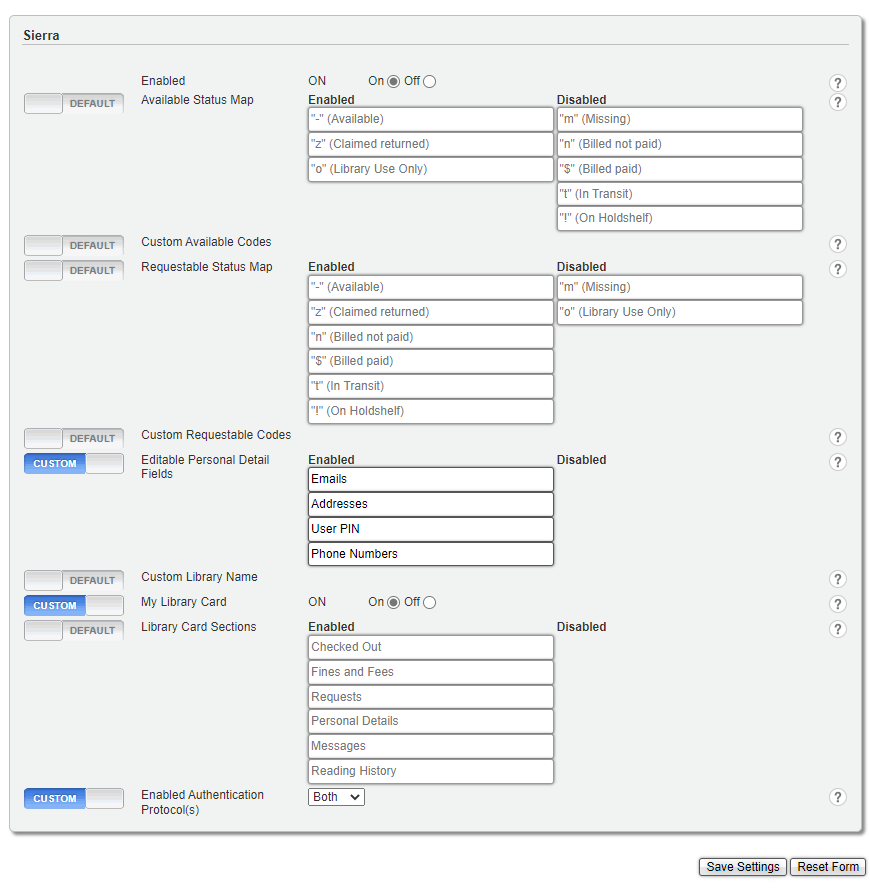
This section configures settings associated with institutions that have integrated Summon with Sierra.
To customize the settings for Summon-Sierra environments:
-
Set the Enabled field to On to enable the integration of Summon and Sierra.
-
Click the DEFAULT slider bar for each of the following options to customize their settings:
Sierra Settings Field Description Available status map
Select the codes returned in items that should display the green dot in Summon to indicate that the item is available.
Custom available codes
Specify any custom codes returned in items that should display the green dot in Summon to indicate that the item is available. Separate multiple codes with a comma.
Requestable status map
Enables the Request button for statuses used to indicate whether an item can be requested.
Custom requestable codes
Specify any custom codes returned in items that should display the Request button in Summon. Separate multiple codes with a comma.
Editable Personal Detail Fields
Enables you to configure which of the following fields users are permitted to edit in their Library Card account: Emails, Addresses, User PIN, and Phone Numbers.
Custom Library Name
Enables you to display a different library name in Library Card from which is received from Sierra.
My Library Card
Enables users to access their Library Card from Summon. This functionality is enabled by default.
To disable access from Summon, set this field to OFF. If disabled, patrons can still place holds on books in Sierra using the Summon UI, but they cannot view their Library Card, which includes information such as the list of checked out books, requests (holds), personal details, fines and fees, messages and reading history.
Library Card Sections
Enables you to configure which of the following sections appear in Library Card: Checked Out, Fines and Fees, Requests, Personal Details, Messages, and Reading History. By default, all sections are enabled.
To disable the display of a section, drag and drop it to the Disabled column.
You can change the order of enabled sections by dragging them to the their desired position in the list.
Enable Authentication Protocol(s)
Enables you to configure which of the following authentications methods users can use to log on to Sierra: SAML (which must be setup using the SAML settings tab), CAS (which must be configured by Support), or Both methods.
-
Click Save Settings.
SAML
This section configures the SAML settings associated with Sierra-Summon authentication and SAML saved searches. For additional information, see Summon: Configuring Summon SAML.
If this configuration is for Sierra-Summon environments, you must indicate whether SAML is also used for Sierra authentication in the Sierra section.
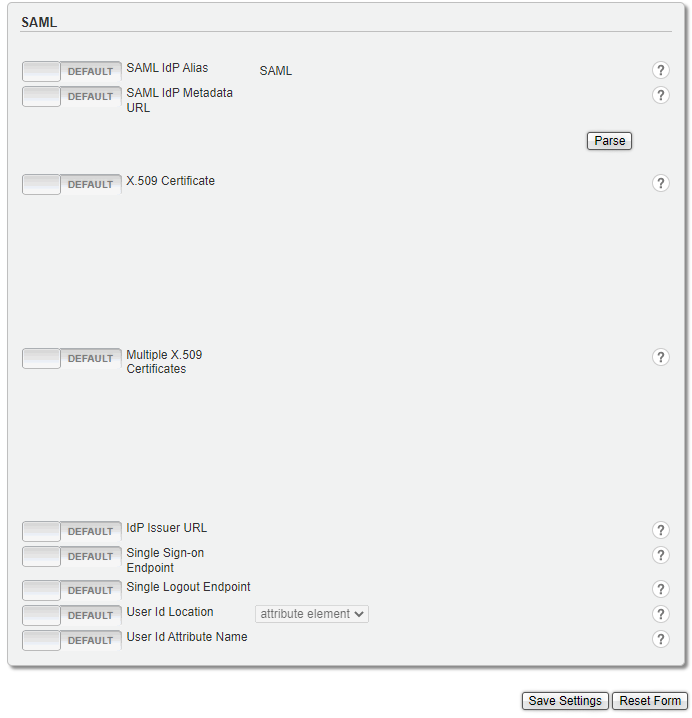
To customize the settings for Summon-Sierra environments:
-
Click the DEFAULT slider bar for each of the following options to customize their settings:
-
SAML Settings Field Description SAML IdP Alias
Specify the display name for the link used to disconnect the user's cloud drive from Summon. The default is SAML. For more details, see Saving Searches in Summon.
SAML IdP Metadata URL
If available, specify the URL to expedite support response. After you add the URL, select Parse and save your settings.
X.509 Certificate
Specify the X.509 certificate used to sign and encrypt SAML assertions.
Multiple X.509 Certificates
If needed, specify multiple X.509 certificates in JSON format to sign and encrypt with distinct certificates or to rollover to a new certificate when the current one expires.
IdP Issuer URL
Specify the issuer's IDP entity ID, which is globally unique name for the SAML entity. This must be a URI and is often a URL.
Single Sign-on Endpoint
Specify the URL of the entity provider, which is used to process SAML login requests from the Summon UI.
Single Logout Endpoint
Specify the URL of the entity provider, which is used to process SAML logout requests from the Summon UI.
User Id Location
Specify whether the unique user ID is found in a nameId or attribute element.
User Id Attribute Name
Specify the name of the user ID attribute.
-
Click Save Settings.
LTI
This section configures the LTI settings used to integrate Canvas with Summon. When configured, users can view your Summon catalog within Canvas.
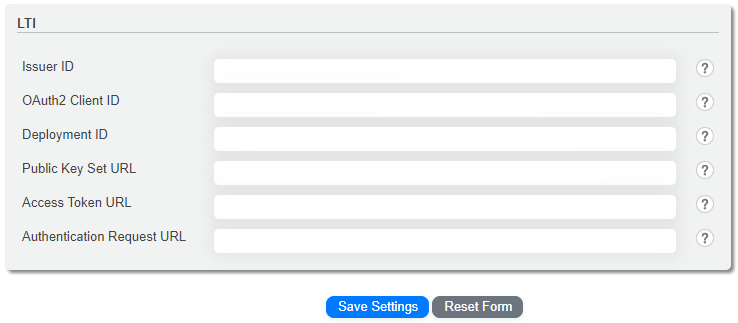
-
Ensure that you have created the Summon LTI in Canvas. Its settings are needed to fill out some of the following LTI settings in Summon. For more information, see Configuring the Summon LTI Tool in Canvas.
-
Click the DEFAULT slider bar for each of the following options to customize their settings:
LTI Settings Field Description Issuer ID
Set this field to the following URL, which is used to sign in to Canvas:
https://canvas.instructure.com
OAuth2 Client ID
Set this field to the Client ID that you copied while creating the Summon LTI tool in Canvas.
Deployment ID
Set this field to the Deployment ID that you copied while creating the Summon LTI tool in Canvas.
Publick Key Set URL
Set this field to the following URL in Canvas:
https://canvas.instructure.com/api/lti/security/jwks
Access Token URL
Set this field to the following URL in Canvas:
https://canvas.instructure.com/login/oauth2/token
Authentication Request URL
Set this field to the following URL in Canvas:
https://canvas.instructure.com/api/lti/authorize_redirect
-
Click Save Settings.
- Date Created: 12-Feb-2014
- Last Edited Date: 2-Feb-2024
- Old Article Number: 9954


