
Configuring External Systems in Esploro
This page describes configuring external systems in Esploro. For Esploro integration see here. For ongoing maintenance and administration tasks see here. For information on general Esploro settings such as languages, logos, Esploro roles, letters and notifications, etc., see here.
Configuring DOI Agencies
For general information about DOIs in Esploro, see Esploro Asset Mapping to DataCite and Crossref and Digital Object Identifier (DOI) Registration.
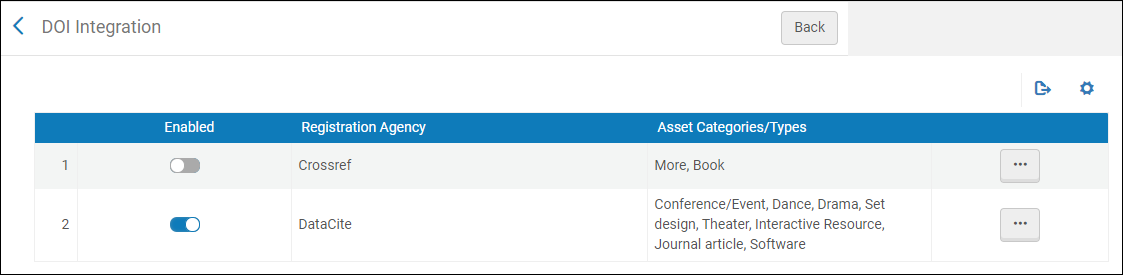
You can enable or disable integration with DOI registration agencies on the DOI Configuration page (Configuration Menu > Repository > Integrations > DOI Integration).
A DOI contains a prefix that is assigned to your institution by the agency and a suffix, The suffix can have its own prefix that is unique for each asset category. The rest of the suffix is a unique number representing the asset. You can select the number of digits in the number and starting number for your assets.
For example, if the prefix assigned to your institution is 10.ABC, and you configure your suffix's starting number to be 1, your suffix padding to be 8, your suffix prefix label to be data, then the first DOI that Esploro generates is 10.ABC/data.00000001.
Currently, Esploro can integrate with Crossref and DataCite. You can enable or disable integration with an agency and you can edit a configuration.
- Select Edit in the row actions list. The agency's integration details page appears.
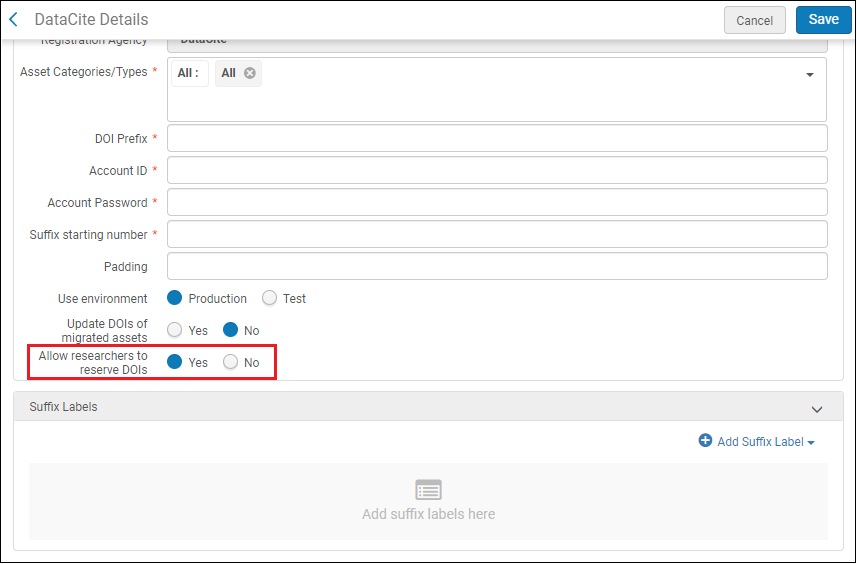
- Edit the fields on the page:
When set to No and the Update DOI Registration Agency - Research Assets job runs, Esploro sends to the DOI registration agency only changes to non-migrated assets that were registered with the DOI registration agency.
- Registration Agency (read only)
- Crossref registration name (Crossref only, mandatory) – The name of the account manager as registered in Crossref.
- Repository name (Crossref only, mandatory) – A name that you would like to call your repository. Crossref uses this name in its interface as the database in which to hold datasets. This name is only used for dataset deposits.
- Email (Crossref only, mandatory) – An email address to which to send updates about the status of registration requests sent to Crossref. With DataCite, Esploro uses an API. As a result, Esploro displays the status of the registration immediately on the page after the request is made. With Crossref, Esploro sends the request using a less immediate interface. If there is a quick response, Esploro displays the result on the page. Otherwise, Crossref sends updates on the status of the request to the email address that you enter in this field.
- Asset Categories/Types (mandatory) – The asset categories/types for which you enable this agency. You can select multiple categories or types.
- DOI prefix (mandatory) – The prefix assigned to your institution by the agency. This should start with 10.
- Account ID (mandatory) – Your institution's repository ID as registered in the agency.
- Account password (mandatory) – Your institution's repository password as registered in the agency.
- Suffix starting number (mandatory) – The first suffix number to use when creating DOIs for your institution with this agency. Enter digits only. If a DOI with this suffix number already exists, Esploro will use the first available number larger than this number that is not already in use. A value of 0 cannot be used as the suffix starting number. A value of 0 cannot be used as the suffix starting number.
- Padding – The length, in digits, of the suffix, including the automatically generated sequence number. Any unused digits in the suffix are replaced with zeroes. Enter a single digit only (between 1 and 9).
- Use environment – Select whether to actually register the DOIs with the agency (Production) or whether you are testing the profile (Test) using the agency's test environment. You cannot migrate DOIs (see below) in a production environment when this profile points to the test environment.
-
Update DOIs of migrated assets – When set to Yes and the Update DOI Registration Agency - Research Assets job runs, the job includes changes to all assets that were registered with the DOI registration agency, including migrated assets that hold DOIs that were registered by your institution. For these assets, the job updates the DOI registration agencies with these assets' metadata and also updates these assets' URLs in the agencies to resolve back to Esploro. Note that these changes cannot be undone.
- Allow researchers to reserve DOIs – Enable/disable researchers to reserve DOIs on their own by selecting Yes or No on the Allow researchers to reserve DOIs radio button.
 Allow Researchers to Reserve DOIs
For example, if the prefix assigned to your institution is 10.ABC, and you configure your suffix's starting number to be 1, your suffix padding to be 8, and your suffix prefix label for this asset category to be data (not yet developed by Ex Libris; coming soon), then the first DOI that Esploro generates for assets of this category is 10.ABC/data.00000001.
- For each category, or for groups of categories, enter an optional suffix label (a prefix for the suffix). For each label:
- Select one or more asset categories/types.
- Enter the suffix label using any of the following characters: a-z A-Z 0-9 . - _ ; ( ) /
You can add, edit, and delete labels.
- When you are done editing, select Save.
Configuring Handle Server Integration
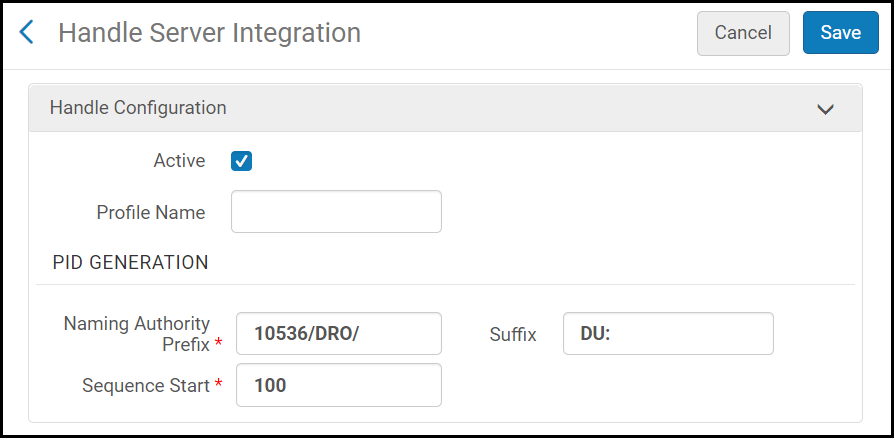
- Select the Active checkbox to activate the integration.
- In the Profile Name field, enter a profile name.
- In the Naming Authority Prefix field, enter the naming authority prefix as assigned to you by the Handle System.
- In the Suffix field, enter a suffix to be added to the handle identifier.
Esploro does not automatically add characters such as a slash or colon, so if you want the output to be: http://hdl.handle.net/10536/DRO/DU:30028653, the prefix should be: 10536/DRO/ and the suffix: DU:.
- In the Sequence Start field, enter a number from which the handle identifiers should start.
- Select Save.
The handle server integration is configured.
Configure ORCID Integration
For information on configuring the integration of Esploro with ORCID see ORCID Integration.
Configure IRUS UK Usage Tracker
You can now send portal usage information to IRUS-UK. IRUS-UK (Institutional Repository Usage Statistics UK) is a national aggregation service, which provides COUNTER-conformant usage statistics for all content downloaded from participating UK institutional repositories (IRs). To enable this feature, you must opt in by enabling the IRUS-UK Tracker (Configuration Menu > Repository > Integrations > IRUS-UK Tracker). Select the Customer Consent check box. You can then choose whether or not to show an alert that the usage information is being sent with the Display information message on the portal check box. By default, the option is disabled.
![]()
For the sake of sending the relevant asset information the usage refer to to IRUS-UK, the following improvements have been made to the OAI DC publishing format:
- More granular asset types were added to dc:type.
- Repository item URL was added to dc:identifier.
Configuring Integration Profiles
- General System Administrator
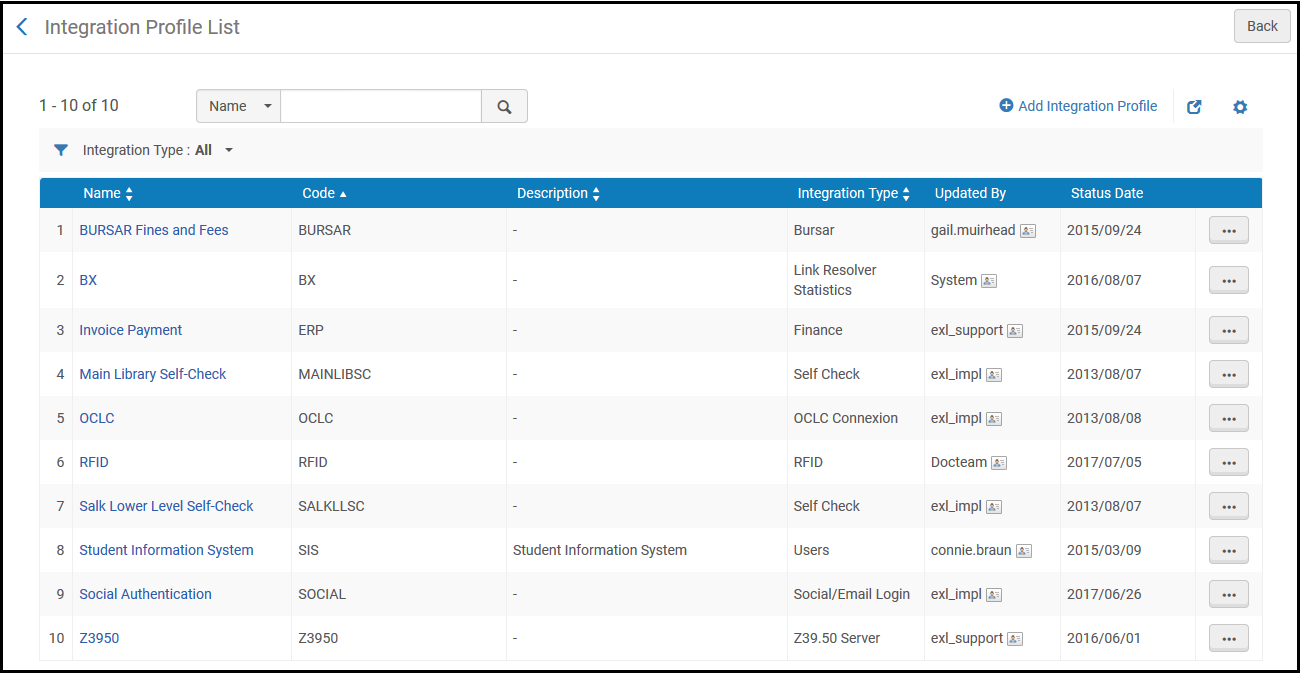
- Add an integration profile (see the linked sections in the table below).
- Edit an integration profile (Edit in the row actions list). When editing a profile, you cannot change the profile type. In addition, you can add contact information relevant to the profile n the Contact Information tab.
- Delete an integration profile (Delete in the row actions list).
- View job history (Job History in the row actions list; see Viewing Completed Jobs.)
| Profile Type | Description | More Information |
|---|---|---|
| Aleph Bridge Integration | Integrate a non-Esploro member's inventory from a central system into a bridge institution that is managed by the Esploro Network Zone. | Integrating a Non-Esploro Member's Inventory from a Central System into a Bridge Institution Managed by a Network Zone |
| API Restrictions | For more information about this profile, see the developer's network documentation at https://developers.exlibrisgroup.com/blog/working-with-api-restriction-profiles/. | |
| Augmentation | Configure OpenURL enrichment. | Esploro Resolver Augmentation |
|
Authority Record Contribution |
For future use (Community Zone only) |
|
| Bursar | Export fines and fees to the institution’s bursar system. | Exporting Fines and Fees to a Bursar Systems |
| CAS | Exchange authentication and authorization information for single sign-on with an external system. | CAS-Based Single Sign-On/Sign-Off |
| Central Catalog Integration | Integrate an external Central Catalog with Esploro. |
Integrating an Esploro institution with SUDOC is the same as in Alma. |
| Cloud IdP | For future use | |
| Course Enrollment | Import course enrollment information into Esploro for use with Leganto. | Configuring Importing Course Enrollment Jobs |
| Course Loader | Import courses from a course management system. | Configuring Course Loading |
| Digital Content Store | Integrate with the UK CLA's Digital Content Store. | Integrating with the UK's Digital Content Store (DCS) |
| Discovery Interface | Configure the location map link in the Get It tab. | Configuring the Template for the Location Map Link |
| Finance | Import and export orders and invoices by vendors from and to an institution’s financial system. | Financial Systems |
|
For customers who are exposing their library's unique materials to Google and want to monitor their site's exposure to Google, can use this integration to allow Google Console to verify the connection for Primo VE customers. |
||
| LDAP | Import information from an Lightweight Directory Access Protocol (LDAP) system. | Supporting LDAP |
| LTI Tool | Authentication between Leganto and your course management system. | Configuring Learning Tools Interoperability (LTI) |
| Link Resolver Plugin | Performs external checks using an API that determines the most accurate available URL for the full text. | |
| Link Resolver Statistics |
The bX integration profile, integrates the connection between Esploro and bX for sharing Esploro link resolver data statistics. In addition, it allows Primo VE customers to register and enable the bX Recommender service. |
|
| Linked Data | Publish structured linked data. | Linked Data |
| Mail Handling | Outgoing email handling | Configuring Outgoing Email |
|
Metadata External Enhancement |
Select this integration option to enrich Japanese text using the Happiness transliteration tool. |
|
| New Order API | Synchronize records from a vendor’s database to a purchasing or licensing library’s offerings.
This profile works with any vendor that uses the new order API, and is also used if the order is created using the API by a REST client. For more information, see the following in the Developer Network:
|
Real-Time Ordering |
| OAI Repository Definition | Publish records as OAI types. | Setting Up OAI Integration |
| OCLC Connexion | Import records from OCLC Connexion. | Importing Records from OCLC Connexion |
| Online Payment | Send payment receipt emails to the user using the WPM Education E-Payment System. | Configuring the WPM Education E-Payment System |
| Online User Update | For future use | |
| OpenID Connect | User authentication layer. | OpenID Connect |
| Reading List Loader | Imports a reading list from a .txt or .csv file | Reading List Loader |
| RFID | Using an RFID reader, communicate with RFID tags on items. | RFID Support |
| Remote Storage | Request a resource from a remote storage location or Automated Storage and Retrieval System. | Requests to Remote Storage Facilities or Configuring the Dematic ASRS |
| Resolver Proxy | Configure a resolver proxy definition | Resolver Proxies or OpenAthens Redirector |
| Resource Sharing Integration | Import borrowing requests from an external system. |
Importing Resource Sharing Borrowing Requests From an External System |
| SAML | Exchange authentication and authorization information for single sign-on with an external system. | SAML-Based Single Sign-On/Sign-Off |
| SMS Communication | Configure SMS communication with patrons. | SMS Communications |
| SRU Server | Activate SRU/SRW searching capability. | SRU/SRW Search |
| Self Check | Configure communication between Esploro and a self-check machine. | Self-Check Machines |
| Social/Email Login | Configure connection with social networks or email for user login. | Social and Email Login |
| SWORD Server | Submit content to Esploro to be added to the repository. Click Monitor SWORD Imports after importing assets to Esploro using the SWORD protocol to view any errors and determine the cause of a failure. | |
|
Upload Electronic Holdings |
Upload and update Elsevier electronic holdings. Upload and update Ovid electronic holdings.
Upload and update electronic holdings from ProQuest Ebook Central.
Upload Electronic Holdings from Springer
|
|
| Users | Export/import users to/from a Student Information System. | Student Information Systems |
| Webhooks | Trigger a HTTP request to a configured URI when a job ends. | Webhooks |
| Z39.50 Server | Activate Z39.50 searching capability. | Z39.50 Search |
Configuring Oable APC Integration for Open Access
An article processing charge (APC) is a fee charged to make a work available for open access in open-access or hybrid journals. This fee may be paid by the author, the author's institution, or their research funder.
Esploro profiles include an APC form that initiates an APC request in a system called OABLE.
The integration can be configured in the OABLE Configuration. Contact Ex Libris support to configure this.
The APC form is enabled in Esploro only to institutions that have a license for OABLE. For these institutions, the customer parameter esploro_oable_integration is set to True.
You will need to supply the following:
- API Key provided by OABLE.
- Institution name as it appears in ROR.
- Institution email suffix (optional).
- Whether this is for production or testing.

For a video showing how to request an APC in Esploro to make your publication open access see here.
Pivot-RP Integration
You can configure Esploro to be integrated with Pivot-RP. This allows you to view funding opportunities that Pivot-RP determines are relevant for you. For a video showing how to embed funding opportunities from Pivot-RP in researcher profiles see here.
- Go to Configuration Menu > Portal & Profiles > Homepage Configuration.
- On the Header/Footer tab enable the Include Discover Funding link for signed in users option.
To display the funding opportunities from Pivot, select the Discover Funding link in the header when logged in to a Researcher Profile.


- The researcher's Pivot ID for a personalized integration to Pivot.

- The organization's Pivot ID. If the user has more than one affiliated organization (with embedded links), then they will be displayed in separate tabs.
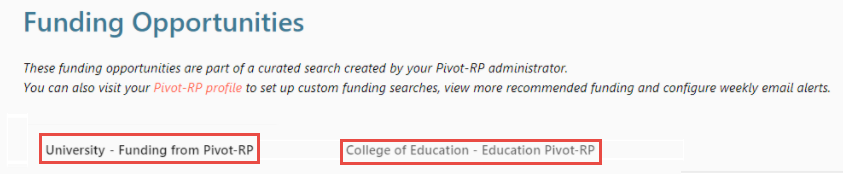
Select a funding opportunity to see more information about that opportunity in Pivot-RP.
Select view more details in Pivot-RP to to see more information about the list of opportunities in Pivot-RP.
If you have a Pivot ID, select Pivot-RP Profile to view your Pivot-RP profile.
For information on configuring the embedded search link from Pivot-RP, see Configuring Research Organization Units. For a video showing how to work with Pivot-RP see here.
Additional References
- Video: How to work with Pivot-RP
- Video: How to Request an APC in Esploro to Make Your Publication Open Access
- Video: How to Setup ORCID Integration
- Esploro Asset Mapping to DataCite and Crossref
- DOI Registration
- Esploro Integration
- Configuring S/FTP Connections
- General Esploro Settings
- Ongoing Maintenance and Administration
- Publishing in Esploro