
Configuring Alma Letters
- General System Administrator
- Letter Administrator
For an overview of configuring Alma letters watch the Configuring Letters in Alma video (5:38 minutes).
Accessing and Configuring Alma Letters
- Enabling/disabling letters
- Setting retention periods
- Updating templates to set the content and formatting for letters
- Updating labels (fields/strings of text that are used in the letter and can be translated)
- Updating and Previewing Example Letters for Testing
- Contributing Letter Customizations to the Community Zone
You will need to assign the Letter Administrator role to users who will customize or maintain the email letters. For more information on assigning roles, see Adding Roles to Users.
If you are working in a sandbox environment or a pre-”Go Live” production environment, add the letter administrators’ email addresses to the allowed email list (see Configuring Allowed Emails).
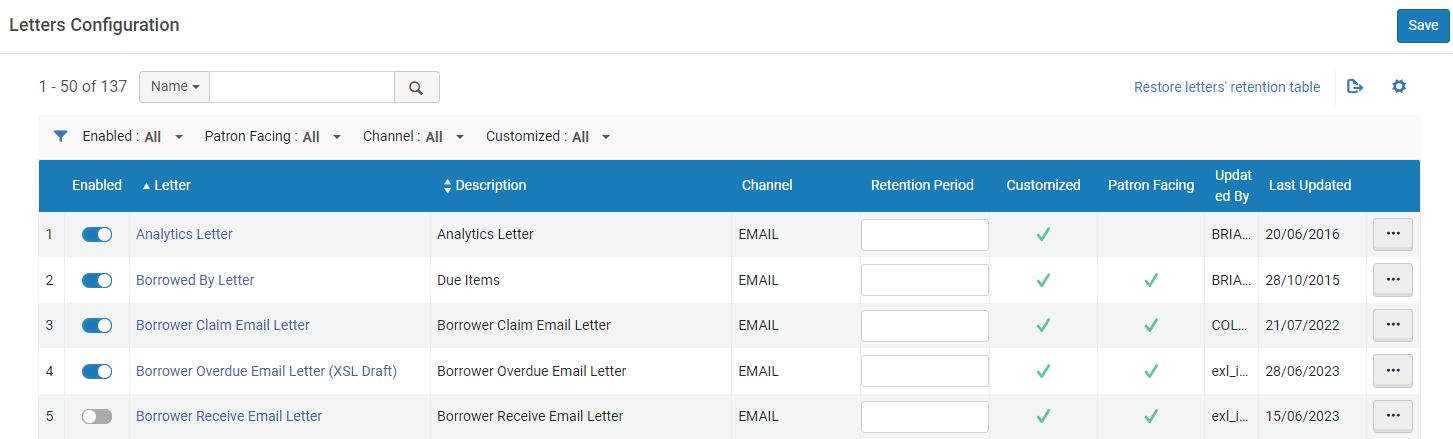
Enabling/Disabling Letters
Select Restore Activation in the row actions menu for a specific letter, to restore the Enabled button to its Out of The Box (OTB) state. If the button is already in its OTB state, this button does nothing.

Setting Letter Retention

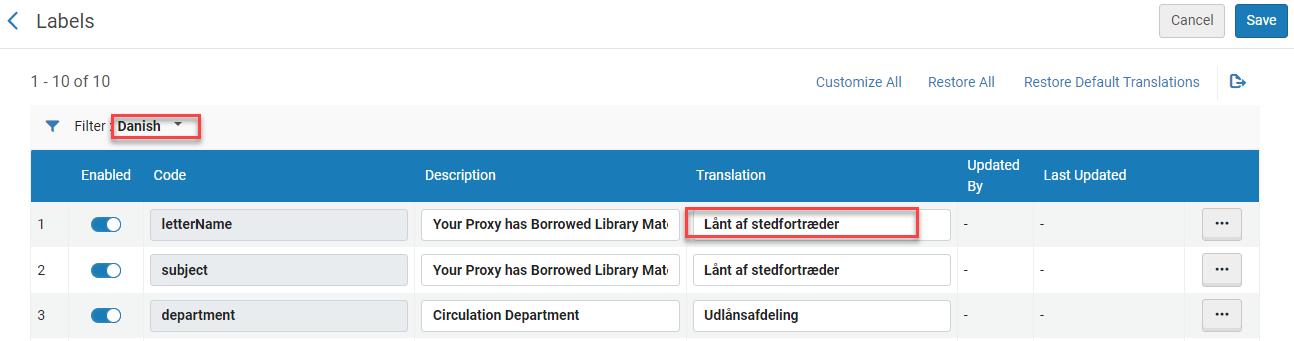
Using Labels to Update the Fields in the Letter
If you want to configure display labels for Primo VE, see Configuring Display Labels.
What are Letter Labels
How to Configure Letter Labels
You can configure the labels for a specific letter as described below.
- Select Edit on the row action list of the letter.
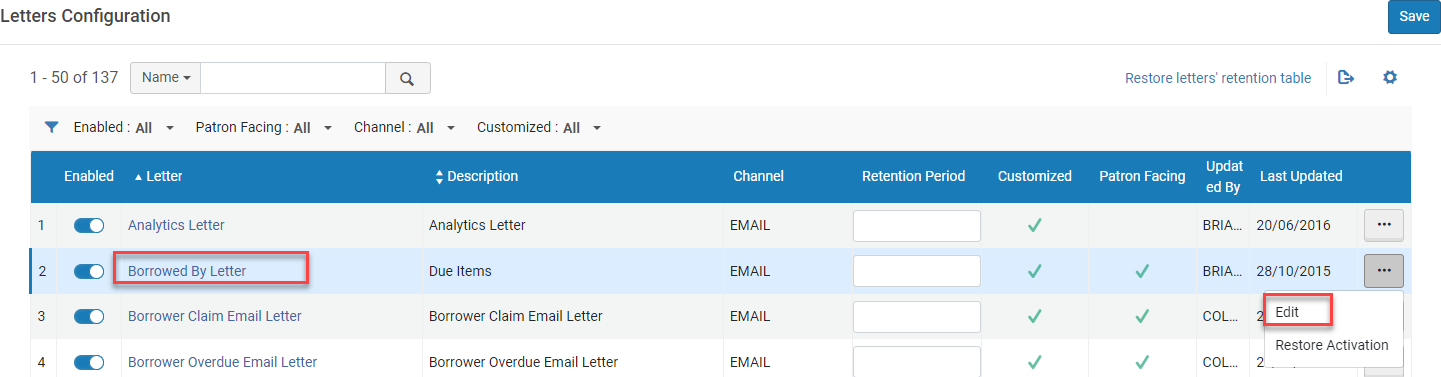
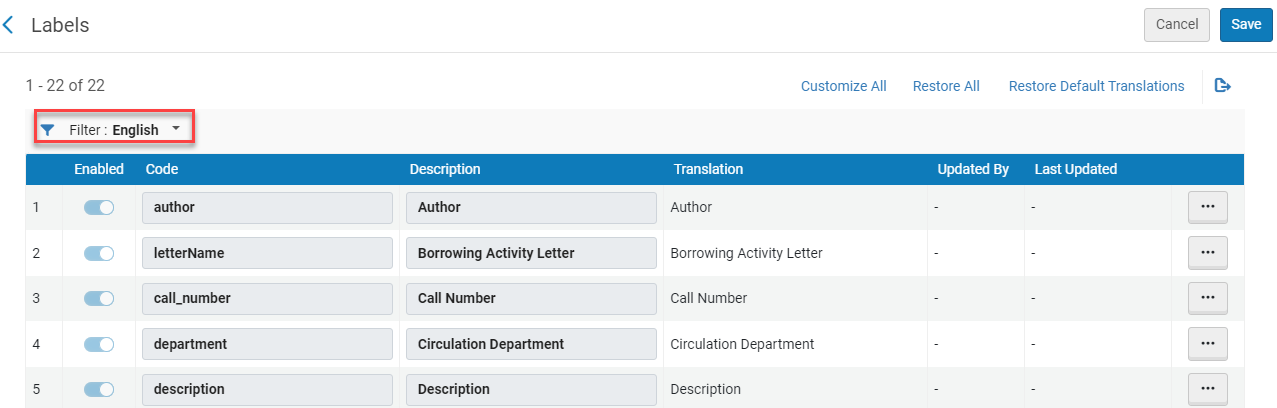
- Select the Labels button at the top of the page.

- Select Customize from the row actions menu. You can update the following:
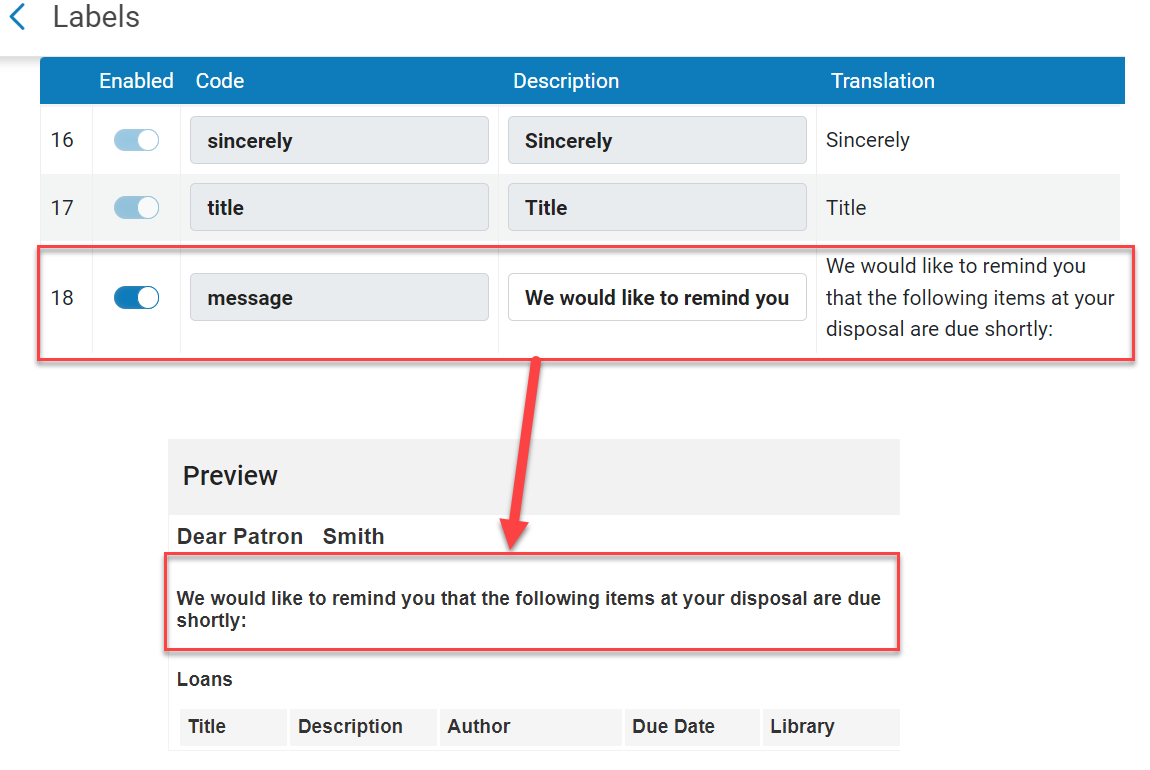
- Enabled — Use this toggle to activate/deactivate the label for usage in the letter.
- Description — Update the label description that displays on the letter.
Note that using HTML tags in the Description field is not supported.
- Translation — If another language is enabled in Alma and it is selected in the Filter drop down, you can edit the translation.
- Restore — If the line was modified, the Enabled and Description fields are restored to their default.
- Restore Translation — If another language is enabled in Alma and its Translation label was modified, the field is restored to the default.
- Select Customize All to edit all rows.
- Select Restore All to restore all rows to their default.
- Select Restore Default Translations to restore all translations.
- When done, select Save. Any changes made to the Labels List are saved, regardless of the Save/Cancel action selected on the main XSL Preview page.
- You can view the changes in the letter preview pane.
- To disable a label, see the knowledge base article How can I disable a line in an Alma email letter?
Including Request ID in the Subject Label
Some letters can include the string %reqId% in the description column of the Subject label. This will be replaced with the request’s ID when the letter is generated. The letters that include this option are:
- Borrower Overdue Email Letter
- Externally Obtained Letter
- Ful Cancel Email Letter
- Ful Outgoing Email Letter
- Ful Renew Email Letter
- Lending Recall Email Letter
- Query To Patron Letter
Using Templates to Update Letter Formatting and Content
How to Customize Letter Templates
Ex Libris Support is available to assist with issues related to customized XSL stylesheets. However, their troubleshooting effort is within practical limits. If a style sheet is heavily customized, it may require time-consuming analysis to identify a specific error. Such validation cannot be provided by Support for all customized style sheets. The best practice in these situations is for you to eliminate one condition/test/section at a time to determine what causes the problem.
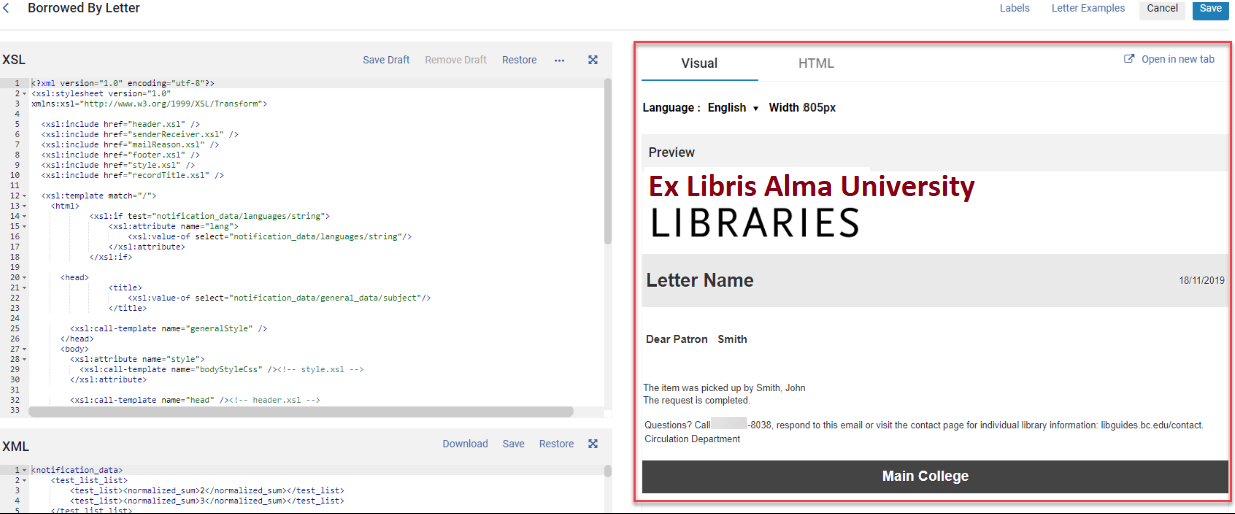
- Select Edit on the row action list of the letter.
The XSL and XML information appear to the left of the letter.

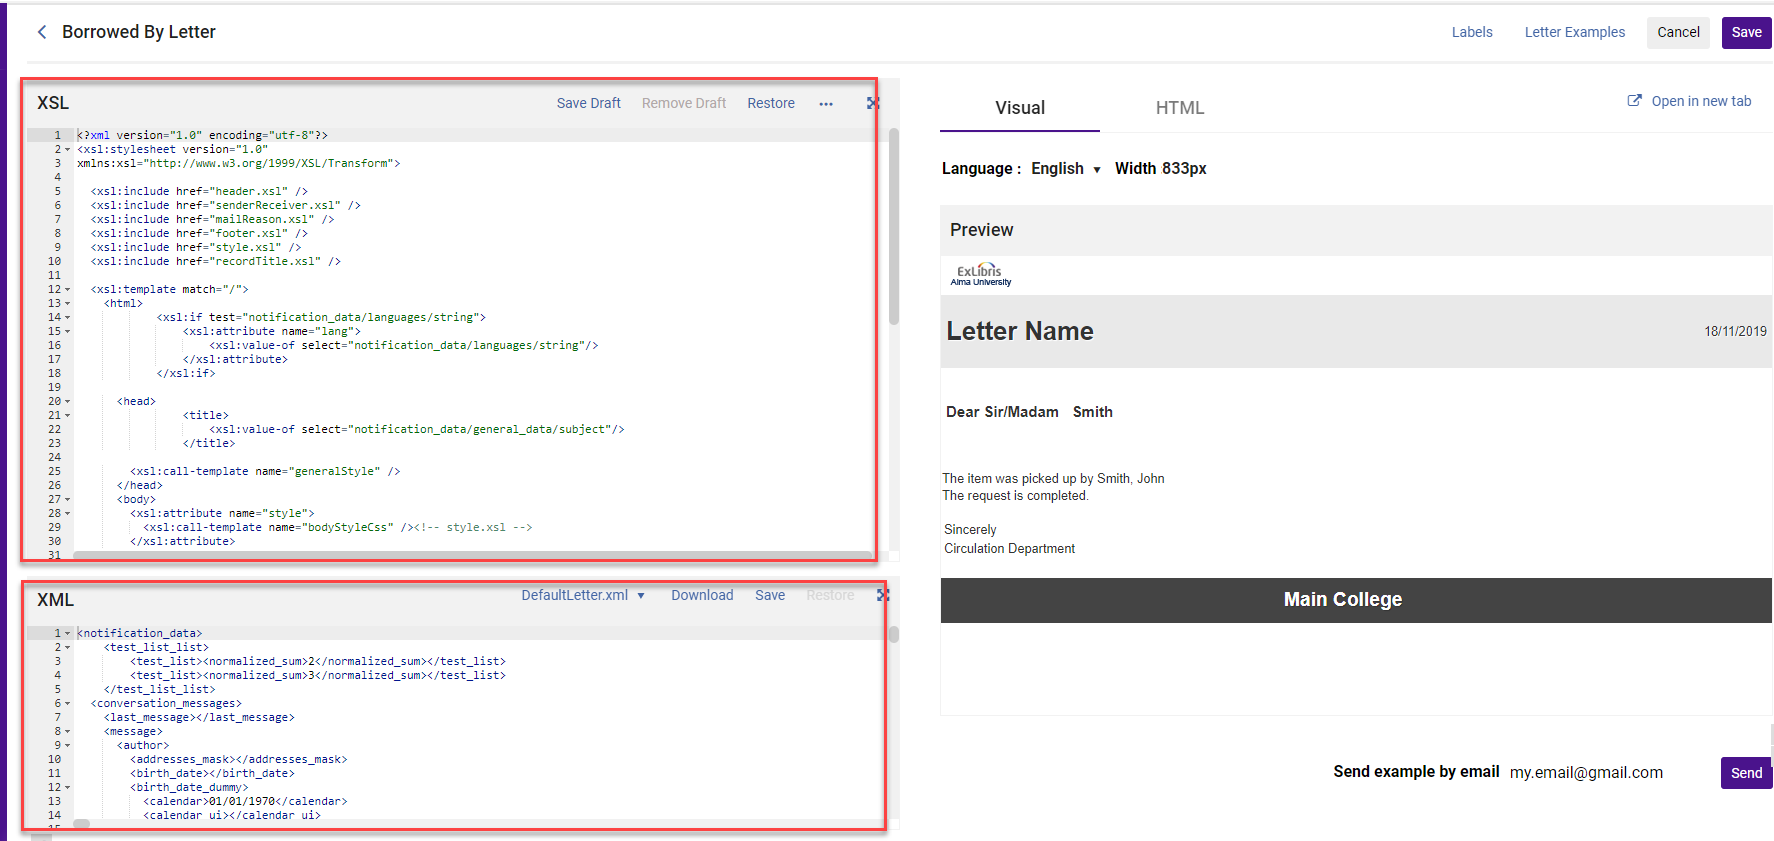
- To the right of the XML/XSL panes is a preview pane of the actual letter output.
.png?revision=1)
Changes in the XSL/XML are immediately reflected in the preview pane.
Errors that are detected while editing the XSL/XML are marked with a red X on the relevant line.
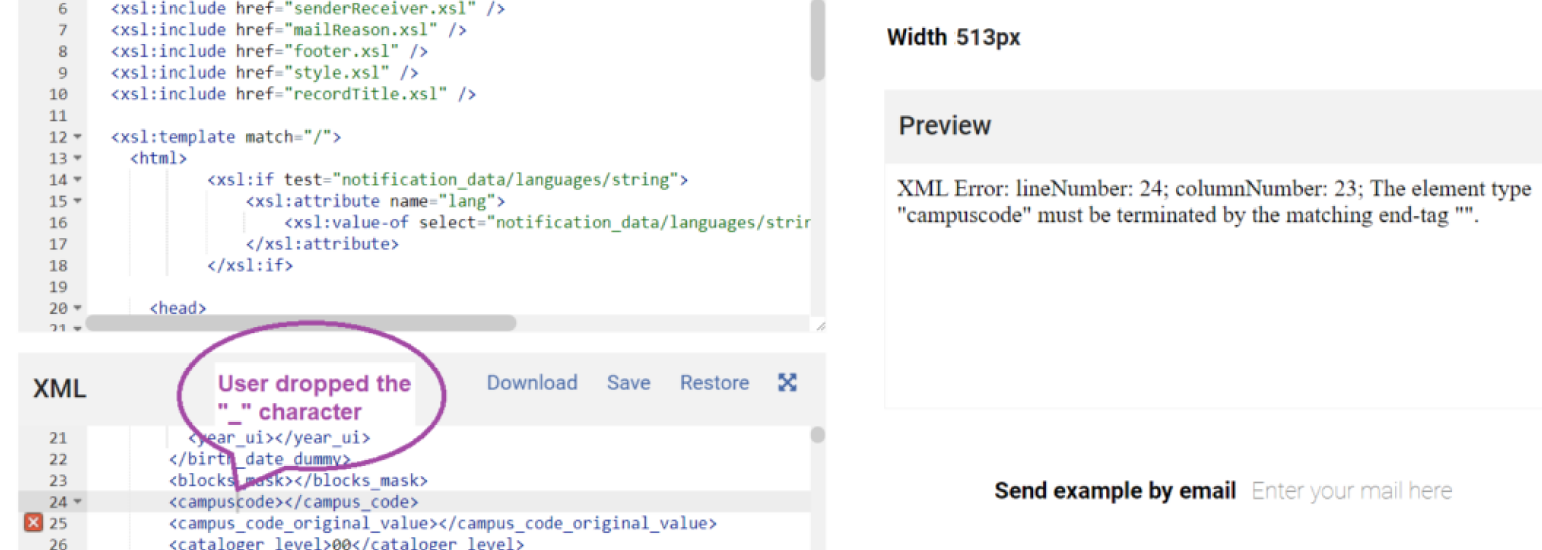
Note that Due to technical limitations, there might be a gap between the error line number reported on the XSL/XML and the line number reported on the Preview pane.The editor also marks the XSL segments in color and implements auto-completion. Ctrl+f can be used to find items within the editor. - You can use Ctrl+Shift+f to implement Prettyprint (convert and present the XSL source code with line breaks and indentations to make the code easier to read).
- You can use Ctrl+Shift+H to provide the X-Path for a particular XML element when you click on that element within the XML editor textbox. This is especially useful when you need to copy an XML element into the XSL.
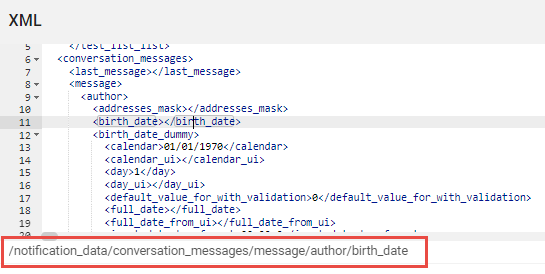 X-Path displayed in XML Editor
 - You can maximize the XML/XSL windows using the full-screen icon.

- Update the labels associated with the letter (see Using Labels). Changes to the labels display in the preview pane.
- Select Open in new tab to open the preview in a separate browser tab and edit the HTML using accessibility plugins.
- Select Visual or HTML to toggle between a visual and HTML view.
- Select another language in the Language drop down to view the letter in a different language. The languages that appear depend on the settings configured in Alma.
Some elements, such as the letter name and subject, are extracted from the letter XML and therefore will not change when changing the preview letter language.
- Update the Width to visualize the output as it will be displayed in narrow screens or printers. Use px to configure the width in pixels, for example 500px.
- Reusable components display in the preview pane (see Reusing Components Across Letters).
- Select Save Draft to save your customizations as a draft. Changes done in the draft will not be applied to the real letter. Select Remove Draft to erase the draft and display the last saved XSL. Select Restore to restore the XSL to its original state.
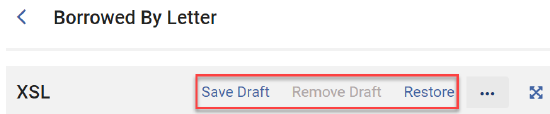
Note that while a draft is active, the Edit Draft and Remove Draft options are available in the row actions menu for the letter.

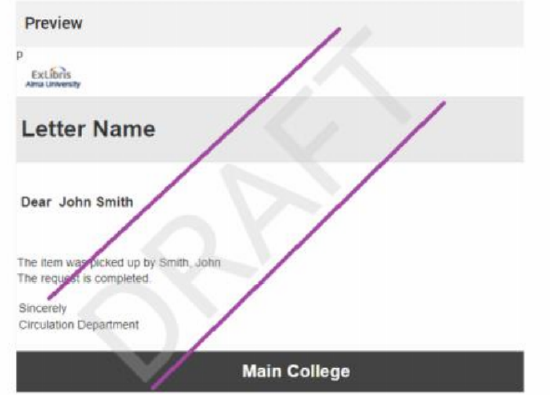
The draft watermark displays in the preview pane.
- Select Save to apply the changes to the real letter. This removes the draft (if one exists for this letter). Note that after saving, the letter remains in the preview window. To return to the full list of letters, select Cancel.
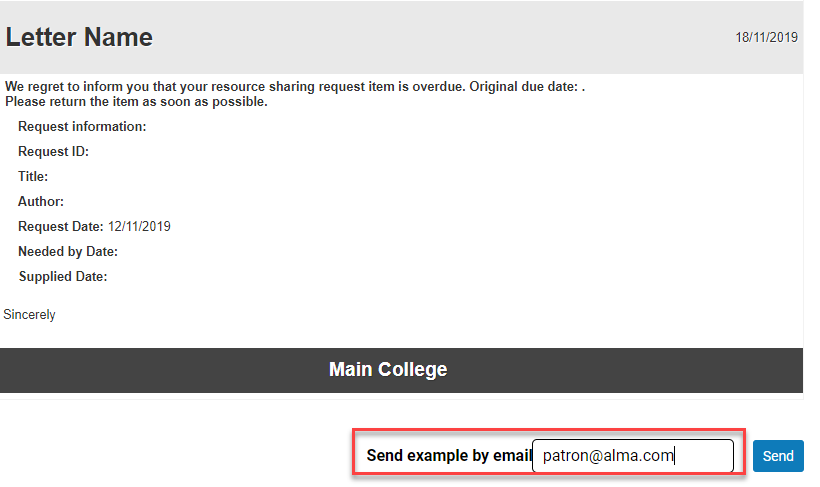
- To send an example by email, add an address to the Send example by email field and select Send.
- You can view examples of letters by selecting Letter Examples. In the Letter Examples page you can add examples of letters that were sent by Esploro and upload new examples. See Updating and Previewing Example Letters for Testing.
Conditional Statements
For a description of how to use conditional statements, see How to use the if condition to configure a letter to not be sent under certain circumstances.docx.
General Examples of XSL Customizations
Output Last Four Digits of a Code
Use the substring and string-length functions to output the last four digits of a code:
<xsl:value-of select="substring (notification_data/user_for_printing/identifiers/code_value/value,string-length(notification_data/user_for_printing/identifiers/code_value/value) - 3)"/></b>
Add Notes to Vendor and Rush Indicator to Order List Mail Letter
Add notes to the vendor (from the PO line) and the rush indicator to the Order List Mail letter:
<td><b>Notes To Vendor: </b><xsl:value-of select="/notification_data/po/po_line_list/po_line/vendor_note"/> </td>
</tr>
<tr>
<td><b>Is Rush? </b><xsl:value-of select="/notification_data/po/po_line_list/po_line/rush"/> </td>
</tr>
Add Condition for Notes that May Affect Loan
Ensure that the Notes that may affect loan line appears in the On Hold Shelf letter only if there is a block on the patron:
<tr>
<td><b>@@notes_affect_loan@@:</b></td>
</tr>
<tr>
<td><xsl:value-of select="notification_data/request/system_notes"/></td>
</tr>
See also How to use the if condition to configure a letter to not be sent under certain circumstances.docx.
Include Phone Number in All Letters Using this Template
If the following snippet follows the address line in the SenderReceiver.xsl file, you can ensure that the user’s phone number is included in all the letters that use this template.
<td><xsl:value-of select="notification_data/user_for_printing/phone"/></td>
</tr>
Include Template Name as Hidden Text
Have the name of the template appear as hidden text in the output by adding the following after the <html> tag:
Remove an Element from a Letter
To remove an element from a letter, find the element to be removed. Add comment indicators on either side of the line, such as, <!--<th>@@description@@</th>-->.
<!--<th>@@description@@</th>-->
<th>@@author@@</th>
<th>@@due_date@@</th>
<th>@@fine@@</th>
<th>@@library@@</th>
Suppress Letters to Users in Specific Group
Suppress a letter being sent to users in a specific user group. Add a terminate clause condition in these two places.
- After the initial include lines at the top of the letter, as follows:
<table cellspacing="0" cellpadding="5" border="0"><tr><td><xsl:for-each select="notification_data"><xsl:if test="user_for_printing/user_group='STUDENT_GRADUATE'"><xsl:message terminate="yes">user group is STUDENT_GRADUATE </xsl:message></xsl:if></xsl:for-each></td></tr></table>
-
And below this line:
<xsl:template match="/">
In the above example, the letter is not generated for users in the Graduate Student user group. For a more detailed explanation, see How to use the if condition to configure a letter to not be sent under certain circumstances.docx.
Example of Query to Patron Letter Customization
- Confirm that the Query to Patron letter is enabled (see Enabling/Disabling Letters).
- Download a copy of the Query to Patron XML fields, as follows:
- Add a borrowing request for an inventory item (make yourself the Requester; see Adding a Resource Sharing Borrowing Task From a Search).
- On the Resource Sharing Borrowing Requests page (Fulfillment > Resource Sharing > Borrowing Requests), in the row actions of the new request, select Send query to patron (see Managing Resource Sharing Borrowing Requests).
- Under Email template, select the letter to send, and then select Send Email to send it.
- Edit the Query to Patron letter (Edit from the row actions menu).
- Select the Letter Examples button.
- Select the Add from System Letters button.
- Select the letter that was sent.
- In the Letter Examples page make this letter the Default Preview.
- In the XML preview pane, you will now see the new letter.
- Select Download to save the XML letter to a file, such as letter.xml.
- Modify the labels:
- On the Letters Configuration page (Configuration Menu > General > Letters > Letters Configuration), locate the Query to Patron letter and open it for editing.
- Select the Labels button.

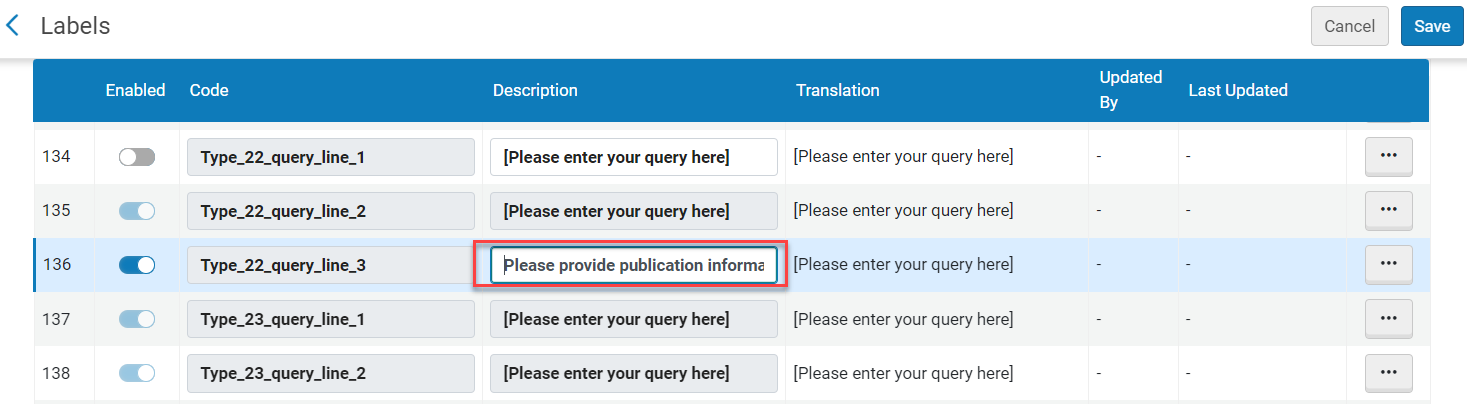
Entries whose Codes begin with Type_xx (Type_1, Type_2, Type_3, and so forth) will only be included in the versions of the Query to Patron letter whose patron query types correspond with those numbers (see Configuring Patron Query Types). For example, the Codes of the entries that will only be included in the Type_1_query_name version of the query letter begin with Type_1 (e.g., Type_1_header, Type_1_subject). - For each of the entries that are specific to the enabled patron query types, in the row actions, select Customize, and then enter the appropriate text in the Description column.
- Select Save.
- Modify the XSL:
- In the Xsl pane, modify the relevant XSL to change the format of your letter. The same XSL file is used to format all of the versions of the Query to Patron letter. You can add labels or fields from the XML, use the values of these fields to define conditions, and so forth.
-
For example, a conditional clause looks something like:<xsl:when test="notification_data/query_type = 'Type_1_query_name'">
... special configurations for type 1 queries ....
</when>The default template only includes rules for patron query types 1 and 2. If your system has more than two types defined, you must add rules for the additional types to the template before you can configure them. You can do this by copying one of the existing rules and modifying the copy as required for each additional rule. - Select Save (or Save Draft as described in How to Customize Letter Templates).
- To test your changes, upload the XML (letter.xml) as described in Updating and Previewing Example Letters for Testing.
Example of Borrowing Activity Letter Customization
This example shows how to make the customizations to the Borrowing Activity Letter email. For general examples of what you can do with XSL to customize the output of your letters, see General Examples of XSL Customizations.
- Change the name of the letter.
- Add a library-specific message.
- Display the material type in the list of loans.
- Change the name of the letter to Patron Activity Letter:
- On the Letters Configuration page, find and edit the Borrowing Activity Letter (Configuration > General > Letters Configuration and select Edit from the row actions menu).
- Select the Labels button.

- Select English from the Filter drop-down list. Note that, in addition to changing the names of labels, you can also translate the labels for other languages.
- Select Customize in the row actions list containing the letterName code.
- In the Description field, change the text to Patron Activity Letter.
- Select the Save page action to store the modified values.
- Configure the XML output and view the output in the preview pane.
.png?revision=1)
- To send a sample letter, enter the email address in the Send Example by Email field in the preview pane and select Send.
- Select Save. Note that after saving, the letter remains in the preview window. To return to the full list of letters, select Cancel.
-
On the Patron Identification page (see Managing Patron Services), enter a patron’s name in the Scan patron’s ID or search for patron field and select Go. The Patron Services page appears.
-
In the Scan item barcode field, enter the item’s barcode and select OK. The item is listed in the Loans tab.
-
Select Send Activity to send the XML output in an email.
-
Copy and paste the XML output from the email to an XML file (such as BorrowingActivityLetter.xml).
The receipt letter is triggered only when selecting Done to terminate a session with a patron.
-
On the Letters Configuration page for the Borrowing Activity Letter, edit the XSL file (in the XML pane).
-
Use the XML file that you created earlier to determine the full path name of the field that contains the library name.
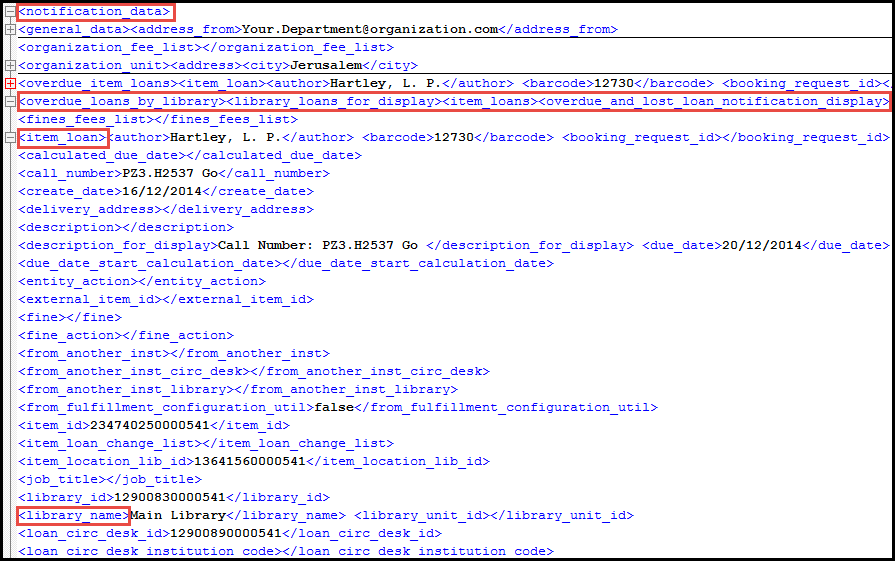 Library Name Field in XML OutputBased on the nested elements in the above figure, the full path to the library name is the following:/notification_data/overdue_loans_by_library/library_loans_for_display/item_loans/overdue_and_lost_loan_notification_display/item_loan/library_name
 - Search for the @@loans@@ placeholder in the XSL file and add the xsl:if clause, shown in bold text shown below:
. . .Alma replaces the placeholders with the labels/translations that are defined in the associated Letters code tables.
<xsl:if test="notification_data/item_loans/item_loan">
<xsl:if test="notification_data/item_loans/item_loan/library_name='Main Library'">
<center>
<span style="font-family:Arial; font-weight:bold">
<FONT COLOR="#FF0000">
<br></br><b> Please check due dates by logging in to your library.</b>
</FONT>
</span>
</center>
</xsl:if>
<tr>
<td>
<b> @@loans@@ </b>
</td>
</tr>
. . .
- While you are still editing the XSL file, add the Type column to the list of loans. Below the @@loans@@ placeholder in the XSL file, add the bold text as shown in the following figure.
<b>@@loans@@</b>
</td>
</tr>
<tr>
<td>
<table cellpadding="5" class="listing">
<xsl:attribute name="style">
<xsl:call-template name="mainTableStyleCss" /> <!-- style.xsl -->
</xsl:attribute>
<tr>
<th>@@title@@</th>
<th>Type</th>
<th>@@due_date@@</th>
<th>@@fine@@</th>
<th>@@description@@</th>
</tr>
<xsl:for-each select="notification_data/item_loans/item_loan">
<tr>
<td><xsl:value-of select="title"/></td>
<td><xsl:value-of select="material_type"/></td>
<td><xsl:value-of select="due_date"/></td>
<td><xsl:value-of select="fine"/></td>
<td><xsl:value-of select="description"/></td>
</tr>
</xsl:for-each>
. . .
- Select Save.
- Test your changes to the XSL file by uploading the XML file that you created previously (see Updating and Previewing Example Letters for Testing).
Working with User Preferred Names in System Notifications and Letters
Some system notifications and letters that incorporate name information can be updated to use a user's preferred name. For system notifications and letters that incorporate name information such as the Mail Reason Letter XSL, the preferred names can be specified using preferred_first_name, preferred_middle_name, and preferred_last_name. See the following example:
<xsl:value-of select="receivers/receiver/user/preferred_last_name"/>
For more information on preferred names, see Managing Users.
For more information on the mailReason.xsl letter, see Reusing Components Across Letters. Configuring Components.
Reusing Components Across Letters
You can reuse components such as headers and footers across letters. See Reusing Components Across Letters.
Updating and Previewing Example Letters for Testing
Overview of Letter Templates
<general_data>
<address_c>None</address_c>
<address_c>None</address_c>
<address_from>nosuchmail@no.such.mail.com</address_from>
<current_date>01/08/2017</current_date>
<letter_channel_info></letter_channel_info>
<letter_name>Regarding your request</letter_name>
<letter_type>QueryToPatronLetter</letter_type>
<subject>Regarding your request</subject>
</general_data>
<languages>
<string>en</string>
</languages>
<letter_params>
<address_from>nosuchmail@no.such.mail.com</address_from>
<letter_name></letter_name>
<subject>Regarding your request</subject>
</letter_params>
<letter_texts></letter_texts>
<library>
<address>
<city>chicago</city>
<country>USA</country>
<country_display>United States</country_display>
<create_date>06/20/2014</create_date>
<entity_action></entity_action>
<library_id>12900830000541</library_id>
<library_unit_id></library_unit_id>
<line1>library 2</line1>
<line2></line2>
<line3></line3>
<line4></line4>
<line5></line5>
<note></note>
<originating_id></originating_id>
<postal_code>36500</postal_code>
<preferred>true</preferred>
<segment_types_display>
<string>Billing</string>
<string>Patron Communications</string>
<string>Primary</string>
<string>Shipping</string>
</segment_types_display>
<state_province>IL</state_province>
<user_address_types_display></user_address_types_display>
</address>
<automatic_creation>false</automatic_creation>
<automatically_activate_locate_profile>false</automatically_activate_locate_profile>
<automatically_locate_resource>true</automatically_locate_resource>
<bibliographic_titles></bibliographic_titles>
<cancel_request_on_locate_failure>true</cancel_request_on_locate_failure>
<code>RES_SHARE</code>
<code_rfid></code_rfid>
<create_date></create_date>
<default_acq_loctaion_id></default_acq_loctaion_id>
<default_item_loctaion_id>12900870000541</default_item_loctaion_id>
<default_move_loctaion_id>12900850000541</default_move_loctaion_id>
<default_pickup_loctaion_id>12900830000541</default_pickup_loctaion_id>
<default_printer></default_printer>
<description>Temporarily manages inventory that is sent to or received from resource sharing partners</description>
<digital_objects></digital_objects>
<digital_storage_size></digital_storage_size>
<disable_call_number_calculation>false</disable_call_number_calculation>
<edi_code></edi_code>
<edi_type></edi_type>
<email>
<create_date>03/31/2013</create_date>
<description></description>
<email>nosuchmail@no.such.mail.com</email>
<entity_action></entity_action>
<external_id></external_id>
<library_id>12900830000541</library_id>
<library_unit_id></library_unit_id>
<originating_id></originating_id>
<preferred>true</preferred>
</email>
<entity_action></entity_action>
<ignore_electronic>false</ignore_electronic>
<itemless_library></itemless_library>
<leader_institution_id></leader_institution_id>
<library_id>12900830000541</library_id>
...
Using Example Letters for Testing
-
Navigate to Configuration > General > Letters > Letters Configuration.
- Select Edit in the row actions menu for the relevant letter.
- Select the Letter Examples button.

- There is always one default letter that appears, but you can add more examples as described below.

- In the Letter Examples page, select the Add from system letters button. Note that if this letter has never been sent in the past, as part of the Alma flow, then the Add from system letters button will not display.

-
The Sent Letters page appears, showing up to 10 of the most recent XMLs from the last 7 days.
- Select the letter to add.
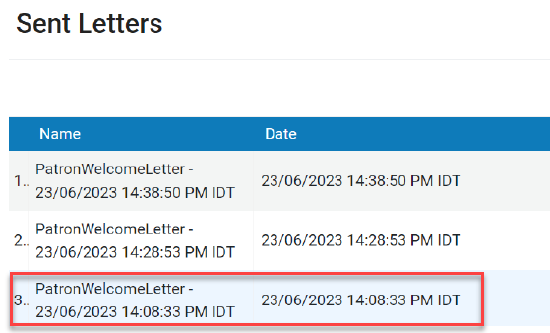
- The selected letter appears in the Letter Examples page.
-
Select Save. This letter will now be the one displayed in the XML pane.
-
You can switch between letters in the XML pane by selecting the relevant letter in the drop down list.
.png?revision=1)
- In the Letters Configuration page, for the relevant letter select Edit in the row actions menu.
- In the XML pane, select the Download button.
- Edit the file in an XML editor to make any relevant changes.
Download letter as XML fileA dropdown has been introduced above the XML editor, displaying all available example letters XML files. Users can switch between files by selecting an option from this dropdown. Upon selection, the XML editor content is replaced with the information from the chosen file, and the letter preview is automatically refreshed.
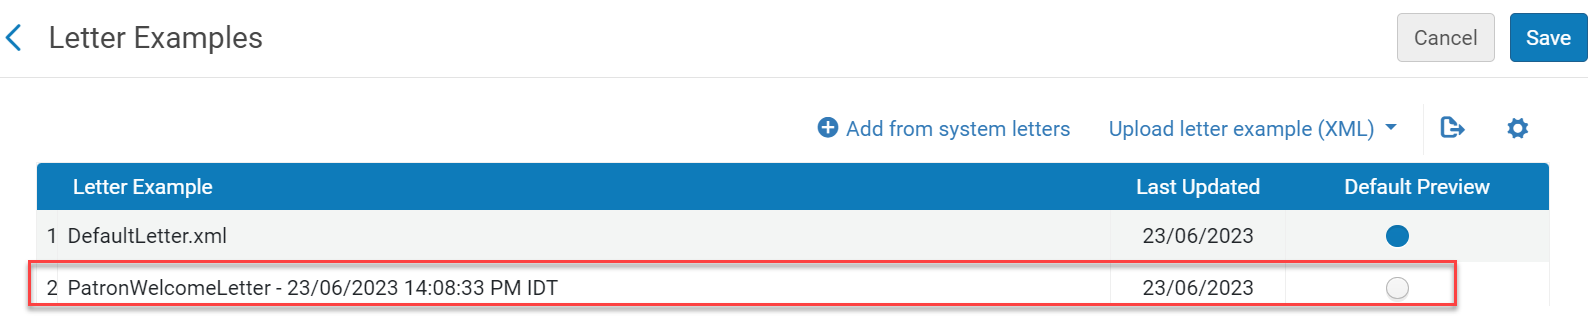
- In the Letter Examples page select the Upload letter example (XML) button.

- Browse to and select the XM file and select Upload.
- The added letter is not marked for default preview unless you select it in the Default Preview column.
These examples are subject to the retention policy of the institution. The XML files saved in the system will be retained for seven days and will be removed by the weekly cleanup job. The XML examples added to the XML list from the system are persistent and will not be cleaned by the weekly job. Any identifying information should be removed from these examples.
Contributing Letter Customizations to the Community Zone
You can contribute XSL templates to the Community Zone and you can copy shared XSL templates from the CZ to your institution for local use. You can also preview how a template will work and look before copying it. This makes it much easier to share XSL templates between institutions.
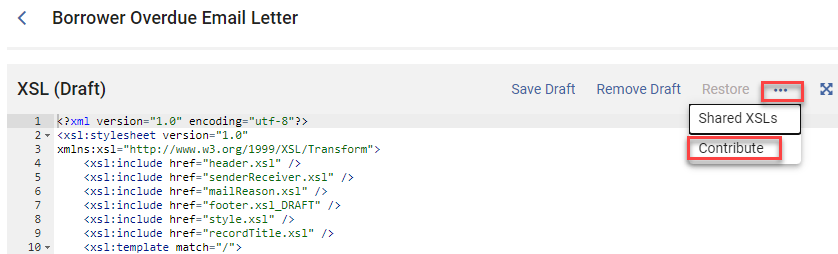
- Access the letter you want to contribute to the Community Zone from the Letter Configuration page (Configuration > General > Letters > Letter Configuration).
- Select the ... icon in the XSL pane and then select Contribute.
- Add a description that will help other users in the Community Zone understand your edits to the configuration, and provide the contact information by which other users can contact you in case they have questions.
By default, your email address appears in the Contact person. You can change this information, for example, to another user's email address or a phone number.
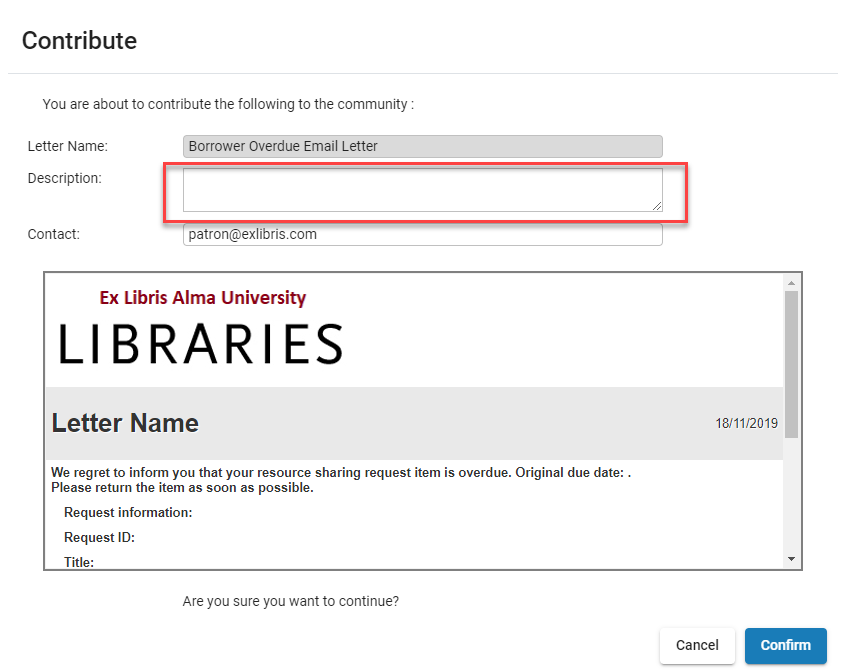
- Select Confirm. The XSL template is contributed to the Community Zone.
- If you or others from your institution attempt to contribute this same XSL configuration again, you are prompted: "This letter was already contributed for this institution. Are you sure you want to overwrite?", since the new contribution overwrites the previous contribution. Select Confirm to re-contribute.
- You can view contributed letters by selecting the ... icon in the XSL pane, and then selecting the Shared XSLs option.
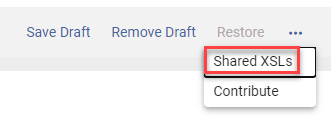
In the row actions menu for the relevant letter, select the Preview option to view the letter. - If at some point your institution decides to stop sharing a letter, select the Shared XSLs on the XSL pane and find your letter version in the list of versions contributed by all the contributing institutions. Select Delete in the row actions to remove the letter.
- Access the letter you want to copy from the Letter Configuration page (Configuration > General > Letters > Letter Configuration).
- In the XSL pane select the ... icon and then Shared XSLs. This displays all of the XSL versions contributed by multiple institutions.
- Select the relevant letter to copy to your institution and then use the Select button to add it.

The selected version now displays in the preview window. - Select Save to save the letter locally at your institution.
Configuring the From and EnvelopeFrom Addresses for Outgoing Email
Alma sends emails to patrons, library staff, and vendors.
- From: Appears in the user's mail reader (generally used to determine the reply to address).
- SMTP EnvelopeFrom address Used internally by mail relay servers to determine the origin of the message. This field appears as From (without the colon :) at the very top of the email packet when you look at the packet source, but does not normally appear in the user's mail reader. You may want to configure this field in order to catch bounced emails. This field is configured in the mail handling integration profile (see Setting the EnvelopeFrom Address with the Integration Profile).
Setting the From Address
The From address can be configured from the addressFrom label or from the Organization Unit page, as described below.
Setting the From Address with the addressFrom Label
You can configure each outgoing email's From: address by configuring the letter's addressFrom label. The addressFrom label must contain a valid email address. You can also specify an alias for the addressFrom parameter in the following format: alias <actual_email_ID@university.edu>.
Note that for the General mail that you can send when managing a user (see Editing Users), the default From: address is set using the from_address parameter (see Configuring Other Settings).
Purchase order and claim notifications ignore the configured addressFrom field in the letter when an email address is defined in the institution for order response or claim response, respectively. See Configuring Institution/Library Contact Information and Communicating with Vendors.
Setting the From Address for Resource Sharing Letters
For resource sharing letters, the From: address contains the library's preferred email address, if this address is configured. If the address is not configured, the letters use ILL@exlibrisgroup.com as the From address.
When rs_use_addressfrom_letter_param (Configuration > Fulfillment > General > Other Settings) is set to true (default is false), then some letters are sent from the letter configuration for addressFrom (Configuration > General > Letters > Letters Configuration) instead of being sent from the Preferred Email Address set in Configuration > General > Libraries > Add a Library or Edit Library Information > Contact Information tab > Add Address/Edit an existing address. For more information see Configuring Other Settings (Fulfillment). Below is the list of letters that this relates to:
- ARTEmail message
- Borrower Claim Email Letter
- Borrower Overdue Email Letter
- Borrower Receive Email Letter
- Borrower Return Email Letter
- Externally Obtained Letter
- Ful Cancel Email Letter
- Ful Damaged Email Letter
- Ful Incoming Slip Letter
- Ful Lost Email Letter
- Ful Outgoing Email Letter
- Ful Renew Email Letter
- General mail Letter
- Interested In Letter
- Lender Checked-in Email Letter
- Lender Email Letter
- Lender Reject Email Letter
- Lender Response Email Letter
- Lender Ship Email Letter
- Lender Will Supply Email Letter
- Lending Recall Email Letter
- OrderListLetter (if any of the library's email addresses are of type 'Order response')
- Query To Patron Letter
- Resource Sharing Request Confirmation Letter
- Resource Sharing Return Slip Letter
- Resource Sharing Shipping Slip Letter
See also the documentation regarding Patron Notifications for Fulfillment Library Independence.
Setting the EnvelopeFrom Address with the Integration Profile
For more information on email handling in Alma, see the Alma Technical Requirements document.
-
On the Integration Profile List page (Configuration Menu > General > External Systems > Integration Profiles), select Add Integration Profile. Alma allows you to define only one mail handling integration profile. If there is already a mail handling integration profile, select Edit in the row actions list to edit the profile.
-
Enter a unique code and name for the profile.
-
In the Integration Type field, select Mail Handling.
-
Select Next. The second page of the wizard appears. Active is selected by default.

-
If you want to continue to use Alma's mail server:
-
Select Send directly from Ex Libris (selected by default).
-
Enter a valid email address for SMTP EnvelopeFrom address.
-
-
To use your institution's mail relay server:
-
Select Send using institution mail relay. Several additional fields appear.
-
Enter the institution domain name. After you do this, the domain name appears after the SMTP EnvelopeFrom address field as @<domain name>. The domain name can contain up to 63 lower case alphanumeric characters, dashes -, and periods followed by a period and a two to six character lower case alphabetic top-level domain.
-
Enter the institution SMTP mail relay host name. The host name can contain lower case alphanumeric characters as well as any of the characters - ! # $ % & ' * + / = ? ^ _ ` { | } or ~ and a period.
-
Custom SMTP EnvelopeFrom address is selected by default. Enter a username of the address in the unlabeled field below this option. This sets EnvelopeFrom to <username>@<domain name>. The username can contain the same characters as the SMTP mail relay host name.
-
If the mail relay requires a username and password to accept email from Ex Libris, enter the username and password. These can be any ASCII characters.
-
If the mail relay requires encryption, select Use encryption.
Encryption port is set to 587 for you.
-
-
Select Save.
Alma Recommendation for Mail Relay and Support Domain Keys Identified Mail (DKIM)
When an email is received by an SMTP server there are several security checks that occur to determine if the email is legitimate or suspicious. If an email is marked as suspicious the SMTP server may delay the delivery of the email, mark the email as ‘spam’ or not deliver the email at all. This article describes how to ensure emails from the Ex Libris cloud will not get marked as suspicious.
Emails can be sent out from Ex Libris products in one of two ways:
1) With a ‘From address’ domain of @exlibrisgroup.com
2) With a branded ‘From address’ for example @institution.edu
For customers using Primo Classic, we recommend changing the value of default.email.form in the 'Send Email and Sms' code table from default "donotreply@exlibris.cloud" to a more appropriate value for your institution, or "donotreply@exlibrisgroup.com".
DKIM is currently supported for both of the above methods. Emails sent from our cloud with a ‘From address’ domain of @exlibrisgroup.com should not be marked as suspicious as they are signed using DKIM and Ex Libris has a DMARC policy. Please note that both the SMTP Envelope ‘From address’ as well as the ‘header.from address’ must use the same domain. The SMTP Envelope from address is configured in the Mail Handling integration profile and the header.from address is configured on each individual letter that is sent out. More information on configuring outgoing mail can be found here.
Since late 2023, email services like GMAIL are gradually encouraging DKIM/SPF compliance (see details here: https://support.google.com/a/answer/174124?hl=en&sjid=15453546060050396344-EU). This may impact your patron’s user experience.
If you want to have a DKIM-compliant setup with a custom domain, the recommended method is to configure the Alma mail integration profile with the "Send using institution email relay" option and implement DKIM on your institutional email relay.
Emails sent from Ex Libris that are branded with the institution’s domain can be implemented securely in the following two ways:
i) Configure the Ex Libris application to pass the email directly to the institution’s SMTP server to be authenticated under the institution’s policies (DKIM + DMARC).
To configure the Alma Platform to pass the email to an external SMTP server, please refer to ‘configure the mail handling integration profile’ in the documentation here. Depending on the firewall policy of the institution your IT may need to open access from Ex Libris cloud to the SMTP server for the relevant port. The outgoing IP range for Alma, Primo VE and Primo Classic can be found here .
ii) Configure the email to be sent from the Ex Libris cloud and be authenticated using the “Sender Policy Framework” (SPF) and DKIM.
SPF is a method of allowing the Ex Libris cloud to send emails on behalf of the institution. When an email is received by a SMTP server, a security check is performed where the IP that had sent the email is compared to the IPs listed in the DNS record for the ‘From Address’ domain. To configure SPF, the DNS administrator of the institution needs to add the Ex Libris mail relay IP’s to the institution’s domain in a TXT record. The Ex Libris mail relay IP’s differ based on the region of the customer so the relevant ‘SPF Include Entry’ should be chosen. The different ‘SPF Include Entries’ for the different regions can be found here.
DKIM, or DomainKeys Identified Mail, serves as an email authentication method specifically designed to identify fraudulent sender addresses in emails, addressing the issue of email spoofing. Once the DKIM functionality is activated for your institution, the Mail-Handling Integration-Profile will include support for DKIM digital signatures in outgoing emails. Configuration instructions can be found here.
For more information, see Outgoing emails configuration.
-
Mark the DKIM Setup checkbox. This creates the keys and uploads the public key to the Ex Libris DNS. A pop-up window appears with the CNAME details.
-
Copy the CNAME from the dialogue window and pass it on to your IT, for them to add it to your DNS.
-
After your IT has added it to the DNS, select the Test DKIM DNS Setup option to test it. If the test passed, a success message will appear. If the test failed for whatever reason, a message will appear with details of the failure.
-
After successful testing, select the DKIM Active checkbox. From this point on, outgoing emails will include the DKIM signature.
Letter List
The following table lists the letters available in Alma.
- The Translation Eligible column corresponds to the Patron Facing column in the Alma Letters Configuration page. In both cases, a yes, or check mark, in this column means that the letter is eligible for translation for environments using languages other than English.
| Letter Name | Letter Description | Category | Channel | Translation Eligible ('Patron Facing' flag in Alma) |
|---|---|---|---|---|
| Analytics Letter | Contains an analytics report that is sent to report subscribers. For more information see Scheduling and Subscribing to Reports and Dashboards. | Analytics | No | |
| Borrowed By Letter | Sent to patrons indicating that a proxy user has borrowed an item on their behalf. For details on working with proxy users, see Managing Proxy Users. | Fulfillment | Yes | |
| Borrower Claim Email Letter | For peer-to-peer partners, the letter is sent when the Automatic Claim field is enabled on the borrowing request and the value of the Time to Claim (days) is reached. See Resource Sharing Partners. | Resource sharing | Yes | |
| Borrower Overdue Email Letter | Sent by the lending institution to the borrowing partner when a resource is overdue. When sent using ISO protocol, the request on the borrowing side is automatically marked as overdue. | Resource sharing | Yes | |
| Borrower Receive Email Letter | Sent to the lending institution when the loaned item has been received at the borrowing institution. | Resource sharing | Yes | |
| Borrower Return Email Letter | Sent to the lending institution when the borrowing institution has returned the loaned item. | Resource sharing | Yes | |
| Borrowing Activity Letter | Sent to patrons with activity; contains a list of the patron’s loans, overdue items, and active fines. If the patron has more than 100 active loans, only the first 100 are included on the letter and a flag is added to the XML - <loans_over_the_limit>true</loans_over_the_limit>. Sent either by a job (Notifications – Send Periodic Fulfillment Activity Report) or by request, for example, the Renew Selected and Renew All actions on the Loans tab of the Patron Services page. For details on configuring the Borrowing Activity Report, see Configuring Fulfillment Jobs.
This letter can be activated to trigger a webhook function. See Webhooks. |
Fulfillment |
SMS Webhook |
Email - Yes SMS - Yes Webhook - No |
| Cancel Request Letter | An SMS message sent to patrons indicating the reason for the request cancellation. For more information, see the email format for Cancel Request Letter.
If the date by which the request is needed has passed, this letter is no longer sent.
|
Fulfillment | SMS | Yes |
| Change Rapido Request Terms Letter | A letter that will notify the patron if the terms that were defined by the previous lender were changed when the request is moved to a new lender.
For a full list of letters used by Rapido, see Rapido Letters. |
Rapido | Yes | |
| Cloud IdP User Created Letter | For future use | User management | Yes | |
| Collection Contribution Letter | Sent to users as an initial response to a contribution to the Community Zone. For detailed information, see Contributing Local Electronic Collections to the Community Zone. | Resource management | No | |
| Collection Contribution Update Status Letter | Sent to users as a follow-up to a contribution to the Community Zone. | Resource management | No | |
| Conversation Letter | Used to communicate with vendors. See Communicating with Vendors.
The customer parameter: conversation_send_from_logged_in_user_address enables conversation letters to be configured as being sent from the logged in user's email (as address "From") or the library's. See Customer Parameters Mapping Table. |
Acquisition | No | |
| Courtesy Letter | Sent to patrons in a nightly job; contains a list of the patron’s loans that are due soon. Generated when the Notifications - Send Courtesy Notices and Handle Loan Renewals job runs and one of the following occurs:
For short loans, if the short_loan_courtesy_reminder parameter is set, this letter is triggered based on the due date time, less the value of the parameter. The letter will be sent if the item was not returned, is not in Lost or Claim Return status, and the current due date time is the same as the due date time that was on the item when the reminder was triggered. The loan due date time can change due to a renewal, recall, or manual change of due date. See also Configuring Short Term Loans. In addition to a short loan indicator that is available in the source XML, this letter has a configurable short_loans_message label in the code table. To see this label, you must be using the XSL file in the default, out-of-the-box format. If you have customized the XSL file, the short loan label is not available. |
Fulfillment |
SMS |
Yes |
| Delivery Registration Status Letter | Sent to patrons by email to notify them when they join the waitlist, when a resource becomes available, and when the grace period expires. | Digital | Yes | |
| Delivery Registration Status Letter | Sent to patrons by SMS to notify them when they join the waitlist, when a resource becomes available, and when the grace period expires. | Digital | SMS | Yes |
| Deposit Activity Letter | Indicates the status of active deposits. For detailed information, see Configuring the Deposit Activity Report Job. | Digital | Yes | |
| Deposit Status Update Letter | Sent to depositors when their deposit is submitted, approved, declined, returned, or withdrawn.
The fields for the Subject is available in the subject field. The field is set by entering your text within <> + deposit_title. The format is as follows: |
Digital | Yes | |
| Document Delivery Notification Letter |
When a patron has requested digital material and the send method on the request is Attach Documents - Link, this notification is sent to patrons to provide links to the file. See Attaching Digitized Items To Be Sent To a Patron. <xsl:if test="notification_data/download_url_saml != ''"> |
Fulfillment | Yes | |
| Download Digital Titles Inventory Job Letter | Sent after running the Download Digital Titles Inventory job to download the files of a digital title into a zip file (see Download Files). This letter informs you that the job is completed. | Digital | Yes | |
| Download Representation Letter | Sent after running the Download Files job to download the files of a representation. | Digital | Yes | |
| Email Records Letter | Sent to patrons when records are export to email in Primo VE. This template allows you to configure the following information in the email: letter's name, subject, and from address. For information regarding export actions, see Exporting Records from Primo VE. | Primo | Yes | |
| Export User Letter | A way to transfer files via FTP (the FTP receiver mechanism of the letters) used by the student information system (SIS) jobs. Does not contain any fields.
For information about the jobs, see Student Information Systems. |
User management | Submission | No |
| Externally Obtained Email Letter | Sent to patrons; contains a URL for a requested article obtained through the CCC GetItNow service. | Resource sharing | Yes | |
| Fine Fee Payment Receipt Letter | Sent to patrons; indicates that payment has been received. | Fulfillment | Yes | |
| Fines and Fees Report Letter | A report of the fine and fee transactions that have been performed over a 1- to 7-day period. For details on configuring the fines and fees report, see Creating Fines and Fees Reports. | Fulfillment | Yes | |
| Ful Borrowing Info Letter | Sent to patrons; indicates whether a loaned resource sharing item was successfully renewed. | Fulfillment | Yes | |
| Ful Cancel Email Letter | Indicates that a resource sharing request has been canceled. Sent to partners automatically when a resource sharing borrowing request is sent to a partner whose Type = Email. | Fulfillment | Yes | |
| Ful Cancel Request Letter | Sent to patrons; indicates that a request has been canceled and the reason for the cancellation.
See Managing Active Hold Shelf Items and Pickup at Shelf. This letter can be activated to trigger a webhook function. See Webhooks. This letter will not be sent if the date by which the request is needed has passed.
|
Fulfillment |
Webhook |
Email - Yes Webhook - No |
| Ful Citation Slip Letter | A slip that is printed out by library staff of a reading list citation so that the item can be retrieved from the shelf. For details on reading list citations, see Managing Citations. You may include a printable barcode image on this letter. | Courses | No | |
| Ful Citations Slip Letter | A slip that is printed out by library staff of all course reading list citations so that the items can be retrieved from the shelf. For details on reading list citations, see Managing Citations. | Courses | No | |
| Ful Damaged Email Letter | Sent to the lending partner to notify them that a resource sharing item has been damaged. See Managing Resource Sharing Borrowing Requests. | Resource sharing | No | |
| Ful Digitization Notification Item Letter |
Sent to a patron who asked for material to be digitized with a send method of Attach Documents - attachment. The letter informs the patron that the digitization request has been completed and informs the patron where the digital material can be viewed. For details on configuring digitization departments for processing digitization requests, see Configuring Digitization Departments. If Alma automatically attempted to add the file to a citation, the email also includes the status of that attempt. If the digitization request is for a citation in a reading list, the librarian assigned to the list is also notified. If you are implementing Leganto, the librarian configured for assign_to is also notified. See Configuring Leganto Copyright-Related Procedures. <tr> |
Fulfillment | Yes | |
| Ful Fines\Fees Notification Letter | Sent to patrons by a job to inform them of fines or fees they owe. | Fulfillment |
SMS |
Email - Yes SMS - No |
| Ful Hold Shelf Request Slip Letter | When enabled, the letter is printed to the circulation desk printer when the item is placed on the hold shelf, regardless of whether a pick slip was already printed. If printing fails, the item is still placed on the hold shelf but the user receives a warning message that printing failed. This way, it is possible to configure a slip for use for on hold shelf items, that is differnet than the slip that is used to pick the item from the shelf.
By default, the letter has the same attributes as the Pickup Print Slip Report Letter, but it can be configured as needed. The letter is invoked when scanning in an item and placing it on the hold shelf and when selecting the Activate next function on the expired hold shelf page.
|
Fulfillment | No | |
| Ful Incoming Slip Letter |
A slip that is printed out by library staff from the Resource Sharing Lending Requests Task List when they need to retrieve an item from the shelf to be shipped to a borrower. You may include a printable barcode image on this letter. Ful Incoming Slip Letter and Resource Sharing Shipping Slip Letter both use the same Print Slip button in Alma and Rapido. |
Resource sharing | No | |
| Ful Lost Email Letter | Sent to the lending partner to notify them that a resource sharing item has been lost. See Managing Resource Sharing Borrowing Requests. | Resource sharing | No | |
| Ful Lost Loan Letter | An invoice letter (for the replacement fee) sent to the borrowing patron when a loan is overdue and the item is declared lost, according to the criteria described in Adding an Overdue and Lost Loan Profile. Each letter generated is for a single item.
The letter is sent when manually changing the loan to lost. Additionally, if the switch_to_overdue_and_lost_loan_new_job parameter is set to false (see Configuring Other Settings), the Loans - Overdue and Lost Item job will also generate this letter. However, if the switch_to_overdue_and_lost_loan_new_job parameter is set to true, the job sends the Ful Overdue and Lost letter instead (see below). |
Fulfillment |
SMS |
Email - Yes SMS - Yes |
| Ful Lost Loan Notification Letter | A warning sent to patrons when a loan is overdue, before the item is declared lost, according to the criteria described in Adding an Overdue and Lost Loan Notification. Sent by the Loans - Overdue and Lost Item job when the switch_to_overdue_and_lost_loan_new_job parameter is set to false (see Configuring Other Settings). | Fulfillment |
SMS |
Email - Yes SMS - Yes |
| Ful Lost Refund Fee Loan Letter | Sent to patrons when a loan that was declared lost is found. Includes refund if applicable. | Fulfillment | Yes | |
| Ful Outgoing Email Letter | The borrowing request sent to a partner with profile type Email. | Resource sharing | Yes | |
| Ful Overdue And Lost Loan Letter | A message sent to the borrowing patron listing all overdue loans that have been declared lost, according to the criteria described in Adding an Overdue and Lost Loan Notification. It is sent to patrons by the Loans - Overdue and Lost Item job when the switch_to_overdue_and_lost_loan_new_job parameter is set to true (see Configuring Other Settings). | Fulfillment |
SMS |
Email - Yes SMS - Yes |
| Ful Overdue And Lost Loan Notification Letter | A warning sent to patrons listing all overdue loans before the items are declared lost, according to the criteria described in Adding an Overdue and Lost Loan Notification. Sent by the Loans - Overdue and Lost Item job when the switch_to_overdue_and_lost_loan_new_job parameter is set to true (see Configuring Other Settings).
For short loans, the short_loan_overdue_reminder parameter is set, this letter is triggered based on the due date time plus the value of the parameter for multiple items. The letter will be sent if the items were not returned, are not in Lost or Claim Return status, and the current due date time for each item is the same as the due date time that was on each item when the reminder was triggered. The loan due date time can change due to a renewal, recall, or manual change of due date. See also Configuring Short Term Loans. |
Fulfillment |
SMS |
Email - Yes SMS - Yes |
| Ful Personal Delivery Letter | Sent to a patron when an item is scanned in for personal delivery from a circulation desk that supports personal delivery. | Fulfillment | Yes | |
| Ful Pickup Print Slip Report Letter | Sent to users. Contains a detailed list of resources to be picked up. | Fulfillment | Yes | |
| Ful Renew Email Letter | Indicates that a resource sharing request has been renewed. Sent to partners automatically when a resource sharing borrowing request is sent to a partner whose Type = Email. | Resource sharing | Yes | |
| Ful Requests Report Letter |
A patron report listing all request items, broken down by Not Active, In Process, and On Hold Shelf. For details on running the report for a single patron, see Managing Patron Services. For details on running the report on a schedule, see Configuring Fulfillment Jobs.
|
Fulfillment | Yes | |
| Ful Resource Request Slip Letter | A slip that is printed out by library staff from the Pick Up Requested Resources page when they need to retrieve an item from the shelf. For details on pickup up items from the shelf, see Pickup at Shelf. You may include a printable barcode image on this letter.
Barcode is populated for item-level requests, not title-level requests. For title-level requests, there could be multiple possible items, so the barcodes appear as optional barcodes, and not a specific barcode linked to the request. This letter is also printed when an item that had a hold request is returned. |
Fulfillment | No | |
| Ful Transit Slip Letter | Sent by the Create Physical Item Move Requests job when Print Transit Letter is set to Yes. You may include a printable barcode image on this letter.
This letter is also printed out by library staff and is added to an item when it is sent from one place to another. |
Inventory | No | |
| General Assign To Letter | This is used when a staff user assigns a record to another staff user and selects the Send as email option. Possible examples of this are:
|
User management | No | |
| General Message Email Letter | An email sent to the resource sharing partner to alert them of a new general message that has been entered on the request. | Resource sharing | Yes | |
| ILL Email to User | Manually sent from the User Details page.
This letter cannot be customized. |
User management | No | |
| Interested In Letter | Informs the User/patron (who is listed on the Interested Users tab on a PO line and has Notify user upon receiving/activation checked) that the physical item is received, or an electronic item is activated (depending on the resource associated with the PO line). | Acquisition | Yes | |
| Interested Users In Letter | Lists the interested users when Print Interested Users List is selected on the Receiving New Material page. For more information, see Receiving Material. | Acquisition | No | |
| Invoice Payment Letter | The finance export job requires you to activate the Invoice Payment Letter. | Acquisition | Submission | No |
| Item Change Due Date Letter | An SMS message sent to patrons indicating changes to the due date. For details on managing patron activities, see Managing Patron Services. For more information on the letter, see the email format for Item Change Due Date Letter. For the email version of this letter, see Loan Status Notice. | Fulfillment | SMS | Yes |
| Legal Deposit Annual Receipts Letter | This report presents an annual overview of subscriptions, indicating which issues have been received within the current year and which are still pending, and awaiting claim. This enables customers to track the delivery status of their serialized materials.
For more information, see Working With Legal Deposits. |
Acquisition | No | |
| Legal Deposit Claim Letter | Sent to vendors to remind them of a previous request for a copy of an item as required by law. If this letter is activated, it is sent even when the order type is LEGAL_DEPOSIT_NOLETTER.
For more information, see Working With Legal Deposits. |
Acquisition | No | |
| Legal Deposit Order Letter | Sent to vendors to request a copy of an item as required by law.
For more information, see Working With Legal Deposits. |
Acquisition | No | |
| Legal Deposit Receipt Letter | Sent to vendors to confirm the receipt of a copy of an item requested as required by law.
For more information, see Working With Legal Deposits. |
Acquisition | No | |
|
Leganto Detailed Notifications Letter |
Sent to instructors when notifications are waiting for them in Leganto. It aggregates the pending notifications by list for a given course into a single letter. Appears only if Leganto is enabled in your institution | Leganto | Yes | |
| Leganto Notifications Letter | Sent to instructors when notifications are waiting for them in Leganto. For more information, see Viewing Scheduled Jobs. Appears only if Leganto is enabled in your institution. | Leganto | Yes | |
| Leganto Upcoming Due Dates Notifications Email Letter | Sent to students nine days before an upcoming due date. Sent only if email_notifications_group value is set to ALL. | Leganto | Yes | |
| Lender Checked-In Email Letter | Sent to the borrowing partner when an item was checked in at the lending institution. | Resource sharing | Yes | |
| Lender Reject Email Letter | Sent to the borrowing partner when the lending partner has rejected a lending request. | Resource sharing | Yes | |
| Lender Renew Response Email Letter | Sent to the borrowing partner when the lending partner responds to a renewal request. | Resource sharing | Yes | |
| Lender Ship Email Letter | Sent to the borrowing partner to indicate that the requested item has been shipped. | Resource sharing | Yes | |
| Lender Will Supply Email Letter | Sent to the borrowing partner when the status of a resource sharing request changes to Will Supply. | Resource sharing | Yes | |
| Lending Recall Email Letter | Sent to the borrowing partner when an item is recalled and must be returned. | Resource sharing | Yes | |
| Lending Requests Report Slip Letter | A slip that is printed out by library staff for the selected requests in the lending task list that lists the availability of the items so that they can be taken off the shelf and shipped to the requester.
For more information see Managing Resource Sharing Lending Requests. |
Resource sharing | Yes | |
| License Printout Letter | Used when printing out a license. See Printing Licenses or Amendments. | Resource management | No | |
| Loan Receipt Letter |
This letter is generated for patrons after items are loaned from the circulation desk, renewed, or have their due dates changed when using the Patron Services workbench, as well as when fulfilling a personal delivery request, with automatic background recording of the loan (see Supporting Personal Delivery for Requests). Any change done to a user's loan generates a Loan Receipt (in addition to any other "designated" letter that is sent). For example, changing the due date of a loan triggers the Loan Status Notice. Selecting Done then initiates a Loan Receipt for the updated loan. |
Fulfillment | Yes | |
| Loan Status Notice | Sent to patrons; indicates changes in the status of a loan or the due date as follows:
For the SMS version of this letter, see Item Change Due Date Letter. For details on managing patron activities, see Managing Patron Services. This letter can be activated to trigger a webhook function. See Webhooks. |
Fulfillment |
Webhook |
Email - Yes Webhook - No |
| Login Using One Time Token Letter | Email letter that is sent to a patron for a one time login to Primo. See Primo Login Using Email. | Primo | Yes | |
| Notify E-Activation due Letter | Sent by the Notify E-Activation Due Task job to the assigned operator when an electronic activation task's due date has passed. For more information on the e-activation due date, see Manually Creating a PO Line, Managing Electronic Resource Activation, and Configuring Other Settings. | Acquisition | No | |
| Notify Upon Renewal Letter | Sent to a user when a continuous PO line with inventory is sent for manual renewal. For more information see Interested Users. | Acquisition | No | |
| On Hold Shelf Letter | Sent to patrons; indicates that an item is ready for pickup at the hold shelf. For details on picking up items from the hold shelf, see Managing the Hold Shelf.
This letter can be activated to trigger a webhook function. See Webhooks. For information on customizing the On Hold Shelf letter to display the Notes that may affect loan line only if there is a block on the patron, see Customizing Letter Templates.
|
Fulfillment |
SMS Webhook |
Email - Yes SMS - Yes Webhook - No |
| On Hold Shelf Reminder Letter | Sent to the patron after a set number of days. The letter is sent by the Send Hold Shelf Reminders job. It is possible to configure how many days after being placed on the hold shelf the reminder will be sent, and whether the reminder will continue to be sent at the configured interval until the Hold Shelf expiry. | Fulfillment | Yes | |
| Order List Letter | Sent to vendors; contains a list of ordered items. See Approving and Sending POs.
This letter is not used if the order is done using EDI or another automatic system.
|
Acquisition | No | |
| Order Now Letter | Sent to the staff user who selects Order Now, which initiates an immediate order that bypasses the usual procedure. The letter indicates whether the order is successful. See Manually Creating a PO Line, Reviewing PO Lines, and Packaging PO Lines into a PO. | Acquisition | No | |
| Overdue Notice Letter | Sent to patrons; contains a list of all the patron’s loans due that day. Sent in a nightly job (Notifications – Send Due Date Reminders).
The item details in this letter represent the item at the time of the loan. |
Fulfillment |
SMS |
Email - Yes SMS - Yes |
| Overlap and Collection Analysis Letter | Sent to a staff user who runs an overlap and collection analysis job. The letter indicates that the overlap and collection analysis job has completed. For more information regarding overlap and collection analysis, see to Working with Overlap and Collection Analysis. | Resource management | No | |
| Owner Subscription Letter | Sent to an instructor when added as an owner of a reading list. For more information, see Managing Reading List Owners and Collaborators. | Courses | No | |
|
This letter is sent when adding a patron role to a user, whether manually, through a job, or via SIS. The letter is not sent when the patron role is added through a merge or migration. If you do not wish send the letter if the patron role was added by a linked account, you can do that by adding a condition to the XSL file that will prevent sending the letter in this case. The XML for the letter includes an indicator for if the role was added by a linked account. This indication can be used to stop the letter from being sent the document, How to configure a letter to not be sent under certain circumstances, shows an example of how this can be done.
|
User management | Yes | ||
| PDA Threshold Letter | Sent to the PDA manager (PDA contact person) when the usage of PDA reaches the alert threshold. | Administration | No | |
| Personal Information Letter |
Sent to patrons with an attached file containing the complete XML record of the data stored about the patron in their user accounts, including attachments. The message is sent to the patron's preferred email. In order to send a Personal Information Letter to a patron, the parameter Send Patron Information Letter must be enabled under Circulation Desk roles'. The parameter Send Patron Information Letter is activated for users with a Circulation Desk role by default. If it is not activated or you wish to |
User management | No | |
| PIN Number Generation Letter | Sent to patrons when a PIN code is set in the user management pages. For details on configuring user details, see Adding Users. | User management | Yes | |
| PO Line Cancelation Letter | Sent to vendors, requesting that an order be canceled. For details on canceling a PO line, see Canceling PO Lines. | Acquisition | No | |
| PO Line Claim Letter |
Sent to vendors when an order does not arrive by the expected date (see Processing Claims), when claims for multiple PO lines are not combined into a single letter (i.e., when the claim_aggregated_letter Customer Parameter is set to FALSE). The fields for the Subject are available in the new_subject field. The field is set by entering your text within <> + field name. The format is as follows:
<My Title Text: > title <My Ref Num Text: > poline_reference_number <My Item Desc Text: > item_description
Following are the fields that can be used within the subject field:
|
Acquisition | No | |
| PO Line Aggregated Claim Letter |
Sent to vendors when an order does not arrive by the expected date (see Processing Claims), when claims for multiple PO lines are combined into a single letter (i.e., when the claim_aggregated_letter Customer Parameter is set to TRUE). If all claimed PO Lines are from the same owning library, the sender address from the library (instead of the institution) is used. If claim_aggregated_letter is set to TRUE, but the PO Line Aggregated Claim Letter letter is disabled, no claim letter is sent to the vendor. This parameter does not impact the Legal Deposit Claim letter.
|
Acquisition | No | |
| PO Line Renewal Letter | Sent to vendors, requesting that a subscription be renewed.
For details on renewing PO lines, see Renewals. For details on configuring automatic renewal of a PO line, see Configuring Fulfillment Jobs.
|
Acquisition | No | |
| Process Bib Export Finished Letter | Sent to a staff user, indicating that a bibliographic export has finished. For details on exporting bibliographic records, see Export bibliographic records in Running Manual Jobs on Defined Sets. | Resource management | No | |
| Process Creation | Sent upon successfully scheduling some user-submitted jobs — for example, jobs run on the Run a Job page (see Running Manual Jobs on Defined Sets).
This letter cannot be customized. |
Administration | No | |
| Purchase Request Status Letter | Sent to requester of a purchase request when the request is approved or rejected.
For more information, see Purchase Requests.
|
Acquisition | Yes | |
| Pz System Job Letter | A report sent to the email specified in the API request, which summarizes information from the portfolio loader and MD import jobs that had been triggered via the Provider Zone Job. | Resource management | No | |
| Query to Patron Letter | Sent to patrons when the user selects Send query to patron from a resource-sharing borrowing request. See Managing Resource Sharing Borrowing Requests.
This letter is only used when the institution is using patron query types; see Configuring Patron Queries.
To configure, see Example of Letter Customization: The Query to Patron Letter.
|
Resource sharing | Yes | |
| Query to Requester Letter | Sent to requester of a purchase request when the librarian queries him or her for more information.
For more information, see Purchase Requests.
|
Acquisition | Yes | |
| Rapido Request New Resource Sharing Partnership Letter | This letter is used to contact an identified partner within the directory from the Find Partner workflow, using the Send Rapido Request action, to begin the process of adding the potential partner as a new partner. | Resource sharing | Yes | |
| Receiving Slip Letter | A slip that is printed out by library staff with item information that is put in a new item when it arrives at the library. You may include a printable barcode image on this letter. | Acquisitions | No | |
| Report a Problem Letter | A feedback sent from a Primo VE user to the feedback administrator. After opening the feedback tool, users must specify an issue type and include an optional problem description and a return email address. Emails include the feedback details, URL of the page from which the feedback was sent, and type of device used to send the feedback. | Discovery | No | |
| Resend Notification Letter | Sent manually to a patron if the patron did not receive an attachment. For more information, see User Attachments. | Fulfillment | Yes | |
| Reset Password Letter | Sent from various workflows, and includes a link to a page which allows the recipient to change (or create) his or her password.
When the Reset Password letter is sent by the Update/Notify Users job or from the Send Message drop-down list, the link is active for twenty-four hours. When the letter is sent from the Forgot Password? link, it is active for one hour. |
User management | Yes | |
| Resource Sharing Receive Slip Letter | A slip that prints automatically when the Automatic Print Slip option is selected on Receiving Items. You may include a printable barcode image on this letter. | Resource sharing | Yes | |
| Resource Sharing Request Confirmation Letter | When configured (Configuration > General > Letters > Letters Configuration > Resource Sharing Request Confirmation Letter), Alma now sends a confirmation email when a request is placed. This letter is disabled by default. | Resource sharing | ||
| Resource Sharing Return Slip Letter | Printable when returning a borrowing item to the lender. You may include a printable barcode image on this letter. Printing the letter will take place if:
The letter is not relevant for NCIP transactions.
|
Resource sharing | Yes | |
| Resource Sharing Shipping Slip Letter | Sent to a user when the user selects the Ship Item link for a lending request and then selects Automatically Print Slip = Yes on the Shipping Items page. You may include a printable barcode image on this letter.
See Shipping Items.
|
Resource sharing | No | |
| Restricted Login IP Letter | Sent to managers when a login attempt is made from a restricted IP address. For more information, see Security. | Administration | No | |
| Return Receipt Letter | Sent to patrons after items are returned to the circulation desk. For details on returning items to the circulation desk, see Returning Items. | Fulfillment | Yes | |
| SAML Certificate Expiration Notification Letter |
Sent to users with the General Systems Admin role to remind them their SAML certificate is nearing expiry date and recommend that they consult with their IT department regarding the potential need to replace it. |
Administration | No | |
| Saved Searches Letter |
This letter is a weekly letter triggered by the Saved Searches Alerts scheduled job, which sends new results of saved Primo VE search queries to the patron. The configuration options for this letter are on the Primo (VE) side. The labels can be found in Discovery > Labels > Send Email and SMS Labels. |
Primo | No | |
| Send Rapido Request Letter | Rapido sends a request to a potential lender for a new resource sharing partnership. For more information about Rapido letter, see Send Rapido Request Letter |
Administration | No | |
| Short Loan Letter | Sent to a patron when loaning an item for a short period (a number of hours), informing the patron of the due date and the fine policy. For details on loaning items, see Loaning Items.
This letter may have to be enabled for some customers.
|
Fulfillment | Yes | |
| Shortened Due Date Letter | Sent to patrons to notify them that the due date of their loan has been shortened. This happens at the time of loan or renewal. However, at renewal time, the letter is only triggered if the renewal is done by staff from the Manage Patron Services page. If the renewal is done by the patron in Primo, the shortened due date is displayed to the patron immediately. The letter data contains the loan object and the message, The possible messages are:
For setting the parameter, shortened_due_date_notifications, see Configuring Other Settings.
|
Fulfillment |
SMS |
Email - Yes SMS - Yes |
| Social Login Account Attached Letter | Sent after attaching a user account to a social logic provider. For library staff, the email includes a link which can be used to quickly log in to Alma. | User management | Yes | |
| Social Login Invite Letter | An email sent to staff users inviting them to use social network logins instead of the standard Alma login. For more information, see Social and Email Login. | User management | Yes | |
| System Job Letter | Sent when jobs initiated in Alma start and complete (letter is sent to the user who initiated the job). For details on configuring Alma jobs (processes), see Managing Jobs. | Administration | No | |
| Test Letter | Sent just for testing if emails can be sent. There is a Test button in the Mail-handling Integration-Profile which sends it. | Administration | No | |
| Trial Letter | Contains a request to evaluate an electronic resource. For details on evaluating resources, see Evaluation Workflow. | Acquisition | Yes | |
| Update Collection Contribution Letter | Sent to users after they update a collection and re-contribute it to the Community Zone. For more information, see Contributing Local Electronic Collections to the Community Zone. | Resource management | No | |
| User Deletion Letter | Sent to a patron before the patron is deleted, containing details of the patron’s active fines and fees. See Deleting Users. | User management | Yes | |
| User Notifications Letter (New Gen) | Sent to users who elected to receive email notifications via the Notifications interface. | Administration | Yes | |
| User Notifications Letter | Sent to users using the Update/Notify Users job. For more information, see Configuring User Notification Types. | User management | Yes | |
| User Registration Letter | Not in use | User management | No | |
| Webhook Failure Letter | Sent to all email contacts defined on a webhook integration profile if a webhook message is not successfully sent after 4 attempts (across 10 hours) when a 5XX HTTP response is received. For more information on the retry mechanism, see the Developer Network. | Administration | No |